
Introduction
In this tutorial, we will teach you how to use a Iptables with DigitalOcean Private Networking. We will also cover why you would want to do this, and provide an example of how to implement this in your own environment. The example given in this tutorial will explain the concept in such a way that you will be able to adapt the configuration to your own needs.
DigitalOcean’s private networking option grants a second networking interface to a VPS, which is only accessible to other servers provisioned on the same account that are also located in the same data center. This means that data sent over a Droplet’s private interface is only accessible to those on your team or with access to your DO password.
Note: This tutorial covers IPv4 security. In Linux, IPv6 security is maintained separately from IPv4. For example, iptables only maintains firewall rules for IPv4 addresses but it has an IPv6 counterpart called ip6tables, which can be used to maintain firewall rules for IPv6 network addresses.
If your VPS is configured for IPv6, please remember to secure both your IPv4 and IPv6 network interfaces with the appropriate tools. For more information about IPv6 tools, refer to this guide: How To Configure Tools to Use IPv6 on a Linux VPS .
Example Scenario
For our example, we will use the environment created by the following tutorial: How To Optimize WordPress Performance With MySQL Replication On Ubuntu 14.04 .
Here is a diagram of what the environment looks like:
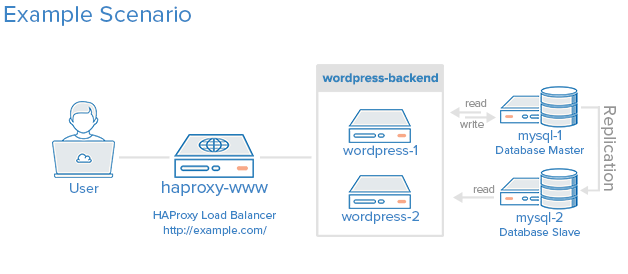
The example environment uses five VPSs (and iptables are not configured):
- haproxy-www: Reverse proxy load balancer
- wordpress-1: First application server
- wordpress-2: Second application server
- mysql-1: Master MySQL database server
- mysql-2: Slave MySQL database server
If your setup doesn’t look like this, you should still be able to follow along. Also, if you would like to read up on setting up a VPS with private networking or iptables basics, here are a few links that you might find to be useful (this tutorial assumes you know the basics of iptables):
- How To Set Up And Use DigitalOcean Private Networking
- How To Enable DigitalOcean Private Networking on Existing Droplets
- How the Iptables Firewall Works
- How To Set Up a Firewall Using Iptables on Ubuntu 14.04
If you are already familiar with the concepts, and would like to see the iptables setup, feel free to skip to the Overview of Iptables Configuration section.
Our Goal
When we are finished with this tutorial, we should have an environment that looks something like the following diagram:
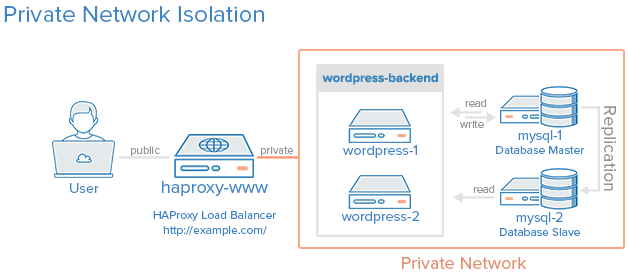
All of the servers in the private network area can only be communicated with by other servers within this private network (the orange box). The load balancer will be accessible via the Internet and also be linked to the private network. The enforcement of this policy will be implemented via iptables on each server.
Note: To block traffic to your public interface, you can either disable your public interface or set up firewall rules to achieve a similar effect with Iptables. We will go with the firewall option because we can configure it block unwanted network traffic, while allowing our server to access the Internet when it initiates the connection (this is useful for things like downloading updates on the server).
Ways To Access Your VPS
Before we get into how to lock down your own private network, we will discuss different the methods to access your servers (especially the command line). Knowing all the methods to connect to your server is particularly important because you can lock yourself out of your own server if you’re not careful.
If you have private networking setup on your DigitalOcean VPS, you have three ways to access it:
- Public Interface
- Private Interface
- Control Panel Console Access
Public Interface
The public interface is accessible via the global Internet. This means that you, or anyone else on the Internet, can access this interface unless it is locked down.
A public interface is necessary on servers that need to be accessible via the Internet, so your customers or users can connect to whatever service you are providing (e.g. a web page or application). If it needs to be accessible by a user, a public interface’s IP address is typically mapped to a domain name (e.g. example.com) via DNS.
Every VPS has a public interface enabled by default. In this tutorial, we will use iptables to restrict the public interface to only accept network traffic that is necessary for our application to function properly (i.e. HTTP).
Private Interface
The private interface is accessible only to other VPSs on the same private network. In the case of DigitalOcean, this means that only other VPSs provisioned under the same account can access the private interface.
If you are connected to multiple VPSs under the same account, you can connect to the private interface of another VPS via SSH. For example, you can SSH to haproxy-www’s public interface, and then SSH to mysql-1’s private interface from there. This is useful if you use iptables to drop SSH connections from the public interface of some of your servers.
In this tutorial, we will restrict the network traffic on the private interfaces to only the VPSs within our defined “private network” (the orange box in the diagram above) and some other necessary network traffic (between the load balancer and the application servers).
Control Panel Console Access
If you lose access to both your public and private interfaces, you can connect to your VPS via console access. In the real world, this is analogous to connecting a keyboard, mouse, and monitor directly to your server. Remember that you can always access your VPS this way, if you accidentally disable both of your interfaces or SSH service.
Note: If your VPS logins are all authenticated with SSH keys, you will need to reset the root password via the control panel to login via the console.
Identify Interface/Port Access Requirements
Before continuing, it is important to determine your interface and port access requirements. Many applications use default ports or can be configured to bind to specific interfaces and ports. Do not change your iptables configuration until you are certain about your policy needs because a misconfigured firewall can potentially break your application.
Here is a breakdown of the network access needs of our example scenario:
- haproxy-www:
- Internet (public) / port 80
- WordPress servers (private) / port 80
- wordpress-1: (all private)
- haproxy_www / port 80
- wordpress-2 / various glusterFS ports
- MySQL servers / port 3306
- wordpress-2: (all private)
- haproxy_www / port 80
- wordpress-1 / various glusterFS ports
- MySQL servers / port 3306
- mysql-1: (all private)
- WordPress servers / port 3306
- mysql-2 / port 3306
- mysql-2: Slave MySQL database server
- WordPress servers / port 3306
- mysql-1 / port 3306
You will also want to allow SSH to at least one of the public interfaces, and SSH between all of the servers on the private network area. In the example, we will allow public SSH to another VPS called tunnel-1, and only private SSH on the other servers–this means that we will need to SSH tunnel through the tunnel-1 to SSH to any of the other servers. Technically, you may use any (or all) your VPSs for this purpose.
Now that we know what we need our firewall to accept, and potentially drop, let’s get into configuring it.
Overview of Iptables Configuration
Here is an overview of how we will configure iptables to fulfill our needs:
- Drop by default
- Allow SSH from private network interface to tunnel-1 VPS
- Allow Internet traffic that is initiated from your server
- Explicitly allow specific private network traffic (by IP address and/or port)
Let’s start with haproxy-www, our only public-facing server. Note that in the iptables commands, eth0 refers to a VPS’s public interface, and eth1 refers to a VPS’s private interface–if your interface names differ, please substitute them when appropriate.
Configure Public Server (haproxy-www)
SSH to tunnel-1:
<pre> ssh <span class=“highlight”>user</span>@<span class=“highlight”>tunnel_1_public_IP</span> </pre>
From here, SSH to haproxy-www’s private interface:
<pre> ssh <span class=“highlight”>user</span>@<span class=“highlight”>haproxy_www_private_IP</span> </pre>
On haproxy-www, set all chains defaults to ACCEPT and delete any existing rules:
sudo iptables -P INPUT ACCEPT
sudo iptables -P OUTPUT ACCEPT
sudo iptables -P FORWARD ACCEPT
sudo iptables -F
Allow tunnel-1 to SSH via its private interface to haproxy-www:
<pre> sudo iptables -A INPUT -p tcp -s <span class=“highlight”>tunnel_1_private_IP</span> --dport <span class=“highlight”>22</span> -i <span class=“highlight”>eth1</span> -j ACCEPT sudo iptables -A OUTPUT -p tcp -d <span class=“highlight”>tunnel_1_private_IP</span> --sport <span class=“highlight”>22</span> -o <span class=“highlight”>eth1</span> -m state --state ESTABLISHED -j ACCEPT </pre>
Allow loopback traffic on your server. This allows your server to use 127.0.0.1 or localhost:
sudo iptables -A INPUT -i lo -j ACCEPT
sudo iptables -A OUTPUT -o lo -j ACCEPT
Allow public and private traffic that is initiated from your server. This will allow your server to access the Internet to do things like download updates or software:
<pre> sudo iptables -I OUTPUT -o <span class=“highlight”>eth0</span> -d 0.0.0.0/0 -j ACCEPT sudo iptables -I INPUT -i <span class=“highlight”>eth0</span> -m state --state ESTABLISHED,RELATED -j ACCEPT </pre>
Allow all HTTP traffic (port 80) on the public interface. This is necessary so users can access our site via *http://www.example.com/*:
<pre> sudo iptables -A INPUT -i <span class=“highlight”>eth0</span> -p tcp --dport <span class=“highlight”>80</span> -m state --state NEW,ESTABLISHED -j ACCEPT sudo iptables -A OUTPUT -o <span class=“highlight”>eth0</span> -p tcp --sport <span class=“highlight”>80</span> -m state --state ESTABLISHED -j ACCEPT </pre>
Allow both WordPress servers access to port 80 via their private IP addresses:
<pre> sudo iptables -A INPUT -p tcp -s <span class=“highlight”>wordpress_1_private_IP</span> --sport 80 -j ACCEPT sudo iptables -A OUTPUT -p tcp -d <span class=“highlight”>wordpress_1_private_IP</span> --dport 80 -j ACCEPT sudo iptables -A INPUT -p tcp -s <span class=“highlight”>wordpress_2_private_IP</span> --sport 80 -j ACCEPT sudo iptables -A OUTPUT -p tcp -d <span class=“highlight”>wordpress_2_private_IP</span> --dport 80 -j ACCEPT </pre>
Now that we have allowed all of the necessary network traffic, we can drop all other traffic by setting DROP as the default behavior for each iptables chain:
sudo iptables -P INPUT DROP
sudo iptables -P OUTPUT DROP
sudo iptables -P FORWARD DROP
Now that you are done configuring haproxy-www’s firewall, you will want to make sure that everything works properly. If you are happy with your configuration, you can save it by installing the iptables-persistent package with the following apt commands:
sudo apt-get update
sudo apt-get install iptables-persistent
During the installation of iptables-persistent, it will ask you if you would like to save your current firewall settings. Answer yes.
Now the haproxy-www firewall allows the following:
- SSH from tunnel-1 via the private network
- Loopback traffic
- Internet activity that haproxy-www initiates
- HTTP on public Internet
- HTTP between itself and the WordPress application servers
- No incoming traffic from other sources
Let’s move on to securing our remaining servers.
Configure Private Network Servers
Note: Do all these steps for all remaining servers: wordpress-1, wordpress-2, mysql-1, and mysql-2. We will refer to these servers, generally, as private-VPS in this section.
Because of the large number of network interfaces and ports that require communication within the private network, we will simplify things by whitelisting the necessary IP addresses instead of only allowing specific IP address and port combinations. Also, we will allow outgoing traffic by default, and just restrict incoming traffic.
SSH to tunnel-1:
<pre> ssh <span class=“highlight”>user</span>@<span class=“highlight”>tunnel_1_public_IP</span> </pre>
From here, SSH to private-VPS’s private interface:
<pre> ssh <span class=“highlight”>user</span>@<span class=“highlight”>private_VPS_private_IP</span> </pre>
On private-VPS, set all chains defaults to ACCEPT and delete any existing rules:
sudo iptables -P INPUT ACCEPT
sudo iptables -P OUTPUT ACCEPT
sudo iptables -P FORWARD ACCEPT
sudo iptables -F
Allow tunnel-1 to SSH via its private interface to private-VPS:
<pre> sudo iptables -A INPUT -p tcp -s <span class=“highlight”>tunnel_1_private_IP</span> --dport <span class=“highlight”>22</span> -i <span class=“highlight”>eth1</span> -j ACCEPT </pre>
Allow loopback traffic on your server. This allows your server to use 127.0.0.1 or localhost:
sudo iptables -A INPUT -i lo -j ACCEPT
Allow public and private traffic that is initiated from your server. This will allow your server to access the Internet to do things like download updates or software:
<pre> sudo iptables -I INPUT -i <span class=“highlight”>eth0</span> -m state --state ESTABLISHED,RELATED -j ACCEPT </pre>
Whitelist all of the servers that only need access to the private network area (you may omit the entry for the server you are working on):
<pre> sudo iptables -A INPUT -p tcp -s <span class=“highlight”>wordpress_1_private_IP</span> -j ACCEPT sudo iptables -A INPUT -p tcp -s <span class=“highlight”>wordpress_2_private_IP</span> -j ACCEPT sudo iptables -A INPUT -p tcp -s <span class=“highlight”>mysql_1_private_IP</span> -j ACCEPT sudo iptables -A INPUT -p tcp -s <span class=“highlight”>mysql_2_private_IP</span> -j ACCEPT </pre>
Only on both WordPress servers, allow haproxy-www HTTP access (port 80), so it can retrieve pages:
<pre> sudo iptables -A INPUT -p tcp -s <span class=“highlight”>haproxy_www_private_IP</span> --sport 80 -j ACCEPT sudo iptables -A OUTPUT -p tcp -d <span class=“highlight”>haproxy_www_private_IP</span> --dport 80 -j ACCEPT </pre>
Drop INPUT and FORWARD chains by default. Note that we are leaving OUTPUT’s default as ACCEPT, as we trust the servers on our private network:
sudo iptables -P INPUT DROP
sudo iptables -P FORWARD DROP
Now that you are done configuring private-VPS’s firewall, you will want to make sure that everything works properly. If you are happy with your configuration, you can save it by installing the iptables-persistent package with the following apt commands:
sudo apt-get update
sudo apt-get install iptables-persistent
During the installation of iptables-persistent, it will ask you if you would like to save your current firewall settings. Answer yes.
Now the private-VPS firewall allows the following:
- SSH from tunnel-1 via the private network
- Loopback traffic
- Internet activity that the private-VPS initiates
- All outgoing network traffic
- All incoming network traffic amongst the servers that were whitelisted (i.e. all of the servers in the private network area)
- No incoming traffic from other sources
Troubleshooting: Iptables List and Logging
If you configure your firewall and find that your application stops working, the best way to troubleshoot it is to look at the policy list and the logs.
Show Iptables Configuration
To view the iptables configuration, or policy list, run the following command:
sudo iptables -vL --line-numbers
This will display all of the chains and rules that you set up, with line numbers. Also, it shows the number of packets dropped. If you are expecting no dropped packets, check the logs.
Read Iptables Logs
Create a new chain called LOG:
iptables -N LOG
Route INPUT/OUTPUT/FORWARD to LOG chain (substitute CHAIN with the chain you want to monitor, such as “INPUT”):
<pre> iptables -A <span class=“highlight”>INPUT</span> -j LOG </pre>
Now log the packets with this command:
iptables -A LOG -m limit --limit 60/min -j LOG --log-prefix "Iptables DROP: " --log-level 7
Now you can monitor your system messages to see which packets are being dropped.
In Ubuntu, the messages can be read in real-time with the following command:
sudo tail -f /var/log/syslog
In CentOS, the messages can be read in real-time with the following command:
sudo tail -f /var/log/messages
The logs will list the interface, source port, destination port, and some other information about each packet dropped. This should help you figure out any issues that you may have.
Conclusion
After following this tutorial, you should have a good foundation for using iptables to protect your VPSs from the public Internet and from other VPSs within the same shared private network (i.e. the same datacenter). Remember that you will need to update your firewall as you add new servers or change your server setup.
Thanks for learning with the DigitalOcean Community. Check out our offerings for compute, storage, networking, and managed databases.
About the author
Software Engineer @ DigitalOcean. Former Señor Technical Writer (I no longer update articles or respond to comments). Expertise in areas including Ubuntu, PostgreSQL, MySQL, and more.
Still looking for an answer?
This textbox defaults to using Markdown to format your answer.
You can type !ref in this text area to quickly search our full set of tutorials, documentation & marketplace offerings and insert the link!
Awesome tutorial! I don’t really know about the other distros but on Ubuntu (or any other Debian derivative) it would be easier to use UFW instead. Though knowing the underlying IPTables functionality is great too :)
Thank you. This makes our network be secure. I have one question.
This:
sudo iptables -A INPUT -p tcp -s haproxy_www_private_IP --sport 80 -j ACCEPT sudo iptables -A OUTPUT -p tcp -d haproxy_www_private_IP --dport 80 -j ACCEPT
should be:
sudo iptables -A INPUT -p tcp -s haproxy_www_private_IP --dport 80 -j ACCEPT sudo iptables -A OUTPUT -p tcp -d haproxy_www_private_IP --sport 80 -j ACCEPT
?
I understand the idea of denying all access on the public interface for some servers to make a private network but then you have to ssh twice to actually reach one of the private server and it seems like it makes it more complicated to use a tool like Ansible to manage the servers if you cannot reach them directly…
Is it worth the hassle then vs allowing only SSH for all the private servers?
Why is it safer to use one server as a tunnel to ssh to the other ones instead of being able to ssh directly to each server? I mean if someone hacks the server that serves as a tunnel then all the servers in the private network can be reached right?
Thank you for your comments. I’m trying to understand the pros and cons of several set up.
@devops: It just reduces the number ways that your servers can be accessed. It is true that if someone gets SSH access to your “tunnel” server, they will be able to attempt to SSH to your other servers. However, it is unlikely that they would even know that they have to tunnel to SSH to your web server, or know where they would have to tunnel from. Whether it’s worth the hassle or not is up to you–I personally wouldn’t do this setup without some sort of configuration management (to distribute the rules).
If you are concerned about accessibility or managing your servers with Ansible, consider this: Install SSH keys, Ansible, and tmux/screen on the “tunnel-1” server. You can just connect once to that server and use tmux to connect to all your other servers. You can also run Ansible from there. This setup works especially well if you get disconnected from your servers frequently (processes keep running and you only need to connect to the single tunnel server to manage all of them).
@Mitchell Anicas Thanks Mitchell for your response. Using Ansible from a server inside the same datacenter would also make it faster, that’s a good point.
So the tunnel server could be the server from which the other ones are managed and would be the only one with a public access. Actually, when it is not needed, it can also be turned off and stored as a snapshot to be turned back on quickly when needed.
I do not know tmux and I do not really understand what I could do with it after looking at some articles. Do you have a more detailled example?
Thanks
@devops: Try this tutorial. The idea is that you create a session, then add “windows” (basically tabs) to the session, then connect to your servers in the windows.
You can also create a script that creates the session and attaches all of the windows to it, in case your tmux dies for some reason.
I would recommend adding a VPN on your private network as well, as this only blocks connections from “outsiders”. Droplets in the same datacenter are able to listen to the private network and sniff packets if they want to on that network…
In the example it would be possible to listen to sql data between the wordpress servers and the mysql instances by sniffing packets on the private network.
Thanks for this informative information. This makes our network be secure. The confidential interface is usually accessible only to different VPSs about the same discreet network. In the case regarding DigitalOcean, this means that only other VPSs in the same datacenter can access the private interface. This is necessary.
Really helpful tutorial, this really helps me due that there’s a large chinese botnet brute forcing my ssh ports. Really annoying.
Is there anywhere I could create those diagrams? Thanks a lot!
On the webserver side, the incoming traffic from HAProxy always landed on eth0 with HAProxy’s public IP instead of on eth1 with private ip. And the settings on webserver does not allow connection to port 80 if coming from non-private network.
Is there a way to change this?
Thanks,
-G
 This work is licensed under a Creative Commons Attribution-NonCommercial- ShareAlike 4.0 International License.
Become a contributor for community
Get paid to write technical tutorials and select a tech-focused charity to receive a matching donation.

DigitalOcean Documentation
Full documentation for every DigitalOcean product.

Resources for startups and AI-native businesses
The Wave has everything you need to know about building a business, from raising funding to marketing your product.
The developer cloud
Scale up as you grow — whether you're running one virtual machine or ten thousand.

Start building today
From GPU-powered inference and Kubernetes to managed databases and storage, get everything you need to build, scale, and deploy intelligent applications.
