By Usman Ismail and Hazel Virdó

An Article from Rancher
Introduction
Effective continuous integration (CI) is a core requirement for any successful development team. Because CI is not a front-line service, it often gets run on mid-tier or surplus hardware. Adding builds for pull requests, automated deployments, acceptance tests, content uploads, and a host of other tasks can quickly overwhelm the resources of the build machine — especially close to launch, when there are a lot of commits and deployment activity.
In this article, we will construct a distributed build system using Docker to create and run our Jenkins images and Rancher to orchestrate our Docker cluster. Jenkins is one of the most prominent open-source CI solutions. Docker automates application deployment within software containers, and Rancher provides a complete platform for managing Docker in production.
This article covers an exclusively cloud-based Jenkins deployment. However, an alternative is to use an in-house Jenkins master with cloud servers to provide overflow capacity when more resources are needed. This is where Docker and Rancher really shine: Docker provides us almost identical deployment environments on any node and Rancher lets us combine nodes from various cloud providers or in-house servers into a single cluster running over its own VPN. By the end of this tutorial, you should be able to easily set up a Dockerized Jenkins deployment with an arbitrary number of slaves.
Prerequisites
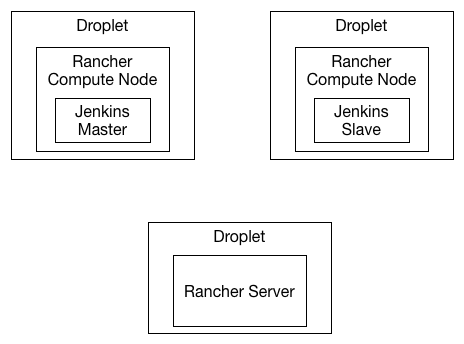
This tutorial will use a total of three Droplets: one for a Rancher server, one for a Rancher compute node running the Jenkins master, and one for a second Rancher compute node running the Jenkins slave.
We’ll refer to the IP addresses of these Droplets with your_rancher_server_ip, your_jenkins_master_ip, and your_jenkins_slave_ip respectively; wherever you see these variables in this tutorial, replace them with the appropriate IP address.
Initially, we will create one Droplet for the Rancher server; creation of the two compute nodes will be covered in a later step. So, to begin this tutorial, you will need:
- One Ubuntu 14.04 Droplet with the Docker 1.5.0 image. Because this Droplet will be used exclusively as as a Rancher server, you can choose a small Droplet size.
You can find the Docker 1.5.0 image option on the Droplet creation page, in the Applications tab under Select Image. This Droplet will also requires custom user data. To add this, click Enable User Data in the Available Settings section, and enter the script below in the text box that appears. This script tells the Droplet to run a Rancher server upon start-up.
#!/bin/bash
docker run -d --name rancher-server -p 8080:8080 rancher/server
Step 1 — Configuring Authentication
Once your Rancher server is created, after a moment you’ll be able to access its UI through a browser pointed to http://your_rancher_server_ip:8080/. Because the Rancher server is open to the Internet, it’s a good idea to set up authentication. In this step, we will set up Github OAuth based authentication, which is what Rancher currently supports.
You will see a warning in the top right corner which says Access Control is not configured followed by a link to Settings. Click Settings and follow the instructions given there to register a new Application with Github, and copy the Client ID and Secret into the respective text fields.
When you finish, click Authenticate with Github, then Authorize application in the window that pops up. Once you do, the page will reload, and the instructions on setting up OAuth will be replaced by the Configure Authorization section. Add any additional users and organizations that should be given access to Rancher. If you make any changes, a button that reads Save authorization configuration will appear. Click it when you’re done.
Once you save the authorization configuration, the warning in the top right corner should be replaced by your Github profile image and a project selection menu (which says Default initially). Click Default to open the project selection menu, then click Manage Projects, and finally Create a project. Add a project called Jenkins, then use the project selection menu again to select the Jenkins project.
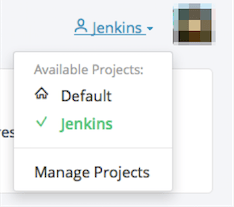
This will help keep your Rancher interface uncluttered by keeping the various projects you run on Rancher isolated. You can create additional projects (which require additional compute nodes) if you want to run other services in addition to Jenkins on the same Rancher cluster. Also note that the Default project is specific to the logged in user, so if you intend to give multiple people access to your Rancher agents, you should not use the default project.
Step 2 — Registering the Rancher Compute Nodes
Now that the server and authentication are set up, we can register some compute nodes to run our Jenkins deployments on.
Note: Prior to authentication, Rancher compute nodes can be registered without providing a registration token. However, because we have enabled authentication, all agents must provide a registration token to be added to the cluster.
In the Rancher UI, click on Hosts (in the menu on the left), then Register a new host. Copy the Docker run command from the window that pops up, then close the window. Return to the DigitalOcean control panel and create two additional Droplets with the Docker 1.5.0 image, like the Rancher server. You may want to select a larger instance size for these two Droplets if your builds are resource intensive.
For the user data in both of these Droplets, add #!/bin/bash followed by the Docker run command you copied earlier. It should look similar to this.
#!/bin/bash
sudo docker run -d --privileged
  -v /var/run/docker.sock:/var/run/docker.sock rancher/agent
  http://your_rancher_server_ip:8080/v1/scripts/A2DE06535002ECCAAFCD:1426622400000:iniUzPiTnjyFaXs9lCKauvoZOMQ
The long string of numbers and letters at the end will be different for your command. Please make sure you have selected your project before clicking Register a new host, as the token is unique for each project.
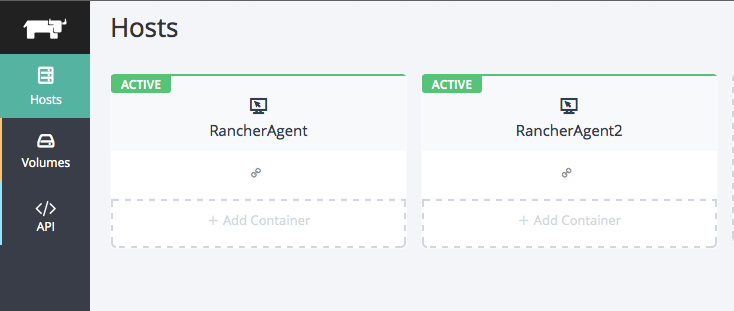
After a few minutes, you should be able to see both of your Rancher compute nodes in the Rancher UI. You’ll see the names of your Droplets where it says RancherAgent in the image below.
Step 3 — Launching the Jenkins Master Node
We are now ready to launch our Jenkins master node using the official Jenkins image.
To launch the container, click Add Container under the compute node you want to use, and add the following options:
- Use Master as the container name, in the text box next to Name.
- Use jenkins as the source image, in the text box next to Select Image.
Next, click the + next to Port Map. Fill in 8080 in both fields, and leave TCP as the protocol. This will give us access to the Jenkins web UI. Click the + again and add port 50000 in both fields, and leave TCP as the protocol. This allows slaves can connect to the master.
Next, click Advanced Options, then the Volumes tab. Click the + next to Volumes, and specify /var/jenkins_home in the text box that comes up. Having your Jenkins home directory in a volume allows you to retain your configuration if you restart your container and also allows you to back up your container using the volumes from another container feature.
Finally, click Create to start your Jenkins container.
Step 4 — Launching the Jenkins Slave Node
In this step, we will launch the Jenkins slave.
Point your browser to http://your_jenkins_master_ip:8080 to load the Jenkins UI.
In the Jenkins UI, create a node configuration by browsing to Manage Jenkins on the left, then Manage Nodes in the next menu, and finally New Node on the left of the final page. In the next menu, enter a name for your slave in the text box next to Node name (and remember it — we’ll need it again in a moment), choose Dumb Slave as the type, and click OK.
You will be redirected to a page with details about this node. For Remote root directory, type /var/jenkins. For Launch method, choose Launch slave agents via Java Web Start. You may also want to update the # of executors setting to higher than its default of 1 to increase the number of parallel builds allowed on the slave. The rest of the settings can be left to their default values. Click save to commit the slave configuration.
We are now ready to launch our slave container. In the Rancher UI, click Add Container on the remaining compute node, and add the following options:
- Use Slave 1 as the container name, in the text box next to Name.
- Use usman/jenkins-slave as the source image, in the text box next to Select Image.
Then click Advanced Options. You’ll start out in the Command tab. Click the + next to Environment Vars and add one entry with Name as MASTER_HOST and Value as your_jenkins_master_ip. Click the + again and add another entry with Name as NODE and Value as the name of your Jenkins slave as specified in the New Node menu via the Jenkins UI earlier in this step.
Next, click the Volumes tab. Click the + next to Volumes, and specify /var/jenkins in the text box that comes up.
Finally, click Create.
The jenkins-slave container will download a jar file from the Jenkins master and run a Jenkins slave node. When the slave comes up, you should be able to see its status after refreshing the Manage Nodes page, where we left off in the Jenkins UI. You should see your slave node with a response time value and no red X over the computer icon as shown below.

Conclusion
In this article we have set up a Jenkins CI deployment using Docker and Rancher. Our Jenkins cluster is now ready for further configuration and the creation of build jobs.
Docker provides us with a consistent environment to run Jenkins, and Rancher provides networking between the host and allows us to manage the cluster from the web UI without having to manually access the Droplets or provision servers. Using this toolset, we are able to scale our build system resources up and down rapidly. This can be essential in maintaining unobtrusive build systems at critical times such as launches.
Thanks for learning with the DigitalOcean Community. Check out our offerings for compute, storage, networking, and managed databases.
About the author(s)
Usman is a server and infrastructure engineer, with experience in building large scale distributed services on top of various cloud platforms.
former DO tech editor publishing articles here with the community, then founded the DO product docs team (https://do.co/docs). to all of my authors: you are incredible. working with you was a gift. love is what makes us great.
Still looking for an answer?
This textbox defaults to using Markdown to format your answer.
You can type !ref in this text area to quickly search our full set of tutorials, documentation & marketplace offerings and insert the link!
Thanks for this. I know have the exact setup up and running with one question. How would you update Jenkins with this setup? Automated updating doesn’t work since the jenkins.war file is owned by root. I can get a shell to the Master container but it logs me in as the jenkins user which doesn’t have the ability to change the permissions on the jenkins.war file. I can’t ssh into the RancherAgent1 machine with the Master Jenkins container after creating it with these instructions. Thanks for any reply.
Thanks for the tutorial ! I added one smaller adjustment to your jenkins docker client container in order to be able to specify the master host port as well via an environment variable. I am running Jenkins on the same host as my rancher service so port 8080 is taken already and I had to change that. My jenkins run-slave.sh looks like this:
#!/bin/sh
curl -O http://${MASTER_HOST}:${MASTER_PORT}/jnlpJars/slave.jar java -jar slave.jar -jnlpUrl http://${MASTER_HOST}:${MASTER_PORT}/computer/${NODE}/slave-agent.jnlp
 This work is licensed under a Creative Commons Attribution-NonCommercial- ShareAlike 4.0 International License.
Become a contributor for community
Get paid to write technical tutorials and select a tech-focused charity to receive a matching donation.

DigitalOcean Documentation
Full documentation for every DigitalOcean product.

Resources for startups and AI-native businesses
The Wave has everything you need to know about building a business, from raising funding to marketing your product.
The developer cloud
Scale up as you grow — whether you're running one virtual machine or ten thousand.

Start building today
From GPU-powered inference and Kubernetes to managed databases and storage, get everything you need to build, scale, and deploy intelligent applications.
