By Kamal Nasser and Brian Hogan

Introduction
Kubernetes ingresses make it easy to expose web services to the internet. When it comes to private services, however, you will likely want to limit who can access them. oauth2_proxy can serve as a barrier between the public internet and private services. oauth2_proxy is a reverse proxy and server that provides authentication using different providers, such as GitHub, and validates users by their email address or other properties.
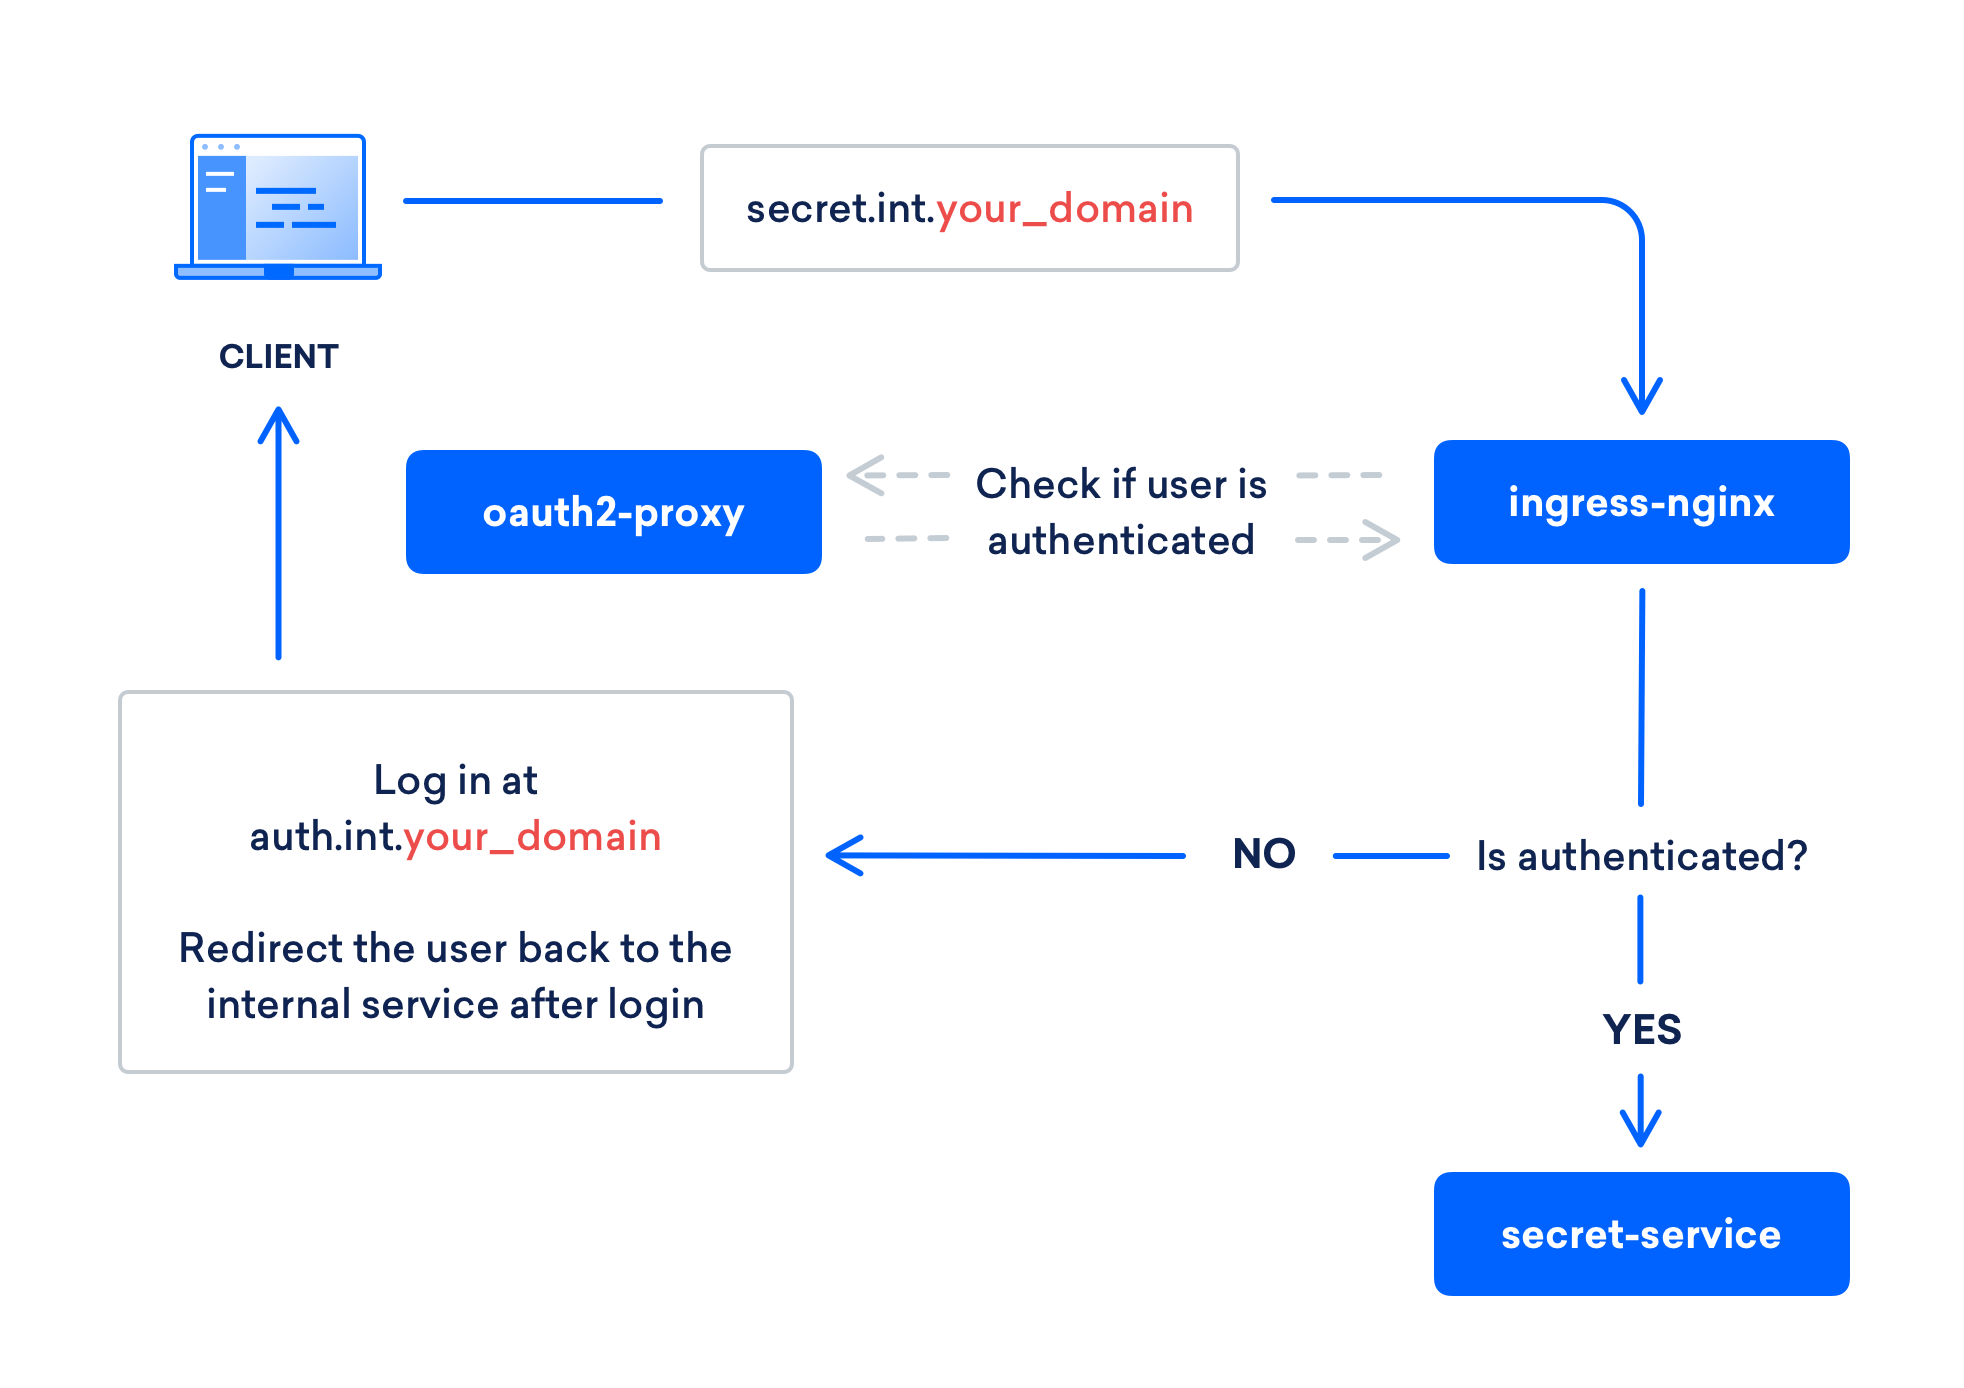
In this tutorial you’ll use oauth2_proxy with GitHub to protect your services. When you’re done, you will have an authorization system that looks like the one in the following diagram:
Prerequisites
To complete this tutorial, you’ll need:
- A Kubernetes cluster with two web services running with an Nginx ingress and Let’s Encrypt. This tutorial builds on How to Set Up an Nginx Ingress with Cert-Manager on DigitalOcean Kubernetes. Be sure to follow it to the very end in order to complete this tutorial.
- A GitHub account.
- Python installed on your local machine. If you do not have it installed, follow the installation instructions for your operating system.
Step 1 — Configuring Your Domains
After following the tutorial linked in the Prerequisites section, you will have two web services running on your cluster: echo1 and echo2. You will also have one ingress that maps echo1.your_domain and echo2.your_domain to their corresponding services.
In this tutorial, we will use the following conventions:
- All private services will fall under the
.int.your_domainsubdomain, likeservice.int.your_domain. Grouping private services under one subdomain is ideal because the authentication cookie will be shared across all*.int.your_domainsubdomains. - The login portal will be served on
auth.int.your_domain.
Note: Be sure to replace your_domain with your own domain name wherever it appears in this tutorial.
To start, update the existing ingress definition to move the echo1 and echo2 services under .int.your_domain. Open echo_ingress.yaml in your text editor so you can change the domains:
- nano echo_ingress.yaml
Rename all instances of echo1.your_domain to echo1.int.your_domain, and replace all instances of echo2.your_domain with echo2.int.your_domain:
apiVersion: extensions/v1beta1
kind: Ingress
metadata:
  name: echo-ingress
  annotations:
    kubernetes.io/ingress.class: nginx
    certmanager.k8s.io/cluster-issuer: letsencrypt-prod
spec:
  tls:
  - hosts:
    - echo1.int.your_domain
    - echo2.int.your_domain
    secretName: letsencrypt-prod
  rules:
  - host: echo1.int.your_domain
    http:
      paths:
      - backend:
          serviceName: echo1
          servicePort: 80
  - host: echo2.int.your_domain
    http:
      paths:
      - backend:
          serviceName: echo2
          servicePort: 80
Save the file and apply the changes:
- kubectl apply -f echo_ingress.yaml
This will update the TLS certificates for your echo1 and echo2 services as well.
Now update your DNS configuration to reflect the changes you made. First, look up the IP address of your Nginx ingress by running the following command to print its details:
- kubectl get svc --namespace=ingress-nginx
You will see the IP address under EXTERNAL-IP in the output:
OutputNAME            TYPE           CLUSTER-IP      EXTERNAL-IP       PORT(S)                      AGE
ingress-nginx   LoadBalancer   10.245.247.67   203.0.113.0   80:32486/TCP,443:32096/TCP   20h
Copy the external IP address to your clipboard. Browse to your DNS management service and locate the A records for echo1-2.your_domain to point to that external IP address. If you are using DigitalOcean to manage your DNS records, see How to Manage DNS Records for instructions.
Delete the records for echo1 and echo2. Add a new A record for the hostname *.int.your_domain and point it to the External IP address of the ingress.
Now any request to any subdomain under *.int.your_domain will be routed to the Nginx ingress, so you can use these subdomains within your cluster.
Next you’ll configure GitHub as your login provider.
Step 2 — Creating a GitHub OAuth Application
oauth2_proxy supports various login providers. In this tutorial, you will use the GitHub provider. To get started, create a new GitHub OAuth App.
In the OAuth Apps tab of the Developer settings page of your account, click the New OAuth App button.
The Application name and Homepage URL fields can be anything you want. In the Authorization callback URL field, enter https://auth.int.your_domain/oauth2/callback.
After registering the application, you will receive a Client ID and Secret. Note the two as you will need them in the next step.
Now that you’ve created a GitHub OAuth application, you can install and configure oauth2_proxy.
Step 3 – Setting Up the Login Portal
You’ll use Helm to install oauth2_proxy onto the cluster. First, you’ll create a Kubernetes secret to hold the GitHub application’s Client ID and Secret, as well as an encryption secret for browser cookies set by oauth2_proxy.
Run the following command to generate a secure cookie secret:
- python -c 'import os,base64; print base64.b64encode(os.urandom(16))'
Copy the result to your clipboard
Then, create the Kubernetes secret, substituting the highlighted values for your cookie secret, your GitHub client ID, and your GitHub secret key:
- kubectl -n default create secret generic oauth2-proxy-creds \
- --from-literal=cookie-secret=YOUR_COOKIE_SECRET \
- --from-literal=client-id=YOUR_GITHUB_CLIENT_ID \
- --from-literal=client-secret=YOUR_GITHUB_SECRET
You’ll see the following output:
Outputsecret/oauth2-proxy-creds created
Next, create a new file named oauth2-proxy-config.yaml which will contain the configuration for oauth2_proxy:
- nano oauth2-proxy-config.yaml
The values you’ll set in this file will override the Helm chart’s defaults. Add the following code to the file:
config:
  existingSecret: oauth2-proxy-creds

extraArgs:
  whitelist-domain: .int.your_domain
  cookie-domain: .int.your_domain
  provider: github

authenticatedEmailsFile:
  enabled: true
  restricted_access: |-
    allowed@user1.com
    allowed@user2.com

ingress:
  enabled: true
  path: /
  hosts:
    - auth.int.your_domain
  annotations:
    kubernetes.io/ingress.class: nginx
    certmanager.k8s.io/cluster-issuer: letsencrypt-prod
  tls:
    - secretName: oauth2-proxy-https-cert
      hosts:
        - auth.int.your_domain
This code does the following:
- Instructs oauth2_proxy to use the secret you created.
- Sets the domain name and provider type.
- Sets a list of allowed email addresses. If a GitHub account is associated with one of these email addresses, it will be allowed access to the private services.
- Configures the ingress that will serve the login portal on
auth.int.your_domainwith a TLS certificate from Let’s Encrypt.
Now that you have the secret and configuration file ready, you can install oauth2_proxy. Run the following command:
- helm repo update \
- && helm upgrade oauth2-proxy --install stable/oauth2-proxy \
- --reuse-values \
- --values oauth2-proxy-config.yaml
It might take a few minutes for the Let’s Encrypt certificate to be issued and installed.
To test that the deployment was successful, browse to https://auth.int.your_domain. You’ll see a page that prompts you to log in with GitHub.
With oauth2_proxy set up and running, all that is left is to require authentication on your services.
Step 4 — Protecting the Private Services
In order to protect a service, configure its Nginx ingress to enforce authentication via oauth2_proxy. Nginx and nginx-ingress support this configuration natively, so you only need to add a couple of annotations to the ingress definition.
Let’s protect the echo1 and echo2 services that you set up in the prerequisite tutorial. Open echo_ingress.yaml in your editor:
- nano echo_ingress.yaml
Add these two additional annotations to the file to require authentication:
   annotations:
     kubernetes.io/ingress.class: nginx
     certmanager.k8s.io/cluster-issuer: letsencrypt-prod
     nginx.ingress.kubernetes.io/auth-url: "https://auth.int.your_domain/oauth2/auth"
     nginx.ingress.kubernetes.io/auth-signin: "https://auth.int.your_domain/oauth2/start?rd=https%3A%2F%2F$host$request_uri"
Save the file and apply the changes:
- kubectl apply -f echo_ingress.yaml
Now when you browse to https://echo1.int.your_domain, you will be asked to log in using GitHub in order to access it. After logging in with a valid account, you will be redirected back to the echo1 service. The same is true for echo2.
Conclusion
In this tutorial, you set up oauth2_proxy on your Kubernetes cluster and protected a private service behind a GitHub login. For any other services you need to protect, simply follow the instructions outlined in Step 4.
oauth2_proxy supports many different providers other than GitHub. To learn more about different providers, see the official documentation.
Additionally, there are many configuration parameters that you might need to adjust, although the defaults will suit most needs. For a list of parameters, see the Helm chart’s documentation and oauth2_proxy’s documentation.
Thanks for learning with the DigitalOcean Community. Check out our offerings for compute, storage, networking, and managed databases.
About the author(s)
Senior Engineer - App Platform, DigitalOcean
Managed the Write for DOnations program, wrote and edited community articles, and makes things on the Internet. Expertise in DevOps areas including Linux, Ubuntu, Debian, and more.
Still looking for an answer?
This textbox defaults to using Markdown to format your answer.
You can type !ref in this text area to quickly search our full set of tutorials, documentation & marketplace offerings and insert the link!
 This work is licensed under a Creative Commons Attribution-NonCommercial- ShareAlike 4.0 International License.
Become a contributor for community
Get paid to write technical tutorials and select a tech-focused charity to receive a matching donation.

DigitalOcean Documentation
Full documentation for every DigitalOcean product.

Resources for startups and AI-native businesses
The Wave has everything you need to know about building a business, from raising funding to marketing your product.
The developer cloud
Scale up as you grow — whether you're running one virtual machine or ten thousand.

Start building today
From GPU-powered inference and Kubernetes to managed databases and storage, get everything you need to build, scale, and deploy intelligent applications.
