By Kong Yang
Not using Ubuntu 22.04?
Choose a different version or distribution.
Introduction
Nginx is an open source web server used for serving static or dynamic websites, reverse proxying, load balancing, and other HTTP and proxy server capabilities. It was built to handle large amounts of concurrent connections, and is a popular web server used to host some of the largest and most high-traffic sites on the internet.
Docker is a popular open source containerization tool used to provide a portable and consistent runtime environment for software applications, while consuming less resources than a traditional server or virtual machine. Docker uses containers, isolated user-space environments that run at the operating system level and share system resources such as the kernel and the filesystem.
By containerizing Nginx, it is possible to cut down on some system administration overhead. For instance, you won’t have to manage Nginx through a package manager or build it from source. The Docker container allows you to replace the whole container when a new version of Nginx is released. This way, you only need to maintain the Nginx configuration file and your content.
In this tutorial, you will learn how to serve a small web page by configuring Nginx with a Docker container.
Prerequisites
To follow this tutorial, you will need the following:
- One Ubuntu 22.04 server set up by following the Ubuntu 22.04 initial server setup guide, including a sudo non-root user and a firewall.
- Docker installed on your server. Complete Steps 1 and 2 of our How To Install and Use Docker on Ubuntu 22.04 tutorial.
With Docker installed on your server, you can proceed with the first step.
Step 1 — Downloading Nginx From Docker Hub
Docker maintains a site called Dockerhub, a public repository of Docker files that include both official and user-submitted images. Docker’s Official Images can be used to quickly develop an application by saving you from having to build your own image. These images are maintained by the Docker community and are often designed for the most common use cases.
You can download Nginx from a pre-built Docker image, with a default Nginx configuration, by running the following command:
- docker pull nginx
This downloads all the necessary components for the container. Docker will cache these, so when you run the container you don’t need to download the container image each time.
Now that you have Nginx installed, you can configure the container so that it’s publicly accessible as a web server. To start your Nginx Docker container, run this command:
- docker run --name docker-nginx -p 80:80 nginx
Here’s a quick rundown of what’s happening with this command:
runis the command to create a new container- The
--nameflag is how you specify the name of the container. If left blank, a generated name like nostalgic_hopper will be assigned. -pspecifies the port you are exposing in the format of-p local-machine-port:internal-container-port. In this case, you are mapping port:80in the container to port:80on the server.nginxis the name of the image on Docker Hub.
In a web browser, enter your server’s IP address to reveal Nginx’s default landing page:
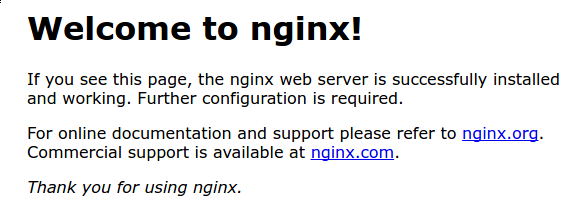
Notice also that in your terminal, a log for Nginx is being updated when you make requests to your server. This is because you’re running your container interactively.
In your terminal, enter CTRL+C to stop the container from running.
Because you shut down the container, you can no longer view the landing page. You can verify the container status with this command:
- docker ps -a
OutputCONTAINER ID        IMAGE               COMMAND                  CREATED             STATUS                      PORTS               NAMES
05012ab02ca1        nginx               "nginx -g 'daemon off"   57 seconds ago      Exited (0) 47 seconds ago                       docker-nginx
The output reveals that the Docker container has exited.
Remove the existing docker-nginx container with this command:
- docker rm docker-nginx
In the next step, you will detach the container to allow it to run independently.
Step 2 — Running in Detached Mode
Create a new, detached Nginx container with this command:
- docker run --name docker-nginx -p 80:80 -d nginx
By attaching the -d flag, you are running this container in the background.
The output is the container’s ID:
Outputb91f3ce26553f3ffc8115d2a8a3ad2706142e73d56dc279095f673580986257
By running the docker ps command, you’ll encounter some new information about your container:
- docker ps
OutputCONTAINER ID   IMAGE     COMMAND                  CREATED          STATUS          PORTS                               NAMES
b91f3ce26553   nginx     "/docker-entrypoint.…"   56 seconds ago   Up 54 seconds   0.0.0.0:80->80/tcp, :::80->80/tcp   docker-nginx
Instead of Exited (0) X minutes ago, you now have Up About a minute in the STATUS column. Notice too, that the port mapping is also a part of the output.
Enter your server’s IP address in a browser to reach the default Nginx landing page again. This time it’s running in the background because you specified the -d flag, which tells Docker to run this container in detached mode.
You now have a running instance of Nginx in a detached container. Currently, the container has no access to any of your website files.
Stop the container by running the following command:
- docker stop docker-nginx
Now that the container is stopped, you can remove it by running the following command:
- docker rm docker-nginx
Now that you understand how to run Nginx independently of your container, in the next step, you’ll create and configure Nginx to build a landing page.
Step 3 — Building a Web Page to Serve on Nginx
In this step, you’ll create a custom page for your website. This setup allows you to have persistent website content that’s hosted outside the container.
Create a new directory for your website content within the home directory:
- mkdir -p ~/docker-nginx/html
Navigate into to it by running this command:
- cd ~/docker-nginx/html
Create an HTML file to serve on your server. The following example uses nano, but you can use your preferred text editor:
- nano index.html
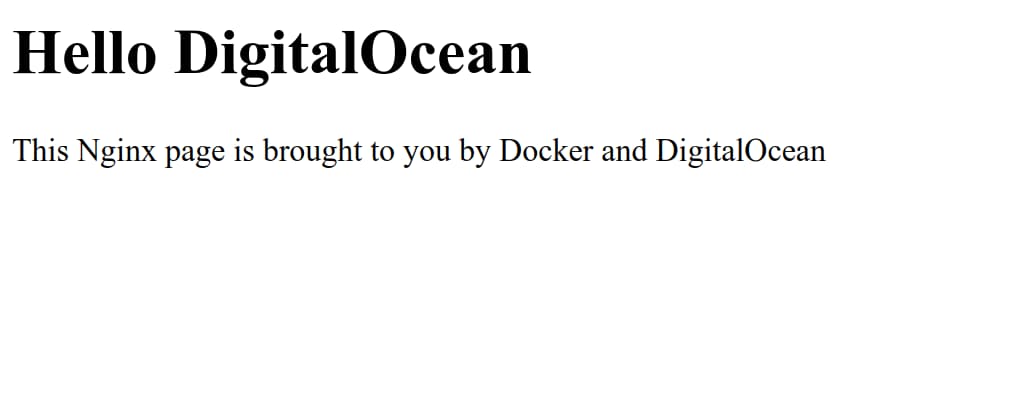
Insert the following HTML content:
<html>
  <head>
    <title>Docker nginx Tutorial</title>
  </head>

  <body>
    <div class="container">
      <h1>Hello DigitalOcean</h1>
      <p>This Nginx page is brought to you by Docker and DigitalOcean</p>
    </div>
  </body>
</html>
If you’re using the nano text editor, exit and save this file by pressing CTRL+X, then Y, then ENTER.
You now have an index page that replaces the default Nginx landing page.
Step 4 — Linking the Container to the Local Filesystem
In this step, you will link Nginx to your container so that it is publicly accessible over port:80, and connect it to your website content on the server.
Docker allows you to link directories from your virtual machine’s local file system to your container. Since you want to serve the new web page, you will need to give your container the files to render.
You could copy the files into the container as part of a Dockerfile, or copy them into the container after the fact, but both of these methods leave your website in a static state inside the container. By using Docker’s data volumes feature, you can create a symbolic link between your server’s filesystem and the container’s filesystem. This allows you to edit your existing web page files and add new ones into the directory. With a symbolic link, your container will have access to these files. If you want to read more about Docker and volumes check out the data volumes documentation.
The Nginx container is set up by default to look for an index page at /usr/share/nginx/html. In your new Docker container, you will need to give it access to your files at that location.
To do this, use the -v flag to map the ~/docker-nginx/html folder from your server to a relative path in the container/usr/share/nginx/html with this command:
- docker run --name docker-nginx -p 80:80 -d -v ~/docker-nginx/html:/usr/share/nginx/html nginx
Here is a brief explanation of the command:
-vflag specifies that you’re linking a volume.- To the left of the
:is the location of your directory on your server,~/docker-nginx/html. - To the right of the
:is the location that you are symbolically linking to your container/usr/share/nginx/html.
After running that command, enter your server’s IP address into your browser to view your new landing page:
If you’re happy with the default Nginx settings, there is nothing else to configure.
You can upload more content to the ~/docker-nginx/html/ directory, and it will be added to your live website.
For example, if you modify your HTML file, and refresh your browser, it will be updated accordingly. You could also build a whole site out of HTML files this way. For instance, if you added an about.html page, you could access it at http://your_server_ip/about.html without needing to interact with the container.
Step 5 — Using Your Own Nginx Configuration File (Optional)
If you want to have more control over how Nginx functions, you can use a custom Nginx configuration file with the Docker container.
First, make sure you’re back in the top level project directory:
- cd ~/docker-nginx
Copy the Nginx config directory into your project folder by using the Docker copy command:
- docker cp docker-nginx:/etc/nginx/conf.d/default.conf default.conf
Since you’ll be using a custom .conf file for Nginx, you will need to rebuild the container.
First stop the container:
- docker stop docker-nginx
Then remove it:
- docker rm docker-nginx
Now you can edit the default Nginx configuration file locally to serve a new directory, or to use a proxy_pass to forward the traffic to another application or container like you would with a regular Nginx installation. You can read about Nginx’s configuration file in our Nginx config file guide.
Once you’ve saved your configuration file, it’s time to create the Nginx container. Add a -v flag with the appropriate paths to give a fresh Nginx container the appropriate links to run from your own configuration file. For example:
- docker run --name docker-nginx -p 80:80 -v ~/docker-nginx/html:/usr/share/nginx/html -v ~/docker-nginx/default.conf:/etc/nginx/conf.d/default.conf -d nginx
This command links the custom website pages to the container.
Please note that you will need to restart the container using the docker restart command when you make any changes to your configuration file after starting the container. This is because Nginx does not hot reload if its configuration file is changed:
- docker restart docker-nginx
This will restart your container and your changes should be reflected on the associated pages.
Conclusion
You now have a running Nginx container serving a custom web page and have learned how to configure Nginx from within your container.
If you want to learn more about how containers work, you can review our Introduction to Containers tutorial.
Furthermore, if you’re interested in learning how to share data between two Docker Containers, check out our How to Share Data Between Docker Containers tutorial.
Thanks for learning with the DigitalOcean Community. Check out our offerings for compute, storage, networking, and managed databases.
About the author
Associate Technical Writer @ DigitalOcean
Still looking for an answer?
This textbox defaults to using Markdown to format your answer.
You can type !ref in this text area to quickly search our full set of tutorials, documentation & marketplace offerings and insert the link!
Thanks for this blog. I am not able to host any other file except index.html.If I use home.html, it will be denied and not linked. Not sure how to solve that.
Thanks for the tutorial. My server just lost power. When I go to look at “docker ps” there is nothing there…
 This work is licensed under a Creative Commons Attribution-NonCommercial- ShareAlike 4.0 International License.
Become a contributor for community
Get paid to write technical tutorials and select a tech-focused charity to receive a matching donation.

DigitalOcean Documentation
Full documentation for every DigitalOcean product.

Resources for startups and AI-native businesses
The Wave has everything you need to know about building a business, from raising funding to marketing your product.
The developer cloud
Scale up as you grow — whether you're running one virtual machine or ten thousand.

Start building today
From GPU-powered inference and Kubernetes to managed databases and storage, get everything you need to build, scale, and deploy intelligent applications.
