
Introduction
Django is a powerful web framework that can help you get your Python application or website off the ground. Django includes a simplified development server for testing your code locally, but for anything even slightly production related, a more secure and powerful web server is required.
In this guide, we will demonstrate how to install and configure some components on Ubuntu 16.04 to support and serve Django applications. We will configure the uWSGI application container server to interface with our applications. We will then set up Nginx to reverse proxy to uWSGI, giving us access to its security and performance features to serve our apps.
Prerequisites and Goals
In order to complete this guide, you should have a fresh Ubuntu 16.04 server instance with a non-root user with sudo privileges configured. You can learn how to set this up by running through our initial server setup guide.
We will be installing Django within two different virtual environments. This will allow your projects and their requirements to be handled separately. We will be creating two sample projects so that we can run through the steps in a multi-project environment.
Once we have our applications, we will install and configure the uWSGI application server. This will serve as an interface to our applications which will translate client requests using HTTP to Python calls that our application can process. We will then set up Nginx in front of uWSGI to take advantage of its high performance connection handling mechanisms and its easy-to-implement security features.
Let’s get started.
Install and Configure VirtualEnv and VirtualEnvWrapper
We will be installing our Django projects in their own virtual environments to isolate the requirements for each. To do this, we will be installing virtualenv, which can create Python virtual environments, and virtualenvwrapper, which adds some usability improvements to the virtualenv work flow.
We will be installing both of these components using pip, the Python package manager. We can install this utility from the Ubuntu repositories.
If you are building your Django projects with Python 2, type:
- sudo apt-get update
- sudo apt-get install python-pip
If you are using Python 3, type:
- sudo apt-get update
- sudo apt-get install python3-pip
Now that you have pip installed, we can install virtualenv and virtualenvwrapper globally. We will also upgrade pip to the latest version using pip itself.
If you are using Python 2, type:
- sudo -H pip install --upgrade pip
- sudo -H pip install virtualenv virtualenvwrapper
If you are using Python 3, type:
- sudo -H pip3 install --upgrade pip
- sudo -H pip3 install virtualenv virtualenvwrapper
With these components installed, we can now configure our shell with the information it needs to work with the virtualenvwrapper script. Our virtual environments will all be placed within a directory in our home folder called Env for easy access. This is configured through an environmental variable called WORKON_HOME. We can add this to our shell initialization script and can source the virtual environment wrapper script.
If you are using Python 3 and the pip3 command, you will have to add an additional line to your shell initialization script as well:
- echo "export VIRTUALENVWRAPPER_PYTHON=/usr/bin/python3" >> ~/.bashrc
Regardless of which version of Python you are using, you need to run the following commands:
- echo "export WORKON_HOME=~/Env" >> ~/.bashrc
- echo "source /usr/local/bin/virtualenvwrapper.sh" >> ~/.bashrc
Now, source your shell initialization script so that you can use this functionality in your current session:
- source ~/.bashrc
You should now have directory called Env in your home folder which will hold virtual environment information.
Create Django Projects
Now that we have our virtual environment tools, we will create two virtual environments, install Django in each, and start two projects.
Create the First Project
We can create a virtual environment easily by using some commands that the virtualenvwrapper script makes available to us.
Create your first virtual environment with the name of your first site or project by typing:
- mkvirtualenv firstsite
This will create a virtual environment, install Python and pip within it, and activate the environment. Your prompt will change to indicate that you are now operating within your new virtual environment. It will look something like this: (firstsite)user@hostname:~$. The value in the parentheses is the name of your virtual environment. Any software installed through pip will now be installed into the virtual environment instead of on the global system. This allows us to isolate our packages on a per-project basis.
Our first step will be to install Django itself. We can use pip for this without sudo since we are installing this locally in our virtual environment:
- pip install django
With Django installed, we can create our first sample project by typing:
- cd ~
- django-admin.py startproject firstsite
This will create a directory called firstsite within your home directory. Within this is a management script used to handle various aspects of the project and another directory of the same name used to house the actual project code.
Move into the first level directory so that we can begin setting up the minimum requirements for our sample project.
- cd ~/firstsite
Begin by migrating the database to initialize the SQLite database that our project will use. You can set up an alternative database for your application if you wish, but this is outside of the scope of this guide:
- ~/firstsite/manage.py migrate
You should now have a database file called db.sqlite3 in your project directory. Now, we can create an administrative user by typing:
- ~/firstsite/manage.py createsuperuser
At this point, your project directory (~/firstsite in our case) should have the following content:
~/firstsite/manage.py: A Django project management script.~/firstsite/firstsite/: The Django project package. This should contain the__init__.py,settings.py,urls.py, andwsgi.pyfiles.~/firstsite/db.sqlite3: The SQLite database file used to store your site information.
Next, open the settings file for the project with your text editor:
- nano ~/firstsite/firstsite/settings.py
Start by locating the ALLOWED_HOSTS directive. This defines a list of the server’s addresses or domain names that may be used to connect to the Django instance. Any incoming requests with a Host header that is not in this list will raise an exception. Django requires that you set this to prevent a certain class of security vulnerability.
In the square brackets, list the IP addresses or domain names that are associated with your Django server. Each item should be listed in quotations with entries separated by a comma. If you wish requests for an entire domain and any subdomains, prepend a period to the beginning of the entry. In the snippet below, there are a few commented out examples used to demonstrate:
. . .
# The simplest case: just add the domain name(s) and IP addresses of your Django server
# ALLOWED_HOSTS = [ 'example.com', '203.0.113.5']
# To respond to 'example.com' and any subdomains, start the domain with a dot
# ALLOWED_HOSTS = ['.example.com', '203.0.113.5']
ALLOWED_HOSTS = ['your_server_domain_or_IP', 'second_domain_or_IP', . . .]
Since we will be setting up Nginx to serve our site, we need to configure a directory which will hold our site’s static assets. This will allow Nginx to serve these directly, which will have a positive impact on performance. We will tell Django to place these into a directory called static in our project’s base directory. Add this line to the bottom of the file to configure this behavior:
. . .
STATIC_URL = '/static/'
STATIC_ROOT = os.path.join(BASE_DIR, 'static/')
Save and close the file when you are finished. Now, collect our site’s static elements and place them within that directory by typing:
- ~/firstsite/manage.py collectstatic
You may be asked to type “yes” to confirm the action and collect the static content. There will be a new directory called static in your project directory.
Next, we can open a port so that we can access the Django development server. If you followed the initial server setup guide, you should have a UFW firewall enabled. Allow connections to port 8080 by typing:
- sudo ufw allow 8080
With all of that out of the way, we can test our project by temporarily starting the development server. Type:
- ~/firstsite/manage.py runserver 0.0.0.0:8080
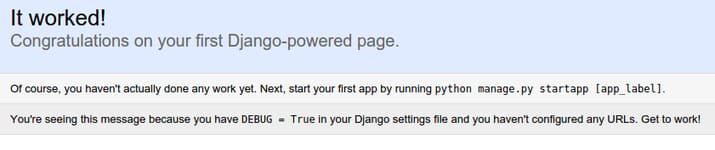
This will start up the development server on port 8080. Visit your server’s domain name or IP address followed by 8080 in your browser:
http://server_domain_or_IP:8080
You should see a page that looks like this:
Add /admin to the end of the URL in your browser’s address bar and you will be taken to the admin login page:
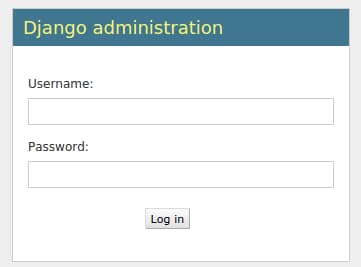
Using the administrative login credentials you selected with the createsuperuser command, log into the server. You will then have access to the administration interface:

After testing this functionality out, stop the development server by typing CTRL-C in your terminal. We can now move on to our second project.
Create the Second Project
The second project will be created in exactly the same way as the first. We will abridge the explanation in this section, seeing as how you have already completed this once.
Move back to your home directory and create a second virtual environment for your new project. Install Django inside of this new environment once it is activated:
- cd ~
- mkvirtualenv secondsite
- pip install django
The new environment will be created and changed to, leaving your previous virtual environment. This Django instance is entirely separate from the other one you configured. This allows you to manage them independently and customize as necessary.
Create the second project and move into the project directory:
- cd ~
- django-admin.py startproject secondsite
- cd ~/secondsite
Initialize the database and create an administrative user:
- ~/secondsite/manage.py migrate
- ~/secondsite/manage.py createsuperuser
Open the settings file:
- nano ~/secondsite/secondsite/settings.py
Set the ALLOWED_HOSTS to your second project’s domain, the server’s IP address, or both, just like you did with the first project:
ALLOWED_HOSTS = ['second_project_domain_or_IP', 'another_domain_or_IP', . . .]
Add the location for the static files, just as you did in the previous project:
. . .
STATIC_URL = '/static/'
STATIC_ROOT = os.path.join(BASE_DIR, 'static/')
Save and close the file. Now, collect the static elements into that directory by typing:
- ~/secondsite/manage.py collectstatic
Finally, fire up the development server to test out the site:
- ~/secondsite/manage.py runserver 0.0.0.0:8080
You should check the regular site at:
http://server_domain_or_IP:8080
Also log into the admin site:
http://server_domain_or_IP:8080/admin
When you’ve confirmed that everything is working as expected, type CTRL-C in your terminal to stop the development server.
Backing Out of the Virtual Environment
Since we are now done with the Django portion of the guide, we can deactivate our second virtual environment:
- deactivate
If you need to work on either of your Django sites again, you should reactivate their respective environments. You can do that by using the workon command:
- workon firstsite
Or:
- workon secondsite
Again, deactivate when you are finished working on your sites:
- deactivate
We can now move on to configuring the application server.
Setting up the uWSGI Application Server
Now that we have two Django projects set up and ready to go, we can configure uWSGI. uWSGI is an application server that can communicate with applications over a standard interface called WSGI. To learn more about this, read this section of our guide on setting up uWSGI and Nginx on Ubuntu 14.04.
Installing uWSGI
Unlike the guide linked above, in this tutorial, we will be installing uWSGI globally. This will create less friction in handling multiple Django projects. Before we can install uWSGI, we need the Python development files that the software relies on. We can install this directly from Ubuntu’s repositories.
If you are using Django with Python 2, type:
- sudo apt-get install python-dev
If you are using Python 3, type:
- sudo apt-get install python3-dev
Now that the development files are available, we can install uWSGI globally through pip.
If you are using Python 2, type:
- sudo -H pip install uwsgi
If you are using Python 3, type:
- sudo -H pip3 install uwsgi
We can quickly test this application server by passing it the information for one of our sites. For instance, we can tell it to serve our first project by typing:
- uwsgi --http :8080 --home /home/sammy/Env/firstsite --chdir /home/sammy/firstsite -w firstsite.wsgi
Here, we’ve told uWSGI to use our virtual environment located in our ~/Env directory, to change to our project’s directory, and to use the wsgi.py file stored within our inner firstsite directory to serve the file (using the firstsite.wsgi Python module syntax). For our demonstration, we told it to serve HTTP on port 8080.
If you go to server’s domain name or IP address in your browser, followed by :8080, you will see your site again (the static elements in the /admin interface, like CSS, won’t work yet). When you are finished testing out this functionality, type CTRL-C in the terminal.
Creating Configuration Files
Running uWSGI from the command line is useful for testing, but isn’t particularly helpful for an actual deployment. Instead, we will run uWSGI in “Emperor mode”, which allows a master process to manage separate applications automatically given a set of configuration files.
Create a directory that will hold your configuration files. Since this is a global process, we will create a directory called /etc/uwsgi/sites to store our configuration files:
- sudo mkdir -p /etc/uwsgi/sites
In this directory, we will place our configuration files. We need a configuration file for each of the projects we are serving. The uWSGI process can take configuration files in a variety of formats, but we will use .ini files due to their simplicity.
Create a file for your first project and open it in your text editor:
- sudo nano /etc/uwsgi/sites/firstsite.ini
Inside, we must begin with the [uwsgi] section header. All of our information will go beneath this header. We are also going to use variables to make our configuration file more reusable. After the header, set a variable called project with the name of your first project. Add a variable called uid which holds your sudo username.
We will also add a variable called base with the path to your user’s home directory. This will be constructed from the username we set using the %(variable_name) syntax. This will be replaced by the value of the variable when the config is read:
[uwsgi]
project = firstsite
uid = sammy
base = /home/%(uid)
Next, we need to configure uWSGI so that it handles our project correctly. We need to change into the root project directory by setting the chdir option. We can combine the home directory and project name using the same variable syntax.
In a similar way, we will indicate the virtual environment for our project. By setting the module, we can indicate exactly how to interface with our project (by importing the “application” callable from the wsgi.py file within our inner project directory). The configuration of these items will look like this:
[uwsgi]
project = firstsite
uid = sammy
base = /home/%(uid)

chdir = %(base)/%(project)
home = %(base)/Env/%(project)
module = %(project).wsgi:application
We want to create a master process with 5 workers. We can do this by adding this:
[uwsgi]
project = firstsite
uid = sammy
base = /home/%(uid)

chdir = %(base)/%(project)
home = %(base)/Env/%(project)
module = %(project).wsgi:application

master = true
processes = 5
Next we need to specify how uWSGI should listen for connections. In our test of uWSGI, we used HTTP and a network port. However, since we are going to be using Nginx as a reverse proxy, we have better options.
Instead of using a network port, since all of the components are operating on a single server, we can use a Unix socket. This is more secure and offers better performance. This socket will not use HTTP, but instead will implement uWSGI’s uwsgi protocol, which is a fast binary protocol for designed for communicating with other servers. Nginx can natively proxy using the uwsgi protocol, so this is our best choice.
We will also modify the ownership and permissions of the socket because we will be giving the web server write access. We’ll set the vacuum option so that the socket file will be automatically cleaned up when the service is stopped:
[uwsgi]
project = firstsite
uid = sammy
base = /home/%(uid)

chdir = %(base)/%(project)
home = %(base)/Env/%(project)
module = %(project).wsgi:application

master = true
processes = 5

socket = /run/uwsgi/%(project).sock
chown-socket = %(uid):www-data
chmod-socket = 660
vacuum = true
With this, our first project’s uWSGI configuration is complete. Save and close the file.
The advantage of setting up the file using variables is that it makes it incredibly simple to reuse. Copy your first project’s configuration file to use as a base for your second configuration file:
- sudo cp /etc/uwsgi/sites/firstsite.ini /etc/uwsgi/sites/secondsite.ini
Open the second configuration file with your text editor:
- sudo nano /etc/uwsgi/sites/secondsite.ini
We only need to change a single value in this file in order to make it work for our second project. Modify the project variable with the name you’ve used for your second project:
[uwsgi]
project = secondsite
uid = sammy
base = /home/%(uid)

chdir = %(base)/%(project)
home = %(base)/Env/%(project)
module = %(project).wsgi:application

master = true
processes = 5

socket = /run/uwsgi/%(project).sock
chown-socket = %(uid):www-data
chmod-socket = 660
vacuum = true
Save and close the file when you are finished. Your second project should be ready to go now.
Create a systemd Unit File for uWSGI
We now have the configuration files we need to serve our Django projects, but we still haven’t automated the process. Next, we’ll create a systemd unit file to manage the uWSGI emperor process and automatically start uWSGI at boot.
We will create the unit file in the /etc/systemd/system directory, where administrator-created unit files are kept. We will call our file uwsgi.service:
- sudo nano /etc/systemd/system/uwsgi.service
Start with the [Unit] section, which is used to specify metadata and ordering information. We’ll simply put a description of our service here:
[Unit]
Description=uWSGI Emperor service
Next, we will open up the [Service] section. We’ll use the ExecStartPre directive to set up the pieces we need to run our server. This will make sure the /run/uwsgi directory is created and that our normal user owns it with the www-data group as the group owner. Both mkdir with the -p flag and the chown command return successfully even if their operation is not needed. This is what we want.
For the actual start command, specified by the ExecStart directive, we will point to the uwsgi executable. We will tell it to run in “Emperor mode”, allowing it to manage multiple applications using the files it finds in /etc/uwsgi/sites. We will also add the pieces needed for systemd to correctly manage the process. These are taken from the uWSGI documentation here.
[Unit]
Description=uWSGI Emperor service

[Service]
ExecStartPre=/bin/bash -c 'mkdir -p /run/uwsgi; chown sammy:www-data /run/uwsgi'
ExecStart=/usr/local/bin/uwsgi --emperor /etc/uwsgi/sites
Restart=always
KillSignal=SIGQUIT
Type=notify
NotifyAccess=all
Now, all we need to do is add the [Install] section. This allows us to specify when the service should be automatically started. We will tie our service to the multi-user system state. Whenever the system is set up for multiple users (the normal operating condition), our service will be activated:
[Unit]
Description=uWSGI Emperor service

[Service]
ExecStartPre=/bin/bash -c 'mkdir -p /run/uwsgi; chown sammy:www-data /run/uwsgi'
ExecStart=/usr/local/bin/uwsgi --emperor /etc/uwsgi/sites
Restart=always
KillSignal=SIGQUIT
Type=notify
NotifyAccess=all

[Install]
WantedBy=multi-user.target
When you are finished, save and close the file.
We will be unable to start the service successfully at this point because it relies on the www-data user being available. We will have to wait to start the uWSGI service until after Nginx is installed.
Install and Configure Nginx as a Reverse Proxy
With uWSGI configured and ready to go, we can now install and configure Nginx as our reverse proxy. This can be downloaded from Ubuntu’s default repositories:
- sudo apt-get install nginx
Once Nginx is installed, we can go ahead and create a server block configuration file for each of our projects. Start with the first project by creating a server block configuration file:
- sudo nano /etc/nginx/sites-available/firstsite
Inside, we can start our server block by indicating the port number and domain name where our first project should be accessible. The server_name block must match one of the server’s domain names or its IP address or else the default Nginx page may be used instead. We’ll assume that you have a domain name for each:
server {
    listen 80;
    server_name firstsite.com www.firstsite.com;
}
Next, we can tell Nginx not to worry if it can’t find a favicon. We will also point it to the location of our static files directory where we collected our site’s static elements:
server {
    listen 80;
    server_name firstsite.com www.firstsite.com;

    location = /favicon.ico { access_log off; log_not_found off; }
    location /static/ {
        root /home/sammy/firstsite;
    }
}
Next we can create a catch-all location block that will pass all additional queries straight to our application. We will include the uwsgi parameters found in the /etc/nginx/uwsgi_params and pass the traffic to the socket that the uWSGI server sets up:
server {
    listen 80;
    server_name firstsite.com www.firstsite.com;

    location = /favicon.ico { access_log off; log_not_found off; }
    location /static/ {
        root /home/sammy/firstsite;
    }

    location / {
        include         uwsgi_params;
        uwsgi_pass      unix:/run/uwsgi/firstsite.sock;
    }
}
With that, our first server block is complete.
We will use this as a basis for our second project’s Nginx configuration file. Copy it over now:
- sudo cp /etc/nginx/sites-available/firstsite /etc/nginx/sites-available/secondsite
Open the new file in your text editor:
- sudo nano /etc/nginx/sites-available/secondsite
Here, you’ll have to change any reference to firstsite with a reference to secondsite. You’ll also have to modify the server_name so that your second project responds to a different domain name or change the port if you don’t have more than one domain name or IP address. When you are finished, it will look something like this:
server {
    listen 80;
    server_name secondsite.com www.secondsite.com;

    location = /favicon.ico { access_log off; log_not_found off; }
    location /static/ {
        root /home/sammy/secondsite;
    }

    location / {
        include         uwsgi_params;
        uwsgi_pass      unix:/run/uwsgi/secondsite.sock;
    }
}
Save and close the file when you are finished.
Next, link both of your new configuration files to Nginx’s sites-enabled directory to enable them:
- sudo ln -s /etc/nginx/sites-available/firstsite /etc/nginx/sites-enabled
- sudo ln -s /etc/nginx/sites-available/secondsite /etc/nginx/sites-enabled
Check the configuration syntax by typing:
- sudo nginx -t
If no syntax errors are detected, you can restart your Nginx service to load the new configuration:
- sudo systemctl restart nginx
If you remember from earlier, we never actually started the uWSGI server. Do that now by typing:
- sudo systemctl start uwsgi
Let’s delete the UFW rule to port 8080 and instead allow access to our Nginx server:
- sudo ufw delete allow 8080
- sudo ufw allow 'Nginx Full'
You should now be able to reach your two projects by going to their respective domain names. Both the public and administrative interfaces should work as expected.
If this goes well, you can enable both of the services to start automatically at boot by typing:
- sudo systemctl enable nginx
- sudo systemctl enable uwsgi
Note
After configuring Nginx, the next step should be securing traffic to the server using SSL/TLS. This is important because without it, all information, including passwords are sent over the network in plain text.
If you have a domain name, the easiest way get an SSL certificate to secure your traffic is using Let’s Encrypt. Follow this guide to set up Let’s Encrypt with Nginx on Ubuntu 16.04.
If you do not have a domain name, you can still secure your site for testing and learning with a self-signed SSL certificate.
Troubleshooting Nginx and uWSGI
If you are not able to access your application, you will need to troubleshoot your installation.
Nginx Is Showing the Default Page Instead of the Django Application
If Nginx displays the default page instead of proxying to your application, it usually means that you need to adjust the server_name within the /etc/nginx/sites-available/firstsite file to point to your server’s IP address or domain name.
Nginx uses the server_name to determine which server block to use to respond to requests. If you are seeing the default Nginx page, it is a sign that Nginx wasn’t able to match the request to a sever block explicitly, so it’s falling back on the default block defined in /etc/nginx/sites-available/default.
The server_name in your project’s server block must be more specific than the one in the default server block to be selected.
Nginx Is Displaying a 502 Bad Gateway Error Instead of the Django Application
A 502 error indicates that Nginx is unable to successfully proxy the request. A wide range of configuration problems express themselves with a 502 error, so more information is required to troubleshoot properly.
The primary place to look for more information is in Nginx’s error logs. Generally, this will tell you what conditions caused problems during the proxying event. Follow the Nginx error logs by typing:
- sudo tail -F /var/log/nginx/error.log
Now, make another request in your browser to generate a fresh error (try refreshing the page). You should see a fresh error message written to the log. If you look at the message, it should help you narrow down the problem.
You might see some of the following message:
connect() to unix:/run/uwsgi/firstsite.sock failed (2: No such file or directory)
This indicates that Nginx was unable to find the socket file at the given location. You should compare the uwsgi_pass location defined in the firstsite and secondsite files in /etc/nginx/sites-available file to the actual location of the firstsite.sock and secondsite.sock socket files in the /run/uwsgi directory.
Check for the existence of the socket files within the /run/uwsgi directory by typing:
- sudo ls /run/uwsgi
If there are no socket files in /run/uwsgi, it generally means that the uwsgi process was unable to create it. Check the status of the uwsgi process to find out whether it was able to start:
- sudo systemctl status uwsgi
If the systemctl status command indicated that an error occurred or if you do not find the socket files in the directory, it’s an indication that uWSGI was not able to start correctly. Check the uWSGI process logs by typing:
- sudo journalctl -u uwsgi
Take a look at the messages in the logs to find out where uWSGI ran into problems. There are many reasons that you may have run into problems, but often, if uWSGI was unable to create the socket file, it is for one of these reasons:
- The project files are owned by the
rootuser instead of asudouser - The
ExecStartPreline in the/etc/systemd/system/uwsgi.servicefile does not include the correct command to create the directory and assign ownership - The
uwsgi_passpath in the site configuration files in the/etc/nginx/sites-availabledirectory are not aimed at the correct socket location - The uWSGI configuration defined in the
.inifiles within the/etc/uwsgi/sitesdirectory is incorrect. Check the following items:- The
chdirdirective, once interpolated, points to the main project directory. - The
homedirective, once interpolated, points to the virtual environment directory. - The
moduledirective uses the Python module import syntax to load thewsgi.pyfile from within the inner project directory. - The
socketdirective points a file in the/run/uwsgifile (that should be created byExecStartPreline in the service file mentioned above).
- The
If you make changes to the /etc/systemd/system/uwsgi.service file, reload the daemon to reread the service definition and restart the uWSGI process by typing:
- sudo systemctl daemon-reload
- sudo systemctl restart uwsgi
Fixing these issues should allow Nginx to find the socket file correctly.
connect() to unix:/run/uwsgi/firstsite.sock failed (13: Permission denied)
This indicates that Nginx was unable to connect to the uWSGI socket because of permissions problems. Usually, this happens when the socket is being created in a restricted environment or if the permissions were wrong. While the uWSGI process is able to create the socket file, Nginx is unable to access it.
This can happen if there are limited permissions at any point between the root directory (/) the socket file. We can see the permissions and ownership values of the socket file and each of its parent directories by passing the absolute path to our socket file to the namei command:
- namei -nom /run/uwsgi/firstsite.sock
Outputf: /run/uwsgi/firstsite.sock
 drwxr-xr-x root  root     /
 drwxr-xr-x root  root     run
 drwxr-xr-x sammy www-data uwsgi
 srw-rw---- sammy www-data firstsite.sock
The output displays the permissions of each of the directory components. By looking at the permissions (first column), owner (second column) and group owner (third column), we can figure out what type of access is allowed to the socket file.
In the above example, each of the directories leading up to the socket file have world read and execute permissions (the permissions column for the directories end with r-x instead of ---). The www-data group has group ownership over the socket itself. With these settings, Nginx process should be able to access the socket successfully.
If any of the directories leading up to the socket are not owned by the www-data group or do not have world read and execute permission, Nginx will not be able to access the socket. Usually, this means that the configuration files have a mistake.
If the directory paths have too restrictive of permissions or ownership, look at the /etc/systemd/system/uwsgi.service file. The ExecStartPre directive is responsible for creating the /run/uwsgi directory and assigning group ownership to the www-data group. If the commands here are not correct, the directory paths might be too restrictive.
If the socket file itself is inaccessible to the Nginx process, the settings defined in the .ini files within /etc/uwsgi/sites may be incorrect. Check the values of chown-socket and chmod-socket to make sure that the web process is given permission to access the files.
Further Troubleshooting
For additional troubleshooting, the logs can help narrow down root causes. Check each of them in turn and look for messages indicating problem areas.
The following logs may be helpful:
- Check the Nginx process logs by typing:
sudo journalctl -u nginx - Check the Nginx access logs by typing:
sudo less /var/log/nginx/access.log - Check the Nginx error logs by typing:
sudo less /var/log/nginx/error.log - Check the uWSGI application logs by typing:
sudo journalctl -u uwsgi
As you update your configuration or application, you will likely need to restart the processes to adjust to your changes.
If you update your Django application, you can restart the uWSGI process to pick up the changes by typing:
- sudo systemctl restart uwsgi
If you change uwsgi systemd service file, reload the daemon and restart the process by typing:
- sudo systemctl daemon-reload
- sudo systemctl restart uwsgi
If you change the Nginx server block configuration, test the configuration and then Nginx by typing:
- sudo nginx -t && sudo systemctl restart nginx
These commands are helpful for picking up changes as you adjust your configuration.
Conclusion
In this guide, we’ve set up two Django projects, each in their own virtual environments. We’ve configured uWSGI to serve each project independently using the virtual environment configured for each. Afterwards, we set up Nginx to act as a reverse proxy to handle client connections and serve the correct project depending on the client request.
Django makes creating projects and applications simple by providing many of the common pieces, allowing you to focus on the unique elements. By leveraging the general tool chain described in this article, you can easily serve the applications you create from a single server.
Thanks for learning with the DigitalOcean Community. Check out our offerings for compute, storage, networking, and managed databases.
About the author
Former Senior Technical Writer at DigitalOcean, specializing in DevOps topics across multiple Linux distributions, including Ubuntu 18.04, 20.04, 22.04, as well as Debian 10 and 11.
Still looking for an answer?
This textbox defaults to using Markdown to format your answer.
You can type !ref in this text area to quickly search our full set of tutorials, documentation & marketplace offerings and insert the link!
This comment has been deleted
Me sirvio mucho para un proyecto que necesitaba. Sin duda el mejor tutorial que hay en internet.
This comment has been deleted
This comment has been deleted
Sorry,I followed all the steps above,but I have a problem. When I open http://my_server_IP ,I saw a nginx page,not the Django “It works!” page. Is it right? I don’t have domain name,how can I test the 2 websites use IP?
thank you!
this part didnt work for me
echo “source /usr/local/bin/virtualenvwrapper.sh” >> ~/.bashrc
virtualenvwrapper.sh for me was installed here
/home/my_username_here/.local/bin/virtualenvwrapper.sh
not sure why but I had to change the path for that command accordingly
this was all fine until the end and Im just getting a 502 error message at my server ip
I changed server_name to that ip in the settings file, is there something else that needs to be done too?
Following on from my other comments I decided to destroy the droplet and make a new one and went through this again but only setting up ‘firstsite’ and I think Ive done everything correctly as I get the ‘Welcome to Django’ message now at my server ip and can access /admin so I guess this is setup now?
I spent a bunch of time chasing down this error so I wanted to leave the solution here in case anyone else runs into it (and it might be worth fixing this guide):
I kept getting an error when trying to run uWSGI: Fatal Python error: Py_Initialize: Unable to get the locale encoding ImportError: No module named ‘encodings’
Eventually I traced this to the concept that the Python versions were not matching up. And finally I discovered this is because I was following the Python 3 directions in this guide but there was no alternate option for installing Django with Python 3. So this line: “pip install django” should actually be “pip3 install django” if you are trying to run everything with Python 3.
Maybe I should have figured that out earlier, but since there were alternate directions for each version everywhere else but not here it fooled me and sent me on a long chase to figure out the answer. After deleting that environment and using pip3 to install Django the error disappeared.
 This work is licensed under a Creative Commons Attribution-NonCommercial- ShareAlike 4.0 International License.
Become a contributor for community
Get paid to write technical tutorials and select a tech-focused charity to receive a matching donation.

DigitalOcean Documentation
Full documentation for every DigitalOcean product.

Resources for startups and AI-native businesses
The Wave has everything you need to know about building a business, from raising funding to marketing your product.
The developer cloud
Scale up as you grow — whether you're running one virtual machine or ten thousand.

Start building today
From GPU-powered inference and Kubernetes to managed databases and storage, get everything you need to build, scale, and deploy intelligent applications.
