By scottdky and Brian Hogan

Introduction
Setting up an SMTP server is not a task for the faint of heart. Not only is security a major concern, but mail deliverability is an even bigger problem. Ensuring high deliverability of email from a home grown SMTP server without being marked as spam is not very feasible due to the high degree of spam protection provided by most email providers today.
A mail relay solves both of these problems. It is much simpler to configure than a full-blown SMTP server because you simply route any email generated by your server to a professionally-managed SMTP server. As a result, you will be free from most email deliverability hassles.
There are two types of mail relays: open and closed. An open mail relay routes mail from external sources as well as internal server mail. This type of relay is is ripe for abuse from spammers. A closed relay only forwards the messages generated internally on our server and internal network.
While you can use any external SMTP server to route email, Mailgun offers many advantages over other SMTP servers. It’s free for up to 10,000 emails per month, it’s incredibly reliable, and it lets you send mail from a separate domain. By using a separate domain from your regular business email domain, you add another layer of protection against being blacklisted accidentally.
This tutorial will walk you through the process of creating and setting up a free Mailgun account and subdomain, setting up the DigitalOcean DNS records needed, and setting up a closed mail relay using Postfix.
Prerequisites
Before you begin this guide you’ll need the following:
- One Ubuntu 16.04 server set up by following the Ubuntu 16.04 initial server setup guide, including a sudo non-root user and a firewall.
- A registered domain name, like
example.com, pointing to DigitalOcean’s name servers. You can set that up by following the tutorial How to Set Up a Host Name with DigitalOcean. - A regular email account where you can receive test messages you’ll send.
Step 1 — Setting Up a Mailgun Account
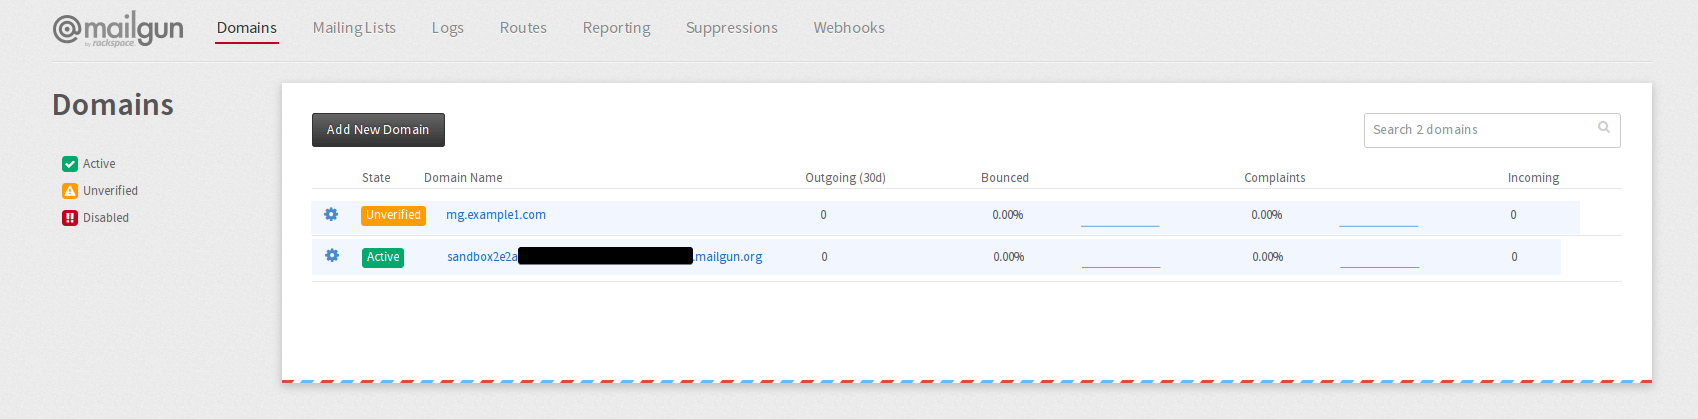
Create a new account at https://mailgun.com/signup. Once your registration is complete, log in and go to your dashboard and click the Domains link in the menu at the top of the page.
You will see a sandbox domain, which Mailgun created for you.

Instead of using the sandbox, create a subdomain for Mailgun by clicking on the Add New Domain button. You can name this subdomain anything you like, such as mailgun.example.com or bulkemail.example.com. This tutorial will use mg.example1.com in its examples.
After creating your subdomain, your Domains page should look like the following image:
Next, go your subdomain’s page by clicking the link for its name. You will see three sets of DNS records, as shown in the following image:
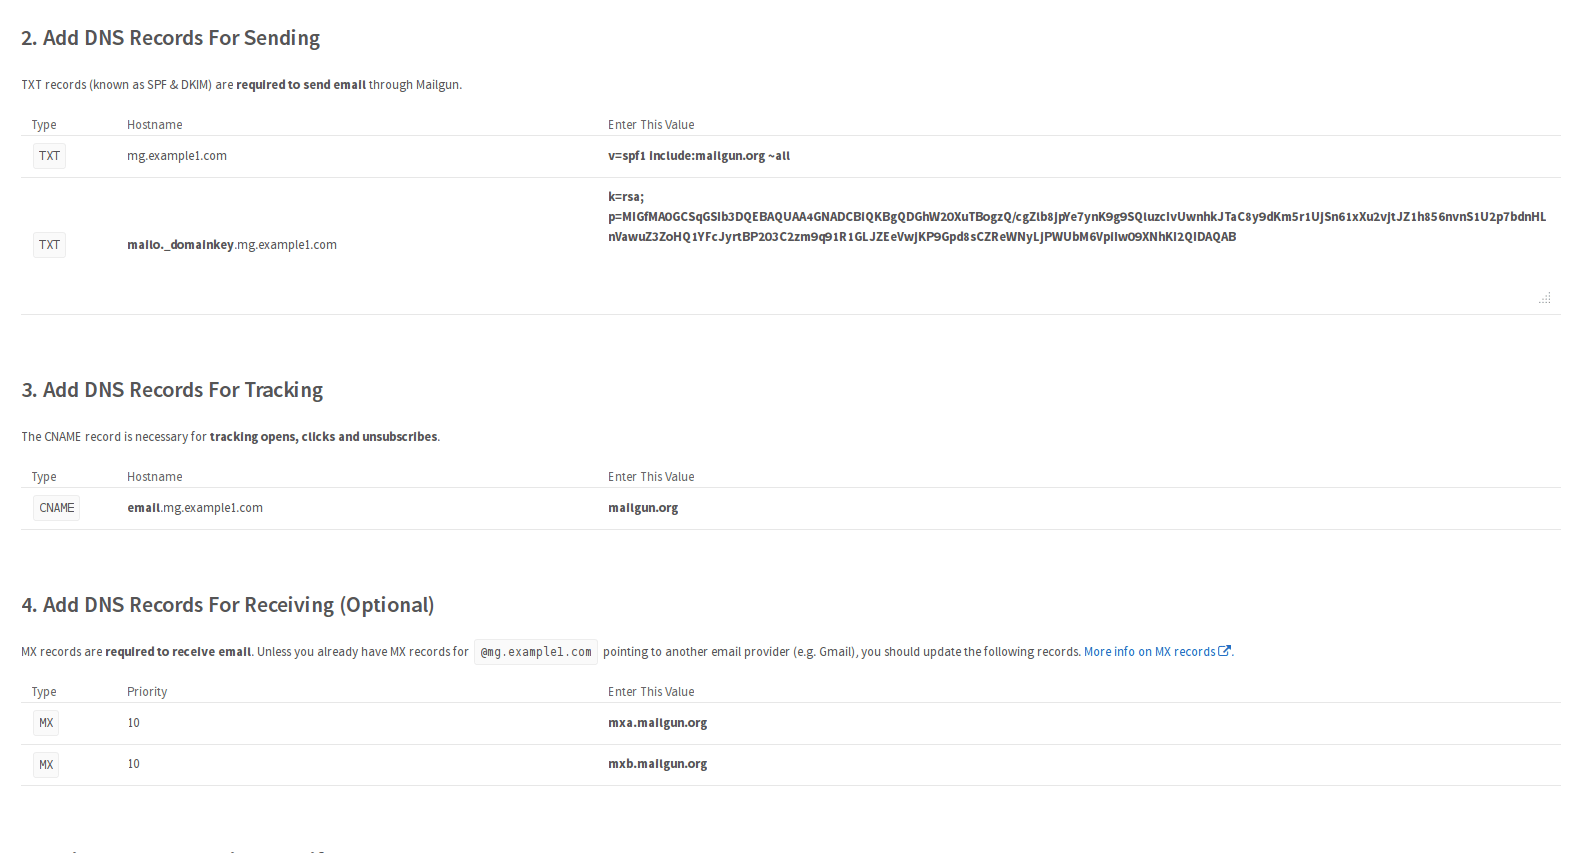
You will need to add these DNS records for your domain in your DigitalOcean dashboard. The DNS records for Sending and Tracking are required, but you can ignore the ones for Receiving. You’ll use the information on this page in order to create the proper DNS records in the next step, so keep this page open so you can copy the values for these records.
Step 2 — Setting up DNS records on DigitalOcean
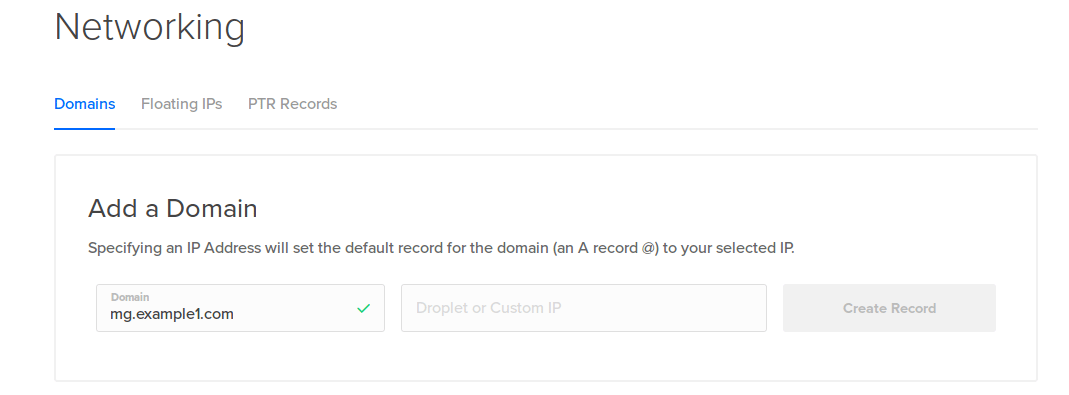
Log in to your DigitalOcean account and click the Networking menu on your Dashboard. Then enter the subdomain you created in Mailgun in the Domain field, and select the droplet that you wish to configure the mail relay on. Then press the Create Record button.
The new domain will appear in your list of domains. Click on it to display its edit page. In addition to the records already created, you will need to add the two TXT records and the CNAME record specifed by Mailgun. You can optionally add the MX records as well, but they aren’t needed for the mail relay. Refer to this example screenshot as you create your records:
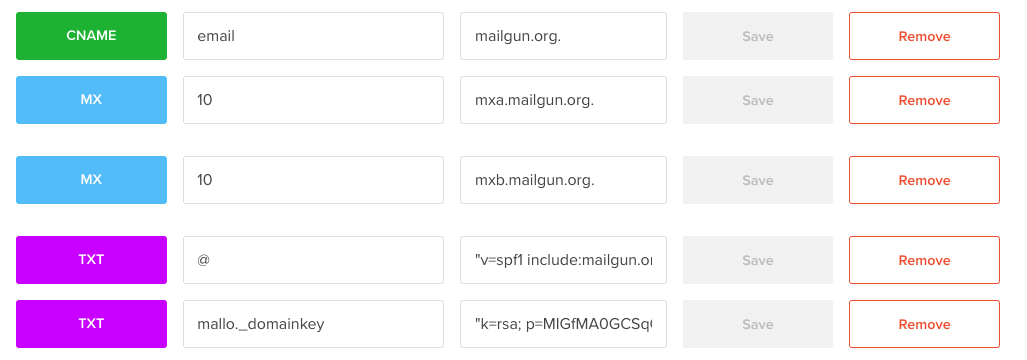
Add the following records, using the information provided by Mailgun you obtained in Step 1:
- Create a new CNAME record:
- Enter
emailfor the name andmailgun.org.for the hostname. The period at the end of the hostname is required.
- Enter
- Create a TXT record:
- Enter
@for the name. - For the Text, enter the text for the first TXT record from Mailgun, in double quotes. In this example, it’s
"v=spf1 include:mailgun.org ~all"but you should verify this by looking at the value provided by Mailgun.
- Enter
- Create another TXT record:
- Enter the bold part of the Hostname from the second txt record provided by Mailgun for the name field. In this example, it is
mallo._domainkey, but it may be different for your Mailgun domain. - For the text, copy the entire value provided by Mailgun and enclose it in double quotes. It should look like
"k=rsa; p=MIGfMA0G...AQAB".
- Enter the bold part of the Hostname from the second txt record provided by Mailgun for the name field. In this example, it is
Mailgun needs to validate your domain settings before you can continue. You can either wait for the DNS records to update, or go back to your domain page in Mailgun, find the section Domain Verification & DNS, and click the button Check DNS Records Now When your DNS records check out, you will see green checkboxes by the records that have validated.
DNS records can take some time to update. Update times can vary from several minutes to hours.
Note: If your DNS records are not validating in Mailgun, double-check the values you entered to make sure they match those from your Mailgun domain page. Remember to put the TXT record values in double quotes ("). Also, the first (shorter) TXT record’s name should be @, not the hostname provided by Mailgun.
While you are waiting for the DNS update, view and copy your SMTP credentials from your MailGun domain page. You’ll need these values shortly. Under the Domain Information section, your username is listed next to Default SMTP Login, and the password is next to Default Password. You can also change these values if desired by clicking on the link Manage SMTP credentials.
Let’s set up Postfix next.
Step 3 — Installing and Configuring Postfix
We’ll use the built-in pacakge manager to install Postfix.
Connect to your server as your non-root user:
- ssh sammy@your_server_ip
Normally, the Postfix installation process uses some interactive screens to prompt you for information. To prevent any possible errors during this setup, let’s preconfigure this information before we start the installation process.
First, configure Postfix to act as a mail relay:
- sudo debconf-set-selections <<< "postfix postfix/main_mailer_type select Satellite system"
Then tell Postfix to use your server’s hostname for the mail server’s hostname:
- sudo debconf-set-selections <<< "postfix postfix/mailname string $HOSTNAME"
Then configure Postfix to use Mailgun’s SMTP server for relayed mail:
- sudo debconf-set-selections <<< "postfix postfix/relayhost string smtp.mailgun.org"
With those configurations in place, install Postfix:
- sudo apt -y install postfix
In order for Postfix to connect with Mailgun, you must create a credentials file with the username and password for the Mailgun subdomain you obtained in Step 2.
Note: Each Mailgun subdomain has its own credentials. For more info see Where Can I Find My API key and SMTP Credentials in the Mailgun documentation.
Create and edit a new credentials file:
- sudo nano /etc/postfix/sasl_passwd
Add the following line to the new file:
smtp.mailgun.org your_mailgun_smtp_user@your_subdomain_for_mailgun:your_mailgun_smtp_password
Next, protect the file by restricting read and write permissions to root and and use the postmap command to update Postfix’s lookup tables to use this new file:
- sudo chmod 600 /etc/postfix/sasl_passwd
- sudo postmap /etc/postfix/sasl_passwd
Next, enhance the mail relay’s security by preventing anonymous logins and specifying the credentials file to provide secure logins to Mailgun. Edit the Postfix configuration file:
- sudo nano /etc/postfix/main.cf
and add these lines to the end of the file:
smtp_sasl_auth_enable = yes
smtp_sasl_password_maps = hash:/etc/postfix/sasl_passwd
smtp_sasl_security_options = noanonymous
smtp_sasl_tls_security_options = noanonymous
smtp_sasl_mechanism_filter = AUTH LOGIN
Note: Postfix has various security measures in place to prevent the use of your mail relay by spambots (see http://www.postfix.org/SMTPD_ACCESS_README.html for more information). Specifically, these two lines in main.cfrestrict the use of the mail relay to your local network and the SASL-authorized users that you defined earlier.
smtpd_relay_restrictions = permit_mynetworks
permit_sasl_authenticated defer_unauth_destination
Now restart Postfix to load the new configuration:
- sudo systemctl restart postfix
You should also make sure that no incoming SMTP ports are open by running this command to check the status of your firewall:
- sudo ufw status
The output should resemble this:
OutputTo                         Action      From
--                         ------      ----
22                         ALLOW IN    Anywhere
22 (v6)                    ALLOW IN    Anywhere (v6)
The output should not contain any of these ports in the To column: 25, 465, or 587. These ports are used for SMTP access, and you do not want to allow incoming traffic to use your mail relay. If those ports do appear in the output, review this tutorial to learn how to remove rules or explicitly deny access.
Normally, in order to set up an SMTP server using Postfix, your server’s hostname must be the same as your website’s fully-qualified domain name (FQDN). If your server’s hostname is a FQDN, you can skip ahead to Step 5. Otherwise, read on.
Step 4 — Setting up Domain Mapping
Since we’re using Mailgun for our SMTP server instead of Postfix, your server’s hostname does not need to match the FQDN you are using for your email. This is very common. For example, If your server is a database server or a monitoring server, it may not have a FQDN at all. We can set up a mapping table, which substitutes one e-mail address for another.
In this case, we are going to map your Linux user email account to any username you wish at your MailGun domain.
Create and edit a new mapping table by creating the file /etc/postfix/generic:
- sudo nano /etc/postfix/generic
Add this line to the file which maps the sammy user on your machine to Mailgun.
sammy@your_hostname sender@your_subdomain_for_mailgun
You can replace sender with whatever name you wish, such as wordpress or no-reply. The only part that really matters is your_subdomain_for_mailgun, which should be your Mailgun subdomain you defined in Step 1.
You can specify multiple users by creating more lines like this one.
Now add this mapping to the Postfix lookup tables by using the postmap command:
- sudo postmap /etc/postfix/generic
Then edit your Postfix configuration file to add the mapping file:
- sudo nano /etc/postfix/main.cf
Add this line to the end of the file:
smtp_generic_maps = hash:/etc/postfix/generic
Finally, restart Postfix to incorporate the changes:
- sudo systemctl restart postfix
Let’s test the mail relay to make sure everything’s configured correctly.
Step 5 — Testing Your Mail Relay
To test your new mail relay, you’ll send a message to your personal email address from your server. Install mailutils so you can send a test email quickly.
- sudo apt -y install mailutils
Then use mailutils to compose and send a message to your personal email account from your current user on the server.
- mail -s "Test mail" your_email_address <<< "A test message using Mailgun"
You can change the message to anything you like.
Check your email client and see if you received your test message. If you did, then congratulations on successfully setting up a mail relay. If you did not, then read on to troubleshoot.
Step 6 — Troubleshooting Your Mail Relay
While there are a number of things that can go wrong, such as making a mistake in any of the previous steps, here are a few common issues you might encounter.
First, make sure Mailgun has validated your DNS records. Nothing can happen until that step is successful. Double-check Mailgun’s user interface and ensure that the domain has been verified.
Next, double-check your credentials file (/etc/postfix/sasl_passwd). Make certain that your username and password match those for the corresponding subdomain in Mailgun. Don’t use your Mailgun credentials, as those won’t work. Use the specific credentials Mailgun provides for your subdomain.
Check your email logs for any helpful error messages. There are two places you’ll want to check. First, check the log on your server, which you can find in the file /var/log/mail.log. You can view the latest entries with
- tail -f /var/log/mail.log
This displays the last several lines of your log file, but also “follows” the output, meaning that any new log entries will be displayed as they are written to the log. Look at the output for error messages that help you diagnose any issues. For example, a bad password for Mailgun will show this error:
Output> Nov 1 16:07:45 cart-1268 postfix/smtp[30082]: 0E8062038A: to=<yourmail@example.com>, relay=smtp.mailgun.org[173.203.37.114]:25, delay=2.3, delays=0.02/0/2.3/0, dsn=4.7.0, status=deferred (SASL authentication failed; server smtp.mailgun.org[173.203.37.114] said: 535 5.7.0 Mailgun is not loving your login or password)
In addition to your server, Mailgun also logs transactions. Visit your Mailgun Dashboard and select the Logs menu to view any error messages that might have occurred that prevented the message from being delivered.
Lastly, if your server’s hostname is not a FQDN, make sure you have completed Step 4 to create mappings for your users so they can send messages.
Conclusion
Congratulations on setting up your first email relay using Mailgun. You now have a secure method for sending all kinds of email from your server, from internal communications and cron task results, to customer newsletters or messages from your web application.
If you have additional servers you want to use to send mail, you only need to perform Steps 3 and 4 again on each server. You can reuse the same MailGun domain for as many servers as you like. You can also set up multiple domains in order to differentiate your email according to use.
A common scenario is to use two domains; one for internal server mail and the other for bulk mailing. Internal server mail is anything that might be sent from one of your server’s programs such as a cron task or Wordpress. Bulk mail is when you blast a message to an entire mailing list. This type of email is especially susceptible to blacklisting because of spam, so you will probably want to use a domain that you can discard if it gets blocked, while still preserving your other domains. In any event, be sure to use good email practices when sending bulk mail. For more information, see The Art of Inboxing.
In order to add additional email domains, complete Steps 1 and 2 again for each new domain, and then edit /etc/postfix/sasl_passwd and /etc/postfix/generic as needed. The basic Postfix configuration remains the same.
Happy emailing!
Thanks for learning with the DigitalOcean Community. Check out our offerings for compute, storage, networking, and managed databases.
About the author(s)
Managed the Write for DOnations program, wrote and edited community articles, and makes things on the Internet. Expertise in DevOps areas including Linux, Ubuntu, Debian, and more.
Still looking for an answer?
This textbox defaults to using Markdown to format your answer.
You can type !ref in this text area to quickly search our full set of tutorials, documentation & marketplace offerings and insert the link!
Thanks for the tutorial. I helped clear getting the domain verified for mailgun.
Would this be a good set-up in order to have multiple wordpress websites installed on one server? If so, what is the next step to have wordpress use Postfix, which then uses Mailgun?
My set-up: Ubuntu 16.04 - LEMP, Server Blocks enabled and ssl via LetsEncrypt. All following the tutorials here on DO :)
Each website is a different server block with its own wordpress installation. At the moment I do not have any MTA installed. So wordpress can’t send emails. This means, password reset emails can’t be set.
Any solutions?
Cheers,
Ramiro
Any idea of how to get postfix to append custom headers that will work with Mailgun? I can get the header appended, but Mailgun seems to ignore them.
/etc/postfix/main.cf
smtp_header_checks = regexp:/etc/postfix/smtp_header_checks
/etc/postfix/smtp_header_checks
/^From: jacob@(.+)/ PREPEND o:tag: jacob
The email received then has:
o:tag: jacob
From: jacob@server.com
To: hello@myemail.com
But Mailgun ignores this header and doesnt set it as a tag. In emails sent with the Mailgun API it replaces the ‘o-tag: jacob’ header with ‘X-Mailgun-Tag: jacob’, but this is clearly not happening when relaying through postfix.
Any ideas?
Thanks, Jacob.
Question. Does anyone know of a solid third-party who is willing to setup my emailserver on my droplet. I, obviously, am green and have been trying this but it is not working out for me. Thanks.
I had to update the relayhost as follows to get this working:
relayhost = [smtp.mailgun.org]:587
I suspect this was due to postfix already having been installed on my server.
I would be willing to do so. Go to trypromocode.com and use the contact form and we can discuss your situation.
Typo found:
permit_sasl_authenticated defer_unauth_destination Should be permit_sasl_authenticated = defer_unauth_destination
I’m receiving a 550 5.7.1 Relaying denied error with this setup. Email sends correctly from my droplet to my email without using the mailgun relay. It seems that mailgun is rejecting emails from my server, as the messages dont appear in the mailgun logs, but only when i use postfix. Sending email with curl through the mailgun api from my droplet is working. Any ideas of what might be causing this?
Here’s the log when the config is set to relay messages (swapped out some info with xxx and Hostname):
Apr 12 15:16:36 Hostname postfix/pickup[22054]: 452FD3FCAB: uid=115 from=<dev> Apr 12 15:16:36 Hostname postfix/cleanup[22060]: 452FD3FCAB: message-id=20170412151636.452FD3FCAB@xxx.localdomain Apr 12 15:16:36 Hostname postfix/qmgr[22055]: 452FD3FCAB: from=dev@xxx.com, size=347, nrcpt=1 (queue active) Apr 12 15:16:36 Hostname postfix/smtp[22062]: 452FD3FCAB: to=xxx@gmail.com, relay=smtp.mailgun.com[52.89.134.190]:25, delay=0.46, delays=0.01/0.01/0.38/0.06, dsn=5.7.1, status=bounced (host smtp.mailgun.com[52.89.134.190] said: 550 5.7.1 Relaying denied (in reply to RCPT TO command)) Apr 12 15:16:36 Hostname postfix/cleanup[22060]: BBFA23FCAC: message-id=20170412151636.BBFA23FCAC@xxx.localdomain Apr 12 15:16:36 Hostname postfix/qmgr[22055]: BBFA23FCAC: from=<>, size=2269, nrcpt=1 (queue active) Apr 12 15:16:36 Hostname postfix/bounce[22063]: 452FD3FCAB: sender non-delivery notification: BBFA23FCAC Apr 12 15:16:36 Hostname postfix/qmgr[22055]: 452FD3FCAB: removed Apr 12 15:16:37 Hostname postfix/smtp[22062]: BBFA23FCAC: to=dev@xxx.com, relay=smtp.mailgun.com[54.149.68.173]:25, delay=0.24, delays=0/0/0.18/0.06, dsn=5.7.1, status=bounced (host smtp.mailgun.com[54.149.68.173] said: 550 5.7.1 Relaying denied (in reply to RCPT TO command)) Apr 12 15:16:37 Hostname postfix/qmgr[22055]: BBFA23FCAC: removed
Many thanks for this - this tutorial is really useful.
Regarding configuring CNAME records, the one problem I had was that the email was coming from mg.yourdomain.com (in the from address) and the recipient (our production server) was looking for that domain in DNS, so I had to create an ‘mg.’ record accordingly.
Also worth mentioning is that the mail server was identifying itself as the original droplet name (the default one given by DO when I created it) and the recipient (our production server again) was looking for a valid domain name. Renaming the droplet to a sensible domain name fixed that one.
Hope all this helps,
Ian.
For what is worth, I found the format of sasl_passwd for SendGrid to be different to the one showed here for Mailgun… if anyone was interested in that.
[smtp.sendgrid.net]:587 username:password
Pro tip: as username you can use “apikey” and use an actual API Key as password.
If you are going to use WordPress, then you need to add mailgun and then add mailgun smtp plugin. After it works correctly for your WordPress notification, comment notification and for sales email.
 This work is licensed under a Creative Commons Attribution-NonCommercial- ShareAlike 4.0 International License.
Become a contributor for community
Get paid to write technical tutorials and select a tech-focused charity to receive a matching donation.

DigitalOcean Documentation
Full documentation for every DigitalOcean product.

Resources for startups and AI-native businesses
The Wave has everything you need to know about building a business, from raising funding to marketing your product.
The developer cloud
Scale up as you grow — whether you're running one virtual machine or ten thousand.

Start building today
From GPU-powered inference and Kubernetes to managed databases and storage, get everything you need to build, scale, and deploy intelligent applications.
