Not using CentOS 7?
Choose a different version or distribution.
Introduction
Node.js is an open source Javascript runtime environment for easily building server-side and networking applications. The platform runs on Linux, OS X, FreeBSD, and Windows, and its applications are written in JavaScript. Node.js applications can be run at the command line but we will teach you how to run them as a service, so they will automatically restart on reboot or failure, so you can use them in a production environment.
In this tutorial, we will cover setting up a production-ready Node.js environment that is composed of two CentOS 7 servers; one server will run Node.js applications managed by PM2, while the other will provide users with access to the application through an Nginx reverse proxy to the application server.
The Ubuntu version of this tutorial can be found here.
Prerequisites
This guide uses two CentOS 7 servers with private networking (in the same datacenter). Private networking can be configured on new servers when they are being created (in the Select additional options section). We will refer to them by the following names:
- app: The server where we will install Node.js runtime, your Node.js application, and PM2.
- web: The server where we will install the Nginx web server, which will act as a reverse proxy to your application. Users will access this server’s public IP address to get to your Node.js application.
Note: Refer to the DigitalOcean Documentation - How to Enable Private Networking on Droplets if you intend on using an existing server that doesn’t currently have private networking configured.
Before you begin this guide, you should have a regular, non-root user with sudo privileges configured on both of your servers—this is the user that you should log in to your servers as. You can learn how to configure a regular user account by following our initial server setup guide for CentOS 7.
Commands executed on the app server:
- an_example_command_on_app
Commands executed on the web server:
- an_example_command_on_web
It is possible to use a single server for this tutorial, but you will have to make a few changes along the way. Simply use the localhost IP address, i.e. 127.0.0.1, wherever the app server’s private IP address is used.
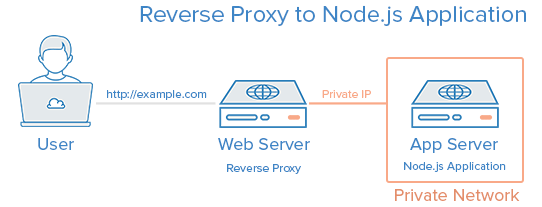
Here is a diagram of what your setup will be after following this tutorial:
If you want to be able to access your web server via a domain name, instead of its public IP address, purchase a domain name then follow these tutorials:
- How To Set Up a Host Name with DigitalOcean
- How to Point to DigitalOcean Nameservers From Common Domain Registrars
Let’s get started by installing the Node.js runtime on the app server.
Step 1 — Installing Node.js
We will install the latest LTS release of Node.js, on the app server.
SSH to your app server using the regular, non-root user with sudo privileges.
On the app server, let’s use curl to download the NodeSource RPM Repository configuration file:
- curl -L -o nodesource_setup.sh https://rpm.nodesource.com/setup_10.x
CURL will use the HTTPS protocol to download the setup script to your server, with the output including information relevant to the download:
Output  % Total    % Received % Xferd  Average Speed   Time    Time     Time  Current
                                 Dload  Upload   Total   Spent    Left  Speed
100 11109  100 11109    0     0  70128      0 --:--:-- --:--:-- --:--:-- 70757
Next, you should inspect the script’s contents. The following command will open the NodeSource setup script in your servers console, which you can then cross-reference with the NodeSource setup script (from the NodeSource Distributions Github repository) to confirm the script that downloaded properly:
- vi nodesource_setup.sh
Once satisfied with the file, exit vi by typing :q to quit and return to the command line.
Now let’s run the setup script to install the NodeSource RPM Repository. This will enable us to access NodeSource’s repository from within the yum package manager:
- sudo -E bash nodesource_setup.sh
The script outputs information on the setup for our reference:
Output## Installing the NodeSource Node.js 10.x repo...

## Inspecting system...

+ rpm -q --whatprovides redhat-release || rpm -q --whatprovides centos-release || rpm -q --whatprovides cloudlinux-release || rpm -q --whatprovides sl-release
+ uname -m

## Confirming "el7-x86_64" is supported...

+ curl -sLf -o /dev/null 'https://rpm.nodesource.com/pub_10.x/el/7/x86_64/nodesource-release-el7-1.noarch.rpm'

## Downloading release setup RPM...

+ mktemp
+ curl -sL -o '/tmp/tmp.2aCcULVx8n' 'https://rpm.nodesource.com/pub_10.x/el/7/x86_64/nodesource-release-el7-1.noarch.rpm'

## Installing release setup RPM...

+ rpm -i --nosignature --force '/tmp/tmp.2aCcULVx8n'

## Cleaning up...

+ rm -f '/tmp/tmp.2aCcULVx8n'

## Checking for existing installations...

+ rpm -qa 'node|npm' | grep -v nodesource

## Run `sudo yum install -y nodejs` to install Node.js 10.x and npm.
## You may also need development tools to build native addons:
     sudo yum install gcc-c++ make
## To install the Yarn package manager, run:
     curl -sL https://dl.yarnpkg.com/rpm/yarn.repo | sudo tee /etc/yum.repos.d/yarn.repo
     sudo yum install yarn
Before installing Node.js it is important to clean all the cached information from yum. Clearing the cache will ensure that yum uses the network connection to get Node.js from our new NodeSource Repository (which will prevent any potential conflicts caused by outdated packages):
- sudo yum clean all
Next we will download and make usable all the metadata for the currently enabled yum repos. This will ensure that our yum queries are completed as quickly as possible:
- sudo yum makecache fast
To compile and install native add-ons from npm we also need to install build tools:
- sudo yum install -y gcc-c++ make
Now we can install the latest release of the Node.js package:
- sudo yum install -y nodejs
Verify that Node is installed by checking its version with this command:
- node -v
Your output will show the version number you’re running:
Outputv10.16.3
The Node.js runtime is now installed, and ready to run an application. Let’s write a Node.js application.
Step 2 — Creating the Node.js Application
Now we will create a Hello World application that simply returns "Hello World" to any HTTP requests. This is a sample application that will help you get Node.js set up, which you can replace with your own application—just make sure that you modify your application to listen on the appropriate IP addresses and ports.
Because we want our Node.js application to serve requests that come from our reverse proxy server (web) we will use our app server’s private network interface for inter-server communication. Look up your app server’s private network address.
If you are using a DigitalOcean Droplet as your server, you may look up the server’s private IP address through the Metadata service. On the app server, use the curl command to retrieve the IP address now:
- curl -sw "\n" http://169.254.169.254/metadata/v1/interfaces/private/0/ipv4/address
You will want to copy the output (the private IP address), as it will be used to configure the Node.js application.
Next, create and open your Node.js application for editing. For this tutorial, we will use vi to edit a sample application called hello.js:
- vi hello.js
Insert the following code into the file, and be sure to substitute the app server’s private IP address for both of the highlighted APP_PRIVATE_IP_ADDRESS items. If you want to, you may also replace the highlighted port, 8080, in both locations (be sure to use a non-admin port, i.e. 1024 or greater):
var http = require('http');
http.createServer(function (req, res) {
  res.writeHead(200, {'Content-Type': 'text/plain'});
  res.end('Hello World\n');
}).listen(8080, 'APP_PRIVATE_IP_ADDRESS');
console.log('Server running at http://APP_PRIVATE_IP_ADDRESS:8080/');
Now save and exit by pressing ESC to exit --INSERT-- mode, followed by :wq to write and quit in a single command.
This Node.js application simply listens on the specified IP address and port, and returns "Hello World" with a 200 HTTP success code. This means that the application is only reachable from servers on the same private network, such as our web server.
If you want to test if your application works, run this node command on the app server:
- node hello.js
Note: Running a Node.js application in this manner will block additional commands until the application is killed by pressing CTRL+C.
It will save a lot of Nginx debugging if we first test that our web server is able to communicate with the Node.js application on app.
In order to test the application, open another terminal session and connect to your web server. Because the web server is on the same private network, it should be able to reach the private IP address of the app server using curl. Be sure to substitute in the app server’s private IP address for APP_PRIVATE_IP_ADDRESS, and the port if you changed it:
- curl http://APP_PRIVATE_IP_ADDRESS:8080
If you see the following output, the application is working properly and listening on the proper IP address and port:
Node Application OutputHello World
If you do not see the proper output, make sure that your Node.js application is running, and configured to listen on the proper IP address and port.
On the app server, be sure to kill the application by pressing CTRL+C.
Step 3 — Installing and Using PM2
Now we will install PM2, which is a process manager for Node.js applications. PM2 provides an easy way to manage and daemonize applications (run them as a service).
We will use Node Packaged Modules (NPM), which is basically a package manager for Node modules that installs with Node.js, to install PM2 on our app server. Use this command to install PM2:
- sudo npm install pm2@latest -g
We will cover a few basic uses of PM2.
The first thing you will want to do is use the pm2 start command to run your application, hello.js, in the background:
- pm2 start hello.js
This also adds your application to PM2’s process list, which is outputted every time you start an application:
Output┌──────────┬────┬──────┬───────┬────────┬─────────┬────────┬─────────────┬──────────┐
│ App name │ id │ mode │ pid   │ status │ restart │ uptime │ memory      │ watching │
├──────────┼────┼──────┼───────┼────────┼─────────┼────────┼─────────────┼──────────┤
│ hello    │ 0  │ fork │ 30099 │ online │ 0       │ 0s     │ 14.227 MB   │ disabled │
└──────────┴────┴──────┴───────┴────────┴─────────┴────────┴─────────────┴──────────┘
As you can see, PM2 automatically assigns an App name (based on the filename, without the .js extension) and a PM2 id. PM2 also maintains other information, such as the PID of the process, its current status, and memory usage.
Applications that are running under PM2 will be restarted automatically if the application crashes or is killed, but an additional step needs to be taken to get the application to launch on system startup (boot or reboot). Luckily, PM2 provides an easy way to do this, the startup subcommand.
The startup subcommand generates and configures a startup script to launch PM2 and its managed processes on server boots. You must also specify the init system you are running on, which is systemd, in our case:
- sudo pm2 startup systemd
You will see output like the following, which indicates that the PM2 service has been installed:
Output[PM2] Generating system init script in /etc/systemd/system/pm2.service
[PM2] Making script booting at startup...
[PM2] -systemd- Using the command:
      su root -c "pm2 dump && pm2 kill" && su root -c "systemctl daemon-reload && systemctl enable pm2 && systemctl start pm2"
[PM2] Dumping processes
[PM2] Stopping PM2...
[PM2] All processes have been stopped and deleted
[PM2] PM2 stopped
[PM2] Done.
To ensure PM2 knows which applications to start on boot, we need to save the current process list. To save the list:
- pm2 save
You will see output like the following, which indicates that the PM2 process list has been saved:
Output[PM2] Saving current process list...
[PM2] Successfully saved in /home/deployer/.pm2/dump.pm2
Now your PM2-managed applications should start automatically on boot.
PM2 provides many subcommands that allow you to manage or look up information about your applications. Note that running pm2 without any arguments will display a help page, including example usage, that covers PM2 usage in more detail than this section of the tutorial.
Stop an application with this command (specify the PM2 App name or id):
- pm2 stop example
Restart an application with this command (specify the PM2 App name or id):
- pm2 restart example
The list of applications currently managed by PM2 can also be looked up with the list subcommand:
- pm2 list
More information about a specific application can be found by using the info subcommand (specify the PM2 App name or id):
- pm2 info example
The PM2 process monitor can be pulled up with the monit subcommand. This displays the application status, CPU, and memory usage:
- pm2 monit
Note: Running PM2’s monit command will block additional commands until the application is killed by pressing CTRL+C.
Now that your Node.js application is running, and managed by PM2, let’s set up the reverse proxy.
Step 4 — Setting Up an Nginx Reverse Proxy Server
Now that your application is running, and listening on a private IP address, you need to set up a way for your users to access it. We will set up an Nginx web server as a reverse proxy for this purpose. This tutorial will set up an Nginx server from scratch. If you already have an Nginx server setup, you can just copy the location block into the server block of your choice (make sure the location does not conflict with any of your web server’s existing content).
On the web server, let’s install the epel-release package using yum:
- sudo yum install epel-release
Then install Nginx:
- sudo yum install nginx
Now open the Nginx configuration file for editing:
- sudo vi /etc/nginx/nginx.conf
First, find the line where server_name is defined, within the default server block. It should look something like this:
server_name _;
Update the server name to substitute the underscore (_) with your own domain name for the server_name directive (or IP address if you don’t have a domain set up).
server_name your-domain;
Then, find the line where location / is defined (usually a few lines below the server_name), within the same default server block. It should look something like this:
        location / {
        }
Replace it with the following code block and be sure to substitute the app server private IP address for the APP_PRIVATE_IP_ADDRESS. Additionally, change the port (8080) if your application is set to listen on a different port:
    location / {
        proxy_pass http://APP_PRIVATE_IP_ADDRESS:8080;
        proxy_http_version 1.1;
        proxy_set_header Upgrade $http_upgrade;
        proxy_set_header Connection 'upgrade';
        proxy_set_header Host $host;
        proxy_cache_bypass $http_upgrade;
    }
This configures the web server to respond to requests at its root. Assuming our server is available at your-domain, accessing http://your-domain/ via a web browser would send the request to the application server’s private IP address on port 8080, which would be received and replied to by the Node.js application.
You can add additional location blocks to the same server block to provide access to other applications on the same web server. For example, if you were also running another Node.js application on the app server on port 8081, you could add this location block to allow access to it via http://your-domain/app2:
    location /app2 {
        proxy_pass http://APP_PRIVATE_IP_ADDRESS:8081;
        proxy_http_version 1.1;
        proxy_set_header Upgrade $http_upgrade;
        proxy_set_header Connection 'upgrade';
        proxy_set_header Host $host;
        proxy_cache_bypass $http_upgrade;
    }
Once you are done editing the location block(s) for your application(s), save and exit by pressing ESC to exit --INSERT-- mode, followed by :wq to write and quit in a single command.
On the web server, restart Nginx:
- sudo systemctl start nginx
Next we want to ensure that Nginx runs whenever the server restarts:
- sudo systemctl enable nginx
The enable command should provide the following Output
OutputCreated symlink from /etc/systemd/system/multi-user.target.wants/nginx.service to /usr/lib/systemd/system/nginx.service.
You can also confirm that Nginx is running and is enabled, by requesting its status from systemctl:
- sudo systemctl status nginx
The status command will output configuration information for the Nginx service:
Output● nginx.service - The nginx HTTP and reverse proxy server
   Loaded: loaded (/usr/lib/systemd/system/nginx.service; enabled; vendor preset: disabled)
   Active: active (running) since Mon 2019-10-14 09:37:23 UTC; 3min 29s ago
 Main PID: 12818 (nginx)
   CGroup: /system.slice/nginx.service
           ├─12818 nginx: master process /usr/sbin/nginx
           └─12819 nginx: worker process

Oct 14 09:37:23 centos-s-1vcpu-1gb-sgp1-01 systemd[1]: Starting The nginx HTTP and reverse proxy server...
Oct 14 09:37:23 centos-s-1vcpu-1gb-sgp1-01 nginx[12814]: nginx: the configuration file /etc/nginx/nginx.conf syntax is ok
Oct 14 09:37:23 centos-s-1vcpu-1gb-sgp1-01 nginx[12814]: nginx: configuration file /etc/nginx/nginx.conf test is successful
Oct 14 09:37:23 centos-s-1vcpu-1gb-sgp1-01 systemd[1]: Failed to read PID from file /run/nginx.pid: Invalid argument
Oct 14 09:37:23 centos-s-1vcpu-1gb-sgp1-01 systemd[1]: Started The nginx HTTP and reverse proxy server.
Finally, provide Nginx with the ability to relay traffic through Security-Enhanced Linux (SELinux). SELinux provides a security layer that implements Mandatory Access Control (MAC) in the Linux Kernel. Each operating system object (process, file descriptor, file, etc.) is labeled with an SELinux context that defines the permissions and operations the object can perform.
Nginx is labelled with the httpd_t context and as a result, has a number of configurations blocked by SELinux unless explicitly allowed. To demonstrate this, run the following command to confirm the Nginx service is labelled httpd_t:
- ps -eZ
This command provides process status information, search for the Nginx specific process information to see the label. You will see the httpd_t, in a similar manner to the following:
Output...
system_u:system_r:httpd_t:s0    10208 ?        00:00:00 nginx
system_u:system_r:httpd_t:s0    10209 ?        00:00:00 nginx
...
Now let’s check the status of the default booleans related to the httpd_t SELinux label. We can show this information by running the following command:
- getsebool -a
We are only interested in the httpd related booleans for this tutorial:
Output...
httpd_anon_write --> off
httpd_builtin_scripting --> on
httpd_can_check_spam --> off
httpd_can_connect_ftp --> off
httpd_can_connect_ldap --> off
httpd_can_connect_mythtv --> off
httpd_can_connect_zabbix --> off
httpd_can_network_connect --> off
httpd_can_network_connect_cobbler --> off
httpd_can_network_connect_db --> off
httpd_can_network_memcache --> off
httpd_can_network_relay --> off
httpd_can_sendmail --> off
httpd_dbus_avahi --> off
httpd_dbus_sssd --> off
httpd_dontaudit_search_dirs --> off
httpd_enable_cgi --> on
httpd_enable_ftp_server --> off
httpd_enable_homedirs --> off
httpd_execmem --> off
httpd_graceful_shutdown --> on
httpd_manage_ipa --> off
httpd_mod_auth_ntlm_winbind --> off
httpd_mod_auth_pam --> off
httpd_read_user_content --> off
httpd_run_ipa --> off
httpd_run_preupgrade --> off
httpd_run_stickshift --> off
httpd_serve_cobbler_files --> off
httpd_setrlimit --> off
httpd_ssi_exec --> off
httpd_sys_script_anon_write --> off
httpd_tmp_exec --> off
httpd_tty_comm --> off
httpd_unified --> off
httpd_use_cifs --> off
httpd_use_fusefs --> off
httpd_use_gpg --> off
httpd_use_nfs --> off
httpd_use_openstack --> off
httpd_use_sasl --> off
httpd_verify_dns --> off
...
The two booleans of particular note, are httpd_can_network_connect and httpd_can_network_relay. The Redhat Documentation provides detail on each of the httpd booleans and their associated function (should you wish to find out more about each boolean), although following are the explanations of the two booleans that relate to this tutorial:
...
httpd_can_network_connect: When disabled, this Boolean prevents HTTP scripts and modules from initiating a connection to a network or remote port. Enable this Boolean to allow this access.
httpd_can_network_relay: Enable this Boolean when httpd is being used as a forward or reverse proxy.
...
Since our configuration is only relaying traffic, we just need to tell SELinux that the httpd server, in our case Nginx, can use the network to relay traffic in the reverse proxy configuration that we have set up. We will use the -P flag, to ensure that the changes are permanent (omitting this flag will result in httpd_can_network_relay reverting to its default state, off, upon restart of the server):
- sudo setsebool -P httpd_can_network_relay on
Assuming that your Node.js application is running, and your application and Nginx configurations are correct, you should be able to access your application via the reverse proxy of the web server. Try it out by accessing your web server’s URL (its public IP address or domain name).
Note: If you were also planning on using your web server to host other sites (as conventional virtual hosts), then you will also need to set the httpd_can_network_connect to on.
Conclusion
You now have your Node.js application running behind an Nginx reverse proxy. This reverse proxy setup is flexible enough to provide your users access to other applications or static web content that you want to share.
Also, if you are looking to encrypt transmissions between your web server and your users, here is a tutorial that will help you get HTTPS (TLS/SSL) support set up.
Thanks for learning with the DigitalOcean Community. Check out our offerings for compute, storage, networking, and managed databases.
About the author(s)
Software Engineer @ DigitalOcean. Former Señor Technical Writer (I no longer update articles or respond to comments). Expertise in areas including Ubuntu, PostgreSQL, MySQL, and more.
Former Senior Technical Editor at DigitalOcean, with a strong focus on DevOps and System Administration content. Areas of expertise include Terraform, PyTorch, Python, and Django.
Still looking for an answer?
This textbox defaults to using Markdown to format your answer.
You can type !ref in this text area to quickly search our full set of tutorials, documentation & marketplace offerings and insert the link!
Hi,
Great post. But after setting it all I was running into an issue: a 502 bad gateway error after strugling with it I discover in nginx error.log that it was a permission error: “nginx (13 permission denied) while connecting to upstream”… after google-it I found the solution here It was SELinux issue. I think this deserved to be shared. Thanks
Great post! I am having a weird issue; the Nginx proxy can only find my node server, if it runs on port 9000, but not on any other ports . This is my nginx.conf:
    server {
        listen       80 default_server;
        listen       [::]:80 default_server;
        server_name  _;
        root         /usr/share/nginx/html;

        # Load configuration files for the default server block.
        include /etc/nginx/default.d/*.conf;

        location / {
        proxy_pass http://localhost:9000;
        proxy_http_version 1.1;
        proxy_set_header Upgrade $http_upgrade;
        proxy_set_header Connection 'upgrade';
        proxy_set_header Host $host;
        proxy_cache_bypass $http_upgrade;
        }

        error_page 404 /404.html;
            location = /40x.html {
        }

        error_page 500 502 503 504 /50x.html;
            location = /50x.html {
        }
    }
Node:
  server.listen(9000, _configEnvironment2['default'].ip, function () {
    console.log('Express server listening on %d, in %s mode', _configEnvironment2['default'].port, app.get('env'));
  });
But if i change the two 9000 ports to for example 8080 nginx can’t find my node server???
Thanks for the great post! Question. Did you have issues with pm2 init? I cannot seem to get this to work via an ansible script. I seem to be running into this pm2 issue. It’s causing me major headaches.
Hi! Im trying to get a web server running on my Centos7 Virtual Box, but no success… I have done all the steps above, and if I type in the browser my private IP I get redirected to my running nodejs app; however, nothing happens if I type my public IP. This is my conf file:
For more information on configuration, see:
* Official English Documentation: http://nginx.org/en/docs/
* Official Russian Documentation: http://nginx.org/ru/docs/
user nginx; worker_processes auto; error_log /var/log/nginx/error.log; pid /run/nginx.pid;
events { worker_connections 1024; }
http { log_format main '$remote_addr - $remote_user [$time_local] “$request” ’ '$status $body_bytes_sent “$http_referer” ’ ‘“$http_user_agent” “$http_x_forwarded_for”’;
access_log  /var/log/nginx/access.log  main;

sendfile            on;
tcp_nopush          on;
tcp_nodelay         on;
keepalive_timeout   65;
types_hash_max_size 2048;

include             /etc/nginx/mime.types;
default_type        application/octet-stream;

# Load modular configuration files from the /etc/nginx/conf.d directory.
# See http://nginx.org/en/docs/ngx_core_module.html#include
# for more information.
include /etc/nginx/conf.d/*.conf;

server {
    listen       80 default_server;
    listen       [::]:80 default_server;
    server_name  http://63.78.220.47; #my public ip(faked)
    root         /usr/share/nginx/html;

    # Load configuration files for the default server block.
    include /etc/nginx/default.d/*.conf;

        location / {
    proxy_pass http://10.0.2.12:3000; #private ip and listening port of my app
    proxy_http_version 1.1;
    proxy_set_header Upgrade $http_upgrade;
    proxy_set_header Connection 'upgrade';
    proxy_set_header Host $host;
    proxy_cache_bypass $http_upgrade;
    }

    error_page 404 /404.html;
        location = /40x.html {
    }

    error_page 500 502 503 504 /50x.html;
        location = /50x.html {
    }
}
}
What am I doing wrong?? Thanks! :)
I also have problem with the startup pm2 on CentOS 7. It seems that these problems disappear if the application is run under root:
sudo pm2 start hello.js
and then:
sudo pm2 startup centos
I played with pm2, and found two working way for CentOS 7 (in your project folder index.js - main file):
# 1
sudo pm2 start index.js
sudo pm2 save
sudo pm2 startup centos
# 2
pm2 start index.js
pm2 save
pm2 startup centos
# and run the script generated in the previous code under sudo
NOT working next
pm2 start index.js
pm2 save
sudo pm2 startup centos
and NOT working next
pm2 start index.js
sudo pm2 startup centos
Hi, After setting everything up as described in above started app with pm2 but if I try to access ip from browser it gives bad gateway ( if node is under nginx ) and just dead page if url points to nodejs app. pm2 status says that app is online…
if I run app with npm ( npm start ) everything works fine, but with pm2 app is online but server is not reachable or badgateway from nginx. plz help!!!
Not sure what APP_PRIVATE_IP_ADDRESS means. To me there is only the public droplet IP and the loopback ip. But you couldn’t have meant that loopback because its the same for server. Please help my ignorance.
Hi Mitchell Anicas!
Thanks for nicely precising this tutorial. I was using forever to keep node application running but it was not reliable.
Do we need to keep port open in iptables if we use this reverse proxy method?
I’ve opened two PORT 31129 for NODE and SOCKET.IO and PORT 6379 for REDIS.
Will my application work if close these two ports?
Thanks
 This work is licensed under a Creative Commons Attribution-NonCommercial- ShareAlike 4.0 International License.
Become a contributor for community
Get paid to write technical tutorials and select a tech-focused charity to receive a matching donation.

DigitalOcean Documentation
Full documentation for every DigitalOcean product.

Resources for startups and AI-native businesses
The Wave has everything you need to know about building a business, from raising funding to marketing your product.
The developer cloud
Scale up as you grow — whether you're running one virtual machine or ten thousand.

Get started for free
Sign up and get $200 in credit for your first 60 days with DigitalOcean.*

*This promotional offer applies to new accounts only.