
Introduction
The ports system is one of FreeBSD’s greatest assets for users who want flexibility and control over their software. It allows administrators to easily create and maintain source-based installations using a system designed to be robust and predictable.
While the advantages of this feature are great, some of the most common complaints levied against ports-based administration are regarding the time and resources required to compile each piece of software. This becomes even more of an issue if you are managing a large number of servers, each of which compiles its own ports. While FreeBSD packages provide an alternative that speeds up installation, it sacrifices the control that ports grant.
To alleviate this issue, administrators can use an application called poudriere to build and maintain custom packages. While technically created to build packages for a variety of architectures, poudriere is often used as a package building environment to create and host packages for an entire infrastructure of FreeBSD servers.
By leveraging poudriere, administrators can customize software as necessary using the ports system and compile packages for easy installation and software management. Any number of FreeBSD servers can use a host with poudriere installed as their package source, allowing them to download and install customized, pre-compiled executables quickly and easily.
In this guide, we will demonstrate how to set up a server with poudriere as a build machine. We can then use this server as the repository for packages for any additional servers. While this setup can be beneficial for a single server, the real efficiency gains are seen when additional servers begin using the same poudriere host as a package source.
Since port building is a resource intensive process, it may be worthwhile to set this up on a more powerful system than usual.
Note: As of July 1, 2022, DigitalOcean no longer supports the creation of new FreeBSD Droplets through the Control Panel or API. However, you can still spin up FreeBSD Droplets using a custom image. Learn how to import a custom image to DigitalOcean by following our product documentation.
Install the Necessary Ports Management Software
To start off, we will install all of the ports that we need.
As always, before beginning any ports-related tasks, we will update our ports tree to make sure that the references on the filesystem are fresh:
sudo portsnap fetch update
After the ports tree is updated, we can begin installing software. First, we need to install poudriere itself. This is found in the ports-mgmt category of the ports tree. To build and install, go to that directory and use make to compile and install:
cd /usr/ports/ports-mgmt/poudriere
sudo make install clean
Feel free to select any of the options presented. For a standard build, none are essential.
Next, if you don’t already have it installed, we will need to install the portmaster port. We will use this to easily generate a list of software on our machine that we want poudriere to build. This is in the ports-mgmt category as well:
cd /usr/ports/ports-mgmt/portmaster
sudo make install clean
Finally, we will also want to install a web server. This will serve two purposes. First, this will be the method in which our machines will be able to download the packages we will be compiling. Secondly, poudriere provides a web interface so that we can keep track of the build process and monitor logs.
For this guide, we will be using nginx as our web server. This is found in the www category of the ports tree:
cd /usr/ports/www/nginx
sudo make install clean
You can accept the default values or customize if you have specific needs for another purpose.
When you are finished compiling and installing the software, make sure to re-evaluate your PATH if you are using the default tcsh or csh shells:
rehash
Now that our software is installed, we can begin to configure each of our components.
Create an SSL Certificate and Key
When we build packages with poudriere, we want to be able to sign them with a private key. This will ensure all of our machines that the packages created are legitimate and that nobody is intercepting the connection to the build machine to serve malicious packages.
To start off, we will create a directory structure for our key and certificate. Since all of our optional software configuration takes place within the /usr/local/etc directory, and because other software uses the /usr/local/etc/ssl location, this is where we will place our files.
We will ensure that we have an ssl directory that contains two subdirectories called keys and certs. We can do this in one command by typing:
sudo mkdir -p /usr/local/etc/ssl/{keys,certs}
Our private key, which must be kept secret, will be placed in the keys directory. This will be used to sign the packages that we will be creating. Keeping this secure is essential to ensuring that our packages are not being tampered with. We can lock down the directory so that users without root or sudo privileges will be unable to interact with the directory or its contents:
sudo chmod 0600 /usr/local/etc/ssl/keys
The certs directory will contain our publicly available certificate created with the key. As such, we can leave the default permissions on that directory.
Next, we will generate a 4096 bit key called poudriere.key, and place it in our keys directory by typing:
sudo openssl genrsa -out /usr/local/etc/ssl/keys/poudriere.key 4096
After the key is generated, we can create a public cert from it by typing:
sudo openssl rsa -in /usr/local/etc/ssl/keys/poudriere.key -pubout -out /usr/local/etc/ssl/certs/poudriere.cert
We now have the SSL components we need to sign packages and verify the signatures. Later on, we will configure our clients to use the generated certificate for package verification.
Configuring Poudriere
Now that we have our SSL certificate and key, we can begin to configure poudriere itself.
The main configuration file is located at /usr/local/etc/poudriere.conf. Open this file with sudo privileges in your text editor:
sudo vi /usr/local/etc/poudriere.conf
The poudriere configuration file is very well commented and has most of the settings we need pre-defined. We will be making a few specific changes, but leaving the majority of it intact.
Beware that there are ZFS-specific options within poudriere. If your FreeBSD server is running the UFS filesystem instead, then you should not set these ZFS-specific options. To indicate that we are using UFS, we must set the NO_ZFS flag to “yes”. Find and uncomment this option within the file:
NO_ZFS=yes
If, on the other hand, your server uses ZFS, you can configure poudriere to use a specific pool by setting the ZPOOL option. Within this pool, you can specify the root that poudriere will use for packages, logs, etc. with the ZROOTFS option. Note that these two options should not be set if you have the NO_ZFS option set to "yes:
# NO_ZFS=yes
ZPOOL=tank
ZROOTFS=/poudriere
When building software, poudriere uses a type of jail in order to separate the build system from the main operating system. Next, we must fill out a valid host where the build machine can download the software it needs for jails. This is configured through the FREEBSD_HOST option.
This option should already be present, although it is not currently set to a valid host. You can change this to the default ftp://ftp.freebsd.org location or use a closer mirror if you know of one:
FREEBSD_HOST=ftp://ftp.freebsd.org
Next, we want to be sure that our data directory within the poudriere root is set correctly. This is controlled with the POUDRIERE_DATA option and should be defaulted, but we will uncomment the option just to be sure:
POUDRIERE_DATA=${BASEFS}/data
The next options we should uncomment are the CHECK_CHANGED_OPTIONS and CHECK_CHANGED_DEPS options. The first option tells poudriere to rebuild packages when the options for it have changed. The second option tells tells poudriere to rebuild packages when dependencies have changed since the last compilation.
Both of these options exist in the form that we want them in the configuration file. We only need to uncomment them:
CHECK_CHANGED_OPTIONS=verbose
CHECK_CHANGED_DEPS=yes
Next, we will point poudriere to the SSL key that we created so that it can sign packages as it builds. The option used to specify this is called PKG_REPO_SIGNING_KEY. Uncomment this option and change the path to reflect the location of the SSL key you created earlier:
PKG_REPO_SIGNING_KEY=/usr/local/etc/ssl/keys/poudriere.key
Finally, we can set the URL_BASE string to the domain name or IP address where your server can be reached. This will be used by poudriere to construct links in its output that can be clicked. You should include the protocol and end the value with a slash:
URL_BASE=http://server_domain_or_IP/
When you are finished making your changes, save and close the file.
Creating the Build Environment
Next, we need to actually construct our build environment. As mentioned earlier, poudriere will build ports in an isolated environment using jails.
We will have to create our jail and have poudriere install FreeBSD inside. It’s possible to have multiple jails, each with a different version of FreeBSD. The jailed FreeBSD versions must be the same as or older than the version that the server itself is running. For this guide, we’ll be focusing on a single jail that mirrors the architecture and FreeBSD version of the host system.
We should choose a descriptive name for the jail we are creating. This is important since it will be used in our repository configuration on the clients, which can be very important when building for different versions of FreeBSD. The man pages also instruct you to avoid using dots in the name due to some interactions with other tools. For instance, in this guide, we’re operating on FreeBSD 10.1 on a 64-bit architecture, so we will call this “freebsd_10-1x64”.
We specify the name for our jail with -j and we indicate the version of FreeBSD to install using the -v option. You can find the format for the supported releases in the “Releases” column of the table on this page. If you are following -CURRENT or -STABLE instead of the release, you can use the format found on this page (such as 11-CURRENT).
For our purposes, our jail construction command will look like this:
sudo poudriere jail -c -j freebsd_10-1x64 -v 10.1-RELEASE
This will take awhile to complete, so be patient. When you are finished, you can see the installed jail by typing:
poudriere jail -l
JAILNAME        VERSION         ARCH  METHOD TIMESTAMP           PATH
freebsd_10-1x64 10.1-RELEASE-p3 amd64 ftp    2015-01-06 20:43:48 /usr/local/poudriere/jails/freebsd_10-1x64
Once you have a jail created, we will have to install a ports tree. It is possible to maintain multiple ports trees in order to serve different development needs. We will be installing a single ports tree that our jail can utilize.
We can use the -p flag to name our ports tree. We will call our tree “HEAD” as it accurately summarizes the use of this tree (the “head” or most up-to-date point of the tree). We will be updating it regularly to match the most current version of the ports tree available:
sudo poudriere ports -c -p HEAD
Again, this procedure will take awhile because the entire ports tree must be fetched and extracted. When it is finished, we can view our ports tree by typing:
poudriere ports -l
After this step is complete, we now have the structures in place to compile our ports and build packages. Next, we can start to assemble our list of ports to build and configure the options we want for each piece of software.
Creating a Port Building List and Setting Port Options
When compiling with poudriere, we indicate the ports we wish to build when calling the build command. It is possible to specify ports individually, but this is not a good solution for long-term management. Instead, we will be creating a list of ports that we can pass directly to the command.
The file create should list the port category followed by a slash and the port name to reflect its location within the ports tree, like this:
port_category/first_port
port_category/second_port
port_category/third_port

. . .
Any needed dependencies will be automatically built as well, so do not worry about tracking down the entire dependency tree of the ports you wish to install. You can build this file manually, but if your base system already has most of the software want to build, you can use portmaster to create this list for you.
Before you do this, it’s usually a good idea to remove any unneeded dependencies from your system to keep the port list as clean as possible. You can do this by typing:
sudo pkg autoremove
Afterwards, we can get a list of the software we’ve explicitly installed on our build system using portmaster. The portmaster command can output a list of explicitly installed ports (not dependencies) in the correct format by using the --list-origins option.
We can pipe this output into sort to alphabetize the list to make it easier to find items. We can output the results to a file in the /usr/local/etc/poudriere.d directory. We will call this file port-list:
portmaster --list-origins | sort -d | sudo tee /usr/local/etc/poudriere.d/port-list
Review the list. If there are any ports that you do not wish to include, remove their associated line. This is also an opportunity to add additional ports that you might need.
If you use specific make.conf options to build your ports, you can create a make.conf file for each jail within your /usr/local/etc/poudriere.d directory. For example, for our jail, we can create a make.conf file with this name:
sudo vi /usr/local/etc/poudriere.d/freebsd_10-1x64-make.conf
Inside, you can put any options you would like to use when building your ports. For instance, if you do not want to build any documentation, examples, native language support, or X11 support you can set:
OPTIONS_UNSET+= DOCS NLS X11 EXAMPLES
Afterwards, we can configure each of our ports, which will create files with the options we selected.
If you have customized your ports on your host system, you can copy the configurations over to poudriere to utilize those settings. To do this, create a new directory within the /usr/local/etc/poudriere.d directory named after your jail with -options appended to the end. For our guide, we can accomplish this by typing:
sudo mkdir /usr/local/etc/poudriere.d/freebsd_10-1x64-options
Now, you can copy the options you have already been using on your host system by typing:
sudo cp -r /var/db/ports/* /usr/local/etc/poudriere.d/freebsd_10-1x64-options
If you complete the above step, you will have a baseline for the options we will be configuring, but many of your dependencies will still need to be configured.
You can configure anything which has not been already configured using the options command. We should pass in both the port tree we created (using the -p option) and the jail we are setting these options for (using the -j option). We also must specify the list of ports we want to configure using the -f option.
Our command will look like this:
sudo poudriere options -j freebsd_10-1x64 -p HEAD -f /usr/local/etc/poudriere.d/port-list
You will see a dialog for each of the ports on the list and any dependencies that do not have corresponding options set in the -options directory. The specifications in your make.conf file will be preselected in the selection screens. Select all of the options you would like to use.
If you wish to reconfigure the options for your ports in the future, you can re-run the command above with the -c option. This will show you all of the available configuration options, regardless of whether you have made a selection in the past:
sudo poudriere options -c -j freebsd_10-1x64 -p HEAD -f /usr/local/etc/poudriere.d/port-list
Building the Ports
Now, we are finally ready to start building ports.
The last thing we need to do is ensure that both our jail and ports tree are up-to-date. This probably won’t be an issue the first time you build ports since we just created both the ports tree and the jail, but it is good to get in the habit to do this each time you run a build.
To update your jail, type:
sudo poudriere jail -u -j freebsd_10-1x64
To update your ports tree, type:
sudo poudriere ports -u -p HEAD
Once that is complete, we can kick off the bulk build process.
Note: This can be a very long running process. If you are connected to your server over SSH, we recommend that you install screen and start a session:
cd /usr/ports/sysutils/screen
sudo make install clean

rehash
screen
To start the build, we just need to use the bulk command and point to all of our individual pieces that we have been configuring. If you’ve been using the values from this guide, the command will look like this:
sudo poudriere bulk -j freebsd_10-1x64 -p HEAD -f /usr/local/etc/poudriere.d/port-list
This will start up a number of workers (depending on your poudriere.conf file or the number of CPUs available) and begin building the ports.
At any time during the build process, you can get information about the progress by holding the CTRL key and hitting t:
CTRL-t
Certain parts of the process will produce more output than others.
If you need to step away, you can detach the screen session by hitting CTRL with a to move control to screen, followed by the d key to detach the session:
CTRL-a d
When you wish to return to the session you can type:
screen -x
Setting Up Nginx to Serve the Front End and Repository
While your packages are building, we can take the opportunity to configure Nginx. Open another terminal, detach your screen session as shown above, or start a new screen window by typing CTRL-a c (you can switch between windows by typing CTRL-a n and CTRL-a p).
The web server will be used for two distinct purposes:
- It will serve the actual package repository that other hosts can use to download your custom compiled packages
- It will serve the
poudriereweb front-end that can be used to monitor the build process
We installed Nginx at the beginning of this guide, but have not configured it.
To begin, enable the service by adding the nginx_enable="YES" line to the /etc/rc.conf file. This will start the server at boot and will allow us to use the conventional service commands to manage the process:
sudo sh -c "echo 'nginx_enable="YES"' >> /etc/rc.conf"
Now, we can adjust the default configuration file. Open it with sudo privileges in your text editor:
sudo vi /usr/local/etc/nginx/nginx.conf
Within this file, we will remove everything from the server {} block and replace it with our own configuration. Make sure that you leave the matching braces (“{” and “}”) intact to ensure that your file is valid.
Within the server context, we can set up some basic directives to allow our web server to respond to conventional HTTP traffic on port 80 and to respond to our server’s domain name or IP address. We will also set the document root of the server to the poudriere web directory found at /usr/local/share/poudriere/html. Change the value of the server_name directive below to match your server’s domain name or IP address:
# http context

. . .

    server {
        listen 80 default;
        server_name server_domain_or_IP;
        root /usr/local/share/poudriere/html;
    }

}
Next, we will add two location blocks.
While the basic root directive we defined above will handle the majority of the web interface, we need to tell Nginx which directory we store logs and the actual data. Poudriere will use the /data endpoint for this. Our logs are all written to a specific directory, so we can turn the autoindex directive on for this location so that we can view the list of logs.
In the end, our first location block will look like this:
# http context

. . .

    server {
        listen 80 default;
        server_name server_domain_or_IP;
        root /usr/local/share/poudriere/html;

        location /data {
            alias /usr/local/poudriere/data/logs/bulk;
            autoindex on;
        }
    }
}
This should make our web interface function correctly (after an additional modification to the mime.types file that we will make in a moment). Next, we need to add our second location block which will be used to serve the actual packages we’ve been building.
The packages will be stored in a directory under /usr/local/poudriere again, this time under data/packages. We can can make this available at the /packages location. Again, we can turn on autoindex to view the contents of the directory, allowing us to also view the files in a web browser.
Once this final modification is complete, the server block should look like this:
#http context

. . .

    server {
        listen 80 default;
        server_name server_domain_or_IP;
        root /usr/local/share/poudriere/html;

        location /data {
            alias /usr/local/poudriere/data/logs/bulk;
            autoindex on;
        }

        location /packages {
            root /usr/local/poudriere/data;
            autoindex on;
        }
    }
}
Save and close the file when you are finished.
Next, we will make one small modification to our mime.types file. With the current settings, if you click on a log in the web browser, it will download the file instead of displaying it as plain text. We can change this behavior by marking files ending in .log as plain text files.
Open the Nginx mime.types file with sudo privileges in your text editor:
sudo vi /usr/local/etc/nginx/mime.types
Find the entry that specifies the text/plain content type and append log to the end of the current list of filetypes, separated by a space:
. . .

text/mathml                         mml;
text/plain                          txt log;
text/vnd.sun.j2me.app-descriptor    jad;

. . .
Save and close the file when you are finished.
Now, check the syntax of your configuration files by typing:
sudo service nginx configtest
If you have any errors, fix them before proceeding. If your configuration test reports no syntax errors, start Nginx by typing:
sudo service nginx start
If you have a firewall enabled, remember to configure your rules to allow traffic to port 80 and restart the service.
Now, you can view the poudriere web interface by going to your server’s domain name or IP address in your web browser:
http://server_domain_or_IP
You should see the main poudriere page:
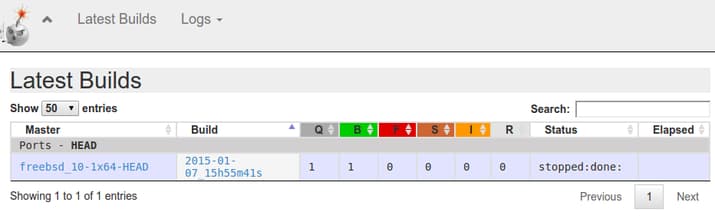
If you click through, you should be able to view the process or results of your port building. You should also be able to click through to the logs of any build that has finished.
If you want to view your compiled packages in the browser, those should be available through a hierarchy starting at /packages:

You may have to wait until the entire build is complete in order to see the packages. Clicking through the links will show you the compiled packages that you produced with your poudriere bulk build command.
Configuring Package Clients
Now that you have packages built and a repository configured to serve your packages, you can configure your clients to use your the server as the source of their packages.
Configuring the Build Server to Use Its Own Package Repo
We can begin by configuring the build server to use the packages it has been building.
First, we need to make a directory to hold our repository configuration files:
sudo mkdir -p /usr/local/etc/pkg/repos
Inside this directory, we can create our repository configuration file. It must end in .conf, so we will call it poudriere.conf to reflect its purpose:
sudo vi /usr/local/etc/pkg/repos/poudriere.conf
We will define the repository name as poudriere once again. Inside the definition, we will point to the location on disk where our packages are stored. This should be a directory that combines your jail name and port tree name with a dash. Check your filesystem to be certain. We will also set up signature validation of our packages by pointing to the certificate we created.
In the end, your file should look something like this:
poudriere: {
    url: "file:///usr/local/poudriere/data/packages/freebsd_10-1x64-HEAD",
    mirror_type: "srv",
    signature_type: "pubkey",
    pubkey: "/usr/local/etc/ssl/certs/poudriere.cert",
    enabled: yes
}
At this point, you need to make a decision. If you want to prefer your compiled packages and fall back on the packages provided by the main FreeBSD repositories, you can set a priority here, telling it to prefer packages out of this repository. This will cause our local repository to take priority over the official repositories.
Keep in mind that mixing packages in this way can have some complicated consequences. If the official repositories have a package version that is higher than your local repository version, your compiled package may be replaced by the generic one from the official repositories (until you rebuild with poudriere and reinstall with pkg). Also, the official packages may assume that dependent packages are built in a certain way and may not function when mixed with your custom packages.
If you choose to mix these two package sources, be prepared to carefully audit each install to ensure that you are not accidentally causing undesirable behavior.
To mix packages, add a priority setting to your repository definition, specifying that the local repo has a higher precedence:
poudriere: {
    url: "file:///usr/local/poudriere/data/packages/freebsd_10-1x64-HEAD",
    mirror_type: "srv",
    signature_type: "pubkey",
    pubkey: "/usr/local/etc/ssl/certs/poudriere.cert",
    enabled: yes,
    priority: 100
}
Save and close the file when you are finished.
If you chose only to install packages that you have custom built yourself (the safer route), you can leave out the priority setting, but you will want to disable the default repositories. You can do this by creating a different repo file that overrides the default repository file and disables it:
sudo vi /usr/local/etc/pkg/repos/freebsd.conf
Inside, use the name FreeBSD in order to match the default repository definition. Disable the repository by defining it like this:
FreeBSD: {
    enabled: no
}
Save and close the file when you are finished.
Regardless of your configuration choice, you should now be ready to use your repository. Update your package list by typing:
sudo pkg update
Now, your server can use the pkg command to install packages from your local repository.
Configuring Remote Clients to Use your Build Machine’s Repository
One of the most compelling reasons to set up poudriere on a build machine is to use that host as the repository for many other machines. All we need to do to make this work is download the public SSL cert from our build machine and set up a similar repository definition.
In order to connect to our build host from our client machines, you should start an SSH agent on your local computer to store your SSH key credentials.
OpenSSL comes with an SSH agent that can be started by typing this on your home computer:
eval $(ssh-agent)
Next, you will need to add your SSH key to it by typing:
ssh-add
Afterwards, you can forward your local SSH credentials to your client machines when you connect by using the -A flag. This will allow you to access any machine from your client machine as if you were accessing it from your home machine:
ssh -A freebsd@client_domain_or_IP
Once you are on your remote client machine, the first step is to create the directory structure (if it doesn’t exist) for you to store the certificate. We will go ahead and create a directory for keys too so that we can use that for future tasks:
sudo mkdir -p /usr/local/etc/ssl/{keys,certs}
Now we can connect to our build machine with SSH and pipe the certificate file back to our client machine. Since we forwarded our SSH credentials, we should be able to do this without being prompted for a password:
ssh freebsd@server_domain_or_IP 'cat /usr/local/etc/ssl/certs/poudriere.cert' | sudo tee /usr/local/etc/ssl/certs/poudriere.cert
This command will connect to the build machine from your client machine using your local SSH credentials. Once connected, it will display the contents of your certificate file and pipe it through the SSH tunnel back to your remote client machine. From there, we use the sudo tee combination to write the certificate to our directory.
Once this is complete, we can make our repository directory structure just as we did on the build machine itself:
sudo mkdir -p /usr/local/etc/pkg/repos
Now, we can create a repository file that is very similar to the one we used on the build machine:
sudo vi /usr/local/etc/pkg/repos/poudriere.conf
The differences are the URL location and the mirror type. Again, we can either choose to mix packages or use only our custom compiled packages. The same warnings apply in regards to mixing package sources.
If you want to mix your custom packages with those of the official repositories, your file should look something like this:
poudriere: {
    url: "http://server_domain_or_IP/packages/freebsd_10-1x64-HEAD/",
    mirror_type: "http",
    signature_type: "pubkey",
    pubkey: "/usr/local/etc/ssl/certs/poudriere.cert",
    enabled: yes,
    priority: 100
}
If you want to only use your compiled packages, your file should look something like this:
poudriere: {
    url: "http://server_domain_or_IP/packages/freebsd_10-1x64-HEAD/",
    mirror_type: "http",
    signature_type: "pubkey",
    pubkey: "/usr/local/etc/ssl/certs/poudriere.cert",
    enabled: yes
In addition, if you are using only your own packages, remember to create another repository config file to override the default FreeBSD repository configuration:
sudo vi /usr/local/etc/pkg/repos/freebsd.conf
Place the following content in the file to disable the official repositories:
FreeBSD: {
    enabled: no
}
After you are finished, update your pkg database to begin using your custom compiled packages:
sudo pkg update
This procedure can be repeated on as many FreeBSD client machines as you would like.
Rebuilding Your Packages When Updates are Available
You should now have your entire poudriere setup running. However, you will need to rebuild your packages from time-to-time when new updates become available, especially if they are security related.
Fortunately, the procedure for rebuilding packages is rather straight forward. First, you should update your FreeBSD jail so that your packages are built against the up-to-date operating system. You can do that by typing:
sudo poudriere jail -u -j freebsd_10-1x64
Next, you should update your ports tree so that the latest version of each port is available to your jail. You can do that by typing:
sudo poudriere ports -u -p HEAD
After the jail and ports tree are updated, you can modify your port list if there are any changes that you want to make:
sudo vi /usr/local/etc/poudriere.d/port-list
If you need to adjust any make.conf options, you can do so by editing the file associated with your build:
sudo vi /usr/local/etc/poudriere.d/freebsd_10-1x64-make.conf
You can check for any new options for your ports by typing this:
sudo poudriere options -j freebsd_10-1x64 -p HEAD -f /usr/local/etc/poudriere.d/port-list
If you would like to instead review all of the options for your ports, you can add the -c flag. This can be helpful when troubleshooting build or runtime issues:
sudo poudriere options -c -j freebsd_10-1x64 -p HEAD -f /usr/local/etc/poudriere.d/port-list
When you have completed the above preparatory steps, you can recompile any ports that were altered or have been updated by typing:
sudo poudriere bulk -j freebsd_10-1x64 -p HEAD -f /usr/local/etc/poudriere.d/port-list
Feel free to monitor the progress in the web interface. Once the new packages are compiled, you can updated the packages on each machine by typing:
sudo pkg upgrade
This will allow you to update your custom packages on your entire FreeBSD infrastructure quite easily.
Conclusion
In this guide, we covered how to configure poudriere to compile and package a custom set of ports for both our build machine and external clients. The process might seem lengthy at first glance, but it is rather simple to manage once you have it up and running.
By leveraging poudriere, you are able to take advantage of both of FreeBSD’s optional software management systems. For many users, this constitutes the best of both worlds. A poudriere build system allows you to customize software in as you see fit on a single machine while utilizing the fast pkg system for actual installation and management.
Thanks for learning with the DigitalOcean Community. Check out our offerings for compute, storage, networking, and managed databases.
About the author
Former Senior Technical Writer at DigitalOcean, specializing in DevOps topics across multiple Linux distributions, including Ubuntu 18.04, 20.04, 22.04, as well as Debian 10 and 11.
Still looking for an answer?
This textbox defaults to using Markdown to format your answer.
You can type !ref in this text area to quickly search our full set of tutorials, documentation & marketplace offerings and insert the link!
Is there a particular reason not to enable https with LetsEncrypt? It would avoid MITM attacks on package installation for clients of the poudriere system…
 This work is licensed under a Creative Commons Attribution-NonCommercial- ShareAlike 4.0 International License.
Become a contributor for community
Get paid to write technical tutorials and select a tech-focused charity to receive a matching donation.

DigitalOcean Documentation
Full documentation for every DigitalOcean product.

Resources for startups and AI-native businesses
The Wave has everything you need to know about building a business, from raising funding to marketing your product.
The developer cloud
Scale up as you grow — whether you're running one virtual machine or ten thousand.

Start building today
From GPU-powered inference and Kubernetes to managed databases and storage, get everything you need to build, scale, and deploy intelligent applications.
