By Elliot Cooper and Kathleen Juell

The author selected the Tech Education Fund to receive a donation as part of the Write for DOnations program.
Introduction
Samba is an open-source implementation of the SMB/CIFS networking protocol used in Windows environments for shared services such as file and printer access and Active Directory. Samba can also be used to create cross-platform file shares in a configuration called a standalone server.
In this guide, you will install and configure a standalone Samba server to provide networked file stores or shares for a hypothetical small organization called Example.com. This organization has several requirements for their file shares: 1. Every employee needs a personal, private file share; 2. All employees should have read and write access to a common file share; 3. An administrative user should have read and write access to all personal shares and ownership of the common share.
Your Samba server will meet all of these requirements. You will also learn how to access the shares from Windows, Linux, and macOS.
Prerequisites
Before you begin this guide you’ll need the following:
-
An Ubuntu 16.04 server with a non-root sudo user. Please refer to the Ubuntu 16.04 initial server setup guide for more information. Samba has modest RAM and CPU requirements and will function well on a 1GB server. You are more likely to run out of storage space, so this should be your primary consideration when choosing your server size.
-
Incoming TCP connections allowed on port
445. If you are using the UFW firewall, please refer to How To Set Up a Firewall with UFW on an Ubuntu and Debian Cloud Server for guidance. If you are using a different or external firewall, please refer to the relevant documentation.
Step 1 — Installing Samba
Let’s start by installing Samba using Ubuntu’s package management system.
Before installing new packages, let’s update the local package index to include the most up-to-date versions from the Ubuntu repositories:
- sudo apt-get update
Next, install Samba:
- sudo apt-get install samba
This command will install and start both the Samba server smbd and the Samba NetBIOS server nmbd. nmbd is not required for this tutorial, so in the interests of security you can stop and disable it with systemctl:
- sudo systemctl stop nmbd.service
- sudo systemctl disable nmbd.service
The sudo systemctl disable nmbd.service command will produce the following output when run:
Outputnmbd.service is not a native service, redirecting to systemd-sysv-install
Executing /lib/systemd/systemd-sysv-install disable nmbd
insserv: warning: current start runlevel(s) (empty) of script `nmbd' overrides LSB defaults (2 3 4 5).
insserv: warning: current stop runlevel(s) (0 1 2 3 4 5 6) of script `nmbd' overrides LSB defaults (0 1 6).
This output communicates that because nmbd does not have native systemd management configuration, it is being disabled by the older SysV init system.
To avoid security issues that can arise from running an unconfigured, network-enabled service, let’s stop the Samba server until configuration details are in place:
- sudo systemctl stop smbd.service
Samba is now installed and ready to be configured.
Step 2 — Setting Samba’s Global Options
Let’s define how the Samba server will behave by modifying its configuration file, located at /etc/samba/smb.conf. This file has two parts: a [global] section and a [shares] section. The [global] section configures the behavior of the Samba server, and the [shares] sections configure the file shares. Let’s begin by setting directives in the [global] section.
Rather than editing /etc/samba/smb.conf directly, rename it to smb.conf.original and create a new file with the name smb.conf:
- sudo mv /etc/samba/smb.conf /etc/samba/smb.conf.orig
Before editing /etc/samba/smb.conf, let’s check the available interfaces in order to tell Samba which it should recognize. Type the following:
- ip link
Output1: lo: <LOOPBACK,UP,LOWER_UP> mtu 65536 qdisc noqueue state UNKNOWN mode DEFAULT group default qlen 1
    link/loopback 00:00:00:00:00:00 brd 00:00:00:00:00:00
2: eth0: <BROADCAST,MULTICAST,UP,LOWER_UP> mtu 1500 qdisc pfifo_fast state UP mode DEFAULT group default qlen 1000
    link/ether 02:21:2c:03:ef:e2 brd ff:ff:ff:ff:ff:ff
This output indicates that lo is the loopback interface and eth0 is the external network interface, though your external interface may differ. Take note of both: you’ll include them with the interfaces directive in the [global] section of the smb.conf file.
Let’s begin editing this file with nano or your favorite editor:
- sudo nano /etc/samba/smb.conf
The [global] section of this file will define the server’s name, role, and other details, including network interfaces:
[global]
        server string = samba_server
        server role = standalone server
        interfaces = lo your_network_interface
        bind interfaces only = yes
        disable netbios = yes
        smb ports = 445
        log file = /var/log/samba/smb.log
        max log size = 10000
These directives specify the following:
server string- This is the identifying information that will be supplied to users during connections. You can usesamba_serveror another name that will identify your server. Throughout this tutorial, you will see the stringsamba.example.comto denote the Samba share for the organization Example.com.server role- This defines what type of Samba server will be created. In this case it is astandalone server, i.e. a file share. Other server types include domain member servers and domain controllers.interfaces- These are the network interfaces that Samba will bind to.lois the loopback interface (127.0.0.1) and is required. You will also need to include the external network interface you outputted earlier. This is usuallyeth0.bind interfaces only- This ensures that Samba only binds to the interfaces listed on theinterfacesline. As a security measure, this causes Samba to ignore packets that do not correspond to the specifiedinterfaces.disable netbios- This disables all NetBIOS functions that are not needed in a standalone server. Doing this simplifies the server name resolution process and the transport of SMB traffic.smb ports- This sets the port that Samba will listen on. Port445is the standard port for Samba.log file- This sets the name and location of Samba’s log file.max log size- This sets a size limit on the log file. The number listed is in bytes and equals 10MB. Some things to keep in mind when setting this size limit: When it is reached, Samba will generate a new log file and move the old contents to a duplicate with an.oldextension. If the limit is exceeded again, the existing.oldfile will be destroyed. This prevents disk/partition space from being overwhelmed with the contents of a single log file. You should therefore define a file size that makes sense for your system resources.
If you want more detailed logging while you are setting up the server, append the following line to the [global] section:
log level = 3 passdb:5 auth:5
This sets the log level to 3 (info), increasing the granularity of log information from the default setting of 1. The higher setting of 5 for the passdb and auth debug classes provides more information related to user authentication.
Save and close the file when you have finished creating this section.
Whenever you edit smb.conf, you should run the Samba utility testparm to check that there are no syntax errors:
- testparm
Running the testparm command on the smb.conf file produces the following output:
OutputLoad smb config files from /etc/samba/smb.conf
Loaded services file OK.
Server role: ROLE_STANDALONE

Press enter to see a dump of your service definitions
Pressing ENTER produces the following output:
Output# Global parameters
[global]
        server string = samba_server
        interfaces = lo your_network_interface
        bind interfaces only = Yes
        server role = standalone server
        log file = /var/log/samba/smb.log
        max log size = 10000
        smb ports = 445
        disable netbios = Yes
        idmap config * : backend = tdb
If testparm reports Loaded services file OK., then there are no syntax errors that would stop the Samba server from starting.
Configuring the [global] section is all that’s required to start the Samba server. However, its functionality will be limited without share configurations. A share is comprised of two parts, a user and a directory, both of which must be created and configured to allow logins and testing. The next section will explain how to create users that can access the shares.
Step 3 — Creating Users
In this step, we will create users that can access the shares. They will need access as Samba and system users in order to authenticate with the Samba server when they log in and read and write to the file system.
In the hypothetical company Example.com there are four employees who need to be added to the Samba server and created as users on the Linux system: david, mike, jane, and lucy. In addition to these four, there will be an admin user who will be able to access and administer the personal shares. This user will also own the common shares that everyone can access.
The first step to adding system users is creating home directories for each of them. Rather than using the standard home directories at /home/user, the Samba directories and data will be located at /samba/. Keeping Samba data in a single location and separated from other user data will make future management tasks such as backups easier.
Note: The users created in this guide are not intended to have SSH logins. If your users already have accounts on the server, you should create a dedicated Samba user for them in order to follow this guide.
The next section will explain the process to add the first user, david, but you will need to repeat this process for mike, jane, and lucy.
The first step is to create the directory where the Samba data will be stored, at the root of the file system. This directory will be called /samba/, and its group ownership will be set to sambashare, a group that was created when you installed Samba.
Execute the following commands to create the /samba/ directory and set the group ownership to sambashare:
- sudo mkdir /samba/
- sudo chown :sambashare /samba/
Next, create david’s home directory under the /samba/ directory:
- sudo mkdir /samba/david
Now, add david as a system user with the following command:
- sudo adduser --home /samba/david --no-create-home --shell /usr/sbin/nologin --ingroup sambashare david
The options do the following:
--home- This sets the location of the user’s home directory.--no-create-home- This stops theaddusercommand from creating david’s home directory. If the system were to create this directory, it would be populated with configuration files such as.bash_historythat are not necessary for the current setup.--shell- This sets which shell david will be allocated when he logs in by SSH. An SSH login is not needed for access to a Samba share; setting this to/usr/sbin/nologinwill disable SSH logins.--in-group sambashare- This adds the user to thesambasharegroup, giving them read and write access to their own shares and to the common share.
You will be prompted for a password when you run this command. Choose a unique, non-dictionary based password of 10 characters or more.
Now that the system user david exists, you can set the ownership and permissions on his Samba home directory:
- sudo chown david:sambashare /samba/david/
- sudo chmod 2770 /samba/david/
Setting the permissions of the directory to 2770 means that new files or directories created under /samba/david/ will inherit the group ownership of the parent directory rather than the primary group of the user that created the file or directory. This means, for example, that if the admin user were to create a new directory in david’s share, david would be able to read and write to it.
Next, add david to the Samba server. Samba keeps its own database of users and passwords, which it uses to authenticate logins. In order to log in, all users must be added to the Samba server and enabled. Execute the following smbpasswd commands to accomplish both of these tasks:
- sudo smbpasswd -a david
- sudo smbpasswd -e david
The options used here do the following:
-a- This adds the user to the Samba server without enabling them.-e- This enables a previously-added user.
The password that you enter here will be used to access the Samba share, and can differ from the system password.
The user david now exists as a system user without the ability to SSH into the server. He has a home directory at /samba/david, and is registered and enabled as a Samba user.
Repeat this process for every Samba user (mike, jane, and lucy).
To create the admin user, run through the following commands, changing the home directory to /samba/everyone/:
- sudo mkdir /samba/everyone
- sudo adduser --home /samba/everyone --no-create-home --shell /usr/sbin/nologin --ingroup sambashare admin
- sudo chown admin:sambashare /samba/everyone/
- sudo chmod 2770 /samba/everyone/
- sudo smbpasswd -a admin
- sudo smbpasswd -e admin
In addition to creating the admin user, let’s create a group called admins to make the management of the server easier. With read and write permissions to each share, this group can simplify the work of adding and deleting users. For example, if individual users function as admin users and then leave the organization, they need to be individually removed from each share. New administrators also need to be manually added to every share. Creating an admins group and giving this group read-write access to the shares means adding and removing users requires only a single command.
Execute the following commands to create a new group called admins and add the user admin to this group:
- sudo groupadd admins
- sudo usermod -G admins admin
Additional users can be added to the admins group by running the second command, sudo usermod -G admins admin, and substituting another user in place of admin.
The system configurations are now complete, with the organization Example.com’s users set as system and Samba users. Let’s move on to configuring the Samba server so these users can access their share directories.
Step 4 — Configuring the Samba Shares
Each share will have its own section in the main Samba configuration file, /etc/samba/smb.conf, following the global parameters. These sections will define how each share will work.
Use the nano text editor again to open and edit this file:
- sudo nano /etc/samba/smb.conf
The following configuration block will define each user’s personal share:
...
[share_name]
        path =
        browseable =
        read only =
        force create mode =
        force directory mode =
        valid users =
These options include:
share_name- This is the name of the share that you will use when logging in.path- This is the absolute path to the share in the filesystem.browsable- This sets whether or not other users are able to see the share. Enabling this option only allows other users of the Samba server to see the existence of the share. It does not confer any read or write permissions.read only- This sets whether thevalid usersare able to write to the share.force create mode- This forces the permissions for any file written to the share.force directory mode- This forces the permissions for any directory created in the share.valid users- This is a list of the users who have access to the share. This setting can take usernames or system groups such as admins. Groups must be listed with an@in front e.g.@admins.
Add the following share configuration block for david, defining his home directory, the permissions for this directory’s group ownership, and the users that should have access to his share:
[david]
        path = /samba/david
        browseable = no
        read only = no
        force create mode = 0660
        force directory mode = 2770
        valid users = david @admins
Note that the directory permissions set the group ownership to that of the parent directory.
Create a share block for mike, jane, and lucy. Change only the share [name], path, and valid users to reflect each of the user’s names.
The [everyone] share will differ from the others in both [name], path, valid users, and browsable options, and will look like this:
...
[everyone]
        path = /samba/everyone
        browseable = yes
        read only = no
        force create mode = 0660
        force directory mode = 2770
        valid users = @sambashare @admins
Giving the sambashare group read-write access to the share enables all of the users access to the share, since they were added to this group when they were created.
The complete smb.conf file will look like this:
[global]
        server string = samba_server
        server role = standalone server
        interfaces = lo your_network_interface
        bind interfaces only = yes
        disable netbios = yes
        smb ports = 445
        log file = /var/log/samba/smb.log
        max log size = 10000

[david]
        path = /samba/david
        browseable = no
        read only = no
        force create mode = 0660
        force directory mode = 2770
        valid users = david @admins

[mike]
        path = /samba/mike
        browseable = no
        read only = no
        force create mode = 0660
        force directory mode = 2770
        valid users = mike @admins

[jane]
        path = /samba/jane
        browseable = no
        read only = no
        force create mode = 0660
        force directory mode = 2770
        valid users = jane @admins

[lucy]
        path = /samba/lucy
        browseable = no
        read only = no
        force create mode = 0660
        force directory mode = 2770
        valid users = lucy @admins

[everyone]
        path = /samba/everyone
        browseable = yes
        read only = no
        force create mode = 0660
        force directory mode = 2770
        valid users = @sambashare @admins
Save and close the file when you have finished editing.
Test the configuration again:
- testparm
This will produce output that looks like the following:
OutputLoad smb config files from /etc/samba/smb.conf
rlimit_max: increasing rlimit_max (1024) to minimum Windows limit (16384)
Processing section "[david]"
Processing section "[jane]"
Processing section "[mike]"
Processing section "[lucy]"
Processing section "[everyone]"
Loaded services file OK.
Server role: ROLE_STANDALONE

Press enter to see a dump of your service definitions
With the configuration check complete, let’s start the Samba server with systemctl:
- sudo systemctl start smbd.service
The Samba server is now running and ready to accept logins. The next step is to log into the Samba server to test that it is working as expected. The following section will cover logging into the Samba server from Windows, Linux, and macOS.
Step 5 — Logging Into the Samba Server
In this section, we will cover how to access the Samba shares we created from Linux, Windows, and macOS.
Linux — The Command Line
You can use a tool called smbclient to access Samba from the command line. This package is not included by default on most Linux distributions, so you will need to install it with your local package manager.
On Debian and Ubuntu servers install smbclient with the following command:
- sudo apt-get update
- sudo apt-get install smbclient
On Fedora systems, use the following:
- sudo dnf update
- sudo samba-client
And on CentOS:
- sudo yum update
- sudo yum install samba-client
Note: On some Linux distributions smbclient will fail with the following error message:
Outputsmbclient: Can't load /etc/samba/smb.conf - run testparm to debug it
If you see this error message, check to be sure that you have created the file at /etc/samba/smb.conf.
smbclient uses the following format to access Samba shares:
- smbclient //your_samba_hostname_or_server_ip/share -U username
You can use either your server’s IP or the hostname you defined in /etc/samba/smb.conf to access the share. This example uses the hostname samba.example.com to access david’s share on the Samba server you created in the previous steps:
- smbclient //samba.example.com/david -U david
If david wants access to the common share (everyone), change the command to:
- smbclient //samba.example.com/everyone -U david
After running the smbclient command, you will be prompted for the Samba password and logged into a command line interface reminiscent of the FTP text interface:
smb: \>
This interface is most useful for testing usernames and passwords and read-write access. For example, you can create a directory and list its contents as follows:
- mkdir test
- ls
You should see the following output:
Output  .                                   D        0  Fri Feb  2 14:49:01 2018
  ..                                  D        0  Wed Jan 24 12:11:33 2018
  test                                D        0  Fri Feb  2 14:49:01 2018
Remove the directory by typing:
- rmdir test
Managing data in a share is often easier with a GUI tool. The next section will look at the built-in GUI tools for KDE.
Linux — KDE with Dolphin
Dolphin is the default file manager in KDE and has built-in functionality to access Samba shares.
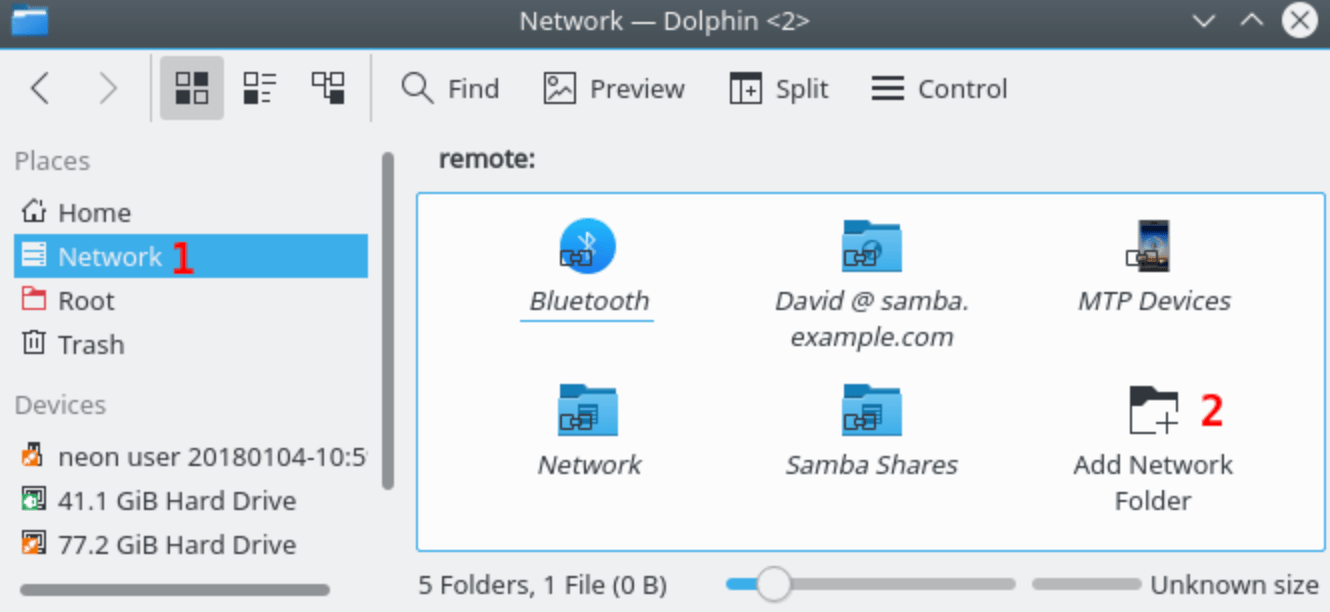
After opening Dolphin, take the following steps:
- Select Network from the Places list.
- Click on Add Network Folder.
- Select the Microsoft Windows network drive option.
- Click Next
- Enter the details for the Samba share:
- Name - This is a memorable name that will be displayed as a bookmark in Dolphin for the share.
- Server - This is the hostname or IP address of the Samba server. In this example it will be
samba.example.com. - Folder - This is the name of the share that was set in
smb.conf.
- Click Save & Connect.
- Enter the username and password for the user you are going to access the Samba share with.
- Click OK.
Dolphin will now connect and open the Samba share which will look like this:
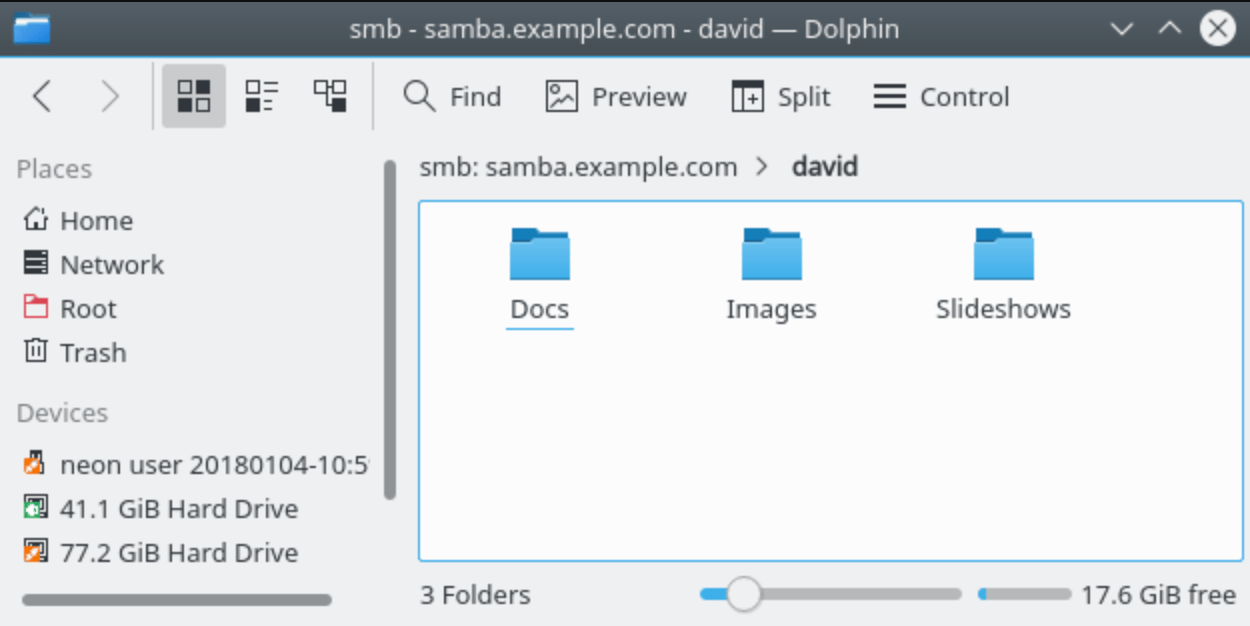
You can now use the Samba share as if it were a local directory to copy, delete, and rename files and directories. The share will also appear as a permanent bookmark in the Network places.
MacOS — The Command Line
MacOS comes pre-installed with command line tools you can use to access a Samba share. Open the terminal with Launchpad by clicking on the Terminal icon.
This will open a command line terminal in your home directory. To mount the Samba share, you can create a new directory that will act as the mount point for the share. A mount point is the location where two file systems are joined: in this case, your local file system and the remote Samba file system.
Create a new directory called samba:
- mkdir samba
Next, mount the Samba share under the new samba directory. This command has the form:
- sudo mount_smbfs //username@your_samba_hostname_or_server_ip/share ./mount_point
Substituting the details from Example.com with user david looks like this:
- sudo mount_smbfs //david@samba.example.com/david ./samba
The samba directory will now show the contents of the david share on the Example.com Samba server. Files and directories can be manipulated with the normal tools such as ls, rm, and mkdir; however, the samba directory will be owned by root after the share has been mounted. You will therefore need to use sudo to access the samba directory and its contents.
To unmount the Samba share, run the umount command from the same directory where you ran the mkdir command:
- umount samba
The next section will look at accessing a Samba share using the desktop GUI application in macOS.
MacOS — Desktop
MacOS is also able to access Samba shares using the Finder application.
Take the following steps:
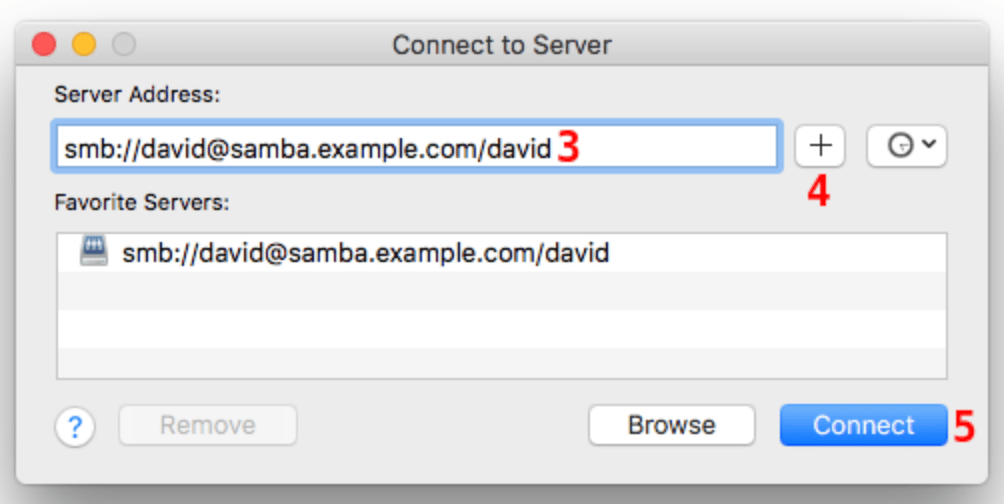
- Open Finder and click Go in the menubar.
- Click on Connect to Server from the list of options.
- Use a
smb://format URL that includes your username, your hostname or server IP, and the name of your share:smb://username@your_samba_hostname_or_server_ip/share. In the example shown here, you will see the username david and the hostnamesamba.example.com. - Bookmark the Samba share by clicking on the button with a + symbol.
- Click Connect
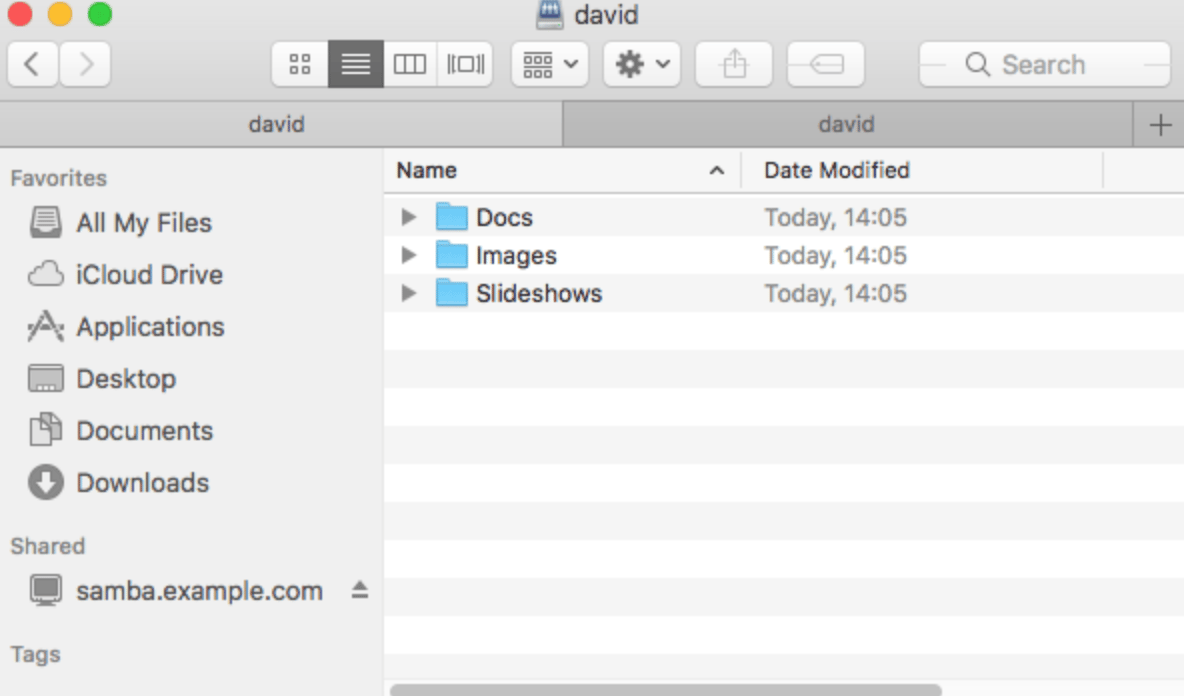
- Select Registered User
- Enter the username and password for the Samba share user.
- Decide if you would like macOS to store the password.
- Click Connect.
After you have successfully connected to the Samba share it will appear in Finder as shown here:
The next section will explore how to access Samba shares from Windows 10.
Windows 10 — The Command Line
Mounting a Samba share from the Windows command line only requires a single command:
- net use drive_letter \\your_samba_hostname_or_server_ip\share
Substitute the variables from user david’s share and set the drive letter to X::
- net use X: \\samba.example.com\david
When this command is entered you will be prompted for david’s username and password. After entering these, you will receive an acknowledgment that the share was successfully mounted:
OutputEnter the user name for 'samba.example.com': david
Enter the password for samba.example.com:
The command completed successfully.
You will now be able to browse the Samba share in File Explorer and manipulate the files and directories as if they were local to your computer.
The next section will look at using Windows GUI tools to access a Samba share.
Windows 10 — Desktop
Windows 10 also has the native ability to connect to a Samba share. The following steps will connect you to your Samba share and keep it as a bookmark using Windows File Explorer. Begin these steps by opening File Explorer:
- Right click on This PC.
- Click on Add a network location and then Next on the page that follows.
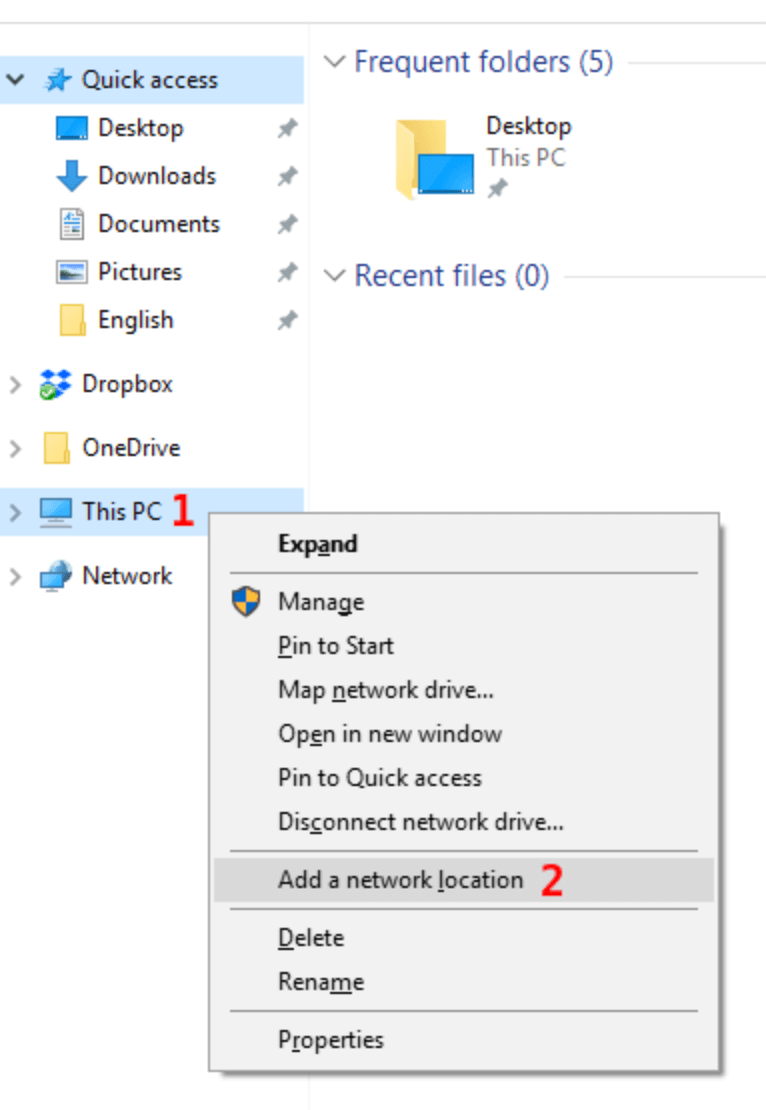
- Click on Choose a custom network location.
- Click Next
- Enter the Windows style address of the Samba server and the share name. Windows uses the following form of a Samba URL:
\\your_samba_hostname_or_server_ip\share\. In the example image the server name issamba.example.comand the share name isdavid:\\samba.example.com\david. - Click Next.
- Enter the username and password for the user.
- Decide whether or not you want Windows to remember the password.
- Click OK.
File Explorer will now connect to the Samba share. Once the connection has successfully completed, a new location will be created under This PC in File Explorer:
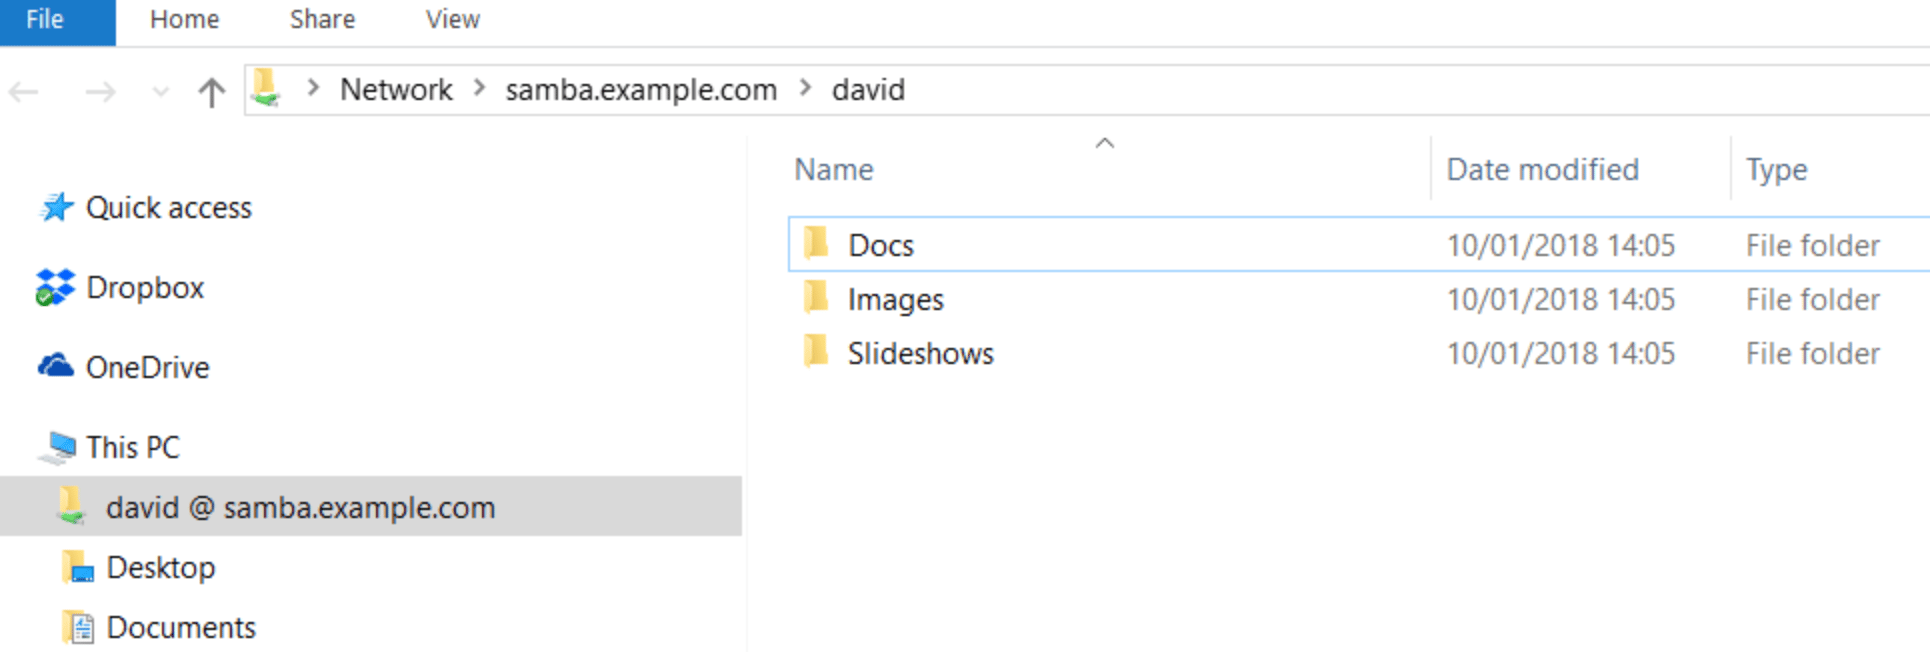
You will now be able to use this folder to manage files and folders in the Samba share as if it were a local folder.
Conclusion
In this article, you have created cross-platform online file shares using the Samba server. You have also accessed these shares from Windows, Linux, and macOS.
Samba shares have become so common that many applications are able to access the data stored in them. These applications can extend the functionality and usefulness of your Samba shares. For example, the mobile version of the media player VLC can connect to and stream music and video from your Samba share. To access it, select open MRL and use the standard Samba URL: smb://username@your_samba_hostname_or_server_ip/share. You can also use a Samba share as the destination for your backups with the cross-platform backup utility BackupPC.
In addition to acting as a simple file share, Samba can work with Windows Active Directory as either a domain controller or a member of a domain. The Samba Wiki User Documentation contains more information on how to do this.
Thanks for learning with the DigitalOcean Community. Check out our offerings for compute, storage, networking, and managed databases.
About the author(s)
I have been a Linux Systems Administrator and technical content creator for more than 20 years. I am passionate about using and promoting OSS.
Former Developer at DigitalOcean community. Expertise in areas including Ubuntu, Docker, Ruby on Rails, Debian, and more.
Still looking for an answer?
This textbox defaults to using Markdown to format your answer.
You can type !ref in this text area to quickly search our full set of tutorials, documentation & marketplace offerings and insert the link!
Good tutorial, but if I want a share directory access by anonymous (not need login), how to configure it?
The ip link command spits out a verbose output, which the user is prompted to note for later use. However, it is unclear what exactly is to be used from this output. There is not a clear example of what we should be inputting in the smb.conf file for the Global - interfaces line. Please clarify! Thank you for your time!
Mac OS clients may require browseable = yes to be able to see the smb share in finder. This was the one thing I had to change to see my share using Mac OS 10.14.6 (Mojave).
 This work is licensed under a Creative Commons Attribution-NonCommercial- ShareAlike 4.0 International License.
Become a contributor for community
Get paid to write technical tutorials and select a tech-focused charity to receive a matching donation.

DigitalOcean Documentation
Full documentation for every DigitalOcean product.

Resources for startups and AI-native businesses
The Wave has everything you need to know about building a business, from raising funding to marketing your product.
The developer cloud
Scale up as you grow — whether you're running one virtual machine or ten thousand.

Start building today
From GPU-powered inference and Kubernetes to managed databases and storage, get everything you need to build, scale, and deploy intelligent applications.
