By Hameer Abbasi and Tammy Fox

Introduction
This guide explains how to install and configure InspIRCd 2.0, an IRC server, on Ubuntu 14.04. Installing on your own server gives you the flexibility to manage users, change their nicks, change channel properties, and more.
At the end of this tutorial, you should have a fully-functioning IRC server you can connect to via most IRC clients.
Prerequisites
Please note that items marked optional will help but aren’t necessary.
- A Ubuntu 14.04 Droplet
- A non-root user with sudo privileges (Initial Server Setup with Ubuntu 14.04 explains how to set this up.)
- RVM installed with the latest Ruby version. Check out this tutorial for help.
- If you have a domain name, you can configure
irc.your_domain_nameandservices.your_domain_nameto point to the Droplet. Go to this tutorial to setup a domain name and A and AAAA records for it. If you want to redirect just two subdomains, use this tutorial. - (Optional) IRC client already installed on your local machine
- (Optional) An SSL certificate
To get a free SSL certificate to use with your IRC server, follow How To Set Up Apache with a Free Signed SSL Certificate on a VPS and request a certificate for irc.your_domain_name.
If you have a paid SSL certificate from a certificate authority already, you’ll need the *.pem, *.crt or *.key files that came with it.
All the commands in this tutorial should be run as a non-root user. If root access is required for the command, it will be preceded by sudo.
Step 1 — Installing InspIRCd
To install InspIRCd, we need to create a new package for it. Unfortunately for us, the package of InspIRCd that is in the Ubuntu 14.04 repositories is out of date. Luckily, there’s a script available that creates an installable .deb file from the source tarball. It’s open source, so we can modify it to our requirements.
We start out by installing some packages that the script uses:
- sudo apt-get install rake git gnutls-bin libgnutls-dev
Now clone the Git repository used to create the package:
- git clone https://github.com/SaberUK/inspircd-packages.git
Then, switch to the directory it was cloned to:
cd ./inspircd-packages
We need to tell the script to use the stable version of InspIRCd, which is version 2.0. We also need to tell it we need SSL support. For this, we export two environment variables that the script will read and act accordingly.
export INSPIRCD_REVISION=insp20
export INSPIRCD_MODULES="regex_posix ssl_gnutls"
Also, remove an extra patch that’s present but causes issues for version 2.0.
- rm ./extras/fix-data-and-log-paths.patch
Generate the .deb file for installation:
- rake deb
This will take a while, so go grab a cup of coffee while it runs. Once it’s done, run the following command to see the filename of the created file:
ls *.deb
Then install the .deb file with the following command (use the filename you just found in the last step):
- sudo dpkg -i ./inspircd_2.0.20_amd64.deb
We will now delete the source files for InspIRCd, so if a hacker gets access, they can’t recompile with malicious code.
- cd ~
- rm -rf ./inspircd-packages
Step 2 — Configuring InspIRCd
Before InspIRCd can actually run, we need to configure it properly. In doing this, we also set some options that are vital to the functioning of our server. Some things are unique to us, such as the network name.
Create the inspircd.conf file:
- sudo nano /etc/inspircd/inspircd.conf
Now, copy the following example configuration file into it. The values in red need to be customized. After you copy the contents to inspircd.conf, we will start at the top and change them to the correct values.
# This is just a more or less working example configuration file, please
# customize it for your needs!
<server name="irc.example.com"
        description="Example IRC Server"
        network="ExampleNet"
        id="00A">

<admin name="Hameer Abbasi"
       nick="habbasi"
       email="admin@example.com">

<bind address="" port="6667" type="clients">

<power diepass="SecretPassword" restartpass="OtherSecretPassword" pause="2">

<connect allow="*"
         timeout="60"
         flood="20"
         threshold="1"
         pingfreq="120"
         sendq="262144"
         recvq="8192"
         localmax="3"
         globalmax="3">

<class name="Shutdown"
       commands="DIE RESTART REHASH LOADMODULE UNLOADMODULE RELOAD">
<class name="ServerLink"
       commands="CONNECT SQUIT RCONNECT MKPASSWD MKSHA256">
<class name="BanControl"
       commands="KILL GLINE KLINE ZLINE QLINE ELINE">
<class name="OperChat"
       commands="WALLOPS GLOBOPS SETIDLE SPYLIST SPYNAMES">
<class name="HostCloak"
       commands="SETHOST SETIDENT SETNAME CHGHOST CHGIDENT">

<type name="NetAdmin"
      classes="OperChat BanControl HostCloak Shutdown ServerLink"
      host="netadmin.omega.org.za">
<type name="GlobalOp"
      classes="OperChat BanControl HostCloak ServerLink"
      host="ircop.omega.org.za">
<type name="Helper"
      classes="HostCloak"
      host="helper.omega.org.za">

<oper name="habbasi"
      password="secretpass"
      host="*@localhost"
      type="NetAdmin">

<files motd="/etc/inspircd/inspircd.motd"
       rules="/etc/inspircd/inspircd.rules">

<channels users="20"
          opers="60">

<dns server="208.67.222.222" timeout="5">
<dns server="208.67.220.220" timeout="5">

<options prefixquit="Quit: "
         noservices="no"
         qaprefixes="no"
         deprotectself="no"
         deprotectothers="no"
         flatlinks="no"
         hideulines="no"
         syntaxhints="no"
         cyclehosts="yes"
         ircumsgprefix="no"
         announcets="yes"
         disablehmac="no"
         hostintopic="yes"
         quietbursts="yes"
         pingwarning="15"
         allowhalfop="yes"
         exemptchanops="">

<security hidewhois=""
          userstats="Pu"
          customversion=""
          hidesplits="no"
          hidebans="no"
          operspywhois="no"
          hidemodes="eI"
          maxtargets="20">

<performance nouserdns="no"
             maxwho="128"
             softlimit="1024"
             somaxconn="128"
             netbuffersize="10240">

<log method="file"
     type="* -USERINPUT -USEROUTPUT"
     level="default"
     target="/var/log/inspircd.log">

<whowas groupsize="10"
        maxgroups="100000"
        maxkeep="3d">

<timesync enable="no" master="no">

<badnick nick="NickServ" reason="Reserved For Services">
<badnick nick="ChanServ" reason="Reserved For Services">
<badnick nick="Global" reason="Reserved For S
ervices">
<badnick nick="InfoServ" reason="Reserved For Services">
<badnick nick="OperServ" reason="Reserved For Services">
<badnick nick="SaslServ" reason="Reserved For Services">
<badnick nick="StatServ" reason="Reserved For Services">
<badnick nick="ALIS" reason="Reserved For Services">
We need to change a few values that are specific to you and your Droplet. At the top, find the server section. Change it to your desired hostname, description, and network name. The id should be changed so it has two numbers and a letter. For example:
<server name="irc.yourdomain.com"
        description="Example description for the IRC server"
        network="ExampleNet"
        id="46T">
Now, find the admin block. Change the values to information for the operator of the IRC network. The operator user will be able to do everything on the network.
<admin name="Hameer Abbasi"
       nick="habbasi"
       email="admin@example.com">
We need to be able to restart or shutdown the server. This is done in the power block. Here, you need to change the passwords. The value of diepass is the password network administrators will use to shut down the server, and the value of restartpass is the password they’ll use to restart it. The value of pause tells the server how long to block an oper (in seconds) from performing these operations if a wrong password is entered. Go ahead and change the passwords. Leave pause at its default value.
<power diepass="SecretPassword" restartpass="OtherSecretPassword" pause="2">
Find the oper block. We need to define the operator account and password. The admin you defined earlier and the operator can be the same person. If you have a static IP address or a trusted domain name, change the host to include it. If possible, do not set this value to *@*, which allows an operator to connect from anywhere.
<oper name="habbasi"
      password="secretPassword"
      host="*@localhost *@your.local.ip.here *@your.local.domain.here"
      type="NetAdmin">
For the host value, separate multiple IP addresses and domains with spaces. You should also add the IP address and domains (if any) of your current Droplet. Save your changes, and close the file.
Step 3 — Editing the Message of the Day
The message of the day will be shown every time a user connects to the IRC network. To customize it, create a inspircd.motd file in /etc/inspircd/:
- sudo nano /etc/inspircd/inspircd.motd
In this file, add the message of the day you want to show users. Typically, you want a friendly reminder informing users of rules. Also, if anything is changing network-wide, this is the place to inform them. For example:
<^>This is ExampleNet. We are the world's newest IRC network.

Support us by joining and becoming regular!

Be sure to view the rules by typing "/rules" and hitting ENTER.<^>
Next, edit the rules file.
- sudo nano /etc/inspircd/inspircd.rules
In this file, put whatever the rules are. These will be shown to the users every time they enter the /rules command. For example,
1. No children under 13 are allowed to be on this network without the knowledge and consent of their parent or legal guardian.
2. No discussion or links involving pirated software is allowed on the network.
3. No discussion of drugs or other narcotics.
4. No trading of weapons.
5. No porn. There are minors on this network.
Step 4 — Starting the IRC Server
Before starting the IRC server, we need to fix the permissions and file ownership:
- sudo find /etc/inspircd -type d -exec chmod 770 {} \;
- sudo find /etc/inspircd -type f -exec chmod 644 {} \;
- sudo chown -R irc:irc /etc/inspircd
Next, we need to set the correct permissions for the PID file and the log file directory.
- sudo chown -R irc:irc /var/inspircd/
- sudo chown -R irc:irc /var/log/inspircd
You are now read to start InspIRCd:
- sudo service inspircd start
You should get the following message near the end, which means we’ve started InspIRCd successfully:
InspIRCd is now running as 'irc.example.com'[46T] with 1024 max open sockets
Step 5 — Testing Basic Functionality
Since basic functionality should be up, try connecting to your newly created IRC network. We’ll walk you through installing a simple command line based IRC client on your Droplet. First, install IRSSI.
- sudo apt-get install irssi
Then start the IRC client:
- irssi
You should be able to type in the bottom window that says [(status)]. Note that all IRC commands begin with a forward slash. To connect to your IRC network, type:
/connect irc.example.com
If you didn’t configure a hostname for your server, you can use the IP address of the Droplet. If you configured your server properly, you should see a screen similar to the following:
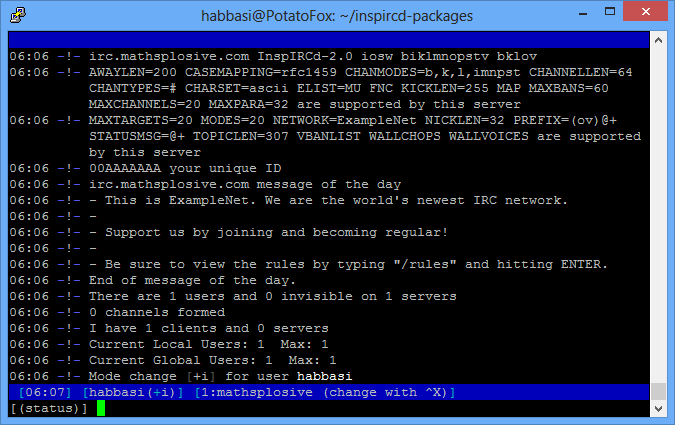
Now login as an operator, by typing the following command:
/oper habbasi secretPassword
If it worked, you should see the words “You are now a NetAdmin”. This means that your operator privileges are working. To quit, we’ll use another command:
/quit
Recommended IRC Clients
There is a huge variety of IRC clients available for almost any device. Here is a small list of the recommended clients:
- HexChat for Windows, Mac OS X, and Linux
- mIRC for Windows
- Colloquy for Mac OS X and iOS
- IRSSI for Linux and Mac OS X
- AndChat for Android
- Kiwi IRC (web browser client)
Please note that with Kiwi IRC, you will have trouble using oper privileges. Kiwi connects through a proxy and does not maintain your IP address. If you choose to list only the specific IP addresses allowed to connect for operator actions (which is recommended for security), oper privileges won’t work with Kiwi IRC.
Step 6 — Setting up SSL (Optional)
The goal of this section is to protect the privacy of your users and to protect passwords and other things that would be visible to anyone watching the data transmitted such as ISPs. It is, of course, optional, but highly recommended.
First of all, we need to copy your SSL certificates to the right directory. For this, we need to make a directory within the IRC server configuration directory.
- sudo mkdir /etc/inspircd/sslcerts
Next, we need to copy the relevant SSL certificate and key to your newly created configuration directory:
- sudo cp /path/to/ssl/private.key /etc/inspircd/sslcerts/private.key
- sudo cp /path/to/ssl/certificate.crt /etc/inspircd/sslcerts/cert.pem
- sudo cp /path/to/ca/validation.crt /etc/inspircd/sslcerts/ca.pem
If you’re using a self-signed certificate, you can omit copying the ca.pem file. This is done in the last command above.
Set the proper permissions for the inspircd directory to protect your certificates, and so InspIRCd will be able to read them.
- sudo find /etc/inspircd -type d -exec chmod 770 {} \;
- sudo find /etc/inspircd -type f -exec chmod 644 {} \;
- sudo chown -R irc:irc /etc/inspircd
Edit the configuration file to tell it to use SSL:
- sudo nano /etc/inspircd/inspircd.conf
Find this:
<bind address="" port="6667" type="clients">
Below the bind section, add these lines:
<bind address="" port="6697" type="clients" ssl="gnutls">
<gnutls cafile="/etc/inspircd/sslcerts/ca.pem"
        certfile="/etc/inspircd/sslcerts/cert.pem"
        keyfile="/etc/inspircd/sslcerts/private.key"
        priority="SECURE192:-VERS-SSL3.0">

<module name="m_ssl_gnutls.so">
If you’re using a self-signed certificate, you can omit the cafile directive.
Restart the server to enable the changes.
- sudo service inspircd restart
SSL should now be enabled on port 6697.
Step 7 — Testing SSL (Optional)
Once again, to test SSL, we’ll use IRSSI. Type this as before to start IRSSI:
- irssi
Next, type the following command to connect with SSL enabled:
/connect -SSL -SSL_Verify irc.example.com 6697
If you’re using a self-signed certificate, you should omit the -SSL_Verify option.
If it succeeded, you should see a screen like this:
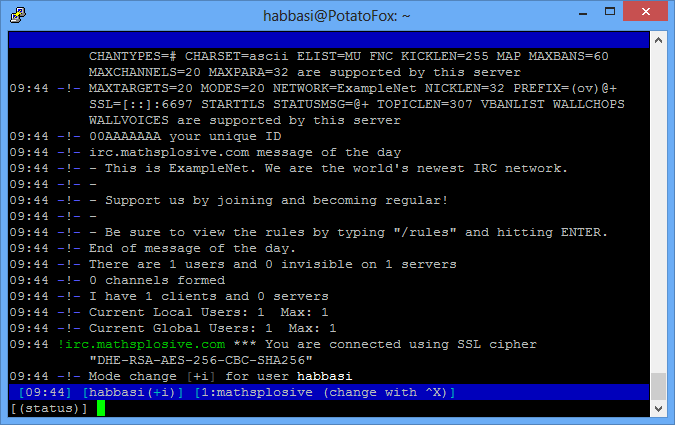
Go ahead and quit the client with /quit.
Step 8 — Installing Shaltúre Services
Your IRC server works, and you can connect to it. But guess what? You can’t register nicks. You can’t manage channel ownership and roles. You can’t send or receive memos. For all that, we use services. The most popular services platform is Atheme, but its development has stopped, and it won’t be updated except maybe to patch serious security vulnerabilities. For this reason, I’ll explain how to install an actively developed fork of Atheme called Shaltúre.
We start out by installing a prerequisite package:
- sudo apt-get install gettext
Shaltúre is best not run as root. But if we run it as our main user, there might be security implications. For this reason, we will create a user with no password for Shaltúre. You cannot log into this account, only access it using sudo.
- sudo adduser --disabled-password shalture
This will give you a number of prompts, but you can just press enter through them. Now switch to the user:
- sudo -i -u shalture
We proceed by changing the directory to your home directory and cloning the shalture repository. We will clone to a different directory because we want to install in the ~/shalture directory.
- git clone git://github.com/shalture/shalture.git shalture-devel
Change your active directory to the shalture-devel directory and clone some other needed repositories.
- cd ./shalture-devel
- git submodule init
- git submodule update
Run the configuration that sets the stage for compilation, and then compile and install:
- ./configure --enable-contrib
- make
- make install
It will take some time after the second command while it compiles, so walk around to stretch your legs a bit. After it’s done, remove the source files.
- cd ~
- rm -rf ./shalture-devel/
Step 9 — Configuring Shaltúre Services
When installation is complete, change the directory to the Shaltúre configuration directory so we can configure it. We will start with the example configuration file.
- cd ~/shalture/etc
- cp shalture.conf.example shalture.conf
- nano shalture.conf
Find this in the file:
#loadmodule "modules/protocol/charybdis";
Uncomment the line by removing the # character at the beginning of the line, and replace charybdis with inspircd:
loadmodule "modules/protocol/inspircd";
Next, find:
name = "services.int";
Change int to match the domain name or IP address of your IRC server:
name = "services.your_domain_name_or_IP";
Find this line:
numeric = "00A";
Change the value of numeric so it’s different from the server id you gave earlier, but it must contain two digits and a letter like so:
numeric = "07C";
Now find:
netname = "misconfigured network";
Change the value of netname to the network name you set in the server block of the InspIRCd configuration file. For example:
netname = "ExampleNet";
Also find:
hidehostsuffix = "users.misconfigured";
And remove everything in the quotation marks after users:
hidehostsuffix = "users";
Next, find this:
adminname = "misconfigured admin";
Change the part inside quotation marks to your name or pseudonym.
Now, change the contact email for the network. Find:
adminemail = "admin@example.com";
Change the value of adminemail to your email address.
Next, find this:
registeremail = "noreply@admin.tld";
Change the value of registeremail to noreply@your_domain_name. This is the email address that will be shown in the welcome email to users when they first register their nick on your network. It’s also the email that will send out password reset instructions and activation instructions. We’ve set it to a non-existent email so it doesn’t crowd up your real inbox and since replies to these emails aren’t required.
Find the first uplink code block and comment out the entire block by adding /* before and */ after it. It should look like this:
/* uplink "irc.example.net" {
    // The server name of the ircd you're linking to goes above.

    // host
    // The hostname to connect to.
    host = "127.0.0.1";

    // vhost
    // The source IP to connect from, used on machines with multiple interfaces.
    #vhost = "192.0.2.5";

    // send_password
    // The password sent for linking.
    send_password = "mypassword";

    // receive_password
    // The password received for linking.
    receive_password = "theirpassword";

    // port
    // The port to connect to.
    port = 6667;
}; */
In the next section (after the one you commented), find:
uplink "irc6.example.net" {
        host = "::1";

        // password
        // If you want to have same send_password and accept_password, you
        // can specify both using 'password' instead of individually.
        password = "linkage";

        port = 6667;
};
Change irc6.example.net to services.your_domain_name. (You should have setup an A record for services.your_domain_name as part of the prerequisites.) Change the password to something secure. Change the port to 7001. It should now look similar to the following:
uplink "services.your_domain_name" {
        host = "::1";

        // password
        // If you want to have same send_password and accept_password, you
        // can specify both using 'password' instead of individually.
        password = "SuperSecret123";

        port = 7001;
};
Next, find the following in the nickserv block:
nickserv {
...
host = "services.int";
...
};
Change it to the host you want NickServ to have. Like so:
host = "ExampleNet/services/NickServ"
Perform changes similar to the last one for the following services. There will be a block in the configuration file for each one:
- ChanServ
- Global
- InfoServ
- OperServ
- SaslServ
- MemoServ
- GroupServ
- StatServ
- ALIS
These services are the ones enabled by default with Shaltúre. Next, find this line:
operator "jilles" {
And change it so it has the nick you chose in the oper block in the InspIRCd configuration:
operator "habbasi" {
Lastly, copy the default cron configuration file to be used later:
- cp /home/shalture/shalture/etc/shalture.cron.example /home/shalture/shalture/etc/shalture.cron
We have successfully configured services! Now, exit out of the prompt to go back to your sudo non-root user.
- exit
Step 10 — Configuring InspIRCd to Work with Shaltúre
Next, we need to configure InspIRCd to play nice with Shaltúre. Edit the InspIRCd config file once again:
- sudo nano /etc/inspircd/inspircd.conf
Add these lines to it at the end of the file:
<bind address="::1" port="7001" type="servers">

<uline server="services.example.com">

<link name="services.example.com"
      ipaddr="::1"
      port="7001"
      allowmask="::1"
      sendpass="password"
      recvpass="password">

<chanprotect noservices="no"
             qprefix="~"
             aprefix="&">

# Modules needed for services to function
<module name="m_chanprotect.so">
<module name="m_halfop.so">
<module name="m_services_account.so">
<module name="m_deaf.so">
<module name="m_spanningtree.so">
<module name="m_globops.so">
<module name="m_cban.so">
<module name="m_svshold.so">
<module name="m_hidechans.so">
<module name="m_servprotect.so">
<module name="m_chghost.so">
<module name="m_namesx.so">
<module name="m_uhnames.so">
For the values highlighted in red, change the values to your domain name and both sendpass and recvpass to the password you used in the uplink section of the Shaltúre configuration.
Save, and exit out of the text editor.
We’re all configured! All we have to do now is to restart the server and services!
- sudo service inspircd restart
- sudo -i -u shalture /home/shalture/shalture/bin/shalture-services
You should see a message at the end that says something similar to the following:
[2015-07-24 22:21:10] running in background mode from /home/shalture/shalture
This means Shaltúre has started successfully.
Step 11 — Testing Shaltúre Services
Once more, connect to your server with IRSSI as you did in step 5 or 7. You should see a screen similar to the following:
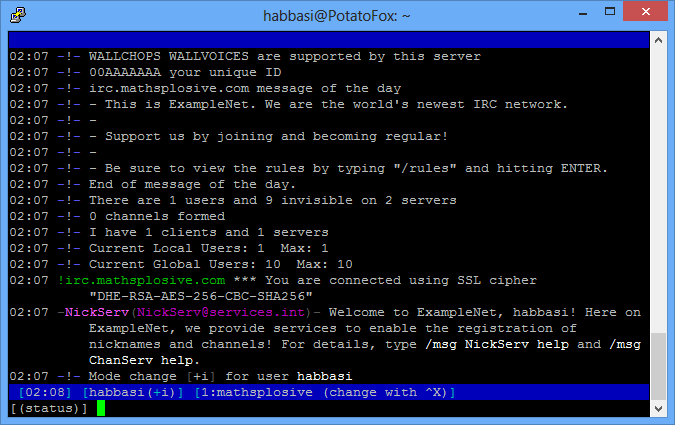
This means that Shaltúre is working properly and has successfully linked to InspIRCd.
Step 12 — Making InspIRCd and Shaltúre Persistent Across Reboots
We’ve configured your IRC server. Now what? Well, Shaltúre wasn’t installed as a service, which means it won’t survive reboots. To make it do that, type:
- sudo -i -u shalture crontab -e
If you get a prompt about which editor to use, press 2 to select nano, or any other editor you wish.
And at the end of the file, add this:
*/5 * * * * /home/shalture/shalture/etc/shalture.cron >/dev/null 2>&1
This will check every five minutes to see if services are running. If not, it starts them. Unfortunately, InspIRCd wasn’t added to the startup list either, but adding it to the list is one simple command away:
- sudo update-rc.d inspircd defaults
Now both InspIRCd and Shaltúre will run on boot!
Conclusion
InspIRCd allows you to set up a customized IRC network, one you can administer and manage yourself. Shaltúre complements it by adding functionality for nickname ownership, channel ownership, memos, and more.
To further configure your IRC server, check out the InspIRCd wiki or the example configuration files included in Shaltúre.
Thanks for learning with the DigitalOcean Community. Check out our offerings for compute, storage, networking, and managed databases.
About the author(s)
Technical Editor, DigitalOcean
Still looking for an answer?
This textbox defaults to using Markdown to format your answer.
You can type !ref in this text area to quickly search our full set of tutorials, documentation & marketplace offerings and insert the link!
Please update this to reflect that Atheme is no longer discontinued. development has been continued over at atheme.net.
Please also update that
cafile=“/etc/inspircd/sslcerts/ca.pem” wont be read, cause apparently, cafile is omitted during parsing.
it will be much better to concatenate cert + bundle in one file like for nginx web server.
thank you.
When I try to run
sudo service inspircd start
I get this error message
Job for inspircd.service failed because a configured resource limit was exceeded. See "systemctl status inspircd.service" and "journalctl -xe" for details.
Whenever I see guides that make use of packages for the actual daemon, I just cringe. Building from source is more beneficial.
Also, Atheme isn’t dead and you made no mention of Anope at all.
 This work is licensed under a Creative Commons Attribution-NonCommercial- ShareAlike 4.0 International License.
Become a contributor for community
Get paid to write technical tutorials and select a tech-focused charity to receive a matching donation.

DigitalOcean Documentation
Full documentation for every DigitalOcean product.

Resources for startups and AI-native businesses
The Wave has everything you need to know about building a business, from raising funding to marketing your product.
The developer cloud
Scale up as you grow — whether you're running one virtual machine or ten thousand.

Start building today
From GPU-powered inference and Kubernetes to managed databases and storage, get everything you need to build, scale, and deploy intelligent applications.
