By Martin Berlove and Tammy Fox

Introduction
Merging code. Coordinating releases. Determining build status. Maintaining updates. If you know the frustration of these processes well enough that the words themselves threaten a headache, you might want to look into Jenkins CI.
Maintaining any project, especially one developed by several team members concurrently and one that might incorporate many functions, components, languages, and environments, is a struggle at the best of times — and at the worst requires a superhuman feat to stay afloat.
Jenkins is here to help. Fundamentally a solution for continuous integration — i.e. the practice of merging all code continually into one central build — Jenkins acts as a headquarters for the operations of your project. It can monitor, regulate, compare, merge, and maintain your project in all its facets.
At its core, Jenkins does two things: automated integration and external build monitoring. This means that it can greatly simplify the process of keeping your code maintainable and keep a close and untiring eye on the quality of your builds, ensuring you don’t end up with nasty surprises when a few of your developers merge their code before it’s ready.
Let’s get down to the nitty gritty and learn exactly what Jenkins looks like and how to use it.
Prerequisites
To follow this tutorial, you will need the following:
- CentOS 7 Droplet
- A non-root user with sudo privileges (How To Edit the Sudoers File on Ubuntu and CentOS explains how to set this up).
All the commands in this tutorial should be run as a non-root user. If root access is required for the command, it will be preceded by sudo.
System-Specific Packages vs the WAR File
Now that you know what Jenkins is, you need to understand how it is distributed. Jenkins runs on Java and comes as a WAR file — a collection of related content comprising a web application and intended to be run on a server. However, the developers of Jenkins kindly extend its ease of use through a number of system-specific packages that allow Jenkins to run as a controlled service.
A Jenkins package is available for the Red Hat family of distributions, which includes the CentOS operating systems. However, CentOS 7 in particular is a finicky breed, so it requires a different approach. Operations that work in other Red Hat-based OSes, even other CentOS versions, tend to work differently in CentOS 7, and the potential errors that result can be difficult to debug. Since the Jenkins package is generic Red Hat, rather than being differentiated for CentOS, the likelihood of running into issues is higher than on other OSs. For this reason, we won’t run Jenkins via this package. That leaves us the WAR file running through Java, which is far less convenient, requiring us to manually start and stop it through Java.
Fortunately, there’s a way around this, and even without a package, we can work with CentOS to have it treat Jenkins like a service.
Step 1 — Installing Jenkins
There are two basic ways to install Jenkins on CentOS: through a repository, or repo, and via the WAR file. Installing from a repo is the preferred method, and it’s what we’ll outline first.
You’ll need Java to run Jenkins (either method), so if your server doesn’t yet have Java, install it with:
- sudo yum -y install java
In general, if you need a service or tool but you’re not sure what package provides it, you can always check by running:
- yum whatprovides service
Where service is the name of the service or tool you require.
Installing from the Repo
Now, run the following to download Jenkins from the Red Hat repo:
- sudo wget -O /etc/yum.repos.d/jenkins.repo http://pkg.jenkins-ci.org/redhat/jenkins.repo
The wget tool downloads files into the filename specified after the “O” flag (that’s a capital ‘O’, not a zero).
Then, import the verification key using the package manager RPM:
- sudo rpm --import https://jenkins-ci.org/redhat/jenkins-ci.org.key
Finally, install Jenkins by running:
- sudo yum install jenkins
That’s it! You should now be able to start Jenkins as a service:
- sudo systemctl start jenkins.service
Once the service has started, you can check its status:
- sudo systemctl status jenkins.service
This will give you a fairly lengthy readout with a lot of information on how the process started up and what it’s doing, but if everything went well, you should see two lines similar to the following:
Loaded: loaded (/etc/systemd/system/jenkins.service; disabled)
Active: active (running) since Tue 2015-12-29 00:00:16 EST; 17s ago
This means that the Jenkins services completed its startup and is running. You can confirm this by visiting the web interface as before, at http://ip-of-your-machine:8080.

Likewise, you can stop the service:
- sudo systemctl stop jenkins.service
or restart it:
- sudo systemctl restart jenkins.service
More information on managing services with systemctl can be found in the How To Use Systemctl to Manage Systemd Services and Units article.
Installing from the WAR File
If you choose not to install Jenkins via the repo for whatever reason, you can accomplish the same results using the WAR file, though this requires somewhat more work.
Let’s first download the Jenkins WAR file to the server and run it without frills to make sure the basics work correctly with no hassle.
The most recent version of Jenkins at any given time is available on the Jenkin’s mirror. You can use any tool you like to download this file. The following method employs a command line tool called wget:
- wget http://mirrors.jenkins-ci.org/war/latest/jenkins.war
When you’re ready, start Jenkins via Java:
- java -jar jenkins.war
You should see output in the console indicating that Jenkins has started running:
...
INFO: Jenkins is fully up and running
...
You can now access the interface via the browser (http://ip-of-your-machine:8080).
Having confirmed that Jenkins runs successfully, end the process so that you can make changes to it to allow it to run as a service, as discussed in the next step. To end a running foreground process, press CTRL-C.
Step 2 — Running Jenkins as a Service
If in the previous section you opted not to install Jenkins via the repo, and instead used the WAR file, you won’t yet be able to use Jenkins like a standard service. If you did use the repo, skip this step.
When we configure Jenkins the following way, it will still run through Java, but you’ll be able to treat it like a service, starting and stopping it and letting it run in the background with ease. The service will essentially be working as a wrapper.
First, make sure the WAR file you’ve downloaded is sitting in a location convenient for long-term storage and use:
- sudo cp jenkins.war /usr/local/bin/jenkins.war
Then, go to your /etc/systemd/system/ directory, and create a new file called jenkins.service. The following demonstration uses the nano editor, but naturally you can use whatever editing tool you wish.
- cd /etc/systemd/system/
- sudo nano jenkins.service
Now, add the following lines to the new jenkins.service file. In a moment, we’ll go over exactly what these lines accomplish.
[Unit]
Description=Jenkins Service
After=network.target

[Service]
Type=simple
User=root
ExecStart=/usr/bin/java -jar /usr/local/bin/jenkins.war
Restart=on-abort

[Install]
WantedBy=multi-user.target
If you’ve seen configuration files before (INI files or similar), you’ll recognize the structure being used here. The bracketed text denotes a section heading. This means that, for instance, [Service] declares a section called “Service,” and all the assignments below it contain relevant information that the system will then know how to find and relate to the section header.
A configuration file, this one included, is typically a text file – meaning it has no intrinsic meaning to the computer. Rather, the text file will be parsed by some process, and that process will use the headings and other information to find its way around. For this reason, it’s technically irrelevant how a given configuration file is laid out – as long as the program which reads it can understand what everything means.
The first section, Unit, contains only two configuration directives. The first is simply a name. It can be whatever name you’d like, but ideally it should be one that uniquely identifies the new process. The second directive states what service, if any, is necessary for the current service to start.
In the next section, the Type directive allows you to select what type of startup this service will use. The value simple indicates that the process noted in the later directive ExecStart will be the primary process of the service being created. Really, type is unnecessary, as simple is assumed when type is unspecified, but we are leaving it in for clarity.
User specifies which user has control over this process, and Restart is used to indicate that, in this case, if the process terminates but the exit code implies error, the service will be restarted. This is useful in maintaining the continuity of the service in case of unexpected crashes.
As mentioned, ExecStart is the directive where we indicate what process is to become the main action of the service. This directive represents the main wrapper for Jenkins – the service will run the WAR through Java rather than treating it a foreground process.
Finally, in the Install section, multi-user.target indicates a target, called a runlevel prior to CentOS 7. It provides for the system a sense of what resources to provide this service and what amount of intensity will be required by the user.
Once your file is created and saved, you should be able to start up your new Jenkins service!
When you are ready, run:
- sudo systemctl daemon-reload
This applies the changes you have made to this unit (actually, it applies the changes to any and all units that have been altered).
You should now be able to start Jenkins as a service:
- sudo systemctl start jenkins.service
Once the service has started, you can check its status:
- sudo systemctl status jenkins.service
This will give you a fairly lengthy readout with a lot of information on how the process started up and what it’s doing, but if everything went well, you should see two lines similar to the following:
Loaded: loaded (/etc/systemd/system/jenkins.service; disabled)
Active: active (running) since Tue 2015-12-29 00:00:16 EST; 17s ago
This means that the Jenkins services completed its startup and is running. You can confirm this by visiting the web interface as before, at http://ip-of-your-machine:8080.
Likewise, you can stop the service:
- sudo systemctl stop jenkins.service
or restart it:
- sudo systemctl restart jenkins.service
More information on managing services with systemctl can be found in the How To Use Systemctl to Manage Systemd Services and Units article.
Step 3 — Creating Users
Once Jenkins is running smoothly, establishing good security is the next step. From here on out, your exact actions will largely depend on your purposes for Jenkins. However, the following are general guidelines of how Jenkins can best be set up and used, along with some examples to pave the way.
Jenkins provides settings for security and role management, useful for controlling access and defining user actions. We’ll visit that briefly to introduce those concepts. To get to those settings, return to the Jenkins interface via your browser once your service is running (http://ip-of-your-machine:8080). You will see a menu on the left – choose Manage Jenkins from within that. This will take you to a page containing a number of options for customization. You may also notice an an alert at the top: Unsecured Jenkins allows anyone on the network to launch processes on your behalf. Consider at least enabling authentication to discourage misuse. This is Jenkins’ directive to get you to introduce some element of security to your system.

The first step to take here is to go to Configure Global Security, near top of the list of links on the manage Jenkins page. Check the option box for Enable security to bring up a group of options for this purpose. There are any number of ways to configure security on Jenkins – you can read the in-depth explanation in the Standard Security Setup section of the Use Jenkins documentation.
The most straightforward of these options, and the one we will lay out today, has Jenkins use its own database to store user configurations. Under the Access Control section that appeared when we flagged the checkbox, select Jenkins’ own user database. Briefly, the other options are to link Jenkins to existing Unix users and groups, to use an organization-wide login (LDAP option), or to allow a Java servlet to manage access. Other options can be added through plugins (we’ll discuss plugins in a bit).
Whether you should allow new users to sign up largely depends on your own needs. In general, however, it pays to restrict access, and allowing users to sign up as they wish can allow a level of openness that can potentially be dangerous. To restrict this, deselect the checkbox marked Allow users to sign up. Once this setting has been turned off, only administrators can create new accounts. In a moment, you’ll supply administrative privileges for a user you’ll create, and we’ll go into detail on adding new users, as well.
Under Authorization, select the Matrix-based security option. This allows some fine-tuning of the controls without resorting to complex setups. You’ll see a user named Anonymous is already present. An anonymous user is anybody from anywhere, even when they’re not logged in, which is why by default the anonymous user has no abilities. Since this is the initial setup of the Jenkins instance, you must give this user full permissions: there are no users other than anonymous right now, and you’re not logged in, so turning off anonymous permissions would effectively cut you off from accessing Jenkins at all.
Use the small button to the right of the Anonymous row to select all permissions. Next, use the User/group to add input field to specify a new user for which to add permissions. Note that this does not actually create a user, but rather specifies permissions for the user you will create shortly.
Normally, you would create a new user first and then specify permissions for them in this part of the form. Since no user exists yet, you’ll set up permissions and then create the user.
Enter a username and press Add. Due to a known bug, it is recommended that you keep the usernames lowercase. Give the new user all permissions the same way you did for the anonymous user. This essentially sets up a new administrator.
When you’re done, press Apply and then Save.
You will be taken automatically to a signup page, from which you can create a new account. The username of the account you create should correspond to the one for which you specified permissions earlier:

When you finish, you should find yourself automatically logged in.
Return to the security page (Manage Jenkins -> Configure Global Security) and scroll down to the security matrix. Now that you’ve created an administrative user, you can restrict the permissions for the anonymous user. Deselect all the permissions in the anonymous row, and then click Apply and Save. Your new user will now be the only user with access to Jenkins.
If you turned off the automatic sign up earlier, you might need to manually create additional new users. Here’s how:
Return to the Manage Jenkins page, scroll down to near the bottom and click on Manage Users. On the left you’ll see a sidebar with links; click on Create User. Enter the information for the new user the same way as you created the first user, and click Sign up. You’ll be redirected to the list of users, which will now include the new user. This user will have no permissions, so you will need to repeat the permissions process, going to Configure Global Security, using the User/group to add field to add a row to the matrix, specifying permissions, and clicking Apply and Save. For simplicity’s sake, if you have multiple users to create, create them all before moving on to adding permissions.
When creating new users, keep in mind that restrictiveness can be a major security asset. You can learn more about the specific ins and outs of matrix-based security in the Matrix-based Security section of the Use Jenkins documentation.
Typically, the next step is to assign roles to your users, controlling their exact abilities. We won’t go into details in this article, but this is a good article on the subject. Be sure to save your changes after you assign roles.
Step 4 — Installing Plugins
Once Jenkins is installed, minimally configured, and reasonably secured, it’s time to make it fit your needs. As found when it is first installed, Jenkins has relatively few abilities. In fact, Jenkins typifies a credo of many software developers: do one thing, and do it well. Jenkins “does one thing” by acting as a middleman for your software projects and “does it well” by providing plugins.
Plugins are add-ons that allow Jenkins to interact with a variety of outside software or otherwise extend its innate abilities. As with many areas of the Jenkins setup, the exact plugins you install will be significantly dependent on your projects.
From the main left hand side menu in Jenkins, click Manage Jenkins -> Manage Plugins. The page you land on shows plugins that are already installed but need updating – you can perform this easily by selecting the plugins you want to update and clicking the button at the bottom.
If you click on Available from this page, you will be taken to a colossal list of available plugins. Obviously, you don’t want to install all possible plugins, so the next question is how to select those you will need.
As mentioned, your choice in this matter will depend on your needs and goals. Fortunately, the Jenkins wiki provides a nice rundown of plugins by topic.
This list is definitely worth perusing, but no matter your project, there are a few plugins which you almost certainly should include. Here are a few — some generic, some specific:
-
Source control Git, SVN, and Team Foundation Server are some of the more common source control systems. All three of these have plugins in the Jenkins list, and others exist for less common systems as well. If you don’t know what source control is, you should really learn about it and start incorporating it in your projects. Be sure to install the plugin for your source control system, so Jenkins can run builds through it and control tests.
-
Copy Artifact This plugin allows you to copy components between projects, easing the pain of setting up similar projects if you lack a true dependency manager.
-
Throttle Concurrent Builds If you have multiple builds running which might introduce a conflict (due to shared resources, etc), this will easily allow you to alleviate this concern.
-
Dependency Graph Viewer A nifty plugin providing a graphic representation of your project dependencies.
-
Jenkins Disk Usage Jenkins may be fairly lightweight, but the same can’t always be said for the projects with which it integrates. This plugin lets you identify how much of your computing resources any of your jobs are consuming.
-
Build tools If your project is large, you probably use a build manager, such as Maven or Ant. Jenkins provides plugins for many of these, both to link in their basic functionality and to add control for individual build steps, projection configuration, and many other aspects of your builds.
-
Reporting While Jenkins provides its own reports, you can extend this functionality to many reporting tools.
-
Additional Authentication If the default Jenkins abilities for security don’t suite you, there are plenty of plugins to extend this – from Google logins, to active directory, to simple modifications of the existing security.
In general, if your project requires a certain tool, search the plugin list page on the wiki for the name of it or for a keyword regarding its function – chances are such a plugin exists, and this is an efficient way to find it.
Once you have selected those plugins you want to install on the Available tab, click the button marked Download now and install after restart.
Now that Jenkins is up and running the way you want it, you can start using it to power your project integration. Jenkins’ capabilities are nearly endless within its domain, but the following example should serve to demonstrate both the extent of what Jenkins can do and the beginnings of how to get a Jenkins job started.
Step 5 — Creating a Simple Project
There are a lot of interesting uses you can get out of Jenkins, and even playing around with the settings can be informative. To get started, though, it helps to understand how to set up a basic task. Follow the example in this section to learn how to establish and run a straightforward job.
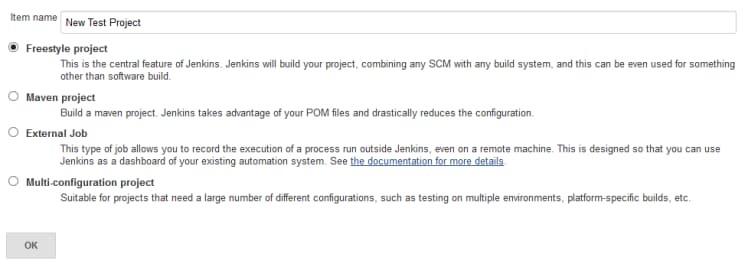
From the Jenkins interface home, select New Item. Enter a name and select Freestyle project.
This next page is where you specify the job configuration. As you’ll quickly observe, there are a number of settings available when you create a new project. Generally, one of the more important controls is to connect to a source repo. For purposes of this introductory example, we’ll skip that step.
On this configuration page you also have the option to add build steps to perform extra actions like running scripts.
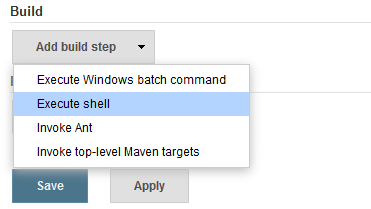
This will provide you with a text box in which you can add whatever commands you need. Use this to run various tasks like server maintenance, version control, reading system settings, etc.
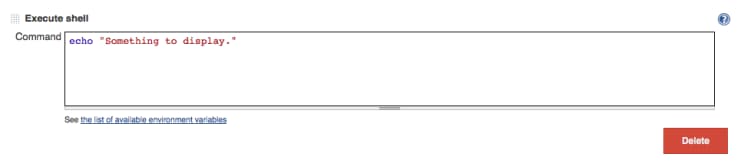
We’ll use this section to run a script. Again, for demonstration purposes, we’ll keep it extremely simple.
If you want, you can add subsequent build steps as well. Keep in mind that if any segment or individual script fails, the entire build will fail.
You can also select post-build actions to run, such as emailing the results to yourself.
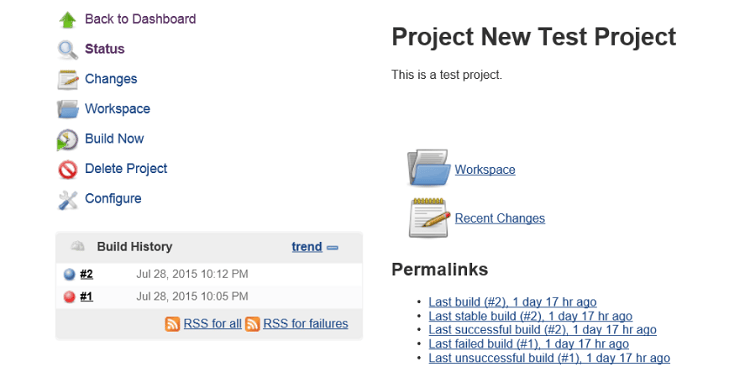
Save the project, and you’ll be taken to its project overview page. Here you can see information about the project, including its built history, though there won’t be any of that at the moment since this is a brand-new project.

Click Build Now on the left-hand side to start the build. You will momentarily see the build history change to indicate it is working. When done, the status icon will change again to show you the results in a concise form.
To see more information, click on that build in the build history area, whereupon you’ll be taken to a page with an overview of the build information:

The Console Output link on this page is especially useful for examining the results of the job in detail — it provides information about the actions taken during the build and displays all the console output. Especially after a failed build, this can be a useful place to look.
If you go back to Jenkins home, you’ll see an overview of all projects and their information, including status (in this case there’s only the one):

Status is indicated two ways, by a weather icon (on the home page dashboard, seen above) and by a colored ball (on the individual project page, seen below). The weather icon is particularly helpful as it shows you a record of multiple builds in one image.
In the image above, you see clouds, indicating that some recent builds succeeded and some failed. If all of them had succeeded, you’d see an image of a sun. If all builds had recently failed, there would be a poor weather icon.
These statuses have corresponding tooltips with explanations on hover and, coupled with the other information in the chart, cover most of what you need in an overview.
You can also rebuild the project from here by clicking (Build Now).
Of course, implementing a full-scale project setup will involve a few more steps and some fine-tuning, but it’s clear that without much effort, you can set up some very useful, very pragmatic monitors and controls for your projects. Explore Jenkins, and you’ll quickly find it to be an invaluable tool.
Conclusion
It’s highly worthwhile to seek out other tutorials, articles, and videos — there are plenty out there, and the wealth of information makes setting up project integration with Jenkins practically a breeze. The tutorials hosted by the Jenkins team are worth a look.
In particular, bridging the gap between basics and fully fledged projects is a great way to improve your Jenkins skills. Try following these examples as a way to ease that transition.
Additionally, many templates exist for common types of projects, such as PHP applications and Drupal, so chances are strong you won’t even need to set up everything from scratch. So go out there, learn all you dare about Jenkins, and make your life that much easier!
Thanks for learning with the DigitalOcean Community. Check out our offerings for compute, storage, networking, and managed databases.
About the author(s)
Software engineer by trade, renaissance man by choice.
Technical Editor, DigitalOcean
Still looking for an answer?
This textbox defaults to using Markdown to format your answer.
You can type !ref in this text area to quickly search our full set of tutorials, documentation & marketplace offerings and insert the link!
Great article. However it is much easier and better to use a repository to install jenkins. The Red Hat package repo works great with CentOS.
http://pkg.jenkins-ci.org/redhat/
https://wiki.jenkins-ci.org/display/JENKINS/Installing+Jenkins+on+Red+Hat+distributions
Cheers,
When I ran the command sudo yum install jenkins I got the error below:
Loaded plugins: fastestmirror, langpacks
Options error: unknown locale: en_NG
Please what did I do wrong?
Hey, thanks for the article :) I followed the above instructions and everything seemed to work fine, but after clicking on “Install suggested plugins”, I get this error:
An error occurred
An error occurred during installation: No valid crumb was included in the request
Any idea what could be causing this? :O
Hi , I am trying to follow the above steps to install jenkins on Oracle Enterprise Linux 7 When I try commands: sudo wget -O /etc/yum.repos.d/jenkins.repo http://pkg.jenkins-ci.org/redhat-stable/jenkins.repo or sudo wget -O /etc/yum.repos.d/jenkins.repo http://pkg.jenkins-ci.org/redhat/jenkins.repo I get connection timeout error. Resolving pkg.jenkins-ci.org (pkg.jenkins-ci.org)… 52.202.51.185 Connecting to pkg.jenkins-ci.org (pkg.jenkins-ci.org)|52.202.51.185|:80… failed: Connection timed out. Retrying
What am I suppose to do now? Any help is appreciated! Thanks
Faced issue that now by default (at least for CentOS 7-4-x64) “wget” is not installed. So need to do “sudo yum install -y wget” first. Makes sense to add this step to manual
Thank you very much for post on Jenkins. It’s very simple to understand and start with Jenkins. Jenkins CLI Example https://onclick360.com/jenkins-command-line
Thanks man. Recently I came across the following quote:
Data Science produces insights Machine Learning produces predictions Artificial Intelligence
 This work is licensed under a Creative Commons Attribution-NonCommercial- ShareAlike 4.0 International License.
Become a contributor for community
Get paid to write technical tutorials and select a tech-focused charity to receive a matching donation.

DigitalOcean Documentation
Full documentation for every DigitalOcean product.

Resources for startups and AI-native businesses
The Wave has everything you need to know about building a business, from raising funding to marketing your product.
The developer cloud
Scale up as you grow — whether you're running one virtual machine or ten thousand.

Start building today
From GPU-powered inference and Kubernetes to managed databases and storage, get everything you need to build, scale, and deploy intelligent applications.
