By Savic and Kathryn Hancox
Not using Ubuntu 18.04?
Choose a different version or distribution.
The author selected the Free and Open Source Fund to receive a donation as part of the Write for DOnations program.
Introduction
Mattermost is an open source collaboration and messaging platform created with security and configurability in mind providing comparable functionality to Discord or Slack. It offers group, threaded and one-to-one messaging, unlimited search history and file sharing capabilities, two-factor authorization and notifications. Mattermost also provides webhooks and bot integration for further customization. It’s accessible from every type of modern device due to its responsive web interface and dedicated mobile apps.
In this tutorial, you will set up the Mattermost Team Edition on your Ubuntu 18.04 server. First, you’ll install it and expose it at your domain, secured with a free Let’s Encrypt TLS certificate. Then, you’ll enable email notifications, customize branding, and create your messaging board (called a team in Mattermost).
Prerequisites
- A server running Ubuntu 18.04 with at least 2GB RAM, root access, and a sudo, non-root account. You can set this up by following this Initial Server Setup Guide.
- MariaDB installed on your server. To see how to do this, visit How To Install MariaDB on Ubuntu 18.04. You can follow the short version outlined at the beginning of the tutorial.
- Postfix installed in send-only mode on your server. Visit the How To Install and Configure Postfix as a Send-Only SMTP Server on Ubuntu 18.04 tutorial to set this up. You’ll use it to enable sending email notifications from Mattermost.
- Nginx installed on your server. For a guide on how to do this, complete Steps 1 to 4 of How To Install Nginx on Ubuntu 18.04.
- A fully registered domain name to host Mattermost, pointed to your server. This tutorial will use
mattermost.your-domainthroughout. You can purchase a domain name on Namecheap, get one for free on Freenom, or use the domain registrar of your choice. For DigitalOcean, you can follow this introduction to DigitalOcean DNS for details on how to add them.
Note: For your Postfix SMTP server to work correctly, the PTR records of your server must match your_domain. You can verify the server’s hostname by typing hostname at the command prompt. The output should match the name you gave your server when you created it.
Step 1 — Installing Mattermost
In this section, you will set up Mattermost on your server. This entails downloading the latest version, configuring it to use the MariaDB database, and creating a systemd service that will keep Mattermost always running in the background.
Downloading Mattermost
You’ll store all data pertaining to the Mattermost installation in a folder named ~/mattermost. Create it by running the following command:
- mkdir ~/mattermost
Navigate to it:
- cd ~/mattermost
You’ll need to head over to the Mattermost download page on the official website and copy the link for the latest release. At the time of writing, the latest version was 5.24.2. Download it using wget with the following command:
- wget https://releases.mattermost.com/5.24.2/mattermost-5.24.2-linux-amd64.tar.gz
Then, unpack the archive by running:
- tar -xvzf mattermost*.gz
This command will unpack all archive files in the directory whose names starts with mattermost.
You’ll get a folder named exactly as the original file you downloaded, which contains the Mattermost binaries. Copy it to /opt so you’ll be able to access it system wide by running:
- sudo cp -r mattermost /opt
Then, create a folder for Mattermost, where it will store user data:
- sudo mkdir /opt/mattermost/data
Note: Mattermost will store files and images you and your team will share in this directory, so make sure you’ve got plenty of free space on the drive where it’s located.
Next, create a user and group for Mattermost:
- sudo useradd --system --user-group mattermost
Then, make the newly made user and its group own the data folder:
- sudo chown -R mattermost:mattermost /opt/mattermost
This is done so that in the event of a breach, the attacker will be confined to the Mattermost directory and won’t be able to easily gain access to the rest of the system.
Finally, make the /opt/mattermost directory writable by groups:
- sudo chmod -R g+w /opt/mattermost
Now that Mattermost binaries are in place with secured permissions, let’s set up a database for it.
Setting Up the Database
Start off by entering the MariaDB prompt by running:
- sudo mysql
Create a database user called mmuser by running the following command, replacing your_mmuser_password with a password of your choice:
- CREATE USER 'mmuser'@'%' IDENTIFIED BY 'your_mmuser_password';
Then, create a database for Mattermost:
- CREATE DATABASE mattermost;
To let mmuser access the mattermost database, grant it access privileges by running:
- GRANT ALL PRIVILEGES ON mattermost.* TO 'mmuser'@'%';
Then, reload the grant tables to immediately apply the changes:
- FLUSH PRIVILEGES;
When you’re done, exit the prompt:
- exit
With the database and an accompanying user created, you’ll now edit the main Mattermost configuration file and set the correct database connection string.
Open it for editing:
- sudo nano /opt/mattermost/config/config.json
Find the lines that look like the following:
. . .
"DriverName": "..."
"DataSource": "..."
. . .
Modify them to as shown here, replacing your_mmuser_password with the password you set for the mmuser database account:
"DriverName": "mysql"
"DataSource": "mmuser:your_mmuser_password@tcp(localhost:3306)/mattermost?charset=utf8mb4,utf8&readTimeout=30s&writeTimeout=30s"
Save and close the file when you’re done.
You’ve now configured Mattermost to use the newly created database where it will store users, teams, and messages. Now you’re ready to move on to creating a systemd service for it.
Creating a systemd Service
Running Mattermost as a service using systemd ensures that it will be running in the background at all times.
You’ll store the service configuration in a file named mattermost.service, in the /lib/systemd/system directory, where systemd stores its services. Create it using your text editor:
- sudo nano /lib/systemd/system/mattermost.service
Add the following lines:
[Unit]
Description=Mattermost
After=network.target
After=mysql.service
Requires=mysql.service

[Service]
Type=notify
User=mattermost
Group=mattermost
ExecStart=/opt/mattermost/bin/mattermost
TimeoutStartSec=3600
Restart=always
RestartSec=10
WorkingDirectory=/opt/mattermost
LimitNOFILE=49152

[Install]
WantedBy=mysql.service
Here you first specify the description of the service. Then, you state that the mysql service must be started before the Mattermost service since the Mattermost service needs MariaDB running to work. After the [Unit] section, you define the type of the service. notify means that the process will inform systemd that it’s loaded. You provide the command that will be executed and set the restart policy to always. You also define the working directory for the process and which user and group it should run as.
In the [Install] section, you specify the database service as the value for the WantedBy parameter to ensure that Mattermost restarts together with the database. Omitting this setting may pose a problem when the database is automatically updated, because Mattermost may stop working if not restarted.
Save and close the file, then reload all services by running the following command:
- sudo systemctl daemon-reload
Check that it’s loaded correctly:
- sudo systemctl status mattermost
You’ll see the following output:
Output● mattermost.service - Mattermost
   Loaded: loaded (/lib/systemd/system/mattermost.service; disabled; vendor preset: enabled)
   Active: inactive (dead)
If systemd reports an error, double-check the file name of the service file, its location, and the validity of its contents.
Then, enable the Mattermost service by running:
- sudo systemctl enable mattermost
In this step, you have downloaded Mattermost, configured it to use the MariaDB database, and created a systemd service for it. In the next step, you’ll expose it at your domain.
Step 2 — Exposing Mattermost at Your Domain
In this section, you will configure Nginx as a reverse proxy server for Mattermost.
Before configuring Nginx, you’ll need to specify your domain in the main Mattermost config file. Open it for editing:
- sudo nano /opt/mattermost/config/config.json
Find the line that looks like the following:
. . .
"SiteURL": ""
. . .
Insert the name of your domain in the quotes:
...
"SiteURL": "http://mattermost.your-domain"
...
Save and close the file.
As you have learned in the Nginx prerequisite step, its site configuration files are stored under /etc/nginx/sites-available and must later be symlinked to /etc/nginx/sites-enabled to become active.
You’ll store the configuration for exposing Mattermost at your domain in a file named mattermost.conf, under /etc/nginx/sites-available. Create it using your editor:
- sudo nano /etc/nginx/sites-available/mattermost.conf
Add the following lines:
upstream backend {
   server localhost:8065;
   keepalive 32;
}

proxy_cache_path /var/cache/nginx levels=1:2 keys_zone=mattermost_cache:10m max_size=3g inactive=120m use_temp_path=off;

server {
   listen 80;
   server_name mattermost.your_domain;

   location ~ /api/v[0-9]+/(users/)?websocket$ {
       proxy_set_header Upgrade $http_upgrade;
       proxy_set_header Connection "upgrade";
       client_max_body_size 50M;
       proxy_set_header Host $http_host;
       proxy_set_header X-Real-IP $remote_addr;
       proxy_set_header X-Forwarded-For $proxy_add_x_forwarded_for;
       proxy_set_header X-Forwarded-Proto $scheme;
       proxy_set_header X-Frame-Options SAMEORIGIN;
       proxy_buffers 256 16k;
       proxy_buffer_size 16k;
       client_body_timeout 60;
       send_timeout 300;
       lingering_timeout 5;
       proxy_connect_timeout 90;
       proxy_send_timeout 300;
       proxy_read_timeout 90s;
       proxy_pass http://backend;
   }

   location / {
       client_max_body_size 50M;
       proxy_set_header Connection "";
       proxy_set_header Host $http_host;
       proxy_set_header X-Real-IP $remote_addr;
       proxy_set_header X-Forwarded-For $proxy_add_x_forwarded_for;
       proxy_set_header X-Forwarded-Proto $scheme;
       proxy_set_header X-Frame-Options SAMEORIGIN;
       proxy_buffers 256 16k;
       proxy_buffer_size 16k;
       proxy_read_timeout 600s;
       proxy_cache mattermost_cache;
       proxy_cache_revalidate on;
       proxy_cache_min_uses 2;
       proxy_cache_use_stale timeout;
       proxy_cache_lock on;
       proxy_http_version 1.1;
       proxy_pass http://backend;
   }
}
Replace mattermost.your-domain with your desired domain, then save and close the file.
In this file, you define that Nginx should listen to HTTP port 80. Then, you specify a server_name that tells Nginx for which domain to accept requests and apply this particular configuration. The next two blocks further configure the proxy connections, so that Mattermost will work correctly.
To make this site configuration active, you will need to create a symlink to it in the /etc/nginx/sites-enabled folder by running:
- sudo ln -s /etc/nginx/sites-available/mattermost.conf /etc/nginx/sites-enabled/mattermost.conf
To test the validity of the configuration, run the following command:
- sudo nginx -t
You’ll see the following output:
Outputnginx: the configuration file /etc/nginx/nginx.conf syntax is ok
nginx: configuration file /etc/nginx/nginx.conf test is successful
For the configuration to take effect, you’ll need to restart Nginx:
- sudo systemctl restart nginx
Then, start the Mattermost service by running:
- sudo systemctl start mattermost
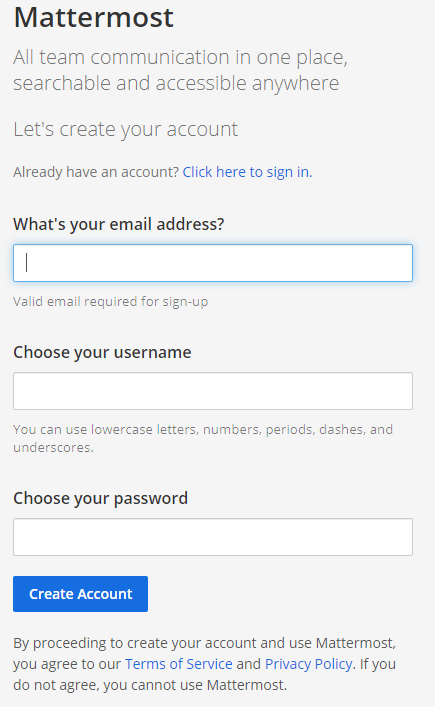
When this command finishes, try navigating to your domain in your browser. You should see a page asking you to sign up:
You now have your Mattermost installation available and accessible at your domain. In the next step, you’ll secure it by applying a free Let’s Encrypt TLS certificate.
Step 3 — Securing Your Domain
In this section, you will secure your domain using a Let’s Encrypt TLS certificate, which you’ll provision using Certbot.
You should have already installed Certbot as part of the prerequisites, so you’ll only need to install its Nginx plugin by running:
- sudo apt install python3-certbot-nginx
Also as part of the prerequisites, you enabled ufw (Uncomplicated Firewall) and configured it to allow unencrypted HTTP traffic. To be able to access the secured site, you’ll need to configure it to accept encrypted traffic by running the following command:
- sudo ufw allow https
The output will be:
OutputRule added
Rule added (v6)
Similarly to Nginx, you’ll need to reload it for the configuration to take effect:
- sudo ufw reload
The output will show:
OutputFirewall reloaded
To request certificates for your domain, run the following command:
- sudo certbot --nginx -d mattermost.your-domain
In this command, you run certbot to request certificates for your domain—you pass the domain name with the -d parameter. The --nginx flag tells it to automatically change Nginx site configuration to support HTTPS. Remember to replace mattermost.your-domain with your domain name.
If this is your first time running Certbot, you’ll be asked to provide an email address for urgent notices and to accept the EFF’s Terms of Service. Certbot will then request certificates for your domain from Let’s Encrypt. It will then ask you if you’d like to redirect all HTTP traffic to HTTPS:
OutputPlease choose whether or not to redirect HTTP traffic to HTTPS, removing HTTP access.
- - - - - - - - - - - - - - - - - - - - - - - - - - - - - - - - - - - - - - - -
1: No redirect - Make no further changes to the webserver configuration.
2: Redirect - Make all requests redirect to secure HTTPS access. Choose this for
new sites, or if you're confident your site works on HTTPS. You can undo this
change by editing your web server's configuration.
- - - - - - - - - - - - - - - - - - - - - - - - - - - - - - - - - - - - - - - -
Select the appropriate number [1-2] then [enter] (press 'c' to cancel):
It is recommended to select the second option in order to maximize security. After you input your selection, press ENTER.
Your output will be similar to this:
OutputIMPORTANT NOTES:
 - Congratulations! Your certificate and chain have been saved at:
   /etc/letsencrypt/live/mattermost.your-domain/fullchain.pem
   Your key file has been saved at:
   /etc/letsencrypt/live/mattermost.your-domain/privkey.pem
   Your cert will expire on 2020-09-28. To obtain a new or tweaked
   version of this certificate in the future, simply run certbot again
   with the "certonly" option. To non-interactively renew *all* of
   your certificates, run "certbot renew"
 - Your account credentials have been saved in your Certbot
   configuration directory at /etc/letsencrypt. You should make a
   secure backup of this folder now. This configuration directory will
   also contain certificates and private keys obtained by Certbot so
   making regular backups of this folder is ideal.
 - If you like Certbot, please consider supporting our work by:

   Donating to ISRG / Let's Encrypt:   https://letsencrypt.org/donate
   Donating to EFF:                    https://eff.org/donate-le
This means that Certbot has successfully generated TLS certificates and applied them to the Nginx configuration for your domain.
Since your domain can now be accessed using HTTPS, you’ll need to correct the URL of your domain in the main Mattermost config file. Open it for editing:
- sudo nano /opt/mattermost/config/config.json
Once more, find the line that looks like this:
. . .
"SiteURL": "http://mattermost.your-domain"
. . .
Change http to https:
. . .
"SiteURL": "https://mattermost.your-domain"
. . .
That is all you need to edit, so save and close the file.
Restart Mattermost by running:
- sudo systemctl restart mattermost
You can now reload your Mattermost domain in your browser and observe a padlock to the left of the site address, which means that you have properly secured your connection.
Now that your TLS certificates are configured successfully and your domain is accessible through a secure connection, you’re ready to configure Mattermost.
Step 4 — Setting up Mattermost
In this section, you’ll create your team in Mattermost, set up email notifications, and change server branding.
When you access Mattermost for the first time, you need to create an account with admin privileges to your server. If you already have an account, you can log in instead. Once you’re logged in, you’ll see a page telling you that there are no teams you can join.
To remedy this, select Create a team. You’ll see a page asking you to name your team (for instance, Sammy):
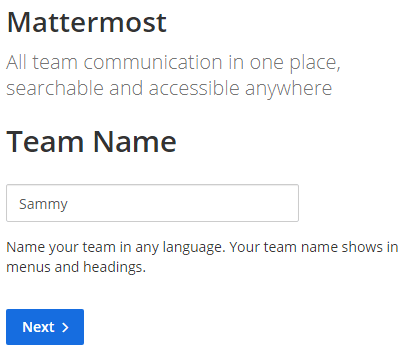
Enter a name of your choice and click Next. It’ll then ask you to define a web address for your team, at your domain, which will be the access point for your team in Mattermost:
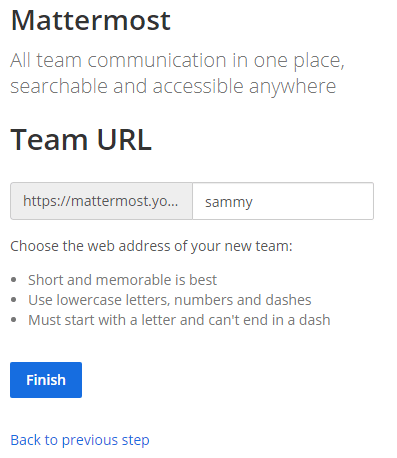
You can leave the URL unchanged. Once you’re done, click Finish. Mattermost will create your team and after you skip the tutorial, you’ll see the main interface, where you’ll spend most of your time communicating:
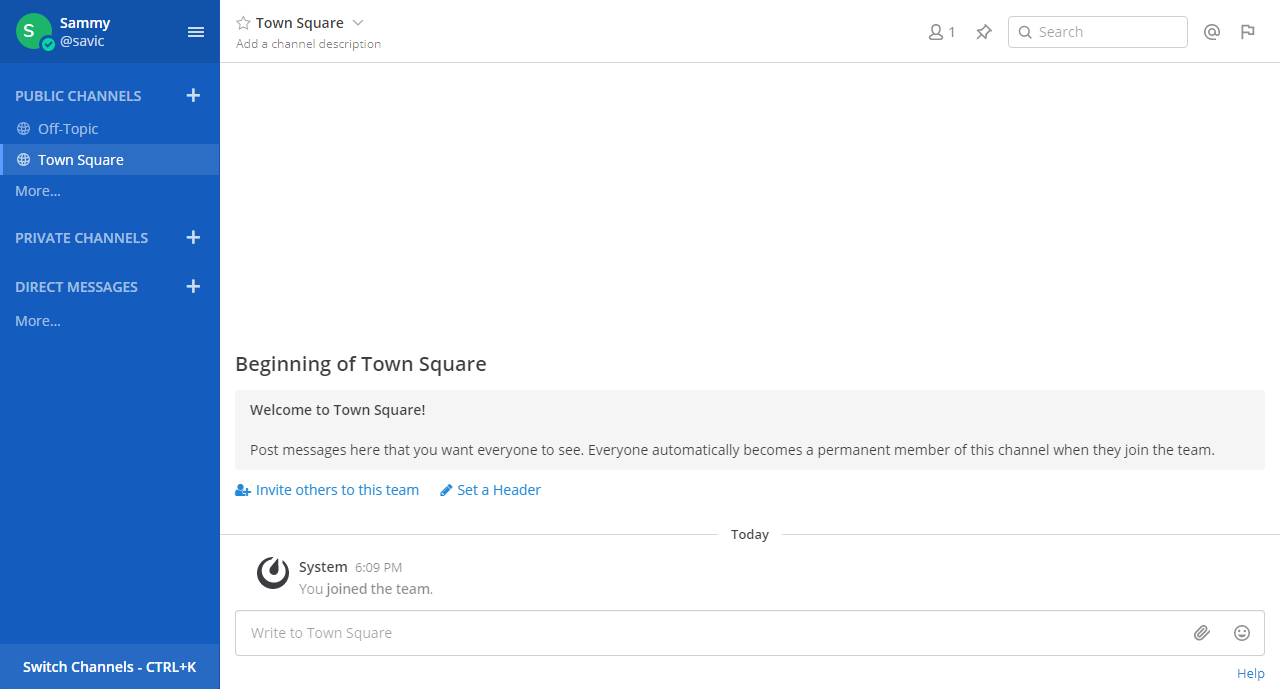
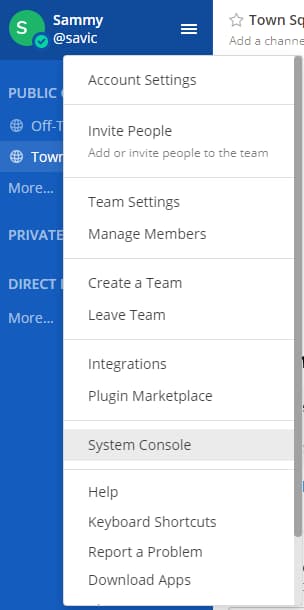
The interface will be explained in detail in the next step. To access settings, click on your username in the upper left corner and then System Console. You’ll be able to access this option only if you are an admin user.
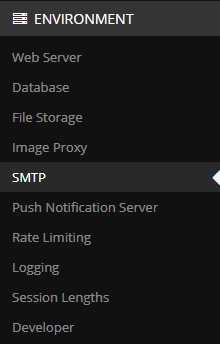
On the left side is a menu providing access to sections of Mattermost configuration. You’ll first set up email notifications, so click the SMTP option, which can be found under Environment:
To connect to the Postfix server you installed as part of the prerequisites, type in localhost as the SMTP Server, and 25 as the SMTP Server Port. Click the blue Save button when you’re done and then press the Test Connection button located further down. You’ll receive a message in a green box saying No errors were reported while sending an email. Please check your inbox to make sure.

You can now check the inbox of the email you signed up with. You’ll find a message from Mattermost, saying that the email settings are set up correctly. If you don’t receive it, check your spam folder. In case you received an error from Mattermost, double-check what you entered, and if required, go through the prerequisite tutorial once again.
Now that you’ve verified that emails are working, you need to enable email notifications by selecting Notifications underneath Site Configuration in the menu. Set the Enable Email Notifications setting to true and set the Notification From Address to an email address of your choice, such as mattermost@your_domain.
Because it does not need to actually exist, and will not be monitored, type in no-reply as the Notification Display Name, which is the sender’s name that will show in the email client. You can optionally Enable Email Batching to compress multiple unread messages into one email to reduce the overall number of emails that you send to members of your team. Click Save when you’re done modifying the settings.
You’ve globally enabled email notifications, and you can now optionally change the server branding by selecting the Customization option below Site Configuration. Here you can set the Site Name and Site Description, as well as upload a custom brand image and text.
You can exit the System Console by clicking on your username in the upper left corner and selecting the first option from the dropdown menu.
You’ve created your team in Mattermost and set up email notifications, so you’ll be kept informed about new discussions occurring in your team.
Conclusion
You now have your own scalable, self-hosted messaging platform, that you and your team can use to collaborate across all devices. You will now be able to communicate more efficiently, share files, and search across messages and channels with ease.
Mattermost does not provide video and audio meeting features. To set up video conferencing, check out our tutorial on Jitsi Meet, an open source application that provides encrypted multi-person conference rooms.
If you’d like to learn more about using the Mattermost user interface, visit the official documentation.
Thanks for learning with the DigitalOcean Community. Check out our offerings for compute, storage, networking, and managed databases.
About the author(s)
Expert in cloud topics including Kafka, Kubernetes, and Ubuntu.
Former Senior Technical Editor at DigitalOcean, with a strong focus on DevOps and System Administration content. Areas of expertise include Terraform, PyTorch, Python, and Django.
Still looking for an answer?
This textbox defaults to using Markdown to format your answer.
You can type !ref in this text area to quickly search our full set of tutorials, documentation & marketplace offerings and insert the link!
Hi! Tks, just one comment it is necesary to active the ‘email_notification’ in the json file to receive the emails and get rid of the ‘message warning’ in mattermost.
Doesn’t Digital Ocean close port 25? If this is the case, how can mattermost use it to send mail?
 This work is licensed under a Creative Commons Attribution-NonCommercial- ShareAlike 4.0 International License.
Become a contributor for community
Get paid to write technical tutorials and select a tech-focused charity to receive a matching donation.

DigitalOcean Documentation
Full documentation for every DigitalOcean product.

Resources for startups and AI-native businesses
The Wave has everything you need to know about building a business, from raising funding to marketing your product.
The developer cloud
Scale up as you grow — whether you're running one virtual machine or ten thousand.

Start building today
From GPU-powered inference and Kubernetes to managed databases and storage, get everything you need to build, scale, and deploy intelligent applications.
