By Brian Hogan
Not using Ubuntu 18.04?
Choose a different version or distribution.
A previous version of this tutorial was written by Sergey Zhukaev.
Introduction
Nginx is a fast and reliable open-source web server. It gained its popularity due to its low memory footprint, high scalability, ease of configuration, and support for a wide variety of protocols.
HTTP/2 is a new version of the Hypertext Transport Protocol, which is used on the Web to deliver pages from server to browser. HTTP/2 is the first major update of HTTP in almost two decades: HTTP1.1 was introduced to the public back in 1999 when webpages were usually just a single HTML file with inline CSS stylesheet. The Internet has dramatically changed since then, and now we are facing the limitations of HTTP 1.1 — the protocol limits potential transfer speeds for most modern websites because it downloads parts of a page in a queue (the previous part must download completely before the download of the next part begins), and an average modern webpage requires about 100 request to be downloaded (each request is a picture, js file, css file, etc).
HTTP/2 solves this problem because it brings a few fundamental changes:
- All requests are downloaded in parallel, not in a queue
- HTTP headers are compressed
- Pages transfer as a binary, not as a text file, which is more efficient
- Servers can “push” data even without the user’s request, which improves speed for users with high latency
Even though HTTP/2 does not require encryption, developers of two most popular browsers, Google Chrome and Mozilla Firefox, stated that for the security reasons they will support HTTP/2 only for HTTPS connections. Hence, if you decide to set up servers with HTTP/2 support, you must also secure them with HTTPS.
This tutorial will help you set up a fast and secure Nginx server with HTTP/2 support.
Prerequisites
Before we get started, we will need a few things:
- One Ubuntu 18.04 server set up by following the Ubuntu 18.04 initial server setup guide, including a sudo non-root user and a firewall.
- Nginx installed on your server, which you can do by following How To Install Nginx on Ubuntu 18.04.
- A domain name configured to point to your server. You can purchase one on Namecheap or get one for free on Freenom. You can learn how to point domains to DigitalOcean Droplets by following the documentation on How To Manage Your Domain With DigitalOcean.
- A TLS/SSL certificate configured for your server. You have three options:
- You can get a free certificate from Let’s Encrypt by following How to Secure Nginx with Let’s Encrypt on Ubuntu 18.04.
- You can also generate and configure a self-signed certificate by following How to Create a Self-signed SSL Certificate for Nginx in Ubuntu 18.04.
- You can buy one from another provider and configure Nginx to use it by following Steps 2 through 6 of How to Create a Self-signed SSL Certificate for Nginx in Ubuntu 18.04.
- Nginx configured to redirect traffic from port
80to port443, which should be covered by the previous prerequisites. - Nginx configured to use a 2048-bit or higher Ephemeral Diffie-Hellman (DHE) key, which should also be covered by the previous prerequisites.
Step 1 — Enabling HTTP/2 Support
If you followed the server block set up step in the Nginx installation tutorial, you should have a server block for your domain at /etc/nginx/sites-available/your_domain with the server_namedirective already set appropriately. The first change we will make will be to modify your domain’s server block to use HTTP/2.
Open the configuration file for your domain:
- sudo nano /etc/nginx/sites-available/your_domain
In the file, locate the listen variables associated with port 443:
...
    listen [::]:443 ssl ipv6only=on;
    listen 443 ssl;
...
The first one is for IPv6 connections. The second one is for all IPv4 connections. We will enable HTTP/2 for both.
Modify each listen directive to include http2:
...
    listen [::]:443 ssl http2 ipv6only=on;
    listen 443 ssl http2;
...
This tells Nginx to use HTTP/2 with supported browsers.
Save the configuration file and exit the text editor.
Whenever you make changes to Nginx configuration files, you should check the configuration for syntax errors, like this:
- sudo nginx -t
If the syntax is error-free, you will see the following output:
nginx: the configuration file /etc/nginx/nginx.conf syntax is ok
nginx: configuration file /etc/nginx/nginx.conf test is successful
Next, we’ll configure our server to use a more restrictive list of ciphers.
Step 2 — Removing Old and Insecure Cipher Suites
HTTP/2 has a blacklist of old and insecure ciphers, so we must avoid them. Cipher suites are cryptographic algorithms that describe how the transferred data should be encrypted.
The method you’ll use to define the ciphers depends on how you’ve configured your TLS/SSL certificates for Nginx.
If you used Certbot to obtain your certificates, it also created the file /etc/letsencrypt/options-ssl-nginx.conf which contains ciphers which aren’t strong enough for HTTP/2. Modifying this file will unfortunately prevent Certbot from applying updates in the future, so we’ll just tell Nginx not to use this file and we’ll specify our own list of ciphers.
Open the server block configuration file for your domain:
sudo nano /etc/nginx/sites-available/your_domain
Locate the line that includes the options-ssl-nginx.conf file and comment it out:
# include /etc/letsencrypt/options-ssl-nginx.conf; # managed by Certbot<^>
Below that line, add this line to define the allowed ciphers:
ssl_ciphers EECDH+CHACHA20:EECDH+AES128:RSA+AES128:EECDH+AES256:RSA+AES256:EECDH+3DES:RSA+3DES:!MD5;
Save the file and exit the editor.
If you used self-signed certificates or used a certificate from a third party and configured it according to the prerequisites, open the file /etc/nginx/snippets/ssl-params.conf in your text editor:
- sudo nano /etc/nginx/snippets/ssl-params.conf
Locate the following line:
...
ssl_ciphers ECDHE-RSA-AES256-GCM-SHA512:DHE-RSA-AES256-GCM-SHA512:ECDHE-RSA-AES256-GCM-SHA384:DHE-RSA-AES256-GCM-SHA384:ECDHE-RSA-AES256-SHA384;
...
Modify it so it looks like this:
...
ssl_ciphers EECDH+CHACHA20:EECDH+AES128:RSA+AES128:EECDH+AES256:RSA+AES256:EECDH+3DES:RSA+3DES:!MD5;
Save the file and exit your editor.
Once again, check the configuration for syntax errors:
- sudo nginx -t
If you see any errors, address them and test again.
Once you see no syntax errors, restart Nginx:
- sudo systemctl reload nginx
With the server restarted, let’s verify that it works.
Step 3 — Verifying that HTTP/2 is Enabled
Let’s ensure the server is running and working with HTTP/2.
Use the curl command to make a request to your site and view the headers:
- curl -I -L https://your_domain
You’ll see the following output:
OutputHTTP/1.1 301 Moved Permanently
Server: nginx/1.14.0 (Ubuntu)
Date: Fri, 06 Jul 2018 19:07:12 GMT
Content-Type: text/html
Content-Length: 194
Connection: keep-alive
Location: https://your_domain/

HTTP/2 200
server: nginx/1.14.0 (Ubuntu)
date: Fri, 06 Jul 2018 19:07:12 GMT
content-type: text/html
content-length: 16
last-modified: Fri, 06 Jul 2018 16:55:37 GMT
etag: "5b3f9f09-10"
accept-ranges: bytes
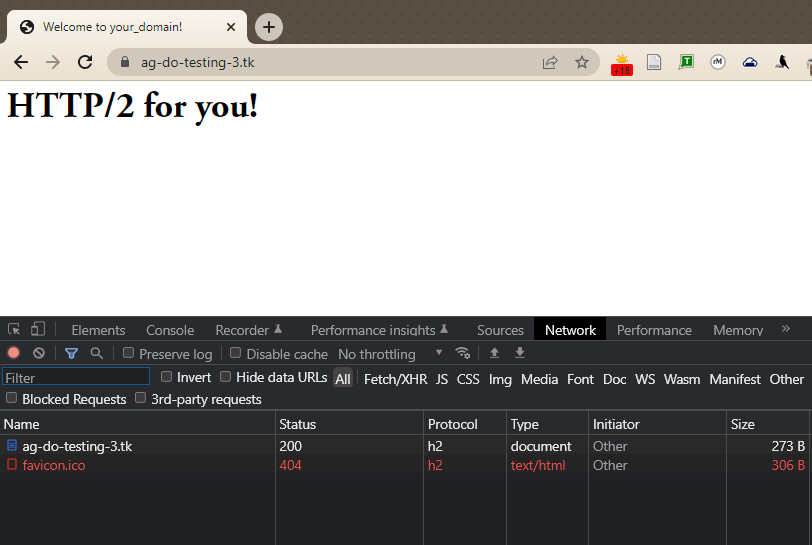
You can also verify that HTTP/2 is in use in Google Chrome. Open Chrome and navigate to http://your_domain. Open the Chrome Developer Tools (View -> Developer -> Developer Tools) and reload the page (View -> Reload This Page). Navigate to the Network tab, right-click on the table header row that starts with Name, and select the Protocol option from the popup menu.
You’ll see h2 (which stands for HTTP/2) in a new Protocol column, indicating that HTTP/2 is working.
At this point, you’re ready to serve content through the HTTP/2 protocol. Let’s improve security and performance by enabling HSTS.
Step 4 — Enabling HTTP Strict Transport Security (HSTS)
Even though your HTTP requests redirect to HTTPS, you can enable HTTP Strict Transport Security (HSTS) to avoid having to do those redirects. If the browser finds an HSTS header, it will not try to connect to the server via regular HTTP again for a given time period. No matter what, it will exchange data using only encrypted HTTPS connection. This header also protects us from protocol downgrade attacks.
Open the Nginx configuration file in your editor:
sudo nano /etc/nginx/nginx.conf
Add this line to the file to enable HSTS:
http {
...
    ##
    # Virtual Host Configs
    ##

    include /etc/nginx/conf.d/*.conf;
    include /etc/nginx/sites-enabled/*;
    add_header Strict-Transport-Security "max-age=15768000" always;
}
...
The max-age is set in seconds. The value 15768000 is equivalent to 6 months.
By default, this header is not added to subdomain requests. If you have subdomains and want HSTS to apply to all of them, you should add the includeSubDomains variable at the end of the line, like this:
add_header Strict-Transport-Security "max-age=15768000; includeSubDomains" always;
Save the file, and exit the editor.
Once again, check the configuration for syntax errors:
- sudo nginx -t
Finally, restart the Nginx server to apply the changes.
- sudo systemctl reload nginx
Conclusion
Your Nginx server is now serving HTTP/2 pages. If you want to test the strength of your SSL connection, please visit Qualys SSL Lab and run a test against your server. If everything is configured properly, you should get an A+ mark for security.
Thanks for learning with the DigitalOcean Community. Check out our offerings for compute, storage, networking, and managed databases.
About the author
Managed the Write for DOnations program, wrote and edited community articles, and makes things on the Internet. Expertise in DevOps areas including Linux, Ubuntu, Debian, and more.
Still looking for an answer?
This textbox defaults to using Markdown to format your answer.
You can type !ref in this text area to quickly search our full set of tutorials, documentation & marketplace offerings and insert the link!
I don’t have the following in my */sites-available/example.com configuration file
# include /etc/letsencrypt/options-ssl-nginx.conf; # managed by Certbot<^>
So what should I do? :)
If I change cipher then getting B grade on Qualys SSL Lab But got A+ if kept defaults by letsencrypt.
Is this okay? I think letsencypt’s ciphers are updated now.
This comment has been deleted
Fantastic tutorial, I got everything up and running, with a bit of additional work. I’m not sure which tutorial to “blame”, but if you follow all of the setup required to get Wordpress running on Ubuntu 18.04, with SSL, etc, you end up with a few minor issues.
Certbot automatically adds entries for listening on port 80 and 443, in the site-specific server block. However, those blocks (for me at least) did NOT include the ipv6 listening on either port. This actually had my SSL failing on ipv6, as ipv6 wasn’t working, which points to the issue coming up before this tutorial, not here exactly.
Either way, a note about that would be fantastic, if we can pinpoint which of these tutorials should address this, and update that one, it would be great.
I don’t have the file /etc/nginx/snippets/ssl-params.conf in the server. Where should i change the ssl_ciphers now?
Thanks
Great tutorial, but I have a question, when I run the command curl -I -L https://… I received the follow information:
HTTP/2 404
server: nginx/1.15.5 (Ubuntu)
date: Thu, 21 Nov 2019 11:19:06 GMT
content-type: text/html; charset=UTF-8
vary: Accept-Encoding
x-magento-cache-control: max-age=86400, public, s-maxage=86400
x-magento-cache-debug: MISS
pragma: no-cache
cache-control: max-age=0, must-revalidate, no-cache, no-store
expires: Wed, 21 Nov 2018 11:19:06 GMT
x-content-type-options: nosniff
x-xss-protection: 1; mode=block
x-frame-options: SAMEORIGIN
strict-transport-security: max-age=15768000
How I can fix the 404? My website works correctly but I don’t get either HTTP / 2 200 or HTTP / 1.1 301 Moved Permanently
As of 1/2020 ssl labs caps grades at B if you are serving with TLS1.0 or TLS 1.1. This guide shows you to comment out the include options-ssl-nginx.conf line in your /etc/nginx/sites-available/example.com file. After that line you set up your ssl_ciphers, when you can also set your protocols explicitly for TLS1.2 and 1.3. I use the following lines below the commented out nginx ssl options line and receive an A+ on the SSLtest as of today 3/2020.
# include /etc/letsencrypt/options-ssl-nginx.conf; # managed by Certbot
ssl_session_cache shared:le_nginx_SSL:10m;
ssl_session_timeout: 1440m;
ssl_session_tickets off;
ssl_protocols TLSv1.2 TLSv1.3;
ssl_prefer_server_ciphers on;
ssl_ciphers EECDH+CHACHA20:EECDH+AES128:RSA+AES128:EECDH+AES256:RSA+AES256:EECDH+3DES:RSA+3DES:!MD5;
 This work is licensed under a Creative Commons Attribution-NonCommercial- ShareAlike 4.0 International License.
Become a contributor for community
Get paid to write technical tutorials and select a tech-focused charity to receive a matching donation.

DigitalOcean Documentation
Full documentation for every DigitalOcean product.

Resources for startups and AI-native businesses
The Wave has everything you need to know about building a business, from raising funding to marketing your product.
The developer cloud
Scale up as you grow — whether you're running one virtual machine or ten thousand.

Start building today
From GPU-powered inference and Kubernetes to managed databases and storage, get everything you need to build, scale, and deploy intelligent applications.
