By Oğuz Kırat and Sharon Campbell
Not using Debian 8?
Choose a different version or distribution.
Introduction
VNC (Virtual Network Computing) is a system that enables users to connect and interact with graphical desktops of remote computers. It can transmit screen updates, and keyboard and mouse events, over the network.
VNC is useful when you need a graphical desktop environment for your server.
XFCE is a lightweight desktop environment. Because it has low system resource requirements, and because many VNC users are familiar with it, we will use XFCE in this tutorial. However, you can also use your favorite desktop environment, such as Gnome or KDE, instead.
In this tutorial we will set up a Debian 8 server, install the XFCE desktop environment on it, and connect it to via VNC. Additionally, we will create a startup script for VNC Server and secure it over SSH.
Prerequisities
Please complete the following prerequisites.
- Debian 8 (or 8.1) Droplet with root access. 512 MB of RAM is enough to run VNC and XFCE, but you might need a bigger Droplet depending on what you plan to do with the graphical interface
- VNC viewer (client) on your computer to connect to your server. In this tutorial, we will use UltraVNC on Windows, but you can use other VNC clients. You can download UltraVNC here. OS X comes with a built in VNC client called Screen Sharing
- SSH client to establish a secure connection over SSH. We will use PuTTY for Windows. You can download PuTTY here. On OS X, just use the built in Terminal application
Step 1 — Installing VNC and XFCE
In this step, we will install VNC Server and the XFCE desktop environment, with additional software and an icon pack.
Update your server’s package lists:
- apt-get update
Upgrade the packages themselves:
- apt-get -y upgrade
Then, we will install tightvncserver and XFCE4 with some useful add-ons, and an icon theme:
- apt-get install xfce4 xfce4-goodies gnome-icon-theme tightvncserver
By default there is no browser installed. You can install iceweasel (which is a rebranded version of Mozilla Firefox for Debian) if you want to access the web from your VNC connection:
- apt-get install iceweasel
Step 2 — Creating a VNC User
We will create a separate user for VNC connections, to keep things secure and tidy. Using sudo is highly recommended, instead of using the root user directly for your VNC server.
You can add a user named vnc to your Debian Droplet by using this command:
- adduser vnc
Give a password to your new user. You can skip all other questions by simply pressing ENTER.
Install sudo by executing this command:
- apt-get install sudo
Add your new vnc user to the sudo group, which will give permissions to that user to execute root commands.
- gpasswd -a vnc sudo
Let’s switch to the vnc user:
- su - vnc
Step 3 — Starting and Stopping Your VNC Server
As our newly created vnc user, we can start VNC Server and test our connection.
Start VNC Server:
- vncserver
As it is your first time running the server, you will be asked to set a password that clients will use to connect. Keep this password in mind for later! You can also set a view-only password, which will allow users to see the screen but not interact with it. Passwords should be 6-8 characters.
You will get a notice about your display number when the server is started.
xauth:  file /home/vnc/.Xauthority does not exist

New 'X' desktop is vnc:1

Creating default startup script /home/vnc/.vnc/xstartup
Starting applications specified in /home/vnc/.vnc/xstartup
Log file is /home/vnc/.vnc/vnc:1.log
By default, VNC connections are served on ports starting at 5901 for the first display. Your second display will be served on port 5902, etc.
Don’t stop the server now, but we’re including the stop command for reference.
Use this command to stop your VNC server on Display 1 (and port 5901):
- vncserver -kill :1
:1 is the display number you want to kill.
You can start VNC Server manually when you want to connect again. We’ll create a service for VNC Server in a later step.
Step 4 — Connecting from a VNC Client
You can now connect to your VNC server. Open your local VNC client, which will vary depending on your operating system.
On Windows, you can use UltraVNC here.
On OS X, you can use the built-in Screen Sharing app or access this app through Safari. In Safari, you can enter vnc://your_server_ip:5901
For your VNC Server address, enter your_server_ip:5901 and use the password you just set for your VNC connection.
You can select the Use default config button on the XFCE welcome screen to get started easily:
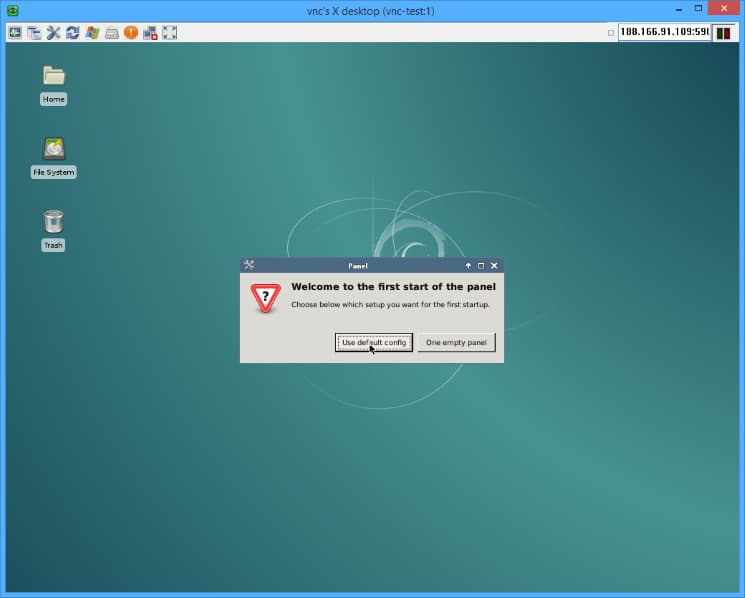
Now you can use your remote desktop!
Step 5 — Creating a systemd Service to Start VNC Server Automatically
In this section we’ll add VNC Server to systemd. Using a service can be useful to start and stop your VNC server, and also to start it automatically when your Droplet is rebooted.
First, let’s kill the current instance:
- vncserver -kill :1
Create a simple script to manage and configure our VNC server easily:
As the vnc or other sudo user, create a script file by using your favorite text editor.
- sudo nano /usr/local/bin/myvncserver
Add these contents exactly. This script provides VNC with a few parameters for startup.
#!/bin/bash
PATH="$PATH:/usr/bin/"
DISPLAY="1"
DEPTH="16"
GEOMETRY="1024x768"
OPTIONS="-depth ${DEPTH} -geometry ${GEOMETRY} :${DISPLAY}"

case "$1" in
start)
/usr/bin/vncserver ${OPTIONS}
;;

stop)
/usr/bin/vncserver -kill :${DISPLAY}
;;

restart)
$0 stop
$0 start
;;
esac
exit 0
You can modify the script to change the color depth or resolution of your VNC connection.
If you are using nano, you can save the file via CTRL+O and exit via CTRL+X.
Make the file executable:
- sudo chmod +x /usr/local/bin/myvncserver
Our script will help us to modify settings and start/stop VNC Server easily.
If you’d like, you can call the script manually to start/stop VNC Server on port 5901 with your desired configuration.
- sudo /usr/local/bin/myvncserver start
- sudo /usr/local/bin/myvncserver stop
- sudo /usr/local/bin/myvncserver restart
We can now create a unit file for our service. Unit files are used to describe services and tell the computer what to do to start/stop or restart the service.
- sudo nano /lib/systemd/system/myvncserver.service
Copy these commands to the service file. Our service will simply call the startup script above with the user vnc.
[Unit]
Description=Manage VNC Server on this droplet

[Service]
Type=forking
ExecStart=/usr/local/bin/myvncserver start
ExecStop=/usr/local/bin/myvncserver stop
ExecReload=/usr/local/bin/myvncserver restart
User=vnc

[Install]
WantedBy=multi-user.target
Now we can reload systemctl and enable our service:
- sudo systemctl daemon-reload
- sudo systemctl enable myvncserver.service
You’ve enabled your new service now. Use these commands to start, stop or restart the service using the systemctl command:
- sudo systemctl start myvncserver.service
- sudo systemctl stop myvncserver.service
- sudo systemctl restart myvncserver.service
Now you can run VNC Server as a service on your Droplet.
Step 6 — Securing Your VNC Server with SSH Tunneling
By default VNC connections don’t use encryption, so it is recommended to use an SSH Tunnel to secure your session.
To do that, we will only let our VNC server serve on localhost.
You can do that by adding -localhost to the OPTIONS line in the startup script created in the previous step.
First, stop the VNC server:
- sudo systemctl stop myvncserver.service
Edit your configuration script:
- sudo nano /usr/local/bin/myvncserver
Change this line:
. . .

OPTIONS="-depth ${DEPTH} -geometry ${GEOMETRY} :${DISPLAY}"

. . .
Replace it with:
. . .

OPTIONS="-depth ${DEPTH} -geometry ${GEOMETRY} :${DISPLAY} -localhost"

. . .
Restart the VNC server:
- sudo systemctl start myvncserver.service
Now you can’t directly connect to your VNC server from your remote computer.
Windows:
We will use PuTTY to create an SSH Tunnel and then connect through the tunnel we have created.
Open PuTTY.
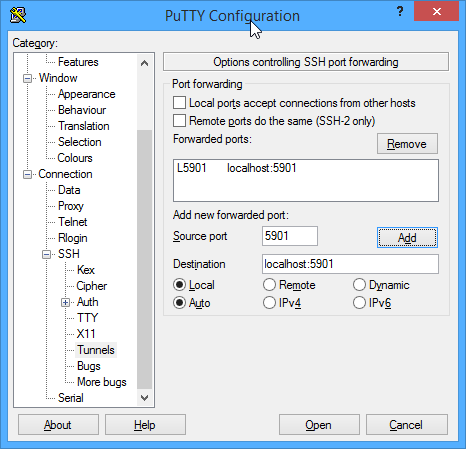
From the left menu, go to the Connection->SSH->Tunnels section.
In the Add New Forwarded Port section, enter 5901 as Source port and localhost:5901 as Destination.
Click the Add button.
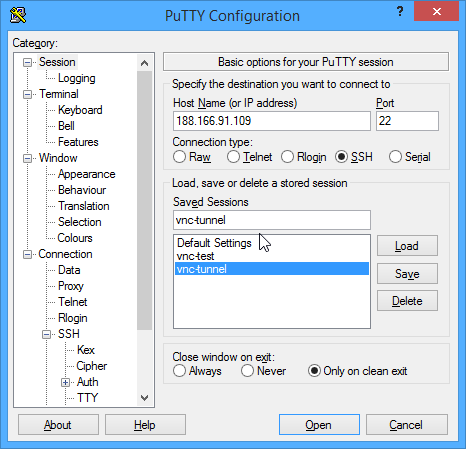
You can now go to the Session section in the left menu.
Enter your Droplet’s IP address in the Host Name (or IP address) field.
Click the Open button to connect. You can also save these options for later use.
Log in with your vnc user.
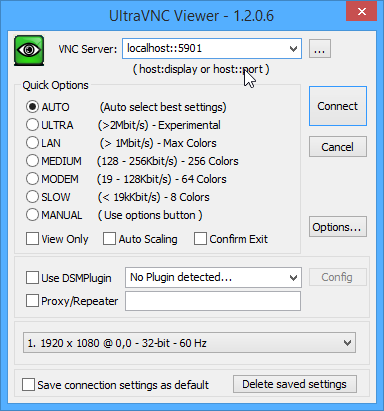
Keep the PuTTY window open while you make your VNC connection.
Now you can use your VNC viewer as usual. Just enter localhost::5901 as the address, and keep your SSH connection live in the background.
OS X:
To establish an SSH tunnel, use the following line in Terminal:
ssh vnc@your_server_ip -L 5901:localhost:5901
Authenticate as normal for the vnc user for SSH. Then, in the Screen Sharing app, use localhost:5901.
Conclusion
Now you can use a shared remote desktop on your Debian 8 server.
Use it to configure your server, or share your screen with others.
Thanks for learning with the DigitalOcean Community. Check out our offerings for compute, storage, networking, and managed databases.
About the author(s)
Current fan and former Editorial Manager at DigitalOcean. Hi! Expertise in areas including Ubuntu, Docker, Rails, and more.
Still looking for an answer?
This textbox defaults to using Markdown to format your answer.
You can type !ref in this text area to quickly search our full set of tutorials, documentation & marketplace offerings and insert the link!
I can’t get it to work. UltraVNC and Putty (latest versions) on Windows 7 to Tightvnc (latest version) on Debian 8 server, using the exact steps given in the article. The VNC connection tests OK by itself (i.e., without the -localhost option on the server) and SSH works by itself. But when I try to open a VNC session after running an SSH session on the client, I get the error message:
Connection failed - End of Stream Possible causes:
- Another user is already listening on this ID
- Bad connection
Could you suggest any remedy for this error?
Great Tutorial, but you should mention that File transfer with UltraVNC viewer and TightVNC server is not compatible.
Very helpful! Everything works great for me except the tunneling. I use putty SSH for other things, no problem, and I followed the instructions exactly. However, UltaVNC refuses to connect with the tunneling configuration (though it works fine in the unsecured configuration) I am running Debian 8.3: 3.16.0-4-amd64 #1 SMP Debian 3.16.7-ckt20-1+deb8u3 (2016-01-17) x86_64 GNU/Linux
Love to hear if others are having (and esp. solving) this problem.
- lonce
I suspect the “-localhost” option for secure SSH tunnelling only works with the paid version of VNC…
I have a problem with keyboard layout I have installed the server on “Debian stretch”. Works well. But when i access from the client in Kde (also on Debian streth - krdc or VNC Viewer) I get an error with keyboard. For instance, pressing “f”, appear letter “h”
Some idea?
OPTIONS="-depth ${DEPTH} -geometry ${GEOMETRY} :${DISPLAY} -localhost"
will still leave port 6001 exposed to the outside world
this should be instead
OPTIONS="-depth ${DEPTH} -geometry ${GEOMETRY} :${DISPLAY} -localhost -nolisten tcp"
Tutorial outdated for Debian 9.
And Iceweasel is now deprecated in favour of Firefox-ESR in Debian 9
https://wiki.debian.org/Iceweasel https://wiki.debian.org/Firefox
Also, UltraVNC 1.2.1.6 will freeze and crash. Use older version.
 This work is licensed under a Creative Commons Attribution-NonCommercial- ShareAlike 4.0 International License.
Become a contributor for community
Get paid to write technical tutorials and select a tech-focused charity to receive a matching donation.

DigitalOcean Documentation
Full documentation for every DigitalOcean product.

Resources for startups and AI-native businesses
The Wave has everything you need to know about building a business, from raising funding to marketing your product.
The developer cloud
Scale up as you grow — whether you're running one virtual machine or ten thousand.

Start building today
From GPU-powered inference and Kubernetes to managed databases and storage, get everything you need to build, scale, and deploy intelligent applications.
