By Jesin A

Introduction
This article will show you how to setup WordPress on the Lighttpd web server with the popular caching plugin W3 Total Cache. It is assumed that you already have setup a LLMP stack and have PHP functioning with Lighttpd. We’ll be doing a lot of manual configuration to make minify and page cache work with Lighttpd, as W3 Total Cache doesn’t support this web server out of the box (as it does with Apache and Nginx).
Enable required modules
WordPress requires mod_rewrite for permalinks but this module is commented out in the Lighttpd configurationp file. So edit the file and remove the #
nano /etc/lighttpd/lighttpd.conf

server.modules = (
        "mod_access",
        "mod_alias",
        "mod_compress",
        "mod_redirect",
#       "mod_rewrite",
)
Change
# "mod_rewrite",
to
"mod_rewrite",
We also need access logs for our site, so enable the accesslog module.
lighttpd-enable-mod accesslog
Create a Virtual Host
Add a virtual host for the WordPress site-- make sure to replace example.com with your own domain name.
nano /etc/lighttpd/lighttpd.conf

$HTTP["host"] =~ "(^|www\.)example.com$" {
    server.document-root = "/var/www/example.com"
    accesslog.filename = "/var/log/lighttpd/example.com-access.log"
    server.error-handler-404 = "/index.php"
}
Setting the “error-handler-404” to “index.php” is enough to get permalinks working. Reload the lighttpd service.
service lighttpd force-reload
Download and Install WordPress
Before downloading WordPress onto your VPS, you’ll create a MySQL database and a user with privileges for that database.
echo "CREATE DATABASE wordpress" | mysql -u root -p
echo "GRANT ALL PRIVILEGES ON wordpress.* TO 'wpuser'@'localhost' IDENTIFIED BY 'S3cRet_pass'" | mysql -u root -p
Replace wpuser and S3cRet_pass with your own values. Download the latest version of WordPress.
wget http://wordpress.org/latest.tar.gz
Extract the files inside the document-root of the virtual host. You’ll now have a directory named “wordpress” in this location. Rename this to the name of your domain to match value of the server.document-root directive.
cd /var/www
tar -xf ~/latest.tar.gz
mv wordpress example.com
Change the ownership of all files inside this directory to “www-data”
chown www-data:www-data -R example.com/
Open the browser, enter your domain name and complete the installation of WordPress. We have to enable and choose a permalink structure. But before that we have a problem to solve: WordPress performs checks for Apache mod_rewrite before enabling permalinks which will fail on lighttpd. So we have to force WordPress to enable permalinks.
Create a “Must Use” Plugin directory.
mkdir /var/www/example.com/wp-content/mu-plugins
Create a file inside it
nano /var/www/example.com/wp-content/mu-plugins/rewrite.php
with the following code.
<?php
add_filter( 'got_rewrite', '__return_true' );
The closing PHP tag ?> has been deliberately omitted.
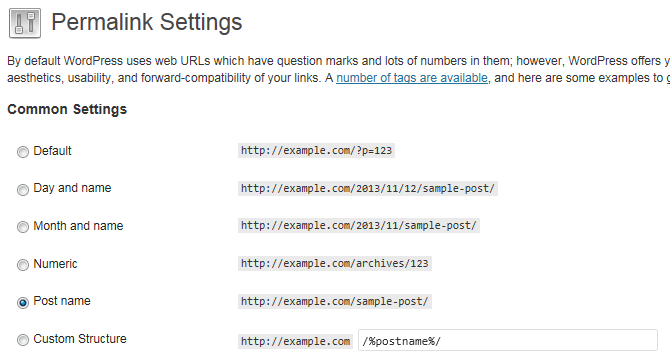
Login to wp-admin, navigate to Settings > Permalinks and choose a permalink structure.
Setting up W3 Total Cache Plugin
Configuring this plugin in lighttpd is different, as W3TC supports only Apache and Nginx, so we’ll be doing much of the configuration manually. Install this plugin from Plugins > Add New, activate it and stop here. We won’t be using this plugin’s options page to set it up initially.
Edit the lighttpd configuration file and add rewrite directives for minification and page caching. The additional configuration will go inside the virtual host block after the error-handler-404.
nano /etc/lighttpd/lighttpd.conf

$HTTP["host"] =~ "(^|www\.)example.com$" {
    server.document-root = "/var/www/example.com"
    accesslog.filename = "/var/log/lighttpd/example.com-access.log"
    server.error-handler-404 = "/index.php"

    #Rewrite rules for minified files
    url.rewrite-if-not-file = (
        "^/wp-content/cache/minify/(.+\.(css|js))$" => "/wp-content/plugins/w3-total-cache/pub/minify.php?file=$1"
    )

    #Rewrite rules for page cache enhanced
    #This is to prevent page cache rules from messing up minify rules
    $HTTP["url"] !~ "(.+\.(css|js|xml|html))" {

    #Bypass cache if the request contains any of these cookies
    $HTTP["cookie"] !~ "(comment_author|wp\-postpass|w3tc_logged_out|wordpress_logged_in|wptouch_switch_toggle)" {

    #Bypass cache for POST requests
    $HTTP["request-method"] != "POST" {

    #Bypass cache if query string isn't empty
    $HTTP["querystring"] !~ "(.*)" {
        url.rewrite-if-not-file = (
            "(.*)" => "/wp-content/cache/page_enhanced/example.com/$1/_index.html"
        )
    }
    }
    }
    }
}
Replace example.com in the /wp-content/cache/page_enhanced/example.com/$1/_index.html path with the exact domain using which you installed WordPress.
Save the file and reload lighttpd
service lighttpd force-reload
Go to the WordPress administration panel (wp-admin), navigate to Plugins > Add New, search and install the plugin.
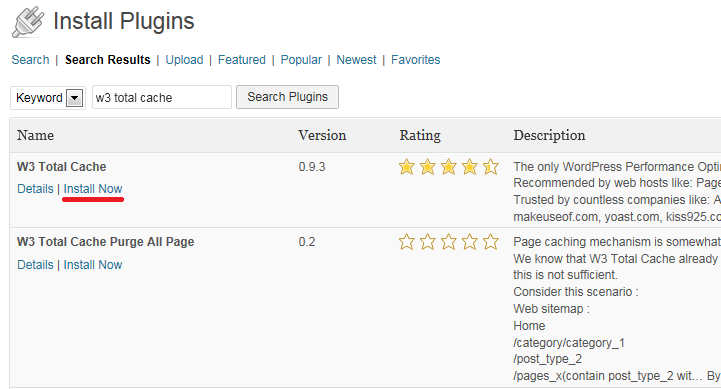
Activate the plugin and come back to the SSH console without changing any settings.
The browser cache module of the W3 Total Cache plugin creates gzipped files from the page cache and minify cache, which will be served to users based on the “Accept-Encoding” request header. But lighttpd can compress content on the fly with the mod_compress module so we’ll disable this option.
Using the sed command, find and replace configuration entries.
cd /var/www/example.com/
sed -i "s/'browsercache.cssjs.compression' => true/'browsercache.cssjs.compression' => false/" wp-content/w3tc-config/master.php
sed -i "s/'browsercache.html.compression' => true/'browsercache.html.compression' => false/" wp-content/w3tc-config/master.php
sed -i "s/'browsercache.other.compression' => true/'browsercache.other.compression' => false/" wp-content/w3tc-config/master.php
sed -i "s/'browsercache.cssjs.compression' => true/'browsercache.cssjs.compression' => false/" wp-content/cache/config/master.php
sed -i "s/'browsercache.html.compression' => true/'browsercache.html.compression' => false/" wp-content/cache/config/master.php
sed -i "s/'browsercache.other.compression' => true/'browsercache.other.compression' => false/" wp-content/cache/config/master.php
Minification
This option is known to break the design of themes and plugins, so use it only if you know it’ll work for you. For this article the Twenty Thirteen theme was used, which works fine with minification.
Before enabling this option the “Auto Minify Test” has to be disabled. This is because the plugin requires a set of rewrite rules for the Minify Auto test to complete successfully. While we can try to convert them for lighttpd (from .htaccess or nginx.conf) it isn’t worth the time, as auto minification works on the site even without these tests.
cd /var/www/example.com/
sed -i "s/'minify.auto.disable_filename_length_test' => false/'minify.auto.disable_filename_length_test' => true/" wp-content/w3tc-config/master.php
sed -i "s/'minify.auto.disable_filename_length_test' => false/'minify.auto.disable_filename_length_test' => true/" wp-content/cache/config/master.php
Back in wp-admin navigate to Performance > General Settings and enable minify.
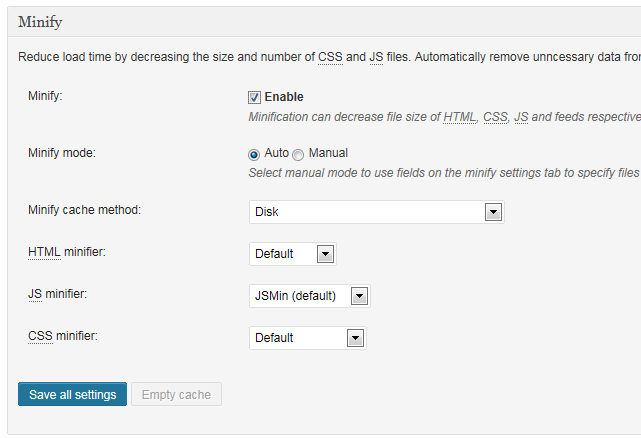
Open your WordPress site on the browser and look in the <head> section. You’ll find minified CSS and JS like this:
<!DOCTYPE html>
<!--[if IE 7]>
<html class="ie ie7" lang="en-US">
<![endif]-->
<!--[if IE 8]>
<html class="ie ie8" lang="en-US">
<![endif]-->
***
<html lang="en-US">
***
<head><link rel="stylesheet" type="text/css" href="http://example.com/wp-content/cache/minify/000000/M9AvKU_NK6ksycgsKklNzdNPy88rKdZPT81LLcpMzs8r1jFAV1FcUpmTCgA.css"media="all" />
<script type="text/javascript" src="http://example.com/wp-content/cache/minify/000000/M9bPKixNLarUMYYydHMz04sSS1L1cjPz4IJ6uYnF-XkgGihooF9SnppXUlmSkVlUkpqap59VrJ9WmpdckpmfVwwA.js"></script>
If the design of the site looks broken, it could mean incorrect minify rewrite rules in lighttpd.conf or you’ve forgotten to reload lighttpd.
Page Caching
Page caching creates static HTML files of your content and serves them to users with a rewrite rule. As we’ve already added rewrite rules we can enable page caching by going to wp-admin > Performance > General Settings.
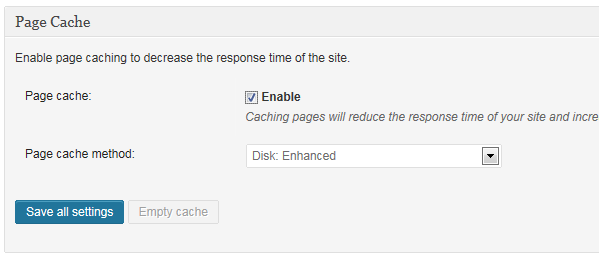
The default Page Cache Method is Disk: Enhanced however if you’ve accidentally changed it to something else you can’t change it back as this option is disabled.
So we need to manually modify this by editing files.
cd /var/www/example.com
sed -i "s/'pgcache.engine' => '\([a-z]\+\)'/'pgcache.engine' => 'file_generic'/" wp-content/w3tc-config/master.php
sed -i "s/'pgcache.engine' => '\([a-z]\+\)'/'pgcache.engine' => 'file_generic'/" wp-content/cache/config/master.php
This enables Page caching with Disk Enhanced. To test if it works use curl to request a page which is not cached.
# curl -v -s -o /dev/null http://example.com/about/
* About to connect() to example.com port 80 (#0)
*   Trying 1.1.1.1... connected
> GET /about/ HTTP/1.1
> User-Agent: curl/7.23.1
> Host: example.com
> Accept: */*
>
< HTTP/1.1 200 OK
< Link: <http://example.com/?p=28>; rel=shortlink
< Last-Modified: Tue, 05 Nov 2013 15:55:53 GMT
< Vary:
< X-Pingback: http://example.com/xmlrpc.php
< Content-Type: text/html; charset=UTF-8
< Transfer-Encoding: chunked
< Date: Tue, 05 Nov 2013 15:55:53 GMT
< Server: lighttpd/1.4.31
<
{ [data not shown]
* Connection #0 to host example.com left intact
* Closing connection #0
Execute the same request again.
# curl -v -s -o /dev/null http://example.com/about/
* About to connect() to example.com port 80 (#0)
*   Trying 1.1.1.1... connected
> GET /about/ HTTP/1.1
> User-Agent: curl/7.23.1
> Host: example.com
> Accept: */*
>
< HTTP/1.1 200 OK
< Vary: Accept-Encoding
< Content-Type: text/html
< Accept-Ranges: bytes
< ETag: "94995388"
< Last-Modified: Tue, 05 Nov 2013 15:55:53 GMT
< Content-Length: 23659
< Date: Tue, 05 Nov 2013 15:55:55 GMT
< Server: lighttpd/1.4.31
<
{ [data not shown]
* Connection #0 to host example.com left intact
* Closing connection #0
Notice the difference between both the headers. The first response has headers Link: and X-Pingback which are added by PHP. The second response was purely HTML so it doesn’t have those headers. You can also view the cached pages on disk.
root@wp-lighttpd:~# ls -lR /var/www/example.com/wp-content/cache/page_enhanced/www.example.com/
/var/www/example.com/wp-content/cache/page_enhanced/www.example.com/:
total 12
drwxr-xr-x 2 www-data www-data 4096 Nov  5 21:25 about
drwxr-xr-x 2 www-data www-data 4096 Nov  5 21:21 front-page
drwxr-xr-x 2 www-data www-data 4096 Nov  5 21:23 sample-page

/var/www/example.com/wp-content/cache/page_enhanced/www.example.com/about:
total 24
-rw-r--r-- 1 www-data www-data 23659 Nov  5 21:25 _index.html

/var/www/example.com/wp-content/cache/page_enhanced/www.example.com/front-page:
total 28
-rw-r--r-- 1 www-data www-data 25100 Nov  5 21:21 _index.html

/var/www/example.com/wp-content/cache/page_enhanced/www.example.com/sample-page:
total 28
-rw-r--r-- 1 www-data www-data 25837 Nov  5 21:23 _index.html
To check if the site supports compression use the –compressed option of curl.
# curl -v -s -o /dev/null/ --compressed http://example.com/about/
* About to connect() to example.com port 80 (#0)
*   Trying 1.1.1.1... connected
> GET /about/ HTTP/1.1
> User-Agent: curl/7.23.1
> Host: www.example.com
> Accept: */*
> Accept-Encoding: deflate, gzip
>
< HTTP/1.1 200 OK
< Vary: Accept-Encoding
< Content-Encoding: gzip
< Last-Modified: Tue, 05 Nov 2013 15:55:53 GMT
< ETag: "2062104151"
< Content-Type: text/html
< Accept-Ranges: bytes
< Content-Length: 4819
< Date: Tue, 05 Nov 2013 16:01:03 GMT
< Server: lighttpd/1.4.31
<
{ [data not shown]
* Connection #0 to host www.example.com left intact
* Closing connection #0
Notice the Content-Length and Content-Encoding headers: the content length was previously 23659, but now it is only 4819.
Browser Cache
This type of cache tells the browser how much time it can keep objects (like images, CSS and JS) in its own cache. This requires adding the Expires and Cache-Control headers which is done using the mod_expire module.
Enable this module
lighttpd-enable-mod expire
and add the neccessary configuration inside the virtual host.
nano /etc/lighttpd/lighttpd.conf
#Browser Cache
$HTTP["cookie"] !~ "(wordpress_logged_in)" {
$HTTP["url"] =~ "^/(.+\.(css|js|png|jpg|bmp|ico)\??.*)$" {
    expire.url = ( "" => "access plus 365 days" )
}
}
In this block, we check if the user isn’t logged in first and then match the files with extensions mentioned. You can also add more extensions inside the brackets separated by “|”. Reload lighttpd
service lighttpd force-reload
and check for the new headers with curl.
# curl -I example.com/wp-content/themes/twentythirteen/style.css

HTTP/1.1 200 OK
Expires: Wed, 05 Nov 2014 16:31:33 GMT
Cache-Control: max-age=31536000
Content-Type: text/css
Accept-Ranges: bytes
ETag: "2905279475"
Last-Modified: Thu, 24 Oct 2013 19:39:10 GMT
Content-Length: 52290
Date: Tue, 05 Nov 2013 16:31:33 GMT
Server: lighttpd/1.4.31
Updating the Plugin
This configuration was done on WordPress 3.7.1 with W3 Total Cache 0.9.3 and works well with these. Any future updates to W3 Total cache which changes the rewrite directory structure will break minifcation and page caching (though the latter isn’t visible). So before upgrading this plugin, spin up a droplet with the WordPress on Ubuntu 12.10 image, install W3 Total Cache and check out the .htaccess file for new rewrite rules.
It is easier to migrate them to lighttpd. Currently Apache uses the following rule for minify
RewriteBase /wp-content/cache/minify/
RewriteRule ^(.+\.(css|js))$ ../../plugins/w3-total-cache/pub/minify.php?file=$1 [L]
In lighttpd this rule becomes
url.rewrite-final = (
        "^/wp-content/cache/minify/(.+\.(css|js))$" => "/wp-content/plugins/w3-total-cache/pub/minify.php?file=$1"
    )
As for page caching Apache has
RewriteRule .* "/wp-content/cache/page_enhanced/%{HTTP_HOST}/%{REQUEST_URI}/_index.html" [L]
Lighttpd doesn’t allow server variables in the rewrite location so we have hard coded it.
url.rewrite-if-not-file = (
    "(.*)" => "/wp-content/cache/page_enhanced/example.com/$1/_index.html"
)
<div class=“author”>Submitted by: <a rel=“author” href=“http://jesin.tk/”>Jesin A</a></div>
Thanks for learning with the DigitalOcean Community. Check out our offerings for compute, storage, networking, and managed databases.
About the author
Independent Technical writer, WordPress developer and Linux administrator.
Still looking for an answer?
This textbox defaults to using Markdown to format your answer.
You can type !ref in this text area to quickly search our full set of tutorials, documentation & marketplace offerings and insert the link!
hi, the minify url rewrite is not working for me. its showing this when I save all the settings: W3 Total Cache error:It appears Minify URL rewriting is not working. Please verify that the server configuration allows .htaccess Unfortunately minification will not function without custom rewrite rules. Please ask your server administrator for assistance. Also refer to the install page for the rules for your server. Technical info .htaccess file contains rules to rewrite url http://domain.com/wp-content/cache/minify/000000/w3tc_rewrite_test. If handled by plugin, it returns “OK” message. The plugin made a request to http://domain.com/wp-content/cache/minify/000000/w3tc_rewrite_test but received: 404 Not Found instead of “OK” response.
@obrcmc Minify will work even if this error is displayed. That is why this article recommends disabling the <strong>minify filename length test</strong>. This can be done with the following commands.
<pre> cd /var/www/example.com/ sed -i “s/‘minify.auto.disable_filename_length_test’ => false/‘minify.auto.disable_filename_length_test’ => true/” wp-content/w3tc-config/master.php sed -i “s/‘minify.auto.disable_filename_length_test’ => false/‘minify.auto.disable_filename_length_test’ => true/” wp-content/cache/config/master.php </pre>
@venkat4india: On your server. Make sure to replace “example.com” with your actual site directory.
I have several servers like this. I am now trying to setup a test site on a server using an ip (no domain name) & a subfolder.
I can reach only the home page, not the inner pages.
http://104.131.186.136/breaking/ – works
http://104.131.186.136/breaking/tennessee-3-year-old-shoots-18-month-old-brother-in-the-head/ – doesn’t work, 404 not found
If I change the permalinks to use index.php – it works. e.g. http://104.131.186.136/breaking/index.php/tennessee-3-year-old-shoots-18-month-old-brother-in-the-head/ – this works (when permalinks set accordingly)
Couldn’t figure this one out.
Thanks,
Avi
Does this setup still apply for new sites setup in 2015? I am currently using server pilot and I noticed that W3 total cache told me the following:
mod_deflate: Not detected (required for disk enhanced Page Cache and Browser Cache) mod_env: Not detected (required for disk enhanced Page Cache and Browser Cache) mod_expires: Not detected (required for disk enhanced Page Cache and Browser Cache) mod_headers: Not detected (required for disk enhanced Page Cache and Browser Cache) mod_mime: Not detected (required for disk enhanced Page Cache and Browser Cache) mod_rewrite: Not detected (required for disk enhanced Page Cache and Browser Cache) mod_setenvif: Not detected (required for disk enhanced Page Cache and Browser Cache)
What does this mean?
 This work is licensed under a Creative Commons Attribution-NonCommercial- ShareAlike 4.0 International License.
Become a contributor for community
Get paid to write technical tutorials and select a tech-focused charity to receive a matching donation.

DigitalOcean Documentation
Full documentation for every DigitalOcean product.

Resources for startups and AI-native businesses
The Wave has everything you need to know about building a business, from raising funding to marketing your product.
The developer cloud
Scale up as you grow — whether you're running one virtual machine or ten thousand.

Start building today
From GPU-powered inference and Kubernetes to managed databases and storage, get everything you need to build, scale, and deploy intelligent applications.
