By Alexandru Andrei and Dave Rankin
Not using Debian 8?
Choose a different version or distribution.
Introduction
For efficiency, security, and the ability to do everything from the command line, many servers don’t use a graphical user interface (GUI). However, there are times when you’ll want to run GUI applications on your remote servers, like when you’re testing web sites in browsers or you’re looking to set up a remotely accessible workstation with a full desktop environment (DE).
The typical solution to interacting with a graphical interface on a remote computer running Linux or other *nix variants is Virtual Network Computing (VNC). Unfortunately, VNC is notoriously sluggish, insecure by default, and requires a lot of manual configuration to get up and running.
In contrast, X2Go provides several advantages:
- Instead of sending images from the remote machine to your computer like VNC, X2Go uses a modified version of the X (graphical) server and X11 protocol to minimize the amount of data exchanged between client and server. This gives you a near local-like desktop experience. The only requirement for this kind of performance is that the network distance between client and server isn’t too large. When you ping the server from the client machine, the round-trip time should not exceed 100 milliseconds. Close to 50ms would be optimal, and 200ms would be acceptable but not great.
- X2Go works with your existing SSH daemon, encrypting all traffic between the client and the server while relying on the same well-tested and secure mechanism of authentication.
- X2Go doesn’t require complex manual configuration. It knows how to set up the session and launch popular desktop environments like XFCE, LXDE, MATE, and others automatically.
- Unlike VNC, X2Go sets up the environment when you log in, so you don’t need to leave an X server running all the time. Plus, your session continues running even after you disconnect, which means that when you reconnect you’ll find everything as you left it, just like on a local desktop.
- X2Go supports multiple login sessions, desktops, and users logged in to their own separate environments.
- Instead of a whole desktop environment, you can launch single graphical applications in X2Go, saving your local machine’s resources while taking advantage of a server’s more powerful resources, even leaving tasks running remotely for days at a time.
Such a setup is useful when:
- You need this type of desktop environment but can’t install a Linux-based operating system locally.
- You’re going on a trip but can’t take your computer with you.
- Your Internet service provider gives you very little bandwidth, but you need access to tens or hundreds of gigabytes of data.
- You need a separate machine to work on something for weeks or months at a time.
- You’re working with a team, and everybody needs access to a single remote desktop.
- You need some combination of graphical desktop, high-speed Internet, reliable power source, and ability to scale resources up and down quickly.
In this tutorial, we’re recommending Debian over Ubuntu, because some versions of Ubuntu’s default DE, Unity, aren’t compatible with X2Go. And, alternative desktop environments can sometimes be problematic on Ubuntu.
Likewise, we’re recommending XFCE, because it doesn’t require a dedicated video card to run, making it more compatible with X2Go. But, LXDE, Mate (with compositing disabled), and even older KDEs, Unity and Cinnamon (with some tweaks) can work, too.
Lastly, Firefox—if xrender is active (which it is by default in Debian 8)—usually provides a smoother experience with X2Go.
After working through this tutorial, you’ll have a Linux desktop that you can connect to remotely and that includes exactly the same utilities you would get by installing Debian XFCE locally. Plus, by installing and configuring a firewall, you’ll secure your remote desktop, making it more difficult to exploit.
Prerequisites
Before getting started with this tutorial, you will need:
- A Debian 8 x64 instance with 1 or 2GB of RAM. (1GB is minimal, 2GB is safer to start with, and 4GB would be optimal). Choose a server location that is as close as possible to the area where you intend to connect from.
- A user with sudo privileges; following this guide will get you started: Initial Server Setup with Debian 8.
Remember that if you run out of RAM, the application will be terminated by the Linux kernel, and you might lose your work. If you know or notice that the programs you use require a lot of RAM, you can power off your droplet and resize as needed.
Step 1 — Firewalling the Server
Installing an entire desktop environment pulls in a lot of additional software dependencies and recommendations, some of which may try to open up network ports. For example, the Common UNIX Printing System (CUPS) included in many DEs might try to open up port 631. While a service like CUPS may be useful at home, we don’t want our server to be that exposed to the entire Internet, so blocking every incoming connection is a good idea. The only exception will be port 22, which will be left open so that we’re able to connect with SSH and X2Go.
To secure our server, we’ll be using Uncomplicated Firewall (UFW), because it’s less error-prone to beginner mistakes, easier to understand and manage, and fits better with our goal of only allowing connections to one port. iptables and other more sophisticated firewalls are better suited for advanced and complex rules that require more fine-grained detail. (See UFW Essentials: Common Firewall Rules and Commands for a quick reference guide to common commands.)
First, install UFW:
- sudo apt-get install ufw
By default, the firewall should be inactive at this point. You can check with:
- sudo ufw status verbose
The result should be:
OutputStatus: inactive
Verifying the status at this point is important to avoid locking ourselves out if ufw is active when we block all incoming connections later.
If UFW is already active, disable it with:
- sudo ufw disable
Now, set the default firewall rules to deny all incoming connections and allow all outgoing ones:
- sudo ufw default deny incoming
- sudo ufw default allow outgoing
And, allow SSH connections to the server (port 22):
- sudo ufw allow 22
With the rules in place, let’s activate ufw:
- sudo ufw enable
This will output:
OutputCommand may disrupt existing ssh connections. Proceed with operation (y|n)?
Type y and press ENTER to activate the firewall.
If you run into a problem and discover that SSH access is blocked, you can follow How To Use the DigitalOcean Console to Access your Droplet to recover access.
With our firewall in place, there’s only one point of entry to our server, and we’re ready to install the graphical environment for the X2Go server.
Step 2 — Installing the Desktop Environment
In this tutorial, you’ll install the XFCE desktop environment. There are two ways to achieve this, but you only need to choose one—either the Minimal Desktop Environment or the Full Desktop Environment.
Minimal Desktop Environment: If you want to install a small, core set of packages and then build on top of them by manually adding whatever you need afterward, you can use the xfce4 metapackage.
A metapackage doesn’t contain software of its own, it just depends on other packages to be installed, allowing for an entire collection of packages to be installed at once without having to type each package name individually at the command line.
Install xfce4 and all of the additional dependencies needed to support it:
- sudo apt-get install xfce4
Full Desktop Environment: If you don’t want to handpick every component you need and would rather have a default set of packages, like a word processor, web browser, email client, and other accessories pre-installed, then you can choose task-xfce-desktop.
Install and configure a complete desktop environment that’s similar to what you would get with Debian XFCE from a bootable DVD on your local PC:
- sudo apt-get install task-xfce-desktop
Now that our graphical environment is installed and configured, we need to set up a way to view it from another computer.
Step 3 — Installing X2Go on the Server
X2Go comes with two main components: the server, which starts and manages the graphical session on the remote machine, and the client, which we install on our local computer to view and control the remote desktop or application.
Since Debian does not include the X2Go server in its default repositories, we have to add an extra repository to the package manager’s configuration.
First, import the X2Go’s developers’ public key. This is a security measure to ensure that we can only download and install packages which are properly signed with their private keys.
- sudo apt-key adv --recv-keys --keyserver keys.gnupg.net E1F958385BFE2B6E
Now, add the repository to the package manager’s config files:
- echo 'deb http://packages.x2go.org/debian jessie main' | sudo tee /etc/apt/sources.list.d/x2go.list
This creates the file /etc/apt/sources.list.d/x2go.list and adds the line deb http://packages.x2go.org/debian jessie main to it, telling the package manager where to find the supplementary packages.
To refresh the database of available software packages, enter the following command:
- sudo apt-get update
And, finally, install X2Go on the server:
- sudo apt-get install x2goserver x2goserver-xsession
At this point, no further setup is required on your server. However, keep in mind that since SSH password authentication is disabled for increased security, you’ll need to have your SSH private key available on any machine that you want to log in from.
We are now done setting up the server and can type exit or close the terminal window. The rest of the steps will focus on the client for your local machine.
Step 4 — Installing the X2Go Client Locally
If you’re using Windows on your local machine, you can download the client software from http://code.x2go.org/releases/X2GoClient_latest_mswin32-setup.exe.
After you select your preferred language and agree to the license, a wizard will guide you through each step of the installation process. Normally, there shouldn’t be any reason to change any of the default values pre-filled or pre-selected in these steps.
If you’re running macOS locally, you can find the client software at http://code.x2go.org/releases/X2GoClient_latest_macosx_10_9.dmg.
Double-click the .dmg file to open a folder containing the copyright, license, and X2Go client executable, then double-click the executable to start the client.
And, if you’re using Debian or Ubuntu you can install the X2Go client with:
- sudo apt-get install x2goclient
If you’d like additional information about the clients or you’d like to build from the source, you can visit X2Go’s official documentation.
Now that the desktop client is installed, we can configure its settings and connect to the X2Go server to use our remote XFCE desktop.
Step 5 — Connecting to the Remote Desktop
When you first open the X2Go client, the following window should appear. If it doesn’t, click Session in the top-left menu and then select New session ….
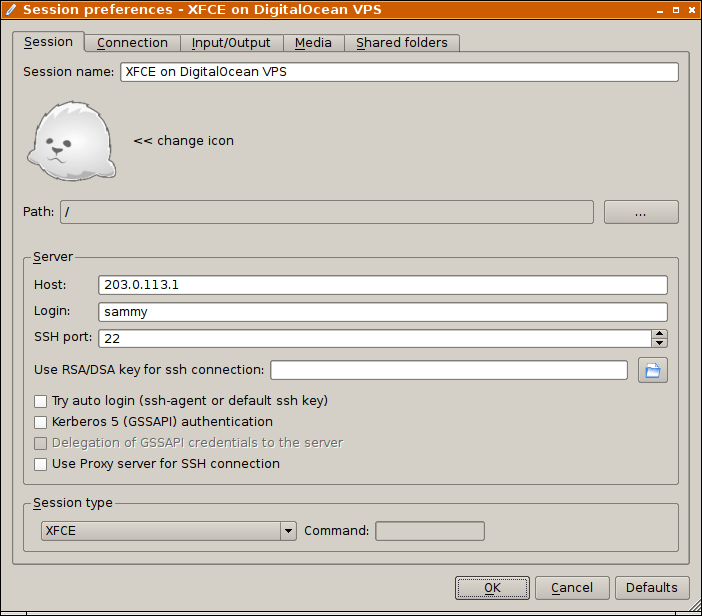
In the Session name field, enter something to help differentiate between servers. This can be particularly useful if you plan on connecting to multiple machines, since all of the names will be listed in the program’s main window once you save your settings.
Enter your server’s IP address or hostname in the Host field under Server.
Enter the username you used for your SSH connection in the Login field.
And, since it’s what we installed in Step Two, choose XFCE as your Session type.
Finally, because we log into the server with SSH keys, click the folder icon next to Use RSA/DSA key for ssh connection and browse to your private key.
The rest of the default settings should suffice for now, but as you get more familiar with the software, you can fine tune the client based on your individual preferences.
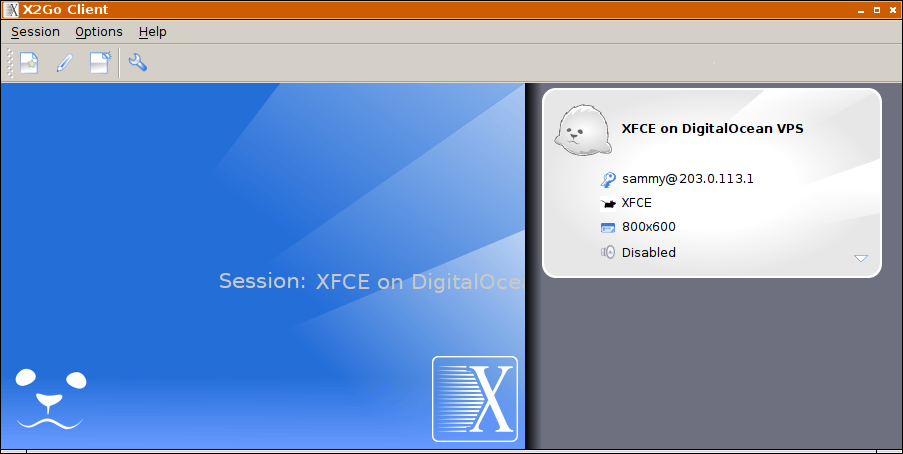
After pressing the OK button, you can start your graphical session by clicking the white box that includes your session name on the top-right side of the screen.
In a few seconds, your remote desktop will be displayed, and you can start interacting with it. At first login, XFCE will ask if you want to Use default config or One empty panel. The first option will create a rectangular panel docked at the bottom of the screen, containing a few useful application shortcuts (e.g. a file manager, a terminal emulator, a browser, etc.). This option will also add a top panel to the desktop that includes utilities like an application launcher, a clock, a shutdown menu, and more.
Unless you’re already familiar with XFCE, opting for an empty panel can be more complicated since you’ll be starting from scratch. There will be no taskbar, no clock, no pre-configured start menu; it will be up to you to add everything to an empty panel on your own.
Additionally, on Windows and Linux-based operating systems, there are a few useful keyboard shortcuts you can use for a better experience:
CTRL+ALT+F will toggle full-screen mode on and off. Working in full-screen mode can feel more like a local desktop experience. Plus, other keyboard shortcuts will be grabbed by the remote OS instead of the local one.
CTRL+ALT+M will minimize the remote view, even if you are in full-screen mode
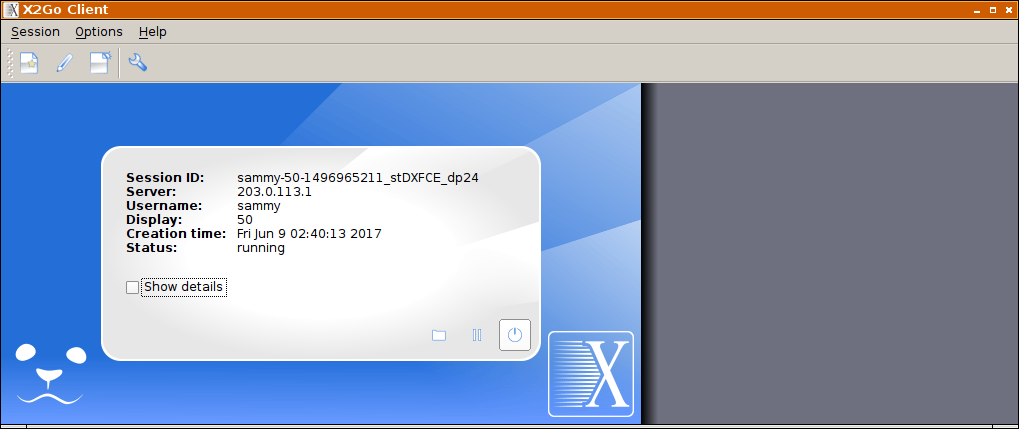
CTRL+ALT+T will disconnect from the session but leave the GUI running on the server. It’s just a quick way of disconnecting without logging off or closing applications on the server. The same will happen if you click the window’s close button.
Lastly, there are two ways you can end the remote session, closing all of the graphical programs running in it. You can log off remotely from XFCE’s start menu, or you can click the button marked with a circle and a small line (like a power/standby icon) in the bottom right corner of the main portion of the screen.
The first method is cleaner but may leave programs like session managing software running. The second method will close everything but may do so forcefully if a process can’t cleanly exit. In either case, be sure to save your work before proceeding.
On a final note, although it’s not required, let’s go into XFCE’s control panel, navigate to power settings and disable all standby features. If you don’t use the desktop for a while, XFCE will try to trigger a standby. Although the server normally won’t do anything when it receives this request, it’s better to avoid any unforeseen behaviors altogether.
Conclusion
You now have a working “cloud desktop,” complete with all the advantages of an always-online, remotely-accessible, computing system.
To go a step further, you could centralize your development work by creating a git repository, installing a remote code editor like Eclipse, or configuring a web server for testing web applications. You could also couple your remote desktop with a good backup scheme to make sure that your work environment is available from anywhere and that it’s safe from data loss.
If you’d like to learn more, visit X2Go’s official documentation website.
Thanks for learning with the DigitalOcean Community. Check out our offerings for compute, storage, networking, and managed databases.
About the author(s)
Technical Editor @ DigitalOcean
Still looking for an answer?
This textbox defaults to using Markdown to format your answer.
You can type !ref in this text area to quickly search our full set of tutorials, documentation & marketplace offerings and insert the link!
E: Unable to locate package x2goserver E: Unable to locate package x2goserver-xsession
looks like x2go is not quite ready for Debian 9.4 (stretch) oh well …
W: GPG error: http://packages.x2go.org jessie InRelease: The following signatures couldn’t be verified because the public key is not available: NO_PUBKEY E1F958385BFE2B6E
Work like a charm on VPS debian 8 using Windows 8 as client ! For error message “stdin is not a tty” at connection, refer to https://www.hackerway.ch/2017/07/30/x2go-stdin-is-not-a-tty-error-on-login/ Thanks !
is there a web client for x2go? i’d quite like to use it on my chromebook
 This work is licensed under a Creative Commons Attribution-NonCommercial- ShareAlike 4.0 International License.
Become a contributor for community
Get paid to write technical tutorials and select a tech-focused charity to receive a matching donation.

DigitalOcean Documentation
Full documentation for every DigitalOcean product.

Resources for startups and AI-native businesses
The Wave has everything you need to know about building a business, from raising funding to marketing your product.
The developer cloud
Scale up as you grow — whether you're running one virtual machine or ten thousand.

Start building today
From GPU-powered inference and Kubernetes to managed databases and storage, get everything you need to build, scale, and deploy intelligent applications.
