By Alyssa Holland and Caitlin Postal

The author selected Vets Who Code to receive a donation as part of the Write for DOnations program.
Introduction
Obtaining solid test coverage is imperative for building confidence in your web application. Jest is a JavaScript test runner that provides resources for writing and running tests. React Testing Library offers a set of testing helpers that structure your tests based on user interactions rather than components’ implementation details. Both Jest and React Testing Library come pre-packaged with Create React App and adhere to the guiding principle that testing apps should resemble how the software will be used.
In this tutorial, you will test asynchronous code and interactions in a sample project containing various UI elements. You will use Jest to write and run unit tests, and you will implement React Testing Library as a helper DOM (Document Object Model) library to handle interacting with components.
Prerequisites
To complete this tutorial, you will need:
-
Node.js version 14 or greater installed on your local machine. To install Node.js on macOS or Ubuntu 18.04, follow the steps in How to Install Node.js and Create a Local Development Environment on macOS or the Installing Using a PPA section of How To Install Node.js on Ubuntu 18.04.
-
npmversion 5.2 or greater on your local machine, which you will need to use Create React App andnpxin the sample project. If you did not installnpmalongsideNode.js, do that now. For Linux, use the commandsudo apt install npm.- For
npmpackages to work in this tutorial, install thebuild-essentialpackage. For Linux, use the commandsudo apt install build-essential.
- For
-
Git installed on your local machine. You can check if Git is installed on your computer or go through the installation process for your operating system with How To Install Git on Ubuntu 20.04.
-
Familiarity with React, which you can develop with the How To Code in React.js series. Because the sample project is bootstrapped with Create React App, you do not need to install it separately.
-
Some familiarity with Jest as a test runner or framework is helpful but not required. Because Jest is pre-packaged with Create React App, you do not need to install it separately.
Step 1 — Setting up the Project
In this step, you will clone a sample project and launch the test suite. The sample project utilizes three main tools: Create React App, Jest, and React Testing Library. Create React App is used to bootstrap a single-page React application. Jest is used as the test runner, and React Testing Library provides test helpers for structuring tests around user interactions.
To begin, you will clone a pre-built React App from GitHub. You will work with the Doggy Directory app, which is a sample project that leverages the Dog API to build a search and display system for a collection of dog images based on a specific breed.
To clone the project from Github, open your terminal and run the following command:
- git clone https://github.com/do-community/doggy-directory
You will see an output similar to this:
OutputCloning into 'doggy-directory'...
remote: Enumerating objects: 64, done.
remote: Counting objects: 100% (64/64), done.
remote: Compressing objects: 100% (48/48), done.
remote: Total 64 (delta 21), reused 55 (delta 15), pack-reused 0
Unpacking objects: 100% (64/64), 228.16 KiB | 3.51 MiB/s, done.
Change to the doggy-directory folder:
- cd doggy-directory
Install the project dependencies:
- npm install
The npm install command will install all the project dependencies defined in the package.json file.
After installing the dependencies, you can either view the deployed version of the app or you can run the app locally with the following command:
- npm start
If you chose to run the app locally, it will open on http://localhost:3000/. You will see the following output in the terminal:
OutputCompiled successfully!

You can now view doggy-directory in the browser.

Local:            http://localhost:3000
On Your Network:  http://network_address:3000
After launching, the landing page for the app will look like this:

The project dependencies have been installed, and the app is now running. Next, open a new terminal and launch the tests with the following command:
- npm test
The npm test command starts the tests in an interactive watch mode with Jest as its test runner. When in watch mode, the tests automatically re-run after a file is changed. The tests will run whenever you change a file and let you know if that change passed the tests.
After running npm test for the first time, you will see this output in the terminal:
OutputNo tests found related to files changed since last commit.
Press `a` to run all tests, or run Jest with `--watchAll`.

Watch Usage
 › Press a to run all tests.
 › Press f to run only failed tests.
 › Press q to quit watch mode.
 › Press p to filter by a filename regex pattern.
 › Press t to filter by a test name regex pattern.
 › Press Enter to trigger a test run.
Now that you have the example application and test suite running, you can start testing with the landing page.
Step 2 — Testing the Landing Page
By default, Jest will look for files with the .test.js suffix and files with the .js suffix in __tests__ folders. When you make changes to the relevant test files, they will be detected automatically. As test cases are modified, the output will update automatically. The testing file prepared for the doggy-directory sample project is set up with minimal code before you add testing paradigms. In this step, you will write tests to verify that the app’s landing page will load before performing a search.
Open src/App.test.js in your editor to see the following code:
import { render, screen } from '@testing-library/react';
import App from './App';

test('renders the landing page', () => {
  render(<App />);
});
A minimum of one test block is required in each test file. Each test block accepts two required parameters: the first argument is a string representing the name of the test case; the second argument is a function that holds the expectations of the test.
Inside the function, there is a render method that React Testing Library provides to render your component into the DOM. With the component that you want to test rendered into the testing environment’s DOM, you can now start writing code to assert against the expected functionality.
You will add a test block to the render method that will test if the landing page renders accurately before any API calls or selections are made. Add the highlighted code underneath the render method:
...
test('renders the landing page', () => {
  render(<App />);

  expect(screen.getByRole("heading")).toHaveTextContent(/Doggy Directory/);
  expect(screen.getByRole("combobox")).toHaveDisplayValue("Select a breed");
  expect(screen.getByRole("button", { name: "Search" })).toBeDisabled();
  expect(screen.getByRole("img")).toBeInTheDocument();
});
The expect function is used every time you want to verify a certain outcome, and it accepts a single argument representing the value that your code produces. Most expect functions are paired with a matcher function to assert something about a particular value. For most of these assertions, you will use additional matchers provided by jest-dom to make it easier to check for common aspects found in the DOM. For example, .toHaveTextContent is the matcher for the expect function in the first line, while getByRole("heading") is the selector to grab the DOM element.
React Testing Library provides the screen object as a convenient way to access the pertinent queries needed to assert against the test DOM environment. By default, React Testing Library provides queries that allow you to locate elements within the DOM. There are three main categories of queries:
getBy*(most commonly used)queryBy*(used when testing the absence of an element without throwing an error)findBy*(used when testing asynchronous code)
Each query type serves a specific purpose which will be defined later in the tutorial. In this step, you will focus on the getBy* query, which is the most common query type. To see an exhaustive list of the different query variations, you can review React’s query cheatsheet.
Below is an annotated image of the Doggy Directory landing page indicating each section that the first test (on rendering the landing page) covers:
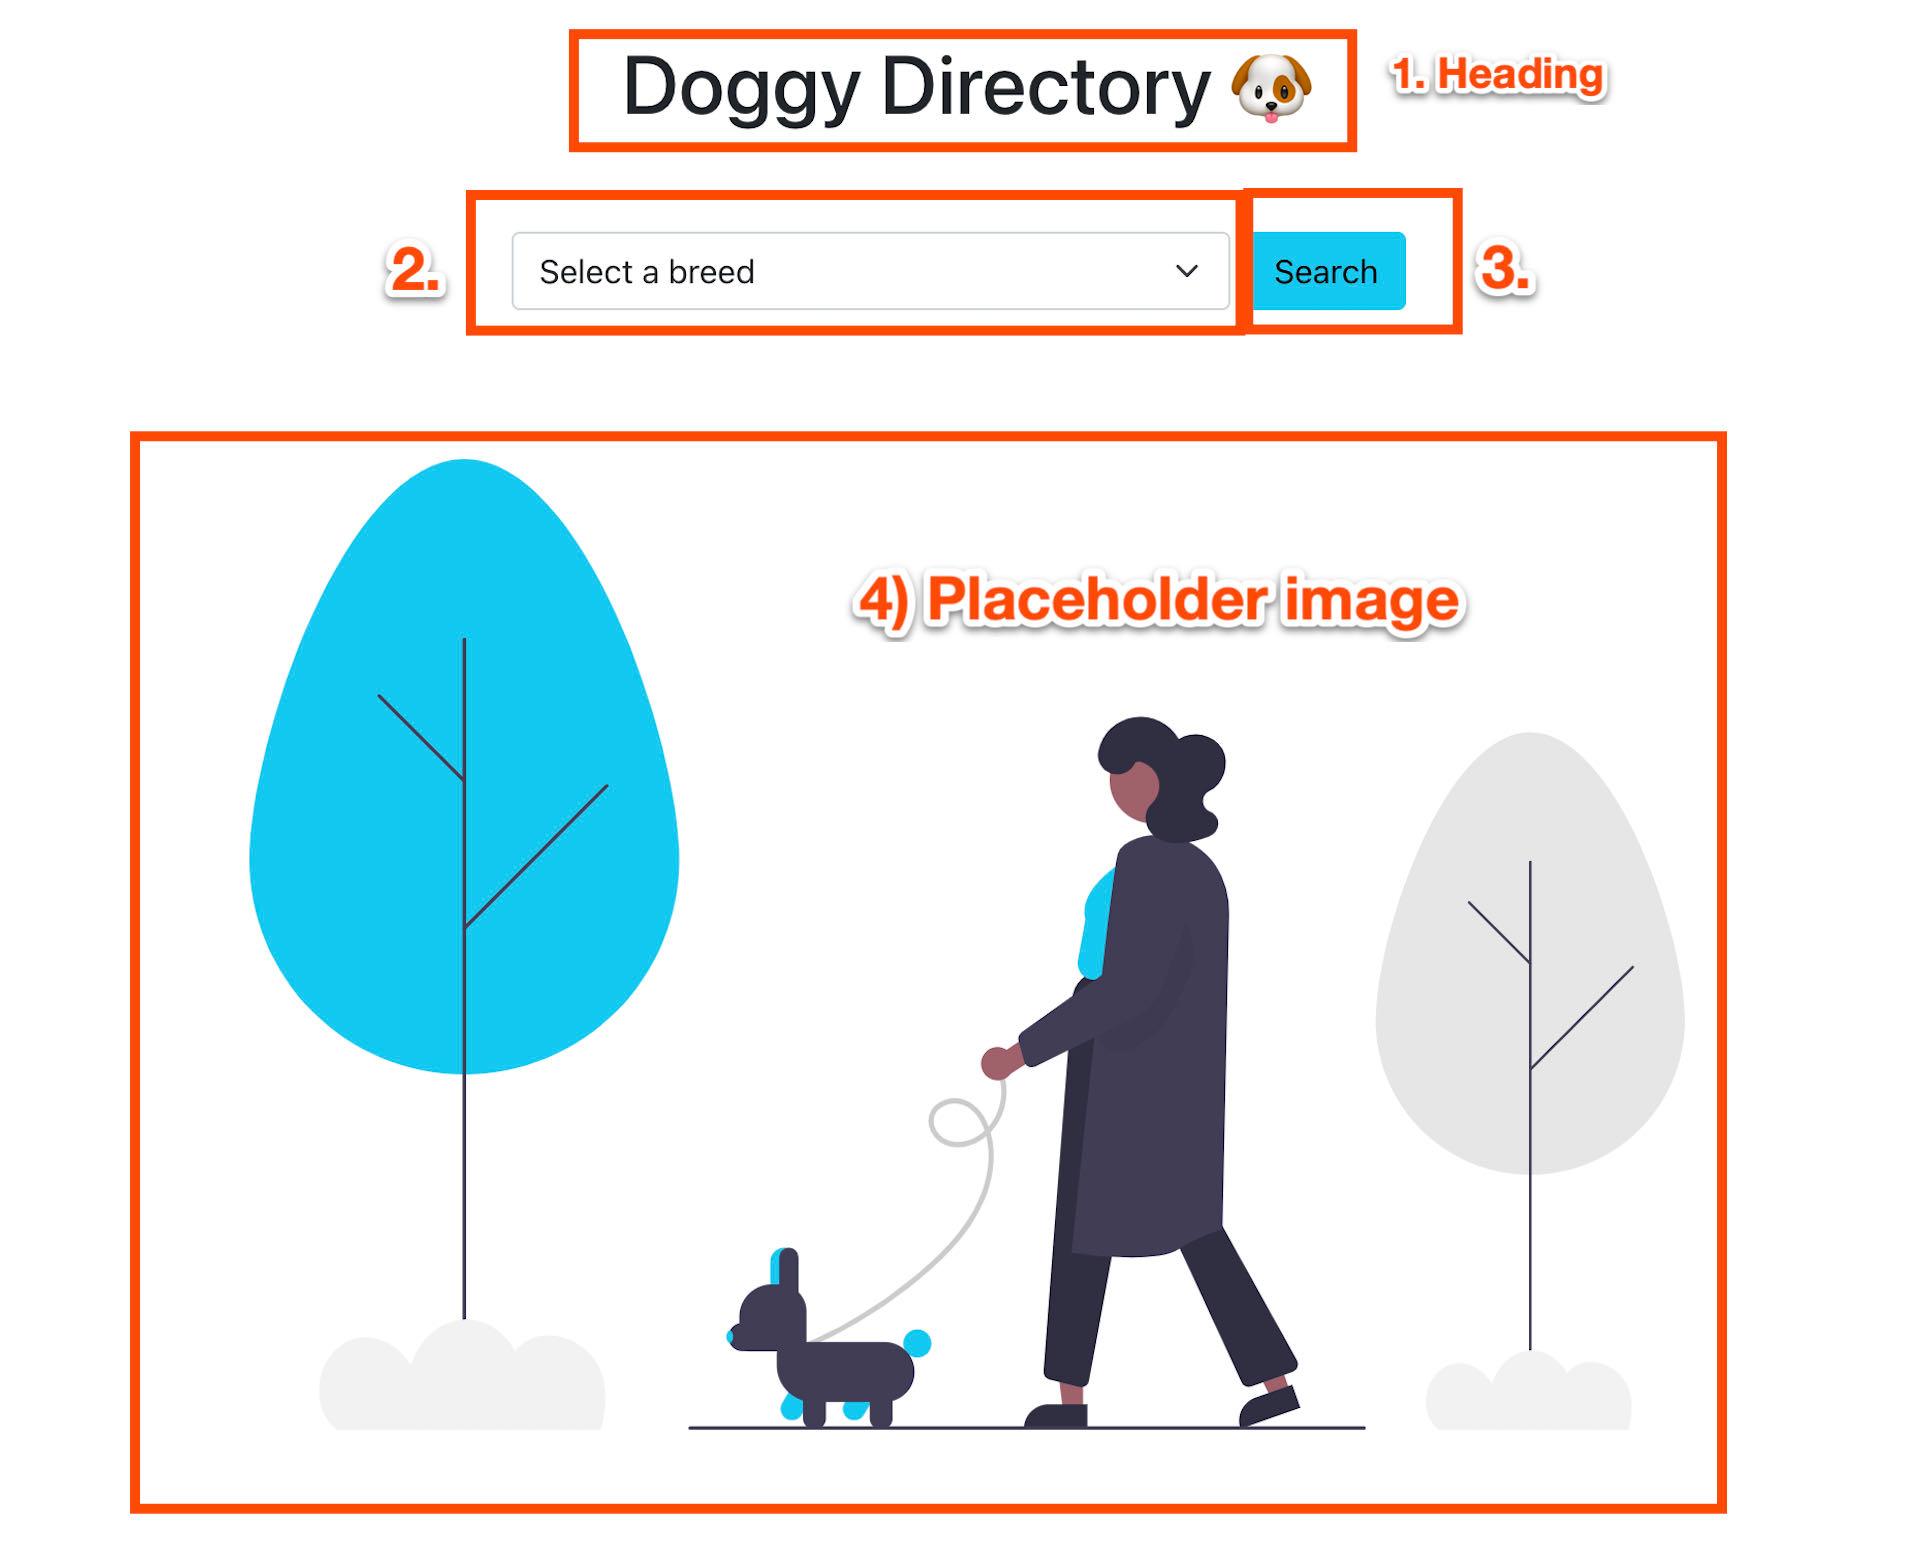
Each expect function is asserting against the following (shown in the annotated image above):
- You expect the element with the heading role to have a substring match of Doggy Directory.
- You expect the select input to have an exact display value of Select a breed.
- You expect the Search button to be disabled since a selection has not been made.
- You expect the placeholder image to be present in the document since a search has not taken place.
When finished, save the src/App.test.js file. Because the tests are running in watch mode, the changes will register automatically. If the changes do not register automatically, you may need to stop and restart the test suite.
Now, when you look at your tests in the terminal, you will see the following output:
Output PASS  src/App.test.js
  ✓ renders the landing page (172 ms)

Test Suites: 1 passed, 1 total
Tests:       1 passed, 1 total
Snapshots:   0 total
Time:        2.595 s, estimated 5 s
Ran all test suites related to changed files.

Watch Usage: Press w to show more.
In this step, you wrote an initial test to verify the initial rendering view of the Doggy Directory landing page. In the next step, you will learn how to mock an API call for testing asynchronous code.
Step 3 — Mocking the fetch Method
fetch MethodIn this step, you will review one approach to mocking JavaScript’s fetch method. While there are numerous ways to achieve this, this implementation will use Jest’s spyOn and mockImplementation methods.
When you rely on external APIs, there is a chance that their API will go down or take a while to return a response. Mocking out the fetch method provides a consistent and predictable environment, giving you more confidence in your tests. An API mocking mechanism is necessary to properly run tests that use an external API.
Note: In an effort to keep this project simplified, you will mock the fetch method. However, you are advised to use a more robust solution like Mock Service Worker (MSW) when mocking asynchronous code for larger, production-ready codebases.
Open src/mocks/mockFetch.js in your editor to review how the mockFetch method works:
const breedsListResponse = {
    message: {
        boxer: [],
        cattledog: [],
        dalmatian: [],
        husky: [],
    },
};

const dogImagesResponse = {
    message: [
        "https://images.dog.ceo/breeds/cattledog-australian/IMG_1042.jpg ",
        "https://images.dog.ceo/breeds/cattledog-australian/IMG_5177.jpg",
    ],
};

export default async function mockFetch(url) {
    switch (url) {
        case "https://dog.ceo/api/breeds/list/all": {
            return {
                ok: true,
                status: 200,
                json: async () => breedsListResponse,
            };
        }
        case "https://dog.ceo/api/breed/husky/images" :
        case "https://dog.ceo/api/breed/cattledog/images": {
            return {
                ok: true,
                status: 200,
                json: async () => dogImagesResponse,
            };
        }
        default: {
            throw new Error(`Unhandled request: ${url}`);
        }
    }
}
The mockFetch method returns an object that closely resembles the structure of what a fetch call would return in response to API calls within the application. The mockFetch method is necessary to test the asynchronous functionality across two areas of the Doggy Directory app: the select dropdown that populates the list of breeds and the API call to retrieve dog images when a search is performed.
Close src/mocks/mockFetch.js. Now that you understand how the mockFetch method will be used in your tests, you can import it into your test file. The mockFetch function will be passed in as an argument to the mockImplementation method and will then be used as a faux implementation of the fetch API.
In src/App.test.js, add the highlighted lines of code to import the mockFetch method:
import { render, screen } from '@testing-library/react';
import mockFetch from "./mocks/mockFetch";
import App from './App';

beforeEach(() => {
   jest.spyOn(window, "fetch").mockImplementation(mockFetch);
})

afterEach(() => {
   jest.restoreAllMocks()
});
...
This code will set up and tear down the mock implementation so that each test starts from a level playing field.
jest.spyOn(window, "fetch"); creates a mock function that will track calls to the fetch method attached to the global window variable in the DOM.
.mockImplementation(mockFetch); accepts a function that will be used to implement the mock method. Because this command overrides the original fetch implementation, it will run whenever fetch is called within the app code.
When finished, save the src/App.test.js file.
Now, when you look at your tests in the terminal, you will receive the following output:
Output  console.error
    Warning: An update to App inside a test was not wrapped in act(...).

    When testing, code that causes React state updates should be wrapped into act(...):

    act(() => {
      /* fire events that update state */
    });
    /* assert on the output */

    This ensures that you're testing the behavior the user would see in the browser. Learn more at https://reactjs.org/link/wrap-tests-with-act
        at App (/home/sammy/doggy-directory/src/App.js:5:31)

      18 |       })
      19 |       .then((json) => {
    > 20 |         setBreeds(Object.keys(json.message));
         |         ^
      21 |       });
      22 |   }, []);
      23 |
 ...

 PASS  src/App.test.js
  ✓ renders the landing page (429 ms)

Test Suites: 1 passed, 1 total
Tests:       1 passed, 1 total
Snapshots:   0 total
Time:        1.178 s, estimated 2 s
Ran all test suites related to changed files.
The warning tells you that a state update occurred when it was not expected. However, the output also indicates that the tests have successfully simulated the fetch method.
In this step, you mocked the fetch method and incorporated that method into a test suite. Although the test is passing, you still need to address the warning.
Step 4 — Fixing the act Warning
act WarningIn this step, you will learn how to fix the act warning that surfaced after the changes in Step 3.
The act warning occurs because you have mocked out the fetch method, and when the component mounts, it makes an API call to grab the list of breeds. The breeds list is stored in a state variable that populates the option element within the select input.
The image below shows what the select input looks like after a successful API call was made to populate the list of breeds:
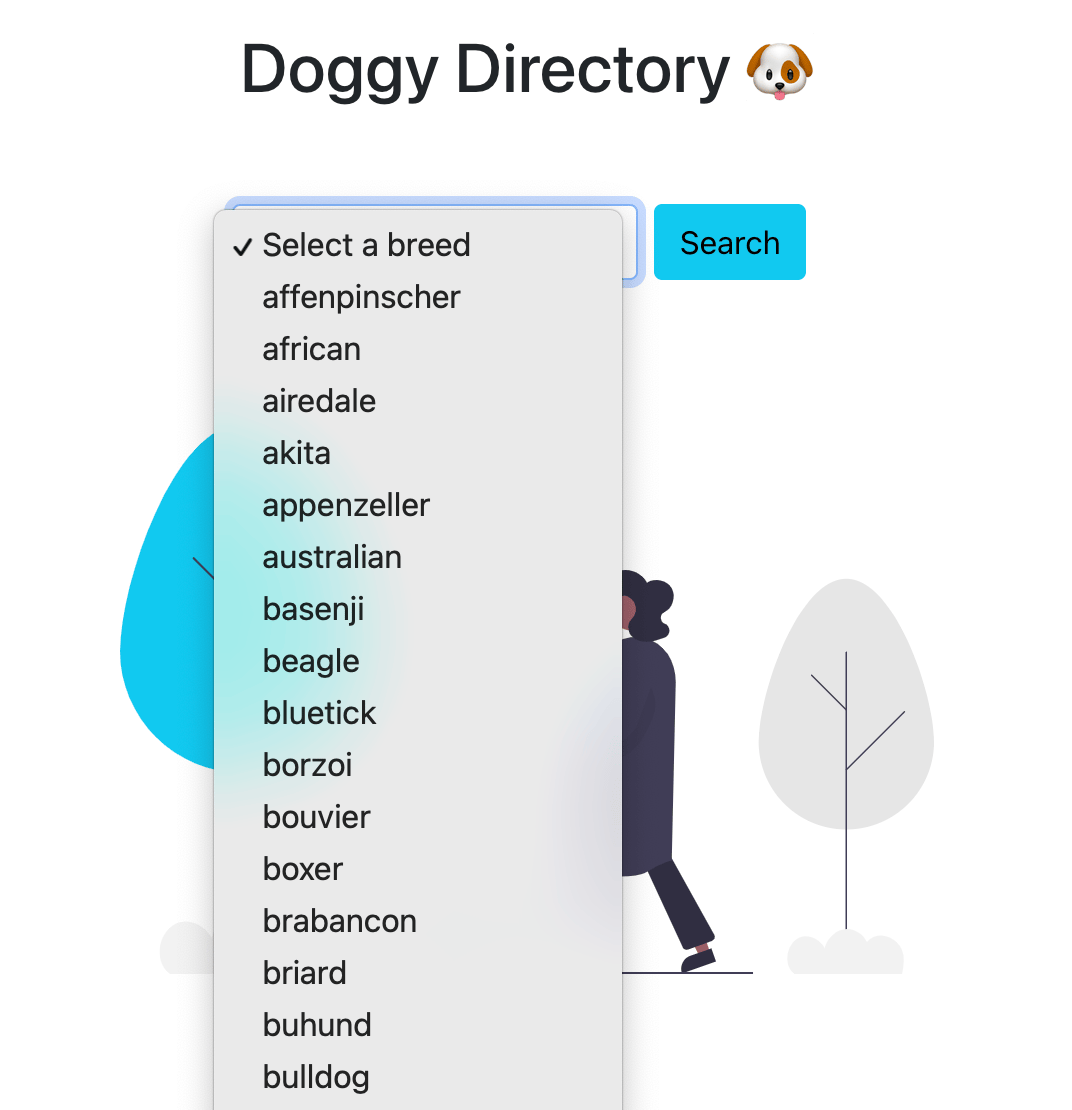
The warning is thrown because the state is set after the test block finishes rendering the component.
To fix this issue, add the highlighted modifications to the test case in src/App.test.js:
...
test('renders the landing page', async () => {
   render(<App />);

   expect(screen.getByRole("heading")).toHaveTextContent(/Doggy Directory/);
   expect(screen.getByRole("combobox")).toHaveDisplayValue("Select a breed");
   expect(await screen.findByRole("option", { name: "husky"})).toBeInTheDocument();
   expect(screen.getByRole("button", { name: "Search" })).toBeDisabled();
   expect(screen.getByRole("img")).toBeInTheDocument();
});
The async keyword tells Jest that asynchronous code runs as a result of the API call that occurs when the component mounts.
A new assertion with the findBy query verifies that the document contains an option with the value of husky. findBy queries are used when you need to test asynchronous code that is dependent on something being in the DOM after a period of time. Because the findBy query returns a promise that gets resolved when the requested element is found in the DOM, the await keyword is used within the expect method.
When finished, save the changes made in src/App.test.js.
With the new additions, you will now see that the act warning is no longer present in your tests:
Output PASS  src/App.test.js
  ✓ renders the landing page (123 ms)

Test Suites: 1 passed, 1 total
Tests:       1 passed, 1 total
Snapshots:   0 total
Time:        0.942 s, estimated 2 s
Ran all test suites related to changed files.

Watch Usage: Press w to show more.
In this step, you learned how to fix the act warning that can occur when working with asynchronous code. Next, you will add a second test case to verify the interactive functionalities of the Doggy Directory application.
Step 5 — Testing the Search Feature
In the final step, you will write a new test case to verify the search and image display feature. You will leverage a variety of queries and API methods to achieve the proper test coverage.
Return to the src/App.test.js file in your editor. At the top of the file, import the user-event companion library and the waitForElementToBeRemoved async method into the test file with the highlighted commands:
import { render, screen, waitForElementToBeRemoved } from '@testing-library/react';import userEvent from '@testing-library/user-event';
...
You will use these imports later in this section.
After the initial test() method, add a new async test block and render the App component with the following block of code:
...
test("should be able to search and display dog image results", async () => {
   render(<App />);
})
With the component rendered, you can now add functions that verify the interactive features of the Doggy Directory app.
Still in src/App.test.js, add the highlighted blocks of code within the second test() method:
...
test("should be able to search and display dog image results", async () => {
   render(<App />);

   //Simulate selecting an option and verifying its value
   const select = screen.getByRole("combobox");
   expect(await screen.findByRole("option", { name: "cattledog"})).toBeInTheDocument();
   userEvent.selectOptions(select, "cattledog");
   expect(select).toHaveValue("cattledog");
})
The highlighted section above will simulate the selection of a dog breed and verify that the correct value is displayed.
The getByRole query grabs the selected element and assigns it to the select variable.
Similar to how you fixed the act warning in Step 4, use the findByRole query to wait for the cattledog option to appear in the document before proceeding with further assertions.
The userEvent object imported earlier will simulate common user interactions. In this example, the selectOptions method selects the cattledog option that you waited for on the previous line.
The last line asserts that the select variable contains the cattledog value selected above.
The next section that you will add to the Javascript test() block will initiate the search request to find dog images based on the breed selected and confirm the presence of a loading state.
Add the highlighted lines:
...
test("should be able to search and display dog image results", async () => {
   render(<App />);

   //...Simulate selecting an option and verifying its value

  //Simulate initiating the search request
   const searchBtn = screen.getByRole("button", { name: "Search" });
   expect(searchBtn).not.toBeDisabled();
   userEvent.click(searchBtn);

   //Loading state displays and gets removed once results are displayed
   await waitForElementToBeRemoved(() => screen.queryByText(/Loading/i));
})
The getByRole query locates the search button and assigns it to the searchBtn variable.
The toBeDisabled jest-dom matcher will verify that the search button is not disabled when a breed selection is made.
The click method on the userEvent object simulates clicking the search button.
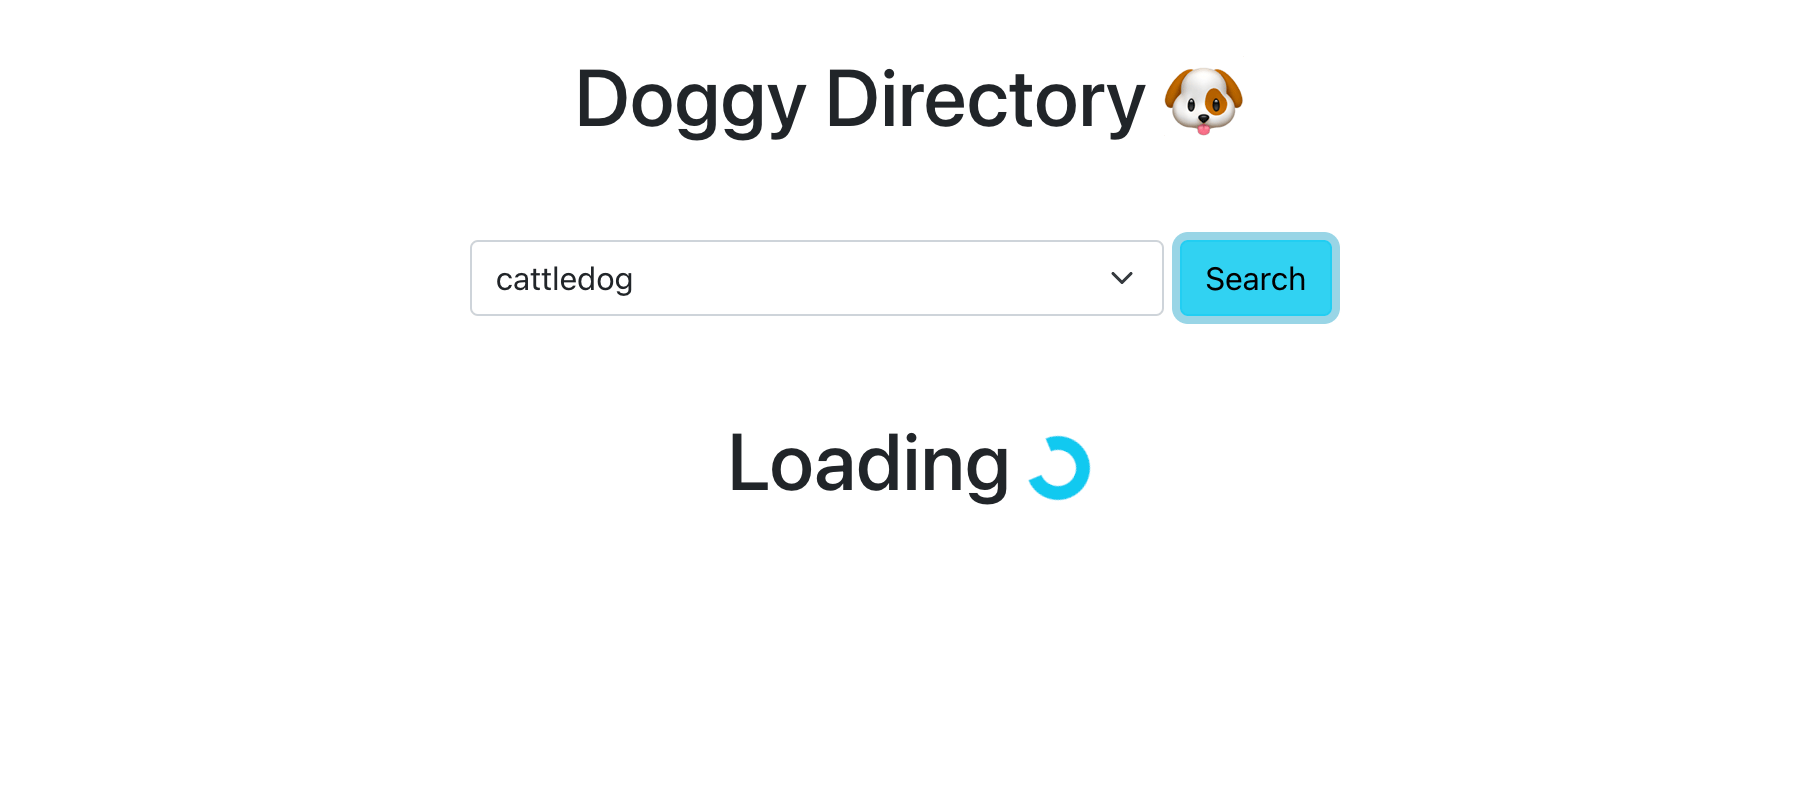
The waitForElementToBeRemoved async helper function imported earlier will wait for the appearance and disappearance of the Loading message while the search API call is in flight. queryByText within the waitForElementToBeRemoved callback checks for the absence of an element without throwing an error.
The image below shows the loading state that will be displayed when a search is in progress:
Next, add the following Javascript code to validate the image and results count display:
...
test("should be able to search and display dog image results", async () => {
render(<App />)
//...Simulate selecting an option and verifying its value
//...Simulate initiating the search request
//...Loading state displays and gets removed once results are displayed
//Verify image display and results count
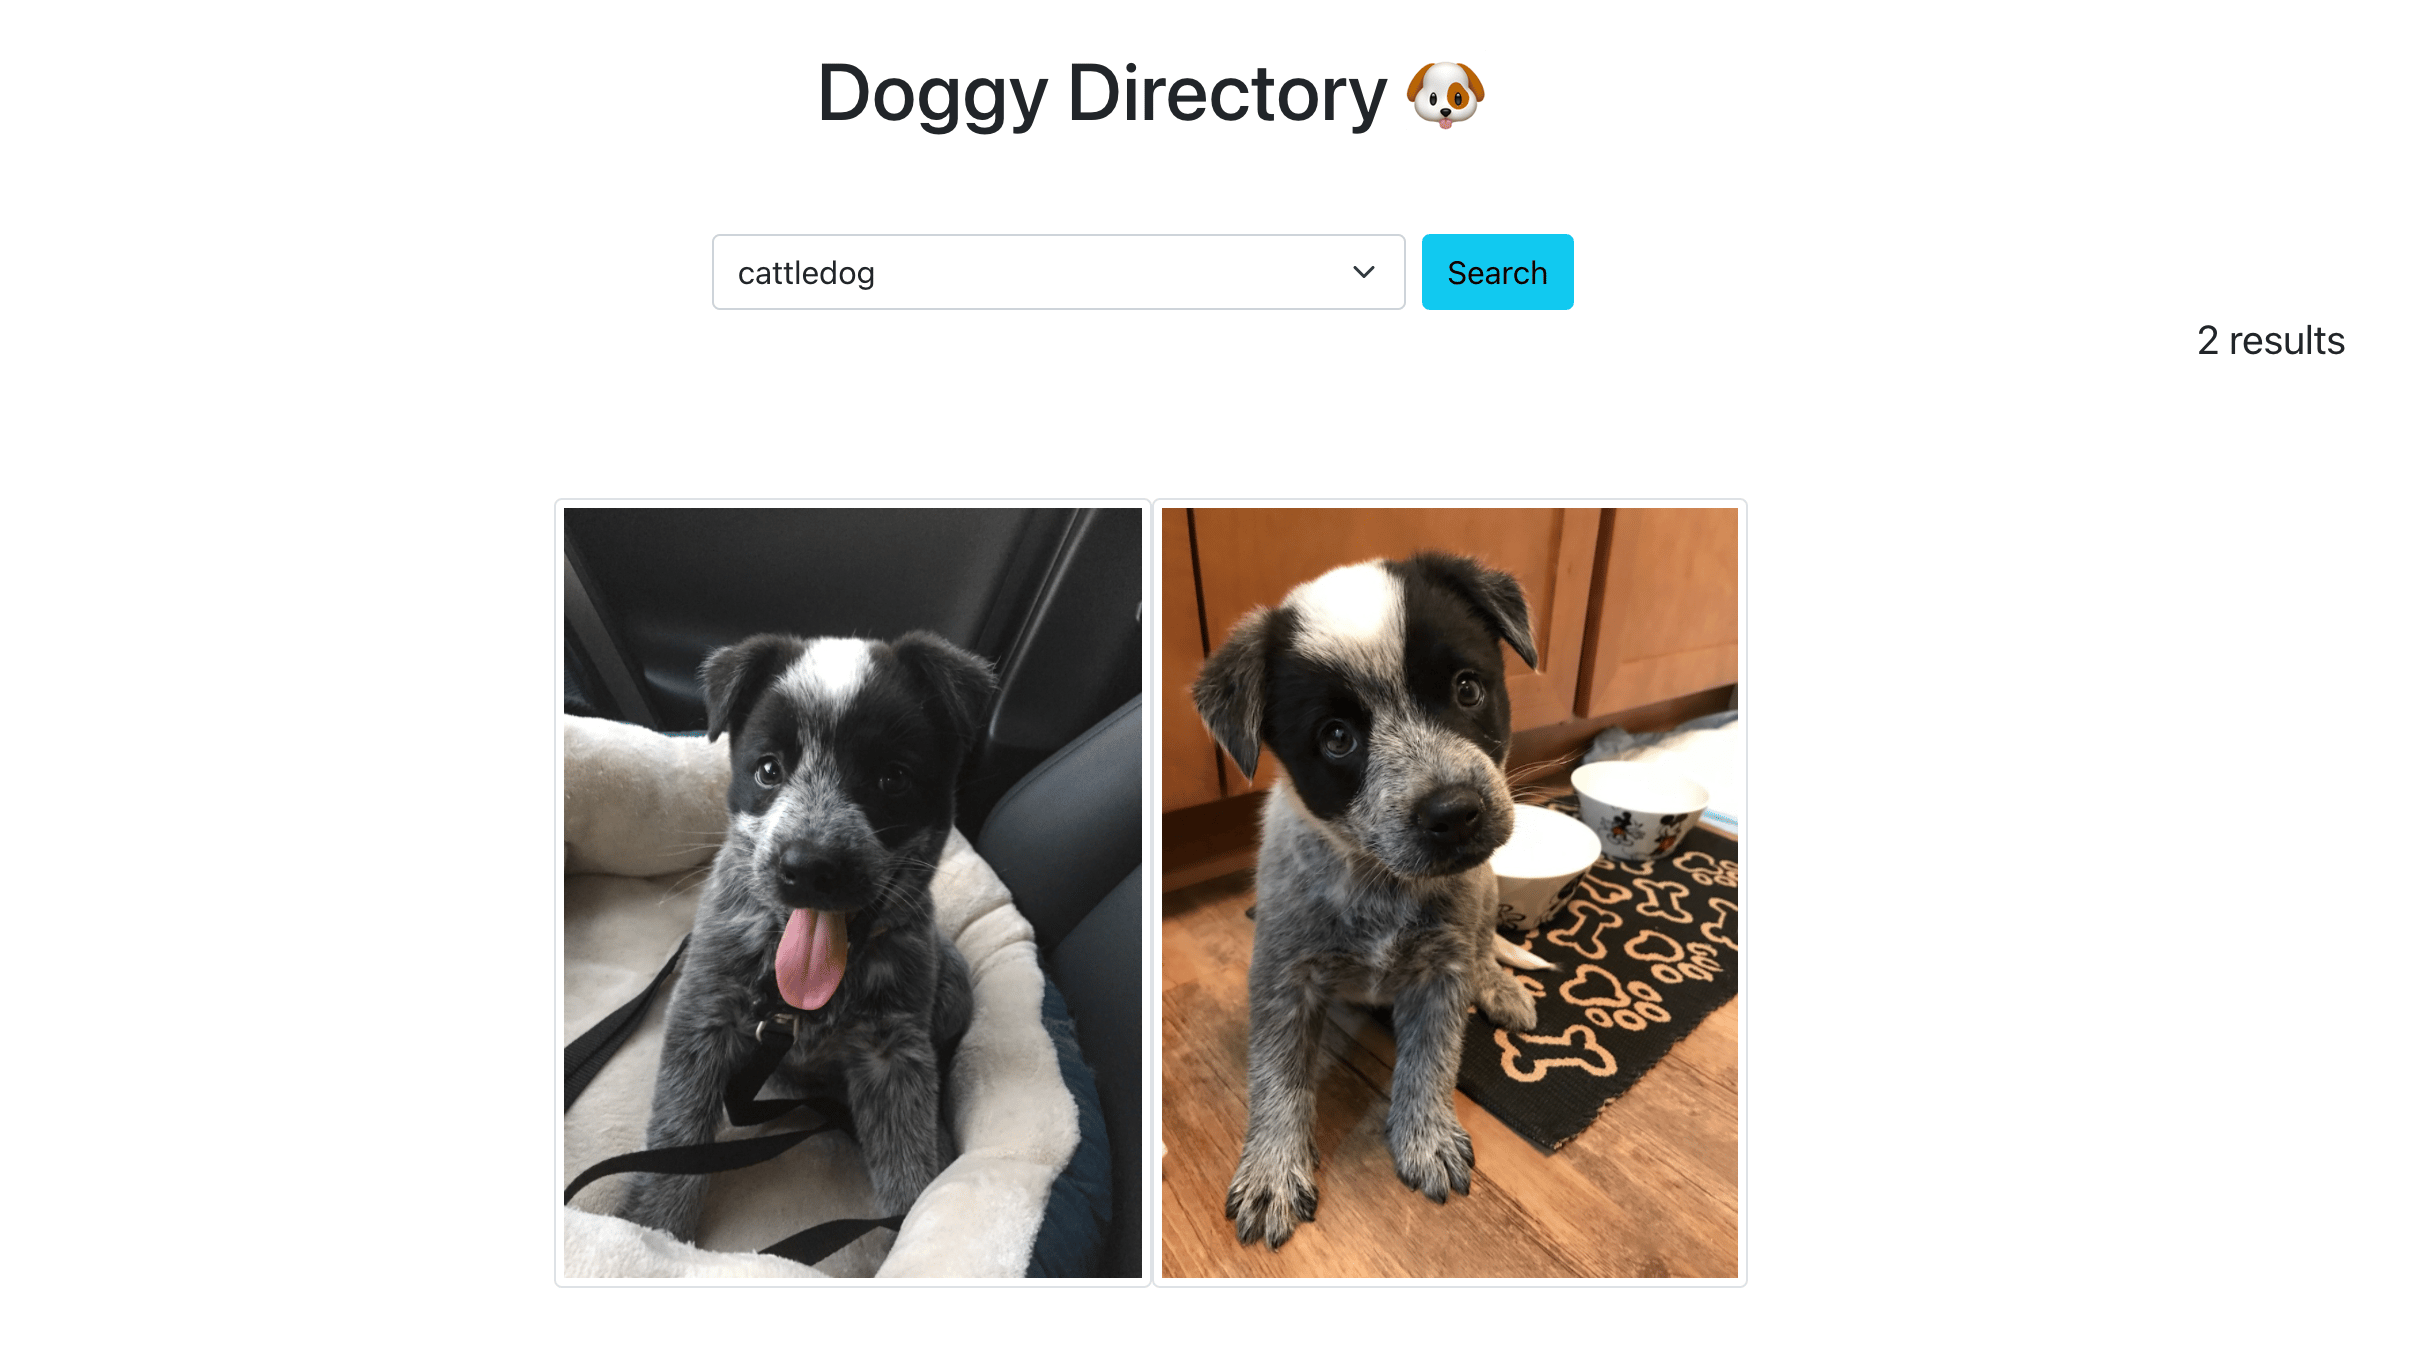
const dogImages = screen.getAllByRole("img");
expect(dogImages).toHaveLength(2);
expect(screen.getByText(/2 Results/i)).toBeInTheDocument();
expect(dogImages[0]).toHaveAccessibleName("cattledog 1 of 2");
expect(dogImages[1]).toHaveAccessibleName("cattledog 2 of 2");
})
The getAllByRole query will select all the dog images and assign them to the dogImages variable. The *AllBy* variant of the query returns an array containing multiple elements that match the specified role. The *AllBy* variant differs from the ByRole variant, which can only return a single element.
The mocked fetch implementation contained two image URLs within the response. With Jest’s toHaveLength matcher, you can verify that there are two images displayed.
The getByText query will check that the proper results count appears in the right-hand corner.
Two assertions using the toHaveAccessibleName matchers verify that the appropriate alt text is associated with individual images.
A completed search displaying images of the dog based on the breed selected along with the number of results found will look like this:
When you combine all the pieces of the new Javascript code, the App.test.js file will look like this:
import {render, screen, waitForElementToBeRemoved} from '@testing-library/react';
import userEvent from '@testing-library/user-event';
import mockFetch from "./mocks/mockFetch";
import App from './App';

beforeEach(() => {
   jest.spyOn(window, "fetch").mockImplementation(mockFetch);
})

afterEach(() => {
   jest.restoreAllMocks();
});

test('renders the landing page', async () => {
   render(<App />);

   expect(screen.getByRole("heading")).toHaveTextContent(/Doggy Directory/);
   expect(screen.getByRole("combobox")).toHaveDisplayValue("Select a breed");
   expect(await screen.findByRole("option", { name: "husky"})).toBeInTheDocument()
   expect(screen.getByRole("button", { name: "Search" })).toBeDisabled();
   expect(screen.getByRole("img")).toBeInTheDocument();
});

test("should be able to search and display dog image results", async () => {
   render(<App />);

   //Simulate selecting an option and verifying its value
   const select = screen.getByRole("combobox");
   expect(await screen.findByRole("option", { name: "cattledog"})).toBeInTheDocument();
   userEvent.selectOptions(select, "cattledog");
   expect(select).toHaveValue("cattledog");

   //Initiate the search request
   const searchBtn = screen.getByRole("button", { name: "Search" });
   expect(searchBtn).not.toBeDisabled();
   userEvent.click(searchBtn);

   //Loading state displays and gets removed once results are displayed
   await waitForElementToBeRemoved(() => screen.queryByText(/Loading/i));

   //Verify image display and results count
   const dogImages = screen.getAllByRole("img");
   expect(dogImages).toHaveLength(2);
   expect(screen.getByText(/2 Results/i)).toBeInTheDocument();
   expect(dogImages[0]).toHaveAccessibleName("cattledog 1 of 2");
   expect(dogImages[1]).toHaveAccessibleName("cattledog 2 of 2");
})
Save the changes made in src/App.test.js.
When you review your tests, the final output in the terminal will now have the following output:
Output PASS  src/App.test.js
  ✓ renders the landing page (273 ms)
  ✓ should be able to search and display dog image results (123 ms)

Test Suites: 1 passed, 1 total
Tests:       2 passed, 2 total
Snapshots:   0 total
Time:        4.916 s
Ran all test suites related to changed files.

Watch Usage: Press w to show more.
In this final step, you added a test that verifies the search, loading, and display functionalities of the Doggy Directory application. With the final assertion written, you now know that your app works.
Conclusion
Throughout this tutorial, you wrote test cases using Jest, React Testing Library, and jest-dom matchers. Building incrementally, you wrote tests based on how a user interacts with the UI. You also learned the differences between the getBy*, findBy*, and queryBy* queries and how to test asynchronous code.
To learn more about the topics mentioned above, take a look at the Jest, React Testing Library, and jest-dom official documentation. You can also read Kent C. Dodd’s Common Mistakes with React Testing Library to learn about best practices when working with React Testing Library. For more on using snapshot tests within a React App, check out How To Write Snapshot Tests.
Thanks for learning with the DigitalOcean Community. Check out our offerings for compute, storage, networking, and managed databases.
About the author(s)
I'm a Front-End Developer with a passion for learning!
Still looking for an answer?
This textbox defaults to using Markdown to format your answer.
You can type !ref in this text area to quickly search our full set of tutorials, documentation & marketplace offerings and insert the link!
Great tutorial! Silly question, why doesn’t beforeAll/afterAll work since we are mocking the same content? Why does jest throw errors?
 This work is licensed under a Creative Commons Attribution-NonCommercial- ShareAlike 4.0 International License.
Become a contributor for community
Get paid to write technical tutorials and select a tech-focused charity to receive a matching donation.

DigitalOcean Documentation
Full documentation for every DigitalOcean product.

Resources for startups and AI-native businesses
The Wave has everything you need to know about building a business, from raising funding to marketing your product.
The developer cloud
Scale up as you grow — whether you're running one virtual machine or ten thousand.

Start building today
From GPU-powered inference and Kubernetes to managed databases and storage, get everything you need to build, scale, and deploy intelligent applications.
