By Erin Glass
Senior Manager, DevEd

This tutorial will teach you the difference between inline-level and block-level elements in HTML and how they affect a piece of content’s position on the page.
When arranging elements in an HTML document, it’s important to understand how these elements take up space on a webpage. Certain elements can take up much more space on the webpage than the content they contain. Understanding the behavior of different element types will help you anticipate how they affect the position of other elements on the page.
In general, there are two different types of elements—inline-level elements and block-level elements—whose spacing defaults behave differently from one another. Below, we’ll describe how the default settings of these elements determine their position on the webpage and relative to the position of nearby elements.
Inline-level Elements
Inline elements are elements whose horizontal width is determined by the width of the content they contain. The <strong> element and the <em> element we covered in the last tutorial are both examples of inline elements.
We can use Firefox’s Web Developer Inspector to inspect the size of HTML elements on a webpage. (If you are using Chrome, you can use the Developer Inspect Elements tool instead but this tutorial will give instructions for Firefox’s Web Developer tool.)
Return to the index.html file that you loaded in your browser. If you need to reload it and don’t remember how, refer to the instructions Loading an HTML File in your Browser from the last tutorial.
Then navigate to the Tools menu item in the top menu bar and select “Web Developer/Inspector.” Selecting this menu item will open up the Inspector interface that allows you to inspect the HTML and CSS of a webpage. Next, hover your cursor over the text My strong text, which should highlight the text in light blue. This highlighting shows the full extent of the space occupied by the element that your cursor is hovering over. As you may have expected, the element’s occupied space is just large enough to contain its text content:
Unlike block-level elements, which we’ll cover in the next section, inline elements do not take up their own line of horizontal space. Thus, inline elements will rest side by side on a webpage if you do not specify a break with an additional HTML element, such as the line break <br> element. This sizing default is often convenient, as you may want to mark up single words in a paragraph with an inline element such as <strong> or <em> without pushing subsequent text to the next line.
Try adding the <br> tag in between your two lines of code in the index.html file. (You will need to return to your file in the text editor.) Note that the <br> element only requires an opening tag and does not wrap around any text:
<strong>My strong text</strong>
<br>
<em>My emphasized text</em>
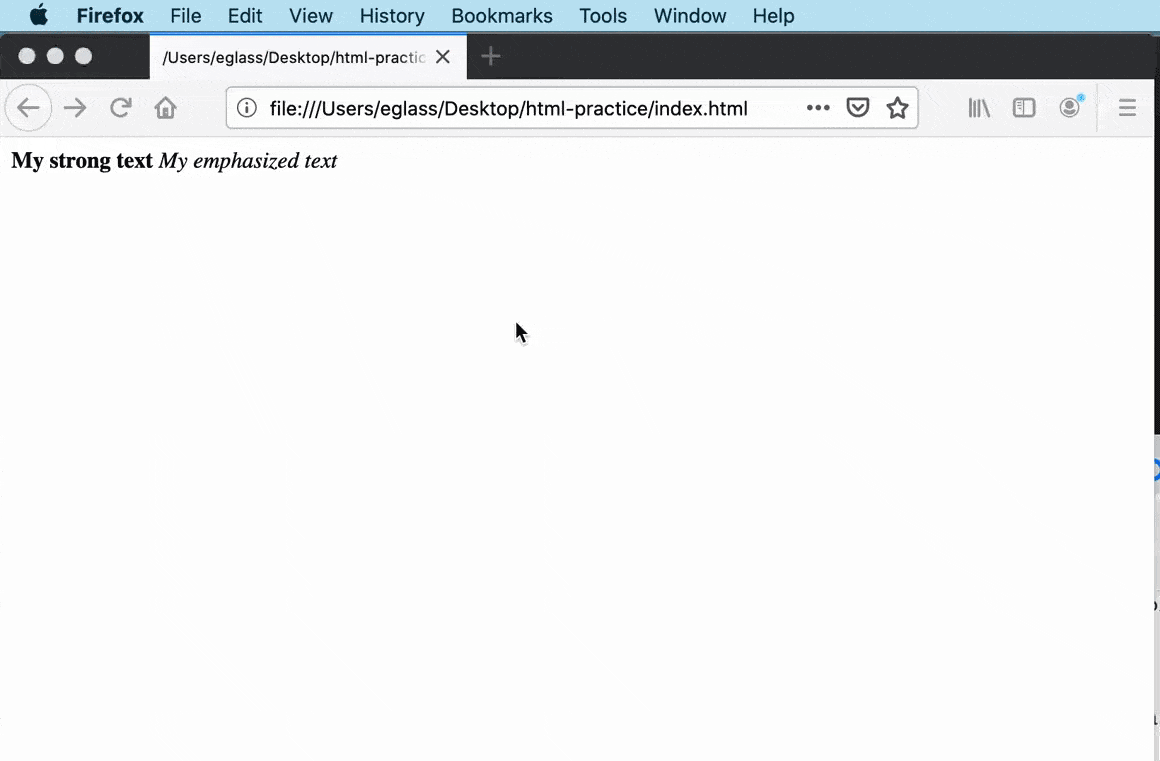
Save and reload the document in your browser to check your results. You should receive something like this:
My strong text My emphasized text
Your two phrases should now be on separate lines as they are now separated by the line break element <br>.
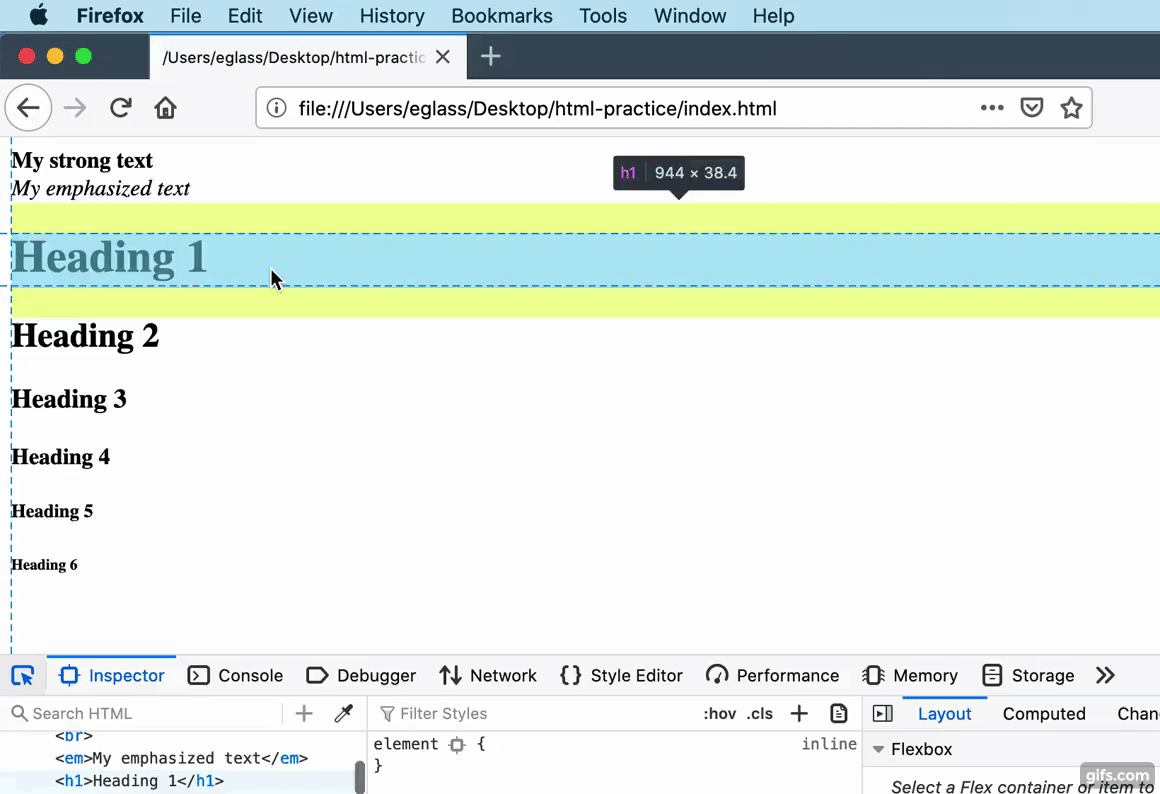
If you use the Firefox Web Developer Inspector to check the size of the elements, you can confirm that the width of each of the text elements is still determined by the width of the text content:
![Inspect Element again] (https://assets.digitalocean.com/articles/how-to-build-a-website-with-html/inspect-element2-min.gif)
Block-level Elements
Block-level elements behave differently than inline-level elements in that they take up an entire line of horizontal space on a webpage. This means that they automatically start on a new line and that they automatically push subsequent elements onto a new line as well.
For example, the HTML heading elements (<h1> through <h6>) are block-level elements that automatically place their content onto a new line and push any content that follows onto a new line. Each of these six heading elements represent a different heading size.
Let’s study how this works in practice. At the bottom of your index.html file, try pasting in the highlighted code snippet:
<strong>My strong text</strong>
<br>
<em>My emphasized text</em>

<h1>Heading 1</h1>
<h2>Heading 2</h2>
<h3>Heading 3</h3>
<h4>Heading 4</h4>
<h5>Heading 5</h5>
<h6>Heading 6</h6>
Save your file and reload it in the browser. You should receive something like this:

Let’s now inspect the block-level heading elements to study how they differ from the inline-level text elements above. Open up the Firefox Web Developer Inspector and hover over each of the elements to inspect their occupied space as indicated by the blue highlighting. You should be able to confirm that the occupied horizontal space of each of the inline-level elements is determined by its text content, while the occupied horizontal space of each of the block-level elements stretches across the entire web page:
Block-level elements will always push inline-level elements down to the next line, even if you write those HTML elements on the same line of the HTML document. To confirm this for yourself, try writing a block-level element and an inline-level element on the same line of your index.html file. Erase the existing content from your file and add the following code snippet:
<strong>My strong text</strong><h1>My heading</h1><em>My emphasized text</a>
Can you guess how this HTML code will render in the browser? Save your file and reload it in the browser. You should receive something like this:
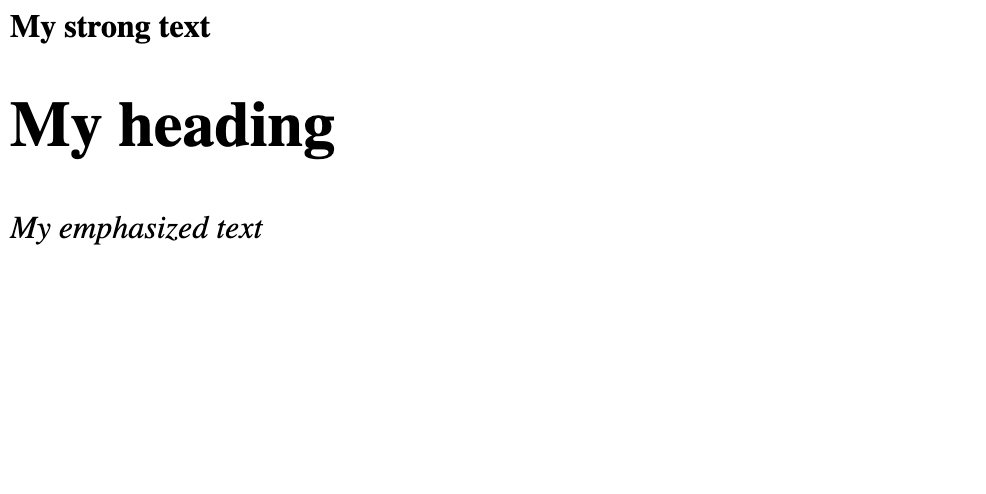
Notice that the heading element <h1> has started on a new line and pushed the subsequent text element to a new line even though the elements were written on the same line in the HTML document.
You should now have an understanding of how inline-level and block-level elements are positioned and how they affect the position of nearby elements. Remembering their distinct behaviors can be useful when arranging HTML elements in the future.
We’ll continue learning about new inline and block elements in the tutorials ahead.
Thanks for learning with the DigitalOcean Community. Check out our offerings for compute, storage, networking, and managed databases.
Tutorial Series: How To Build a Website with HTML
This tutorial series will guide you through creating and further customizing this website using HTML, the standard markup language used to display documents in a web browser. No prior coding experience is necessary but we recommend you start at the beginning of the series if you wish to recreate the demonstration website.
At the end of this series, you should have a website ready to deploy to the cloud and a basic familiarity with HTML. Knowing how to write HTML will provide a strong foundation for learning additional front-end web development skills, such as CSS and JavaScript.
Browse Series: 23 tutorials
About the author
Open source advocate and lover of education, culture, and community.
Still looking for an answer?
This textbox defaults to using Markdown to format your answer.
You can type !ref in this text area to quickly search our full set of tutorials, documentation & marketplace offerings and insert the link!
 This work is licensed under a Creative Commons Attribution-NonCommercial- ShareAlike 4.0 International License.
Become a contributor for community
Get paid to write technical tutorials and select a tech-focused charity to receive a matching donation.

DigitalOcean Documentation
Full documentation for every DigitalOcean product.

Resources for startups and AI-native businesses
The Wave has everything you need to know about building a business, from raising funding to marketing your product.
The developer cloud
Scale up as you grow — whether you're running one virtual machine or ten thousand.

Start building today
From GPU-powered inference and Kubernetes to managed databases and storage, get everything you need to build, scale, and deploy intelligent applications.
