
Introduction
Setting up a DNS server to be responsible for domain names can be a complex task even for seasoned administrators. DNS zone management is a vital duty, but can be bewildering, especially when attempting to get started.
Software like the Bind DNS server is incredibly flexible and can be configured to operate as many of the components in the overall DNS hierarchy. However, that flexibility also means that Bind is not optimized for any one task. This has a few side effects.
Most of the time there are huge chunks of functionality that your configuration has no need for. This additional complexity makes management more difficult. It also means that the software itself will be less responsive for any one task.
To solve this problem, alternative DNS servers have been created that specialize in a single area of DNS resolution. A piece of software known as NSD is an authoritative-only DNS server that is ideal for managing DNS zones authoritatively. Without the need to ever worry about recursion or caching, this server operates with high performance and a lower footprint.
In this guide, we will demonstrate how to install and configure NSD to securely administer our DNS zones on Ubuntu 14.04 servers.
Prerequisites and Goals
Before you begin with this guide, you should be familiar with some basic DNS concepts and terminology. If you need help understanding what an authoritative-only DNS server is used for, check out our guide on the differences between DNS server types.
As an authoritative-only DNS server, NSD does not provide any caching, forwarding, or recursive functionality. It only responds to iterative requests for the zones it controls. It can also refer resolvers to other name servers for zones that it has delegated away.
For the purposes of this guide, we will be configuring two servers with NSD software to act as our primary and secondary servers for our zones. We will also provide configuration data that will let clients reach a web server on a third host.
We will be using the dummy domain example.com for this guide. You should substitute your own domain to follow along. The machines that we will be configuring will have the following properties:
| Purpose | DNS FQDN | IP Address |
|---|---|---|
| Primary name server | ns1.example.com. | 192.0.2.1 |
| Secondary name server | ns2.example.com. | 192.0.2.2 |
| Web Server | www.example.com. | 192.0.2.3 |
After you are finished with this guide, you should have the first two servers configured with NSD to act as authoritative-only server for your zones. You will be able to use the host names that we configure to reach your servers from the internet, as well as find out the host names by querying the IP addresses. Any resolving client capable of reaching our servers will be able to get the domain data from our servers.
Setting the Hostname on the Name Servers
The first step that we need to take is a preparatory one. Before worrying about the DNS configuration, we need to make sure our name servers can correctly resolve their own hostname in the way we require.
On your first DNS server, edit the /etc/hosts file to set up the FQDN of this computer:
sudo nano /etc/hosts
In our case, we need to map the 192.0.2.1 IP address to our first name server’s full name, ns1.example.com. We can do this by replacing the line that specifies our host name with our public IP address, the FQDN, and the shortened alias for our host:
127.0.0.1       localhost
192.0.2.1       ns1.example.com ns1
Save and close the file when you are finished.
Next, we need to double-check the /etc/hostname file:
sudo nano /etc/hostname
This should contain the value of our unqualified host name. Modify it if necessary:
ns1
Save and close the file when you are finished.
If you modified the /etc/hostname file above, tell the system to re-read the file:
sudo hostname -F /etc/hostname
We are done with our first DNS server for the time being. Repeat the steps on the second server.
Modify the /etc/hosts file to specify the second DNS server’s host:
sudo nano /etc/hosts
127.0.0.1       localhost
192.0.2.2       ns2.example.com ns2
Check the /etc/hostname file as well. This should only have the short unqualified name:
sudo nano /etc/hostname
ns2
Again, make the system re-read the file if you had to modify anything:
sudo hostname -F /etc/hostname
Your servers can now resolve their own names without using DNS. You are now ready to set up NSD on your servers.
Install NSD on Both Name Servers
The next step is to actually install the software on your name servers.
Before we begin, we actually have to take one additional preparatory step. The NSD package in the repos installs the software, configures some components, and attempts to start the service. The service expects to run as a user called nsd, but the package does not actually create this user account.
To avoid an error upon installation, we will create this user before we install the software. On each of your machines, create the nsd system user by typing:
sudo useradd -r nsd
This will create the correct account needed to complete the installation successfully.
Now, we just need to install the NSD software. Luckily, NSD is included in the Ubuntu 14.04 repositories, so we can just use apt to pull it down. We will update our local package index and then download the appropriate package:
sudo apt-get update
sudo apt-get install nsd
This will install the software and do some initial configuration. It will also start the service, even though we have not configured it to serve anything yet.
Configure the Primary NSD Server
We will begin by setting up our ns1 server, which will be configured as the primary DNS server for our zones.
The first thing we should do is make sure all of the SSL keys and certificates that NSD uses to securely communicate between the daemon portion of the application and the controller are generated.
To do this, type:
sudo nsd-control-setup
There are probably already keys and certificates present in the /etc/nsd directory, but this command will generate anything that is missing.
Configure the nsd.conf File
The main configuration file for NSD is a file called nsd.conf located in the /etc/nsd directory.
There is a file containing only a few comments already in this directory, but we will use a more fully commented example file as our template. Copy this now to overwrite the current file:
sudo cp /usr/share/doc/nsd/examples/nsd.conf /etc/nsd/nsd.conf
Now, open the new file in your text editor with sudo privileges:
sudo nano /etc/nsd/nsd.conf
Inside, you will see a number of commented configuration lines organized into sections. The main sections are server, remote-control, key, pattern, and zone. We will use most of these for our configuration.
To start with, we should configure the basic properties of our DNS server in the server section. We will be handling basic IPv4 traffic on the default DNS port 53. We will use the nsd user we set up earlier. Most of these will be the default values, but we will uncomment the associated lines to make their values explicit.
We also want to explicitly set the directory that contains our zone data, and our log and pid file locations. There are many other configuration choices that you can set for this section, but we are going to keep it relatively simple. Feel free to make additional changes.
Our server section will look like this:
server:
    do-ip4: yes
    port: 53
    username: nsd
    zonesdir: "/etc/nsd"
    logfile: "/var/log/nsd.log"
    pidfile: "/run/nsd/nsd.pid"
Next, let’s take a look at the remote-control section. This section is a bit of a misnomer because it is not only used for remote control of our daemon. We are going to configure this to control the daemon locally.
First, we need to enable the resource and set its interface and port number. This can all be done by uncommenting the appropriate lines and changing the control-enable directive to “yes”.
Next, we can uncomment the lines that specify the key and certificate files. These match the file names generated when we ran the nsd-control-setup command and should not need to be modified once they are uncommented.
Our values for this section should look like this:
remote-control:
    control-enable: yes
    control-interface: 127.0.0.1
    control-port: 8952
    server-key-file: "/etc/nsd/nsd_server.key"
    server-cert-file: "/etc/nsd/nsd_server.pem"
    control-key-file: "/etc/nsd/nsd_control.key"
    control-cert-file: "/etc/nsd/nsd_control.pem"
Next, we will configure the key section. This section will contain the secret keys that NSD will use to securely execute zone transfers between our primary and secondary servers.
We need to set the name and algorithm that will be used. We will use the name demokey for our example. We will also use the default algorithm (hmac-sha256) that they have selected.
For the secret itself, we will take the advice in the comment on how to securely generate one. Exit the text editor. In your terminal, run the following command:
dd if=/dev/random of=/dev/stdout count=1 bs=32 | base64
You will receive a randomly generated key in the output of the command:
0+1 records in
0+1 records out
19 bytes (19 B) copied, 0.000571766 s, 33.2 kB/s
+kO0Vu6gC+9bxzMy3TIZVLH+fg==
Copy the output in red above and open your configuration file again. Use the copied output as the value of the secret parameter. This section should look like this:
key:
    name: "demokey"
    algorithm: hmac-sha256
    secret: "+kO0Vu6gC+9bxzMy3TIZVLH+fg=="
Next, we’ll set up a simple pattern since we have some repetitive information involving our secondary server. We will be notifying and transferring our zones to the same secondary each time, so creating a pattern makes sense.
We will call our pattern tosecondary to describe what the pattern will be used for. We will set the name and file for each zone individually, so we don’t need to worry about that in the pattern.
We want to set the notify parameter in our pattern to reference our secondary server’s IP address. We also want to use the key that we specified to securely transfer the zones with TSIG. We will set up the provide-xfr parameter exactly the same way.
In the end our pattern section should look like this:
pattern:
    name: "tosecondary"
    notify: 192.0.2.2 demokey
    provide-xfr: 192.0.2.2 demokey
Finally, we get to our zone section. Here, we configure how NSD will handle our specific zones and their associated files.
First, we will configure our forward zone. We need to set up the zone for our example.com zone. This is as simple as specifying the domain itself under the name parameter, specifying the name we will use for the zone file, and including the pattern we created above in order to transfer this to our secondary server.
The finished forward zone for our demo should look like this:
zone:
    name: "example.com"
    zonefile: "example.com.zone"
    include-pattern: "tosecondary"
Next, we can take care of the reverse zone. A reverse zone is basically a zone file that allows DNS software to map an IP address back to a host name for clients. In general, with hosting like DigitalOcean, this is taken care of by the hosting provider.
For instance, with DigitalOcean, you are not delegated responsibility for a range of IP addresses to set up reverse mappings. Instead, DigitalOcean automatically creates the necessary reverse mappings if you set the host name of the server in the control panel to the FQDN you would like it mapped back to.
You can learn more about reverse mappings by reading the “A Bit About Reverse Zones” section of the Bind authoritative-only guide. We will show you how to set up the reverse zones for NSD for informational purposes and for greater flexibility, even though this will only be relevant in situations where you have been delegated control over the reverse mappings for a block of IPs.
For a reverse zone, we take the first three octets of the IP address, reverse them, and add them as subdomain delegations onto the special domain in-addr.arpa. This is how the DNS system searches for IP addresses using the same lookup methods as regular domains. For our case, we will be making a reverse zone that defines the 2.0.192.in-addr.arpa mapping. This will look very similar to the forward zone specification:
zone:
    name: "2.0.192.in-addr.arpa"
    zonefile: "192.0.2.zone"
    include-pattern: "tosecondary"
Save and close the file when you are finished.
Create the Forward Zone File
Now, we need to create the forward zone file. In our configuration, we named the zone file as “example.com.zone”. We will have to create a file with this name in our /etc/nsd directory.
Open that file up in your text editor with sudo privileges:
sudo nano /etc/nsd/example.com.zone
The first thing we need to do is set a few parameters up top. We will set the $ORIGIN parameter which points to the domain we are configuring in FQDN format (complete with the ending dot). We also want to set the default time-to-live. We will use 1800 seconds, or 30 minutes:
$ORIGIN example.com.
$TTL 1800
Next, we need our SOA, or start of authority record. This will look like this:
@       IN      SOA     ns1.example.com.      admin.example.com. (
                        2014070201        ; serial number
                        3600                    ; refresh
                        900                     ; retry
                        1209600                 ; expire
                        1800                    ; ttl
                        )
This defines some zone-wide values. The ns1.example.com. value is used to specify the domain location of one of the authoritative servers for this zone. The admin.example.com. is used to specify an email address where the zone administrators can be reached.
The email address, in this case is admin@example.com. In a DNS zone file, the “@” symbol must be changed into a dot. The ending dot is also important, as they always are when specifying a FQDN.
The values in the parentheses define some of the values for our zone. The only one we will mention here is the serial number. This value must be incremented every time that you make a change to the zone file. Here, we are demonstrating using the date of this writing (July 02, 2014) plus a revision number.
Next, we need to use NS records to define the name servers that are authoritative for this zone. Remember to use the FQDN for your domain, including the ending dot:
                    IN      NS      ns1.example.com.
                    IN      NS      ns2.example.com.
Next, we need to set up the A records that will actually tell clients how to reach the name servers we specified. This is what maps our host names to their actual IP addresses:
ns1                 IN      A       192.0.2.1
ns2                 IN      A       192.0.2.2
Finally, we want to add any additional A records for our other hosts. In our case, we will be setting up our base domain (example.com) and the www hostname to map to our web server:
@                   IN      A       192.0.2.3
www                 IN      A       192.0.2.3
When you are finished, your completed file should look like this:
$ORIGIN example.com.
$TTL 1800
@       IN      SOA     ns1.example.com.      admin.example.com. (
                        2014070201        ; serial number
                        3600                    ; refresh
                        900                     ; retry
                        1209600                 ; expire
                        1800                    ; ttl
                        )
; Name servers
                    IN      NS      ns1.example.com.
                    IN      NS      ns2.example.com.

; A records for name servers
ns1                 IN      A       192.0.2.1
ns2                 IN      A       192.0.2.2

; Additional A records
@                   IN      A       192.0.2.3
www                 IN      A       192.0.2.3
Save and close the file when you are finished.
Create the Reverse Zone File
Next, we will make a similar file for our reverse zone. Remember that this is only necessary if you have been delegated responsibility for the reverse mapping of a block of addresses.
Create the reverse zone file that you referenced in your nsd.conf file and open it with sudo privileges in your text editor:
sudo nano /etc/nsd/192.0.2.zone
Again, we will start off by defining the $ORIGIN and $TTL parameters. This time, remember to set the origin to the in-addr.arpa subdomain for your zone. In our case this will look like this:
$ORIGIN 2.0.192.in-addr.arpa.
$TTL 1800
Next, we need to set the SOA records, just as before. We can pretty much use the exact same values for this file since the same email and authoritative name server are responsible for both zones. Furthermore, the numerical values should work in this instance as well. Remember to modify the serial number though every time you make a change:
@       IN      SOA     ns1.example.com.      admin.example.com. (
                        2014070201        ; serial number
                        3600                    ; refresh
                        900                     ; retry
                        1209600                 ; expire
                        1800                    ; ttl
                        )
When you are finished, the file should look like this:
Again, we need to define the name servers that are authoritative for the zone. These will be the same servers again:
                        IN      NS      ns1.example.com.
                        IN      NS      ns2.example.com.
Finally, we need to provide the actual reverse domain mappings by routing the last octet of each IP address to the FQDN of the associated host using PTR records:
1                       IN      PTR     ns1.example.com.
2                       IN      PTR     ns2.example.com.
3                       IN      PTR     www.example.com.
When you are finished, the file should look like this:
$ORIGIN 2.0.192.in-addr.arpa.
$TTL 1800
@       IN      SOA     ns1.example.com.      admin.example.com. (
                        2014070201        ; serial number
                        3600                    ; refresh
                        900                     ; retry
                        1209600                 ; expire
                        1800                    ; ttl
                        )
; Name servers
                        IN      NS      ns1.example.com.
                        IN      NS      ns2.example.com.

; PTR records
1                       IN      PTR     ns1.example.com.
2                       IN      PTR     ns2.example.com.
3                       IN      PTR     www.example.com.
Save and close the file when you are finished.
Testing the Files and Restarting the Service
Now that we have our primary server configured, we can go ahead and test our configuration file and implement our changes.
You can check the syntax of the main configuration file by using the included nsd-checkconf tool. Simply point the tool to your main configuration file:
sudo nsd-checkconf /etc/nsd/nsd.conf
If this returns immediately with no output, it means the syntax of your main configuration file is valid. If you get an error, check the syntax of your configuration file to fix any mistakes.
After you are able to execute the check cleanly, you can restart the service by typing:
sudo service nsd restart
This will stop and start the NSD daemon.
Check the logs to see any messages:
sudo tail -f /var/log/nsd.log
You should see a number of errors that look like this:
. . .
[1404333729] nsd[2142]: error: xfrd: zone 2.0.192.in-addr.arpa: received notify response error NAME ERROR from 192.0.2.2
[1404333729] nsd[2142]: error: xfrd: zone 2.0.192.in-addr.arpa: max notify send count reached, 192.0.2.2 unreachable
This is here because NSD is attempting to transfer the zone to the secondary server, which has not been configured yet.
Configure the Secondary NSD Server
Now that we have the primary server set up, we can go ahead and get the secondary server ready as well.
Again, we want to make sure that our SSL certificates and keys are all generated and available. To do this, issue the following command:
sudo nsd-control-setup
This will ensure that all of the credential files needed to control the daemon are available to us.
Configure the nsd.conf File
The nsd.conf file for the secondary server will be mostly the same as the primary server. There are only a few things that we will need to modify. Begin by copying the primary server’s /etc/nsd/nsd.conf file into the secondary server’s /etc/nsd/nsd.conf file.
This secondary server’s file should now look like this:
server:
    do-ip4: yes
    port: 53
    username: nsd
    zonesdir: "/etc/nsd"
    logfile: "/var/log/nsd.log"
    pidfile: "/run/nsd/nsd.pid"

remote-control:
    control-enable: yes
    control-interface: 127.0.0.1
    control-port: 8952
    server-key-file: "/etc/nsd/nsd_server.key"
    server-cert-file: "/etc/nsd/nsd_server.pem"
    control-key-file: "/etc/nsd/nsd_control.key"
    control-cert-file: "/etc/nsd/nsd_control.pem"

key:
    name: "demokey"
    algorithm: hmac-sha256
    secret: "+kO0Vu6gC+9bxzMy3TIZVLH+fg=="

pattern:
    name: "tosecondary"
    notify: 192.0.2.2 demokey
    provide-xfr: 192.0.2.2 demokey

zone:
    name: "example.com"
    zonefile: "example.com.zone"
    include-pattern: "tosecondary"

zone:
    name: "2.0.192.in-addr.arpa"
    zonefile: "192.0.2.zone"
    include-pattern: "tosecondary"
This is almost exactly what we need.
The server, remote-control, and key sections are already completely configured. The “secret” in the key section must match the primary server’s value, so copying the complete file contents makes it easy to satisfy this requirement.
The first thing we will need to modify is the pattern section. The section that we copied is specific to the primary server, so we want to modify it to address things from the secondary server’s perspective.
First, change the name to something more descriptive. We will use the same convention and call this fromprimary. We also need to change the directives that this sets. Instead of the notify parameter, secondary servers need an allow-notify parameter, which specifies the servers that are allowed to notify it. We will still use the same key, so we just need to modify the name and the appropriate IP address.
In a similar manner, we need to change the provide-xfr parameter to request-xfr. The format of this changes slightly. We need to specify that we are wanting a AXFR transfer (the only kind that NSD primaries are capable of) and we need to specify the IP address and the port number of the primary.
The pattern section will look something like this when you are finished:
pattern:
    name: "fromprimary"
    allow-notify: 192.0.2.1 demokey
    request-xfr: AXFR 192.0.2.1@53 demokey
For the zone sections, the only thing we need to modify is the include-pattern to match our the new pattern we just created:
zone:
    name: "example.com"
    zonefile: "example.com.zone"
    include-pattern: "fromprimary"

zone:
    name: "2.0.192.in-addr.arpa"
    zonefile: "192.0.2.zone"
    include-pattern: "fromprimary"
When you are finished, save and close the file.
Testing the Files and Restarting the Service
Since our secondary server will receive all of its zone data through transfers from the primary, we do not actually need to configure the zone files on this host.
Again, we should check the syntax of our main configuration file by typing:
sudo nsd-checkconf /etc/nsd/nsd.conf
If you receive any errors, you need to take another look at your nsd.conf file to address the syntax issues. If the command returns without any output, it means that your syntax is valid in the file.
When your configuration file passes the test, you can restart the service by typing:
sudo service nsd restart
Check the logs to make sure things are going okay:
sudo tail -f /var/log/nsd.log
Delegate Authority to your Name Servers
Now, your authoritative-only NSD servers should be configured and ready to serve DNS information about your domain. We still need to configure your domain so that it knows to use your name servers though.
To do this, you need to adjust some settings under the registrar where you purchased your domain name. Some of the terminology and certainly the interface will vary from registrar to registrar, but you should be able to find the settings if you look carefully.
I will be demonstrating how to do this with Namecheap, a fairly standard domain name registrar.
We need to adjust your name servers in a way that will allow us to set glue records at the domain’s parent. This is necessary whenever the name servers are within the domain itself.
When you delegate a subdomain (like example.com from the com domain), you must specify the name servers that are authoritative for the domain. If the name servers are within the domain, you also must include a glue record, which is simply an A record for each of the name server’s that are authoritative for the delegated zone.
We need this because DNS lookups would get caught in a loop if the glue records were not included. Clients would ask our registrar who is authoritative for the domain example.com and our registrar would (after we configure this) return ns1.example.com and ns2.example.com. If we do not include A records to resolve these to IP addresses, then the client will never be able to move beyond this point. It would have no way of finding the IP addresses of the name servers it needs because these are typically defined in the name servers themselves.
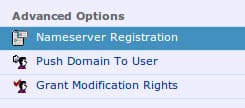
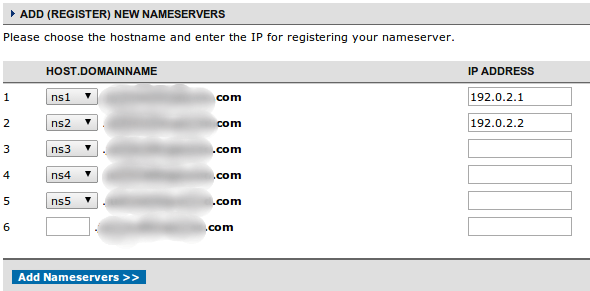
The location in the registrar’s interface where you can configure your name servers and their associated IP addresses will vary depending on your provider. With Namecheap, there is a section called “Nameserver Registration” that allows you to set the IP addresses of name servers to create glue records:
Here, you can set up the name servers and map them to a specific IP address:
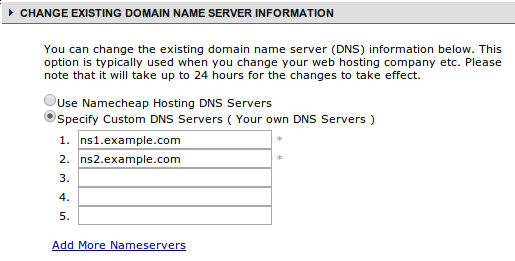
When you’re done with this, you’ll need to set the active name servers that are being used for your domain. Namecheap has an option called “Domain Name Server Setup” that accomplishes that:

In the interface that you get when selecting that option, you can enter the host names of your name servers that you just registered:
The changes that you make with your registrar might take some time to propagate. The data will also take additional time to spread to the rest of the world’s DNS servers. Typically, this process should complete in the next 24-48 hours.
Conclusion
Using this guide, you should now have a primary and secondary authoritative-only DNS servers that can be used to serve DNS information about your domains. Unlike Bind, NSD is optimized for high performance authoritative behavior, so you can get greater performance that is tuned specifically your needs.
Thanks for learning with the DigitalOcean Community. Check out our offerings for compute, storage, networking, and managed databases.
Tutorial Series: An Introduction to Managing DNS
DNS, or the domain name system, is an essential component of modern internet communication. It allows us to reference computers by names instead of IP addresses. In this series, we will cover the basic ideas behind DNS so that you feel comfortable working with it. Afterwards, we will walk through various ways that you can gain greater control over your domains and DNS resolution.
About the author
Former Senior Technical Writer at DigitalOcean, specializing in DevOps topics across multiple Linux distributions, including Ubuntu 18.04, 20.04, 22.04, as well as Debian 10 and 11.
Still looking for an answer?
This textbox defaults to using Markdown to format your answer.
You can type !ref in this text area to quickly search our full set of tutorials, documentation & marketplace offerings and insert the link!
What if the two VPS are on different subnets? How do you do the reverse DNS then?
It appears to me that this information is outdated. I just installed NSD 3.2.18 on Fedora 20, and found a couple of problems:
- There is no nsd-control-setup
- The man page says the nsd database has to be initialized by something called zonec
I don’t think I can proceed with these instructions. It would be great if you could update these instructions to match the latest release.
This article doesn’t explain how you switch users and indicates you should do so before editing nsd.conf.
On Ubuntu 16, you need to perform an extra step before “Configure the nsd.conf File”: gunzip /usr/share/doc/nsd/examples/nsd.conf.gz.
Hello, according to this article, there has a sentence is follow: For a reverse zone, we take the first three octets of the IP address, reverse them, and add them as subdomain delegations onto the special domain in-addr.arpa.
Why is the first three octets of the IP address, not all octets of the IP address? Can i use all octets of the IP address?
Is there a situation here: the first three octets of the IP address is SAME, such as 10.10.2.8 and 10.10.2.10 ?
 This work is licensed under a Creative Commons Attribution-NonCommercial- ShareAlike 4.0 International License.
Become a contributor for community
Get paid to write technical tutorials and select a tech-focused charity to receive a matching donation.

DigitalOcean Documentation
Full documentation for every DigitalOcean product.

Resources for startups and AI-native businesses
The Wave has everything you need to know about building a business, from raising funding to marketing your product.
The developer cloud
Scale up as you grow — whether you're running one virtual machine or ten thousand.

Start building today
From GPU-powered inference and Kubernetes to managed databases and storage, get everything you need to build, scale, and deploy intelligent applications.
