By Kent Shultz and Madison Scott-Clary

Introduction
Do you need to present some data in well-formatted output, textual reports, or HTML pages? You can do that with Go templates. Any Go program can use the text/template or html/template package—both included in the Go standard library—to present data neatly.
Both packages allow you to write textual templates and pass data into them to render a document formatted to your liking. Within the templates, you can loop over the data and use conditional logic to decide which items to include in the document and how they should appear. This tutorial will show you how to use both template packages. First you’ll use text/template to render some data into a plain text report using loops, conditional logic, and custom functions. Then you’ll use html/template to render the same data into an HTML document that is free of code injection.
Prerequisites
Before starting this tutorial, you only need to install Go. Read the right tutorial for your operating system:
- How To Install Go On Ubuntu 20.04
- How To Install Go and Set Up a Local Programming Environment on macOS
- How To Install Go and Set Up a Local Programming Environment on Windows 10
You will also need a working knowledge of the Go language, including creating structs and using struct methods.
Let’s get started.
Step 1 — Importing text/template
text/templateSuppose you would like to generate a simple report about some data you have on dogs. You want to display it like so:
---
Name:  Jujube

Sex:   Female (spayed)

Age:   10 months

Breed: German Shepherd/Pitbull

---
Name:  Zephyr

Sex:   Male (intact)

Age:   13 years, 3 months

Breed: German Shepherd/Border Collie
This is the report you will generate using the text/template package. The highlighted items are your data and the rest is static text from the template. Templates live either as strings in your code or in their own files alongside your code. They contain boilerplate static text interlaced with conditional statements (i.e. if/else), flow control statements (i.e. loops), and function calls, all wrapped within {{. . .}} markers. You will pass some data into your template to render a final document like the one above.
To get started, navigate to your Go workspace (go env GOPATH) and make a new directory for this project:
- cd `go env GOPATH`
- mkdir pets
- cd pets
Using nano or your favorite text editor, open a new file called pets.go and paste this in:
- nano pets.go
package main

import (
	"os"
	"text/template"
)

func main() {
}
This file declares itself to be in the main package and contains a main function, meaning that it is runnable using go run. It imports the text/template standard library package to allow you to write and render a template, and os, which will be used to print to the terminal.
Step 2 — Creating Template Data
Before writing a template, let’s create some data to pass into the template. Below the import statements and before main(), define a struct called Pet that contains fields for a pet’s Name, Sex, whether or not the pet is spayed/neutered (Intact), Age, and Breed. Edit pets.go and add this struct:
. . .
type Pet struct {
	Name   string
	Sex    string
	Intact bool
	Age    string
	Breed  string
}
. . .
Now, in the body of the main() function, create a slice of Pets to hold data about two dogs:
. . .
func main() {
	dogs := []Pet{
		{
			Name:   "Jujube",
			Sex:    "Female",
			Intact: false,
			Age:    "10 months",
			Breed:  "German Shepherd/Pitbull",
		},
		{
			Name:   "Zephyr",
			Sex:    "Male",
			Intact: true,
			Age:    "13 years, 3 months",
			Breed:  "German Shepherd/Border Collie",
		},
	}
} // end main
This data will be passed to your template to render a final report. Of course, the data you pass to your templates can come from anywhere: your database, a third-party API, etc. For this tutorial, it’s simplest to just paste some sample data into your code.
Now let’s see how to render—or execute, in the terminology of these packages—a template.
Step 3 — Executing a Template
In this step, you will see how to use text/template to generate a finished document from a template, but you won’t actually write a useful template until Step 4.
Create an empty text file named pets.tmpl with some static text:
Nothing here yet.
Save the template and exit your editor. If you are using nano, press CTRL+X then Y and ENTER to confirm your changes.
Although executing this template will just print “Nothing here yet.”, let’s pass your data in and execute the template just to prove that text/template is working. Add the following within your main() function after the dogs slice:
	. . .
	var tmplFile = “pets.tmpl”
	tmpl, err := template.New(tmplFile).ParseFiles(tmplFile)
	if err != nil {
		panic(err)
	}
	err = tmpl.Execute(os.Stdout, dogs)
	if err != nil {
		panic(err)
	}
} // end main
In this snippet of code, you are using Template.New to create a new Template, then calling ParseFiles on the resulting template to parse your minimal template file. After checking for errors, you are calling the new template’s Execute method, passing in os.Stdout to print the finished report to the terminal, and also passing in your dogs slice. For the first argument, you can pass in anything that implements the io.Writer interface, meaning you could write your report to a file, for example. We’ll see how to do that later on.
The complete program should look like this:
package main

import (
	"os"
	"text/template"
)

type Pet struct {
	Name   string
	Sex    string
	Intact bool
	Age    string
	Breed  string
}

func main() {
	dogs := []Pet{
		{
			Name:   "Jujube",
			Sex:    "Female",
			Intact: false,
			Age:    "10 months",
			Breed:  "German Shepherd/Pitbull",
		},
		{
			Name:   "Zephyr",
			Sex:    "Male",
			Intact: true,
			Age:    "13 years, 3 months",
			Breed:  "German Shepherd/Border Collie",
		},
	}
	var tmplFile = “pets.tmpl”
	tmpl, err := template.New(tmplFile).ParseFiles(tmplFile)
	if err != nil {
		panic(err)
	}
	err = tmpl.Execute(os.Stdout, dogs)
	if err != nil {
		panic(err)
	}
} // end main
Save the program, then run it with go run:
- go run pets.go
OutputNothing here yet.
The program does not print your data yet, but at least the code runs cleanly. Now let’s write a template.
Step 4 — Writing A Template
A template is just UTF-8 plain text, but there’s more to it than that. Yes, it contains some static text that will appear in the final output unchanged, but it also contains actions, which are instructions to the template engine that tell it how to walk through the data that was passed in and what to include in the output. Actions are wrapped in a pair of opening and closing double-curly braces—{{ <action> }}—and they access the data via the cursor, denoted by a dot (.).
The data passed into a template may be absolutely anything, but it is common to pass in a slice, array, or map—something iterable. Let’s have the template walk through your dogs slice.
Looping Over a Slice
In Go code, you can use range within a for loop’s opening statement to iterate over a slice. In templates, you use the range action for the same purpose, but it has a different syntax: there is no for, but there is an added end to close the loop.
Open pets.tmpl and replace its contents with the following:
{{ range . }}
---
(Pet will appear here...)
{{ end }}
The range action takes one argument here: the cursor (.), which refers to the entire dogs slice. The loop is closed with the {{ end }} at the bottom. In the body of the loop, you are printing some static text and still nothing about the dogs yet.
Save pets.tmpl and run pets.go again:
- go run pets.go
Output
---
(Pet will appear here...)

---
(Pet will appear here...)
The static text is printed twice since there are two dogs in your slice. Now let’s replace this with some more useful static text, along with the dog data.
Displaying a Field
When passing . to range in this template, the dot refers to the whole slice, but within each iteration of the range loop, the dot refers to the current item in the slice. This lets you access the exported fields of each pet using just the bare dot. You don’t need to reference slice indexes.
Displaying a field is as simple as wrapping it in curly braces and prepending it with the dot. Open pets.tmpl and replace its contents with this:
{{ range . }}
---
Name:  {{ .Name }}

Sex:   {{ .Sex }}

Age:   {{ .Age }}

Breed: {{ .Breed }}
{{ end }}
Now pets.go will print four of five fields for each of the two dogs, including some labels for the fields. (We’ll get to the fifth field in a moment.)
Save and run the program again:
- go run pets.go
Output
---
Name:  Jujube

Sex:   Female

Age:   10 months

Breed: German Shepherd/Pitbull

---
Name:  Zephyr

Sex:   Male

Age:   13 years, 3 months

Breed: German Shepherd/Border Collie
Looks good. Now let’s see how to use some conditional logic to display that fifth field.
Using Conditionals
The reason we did not include the Intact field by adding {{ .Intact }} to the template is that this would not be very reader-friendly. Imagine if your veterinarian bill said Intact: false in the summary about your dog. While it may be efficient to store this field as a boolean rather than a string, and Intact is a good sex-neutral name for this field, we can display it differently in our final report by using an if-else action.
Open pets.tmpl again and add the highlighted part shown here:
{{ range . }}
---
Name:  {{ .Name }}

Sex:   {{ .Sex }} ({{ if .Intact }}intact{{ else }}fixed{{ end }})

Age:   {{ .Age }}

Breed: {{ .Breed }}
{{ end }}
The template now checks if the Intact field is true and prints (intact) if so or (fixed) if not. But we can do better than that. Let’s edit the template further to print the sex-specific terms for a fixed dog—spayed or neutered—rather than fixed. Add a nested if within the original else:
{{ range . }}
---
Name:  {{ .Name }}

Sex:   {{ .Sex }} ({{ if .Intact }}intact{{ else }}{{ if (eq .Sex "Female") }}spayed{{ else }}neutered{{ end }}{{ end }})

Age:   {{ .Age }}

Breed: {{ .Breed }}
{{ end }}
Save the template and run pets.go:
- go run pets.go
Output
---
Name:  Jujube

Sex:   Female (spayed)

Age:   10 months

Breed: German Shepherd/Pitbull

---
Name:  Zephyr

Sex:   Male (intact)

Age:   13 years, 3 months

Breed: German Shepherd/Border Collie
We have two dogs, but three possible cases for displaying Intact. Let’s add one more dog to the slice in pets.go to cover all three cases. Edit pets.go and append a third dog to the slice:
. . .
func main() {
	dogs := []Pet{
		{
			Name:   "Jujube",
			Sex:    "Female",
			Intact: false,
			Age:    "10 months",
			Breed:  "German Shepherd/Pitbull",
		},
		{
			Name:   "Zephyr",
			Sex:    "Male",
			Intact: true,
			Age:    "13 years, 3 months",
			Breed:  "German Shepherd/Border Collie",
		},
		{
			Name:	"Bruce Wayne",
			Sex:	"Male",
			Intact:	false,
			Age:	"3 years, 8 months",
			Breed:	"Chihuahua",
		},
	}
. . .
Now save and run pets.go:
- go run pets.go
Output
---
Name:  Jujube

Sex:   Female (spayed)

Age:   10 months

Breed: German Shepherd/Pitbull

---
Name:  Zephyr

Sex:   Male (intact)

Age:   13 years, 3 months

Breed: German Shepherd/Border Collie

---
Name:  Bruce Wayne

Sex:   Male (neutered)

Age:   3 years, 8 months

Breed: Chihuahua
Great—it looks as expected.
Now let’s discuss template functions, like the eq function you just used.
Using Template Functions
Along with eq, there are other functions for comparing field values and returning a boolean: gt (>), ne (!=), le (<=), etc. You may call these functions—and any template function—in one of two ways:
- Write the function name, followed by one or more parameters with a space between each one. That’s how you used
eqabove:eq .Sex “Female”. - Write one parameter first, followed by a pipe (
|), then the function name, followed by any more parameters. This is similar to command pipes on the Unix command line, and as on the command line, you can chain together many function calls in a pipeline, passing the output of one call as the input to the next call, and so on.
So while the eq comparison in your template is written as eq .Sex “Female”, it could also be written as .Sex | eq “Female”. These two expressions are equivalent.
Let’s use the len function to display the number of dogs at the top of your report. Open pets.tmpl and add the following to the top:
Number of dogs: {{ . | len -}}

{{ range . }}
. . .
You could also have written {{ len . -}}.
Notice the dash (-) beside the closing double-curly braces. This prevents newlines (\n) being printed after an action. You can also append a dash to opening double-curly braces ({{-) to suppress the newline before an action.
Save the template and run pets.go:
- go run pets.go
OutputNumber of dogs: 3
---
Name:  Jujube

Sex:   Female (spayed)

Age:   10 months

Breed: German Shepherd & Pitbull

---
Name:  Zephyr

Sex:   Male (intact)

Age:   13 years, 3 months

Breed: German Shepherd & Border Collie

---
Name:  Bruce Wayne

Sex:   Male (neutered)

Age:   3 years, 8 months

Breed: Chihuahua
Because of the dash in {{ . | len -}}, there are no blank lines between the Number of dogs label and the first dog.
You may have noticed that the list of built-in functions in the text/template documentation is quite small. The good news is that you can make any Go function available to your templates, as long as it returns either a single value, or two values if the second one is an error type.
Using Go Functions In Templates
Suppose you wanted to write a template that takes a slice of dogs and only prints the last one. You can get a subset of a slice in templates using the slice built-in function, which works similarly to mySlice[x:y] in Go. You could write {{ slice . 2 }} to get the last item of a three-item slice, although the slice function returns another slice, not an item. That is, {{ slice . 2 }} is equivalent to slice[2:], not slice[2]. (The function can also take more than one index, e.g. {{ slice . 0 2 }} to get the slice slice[0:2], but won’t use that here.)
But how can you reference the last index of a slice within your template? The len function is available, but the last item in a slice has an index of len - 1, and unfortunately you cannot do arithmetic in templates.
That’s where a custom function is so useful. Let’s write a function that decrements an integer and make that function available to our template.
But before we do that, let’s make a new template. Open a new file lastPet.tmpl and paste in the following:
{{- range (len . | dec | slice . ) }}
---
Name:  {{ .Name }}

Sex:   {{ .Sex }} ({{ if .Intact }}intact{{ else }}{{ if ("Female" | eq .Sex) }}spayed{{ else }}neutered{{ end }}{{ end }})

Age:   {{ .Age }}

Breed: {{ .Breed }}
{{ end -}}
The call to the dec function on the first line references the custom function you’re about to define and pass to the template. Within the main() function in pets.go, make the following changes (highlighted) below the dogs slice and before the call to tmpl.Execute():
	. . .
	funcMap := template.FuncMap{
		"dec": func(i int) int { return i - 1 },
	}
	var tmplFile = “lastPet.tmpl”
	tmpl, err := template.New(tmplFile).Funcs(funcMap).ParseFiles(tmplFile)
	if err != nil {
		panic(err)
	}
	. . .
First, you are declaring a FuncMap, which is a map of functions: the keys are the function names being made available to your templates, and the values are the functions themselves. Your one function here, dec, is an anonymous function provided inline because it is so short. It takes an integer, subtracts one from it, and returns the result.
Then you are changing your template file name. Finally, you are inserting a call to Template.Funcs before the call to ParseFile, passing it the funcMap you just defined. The Funcs method must be called before ParseFiles.
Before running your code, let’s understand what is happening in the range action in your template:
{{- range (len . | dec | slice . ) }}
You are getting the length of your dogs slice, passing that to your custom dec function to subtract one, and then passing that as the second parameter to the slice function discussed earlier. So for a three-dog slice, the range action is equivalent to {{- range (slice . 2) }}.
Save pets.go and run it:
go run pets.go
Output
---
Name:  Bruce Wayne

Sex:   Male (neutered)

Age:   3 years, 8 months

Breed: Chihuahua
Looks good. What if you wanted to show the last two dogs instead of just the last one? Edit lastPet.tmpl and add another call to dec into the pipeline:
{{- range (len . | dec | dec | slice . ) }}
. . .
Save the file and run pets.go again:
go run pets.go
Output
---
Name:  Zephyr

Sex:   Male (intact)

Age:   13 years, 3 months

Breed: German Shepherd/Border Collie

---
Name:  Bruce Wayne

Sex:   Male (neutered)

Age:   3 years, 8 months

Breed: Chihuahua
You can probably imagine how to improve the dec function by having it take a parameter and changing its name so you could call minus 2 instead of dec | dec.
Now say you wanted to display mixed-breed dogs like Zephyr differently, replacing the slash with an ampersand. You don’t have to write your own function to do that because the strings package has one, and you can borrow a function from any package to use in your templates. Edit pets.go to import the strings package and add one of its functions to funcMap:
package main

import (
	"os"
	"strings"
	"text/template"
)
. . .
func main() {
	. . .
	funcMap := template.FuncMap{
		"dec":     func(i int) int { return i - 1 },
		"replace": strings.ReplaceAll,
	}
	. . .
} // end main
You are now importing the strings package and adding its ReplaceAll function to your funcMap under the name replace. Now edit lastPet.tmpl to use this function:
{{- range (len . | dec | dec | slice . ) }}
---
Name:  {{ .Name }}

Sex:   {{ .Sex }} ({{ if .Intact }}intact{{ else }}{{ if ("Female" | eq .Sex) }}spayed{{ else }}neutered{{ end }}{{ end }})

Age:   {{ .Age }}

Breed: {{ replace .Breed “/” “ & ” }}
{{ end -}}
Save the file and run it one more time:
- go run pets.go
Output
---
Name:  Zephyr

Sex:   Male (intact)

Age:   13 years, 3 months

Breed: German Shepherd & Border Collie

---
Name:  Bruce Wayne

Sex:   Male (neutered)

Age:   3 years, 8 months

Breed: Chihuahua
Zephyr’s breed now contains an ampersand instead of a slash.
You could have manipulated that string within pets.go instead of your template, but the presentation of data is the job of templates, not code.
In fact, some of the dog data already contains some presentation—and maybe it shouldn’t. The Breed field crams multiple breeds into one string, punctuating them with a slash. This single-string pattern could invite data enterers to introduce different formats into the database: Labrador/Poodle, Labrador & Poodle, Labrador, Poodle, Labrador-Poodle mix, etc. It may be better to store Breed as a slice of strings ([]string) instead of a string to avoid this format ambiguity, and to make searching by breed more flexible and presenting it easier. Then you could use the strings.Join function in your templates to print all breeds, plus an extra note by the .Breed field ((purebred) or (mixed breed)).
Try It Yourself
Try modifying your code and templates to implement these changes. When you are finished, click Solution below to check your work.
Solution
. . .
type Pet struct {
	Name   string
	Sex    string
	Intact bool
	Age    string
	Breed  []string
}

func main() {
	dogs := []Pet{
		{
			Name:   "Jujube",
			. . .
			Breed:  []string{"German Shepherd", "Pit Bull"},
		},
		{
			Name:   "Zephyr",
			. . .
			Breed:  []string{"German Shepherd", "Border Collie"},
		},
		{
			Name:   "Bruce Wayne",
			. . .
			Breed:  []string{"Chihuahua"},
		},
	}
	funcMap := template.FuncMap{
		"dec":     func(i int) int { return i - 1 },
		"replace": strings.ReplaceAll,
		"join":    strings.Join,
	}
	. . .
} // end main
{{- range (len . | dec | dec | slice . ) }}
---
Name:  {{ .Name }}

Sex:   {{ .Sex }} ({{ if .Intact }}intact{{ else }}{{ if ("Female" | eq .Sex) }}spayed{{ else }}neutered{{ end }}{{ end }})

Age:   {{ .Age }}

Breed: {{ join .Breed " & " }} ({{ if len .Breed | eq 1 }}purebred{{ else }}mixed breed{{ end }})
{{ end -}}
In closing, let’s render this same dog data into an HTML document and see why you should always use the html/template package when the output of your templates is HTML.
Step 5 — Writing an HTML Template
A command-line tool might use text/template to neatly print output, and some other batch program might use it to create well-structured files from some data. But Go templates are commonly used to render HTML pages for web applications as well. The popular open-source static site generator Hugo, for example, uses both text/template and html/template as a foundation for its templating.
HTML comes with a few special challenges that plain text does not. It uses angle brackets to wrap elements (<td>), ampersands to mark entities ( ), and quote characters to wrap tag attributes (<a href=“https://www.digitalocean.com/”>). If any of the data your template is inserting contains these characters, using the text/template package could result in malformed HTML—or worse, code injection.
Not so with the html/template package. This package escapes these problematic characters, inserting their safe HTML equivalents (entities). An ampersand in your data becomes &, a left angle bracket becomes <, and so on.
Let’s use the same dog data from earlier to create an HTML document, but first we’ll keep using the text/template to show its danger.
Open pets.go and add the following highlighted text to Jujube’s Name field:
        . . .
	dogs := []Pet{
		{
			Name:   "<script>alert(\"Gotcha!\");</script>Jujube",
			Sex:    "Female",
			Intact: false,
			Age:    "10 months",
			Breed:  "German Shepherd/Pit Bull",
		},
		{
			Name:   "Zephyr",
			Sex:    "Male",
			Intact: true,
			Age:    "13 years, 3 months",
			Breed:  "German Shepherd/Border Collie",
		},
		{
			Name:   "Bruce Wayne",
			Sex:    "Male",
			Intact: false,
			Age:    "3 years, 8 months",
			Breed:  "Chihuahua",
		},
	}
        . . .
Now create an HTML template in a new file called petsHtml.tmpl:
<p><strong>Pets:</strong> {{ . | len }}</p>
{{ range . }}
<hr />
<dl>
	<dt>Name</dt>
	<dd>{{ .Name }}</dd>
	<dt>Sex</dt>
	<dd>{{ .Sex }} ({{ if .Intact }}intact{{ else }}{{ if (eq .Sex "Female") }}spayed{{ else }}neutered{{ end }}{{ end }})</dd>
	<dt>Age</dt>
	<dd>{{ .Age }}</dd>
	<dt>Breed</dt>
	<dd>{{ replace .Breed “/” “ & ” }}</dd>
</dl>
{{ end }}
Save the HTML template. Before running pets.go, we need to edit the tmpFile var, but let’s also edit the program to output the template to a file instead of the terminal. Open pets.go and add the highlighted code within the main() function:
	. . .
	funcMap := template.FuncMap{
		"dec":     func(i int) int { return i - 1 },
		"replace": strings.ReplaceAll,
	}
	var tmplFile = "petsHtml.tmpl"
	tmpl, err := template.New(tmplFile).Funcs(funcMap).ParseFiles(tmplFile)
	if err != nil {
		panic(err)
	}
	var f *os.File
	f, err = os.Create("pets.html")
	if err != nil {
		panic(err)
	}
	err = tmpl.Execute(f, dogs)
	if err != nil {
		panic(err)
	}
	err = f.Close()
	if err != nil {
		panic(err)
	}
} // end main
You are opening a new File called pets.html, passing it (instead of os.Stdout) to tmpl.Execute, then closing the file when finished.
Now run go run pets.go to generate the HTML file. Then, open this local webpage in your browser:
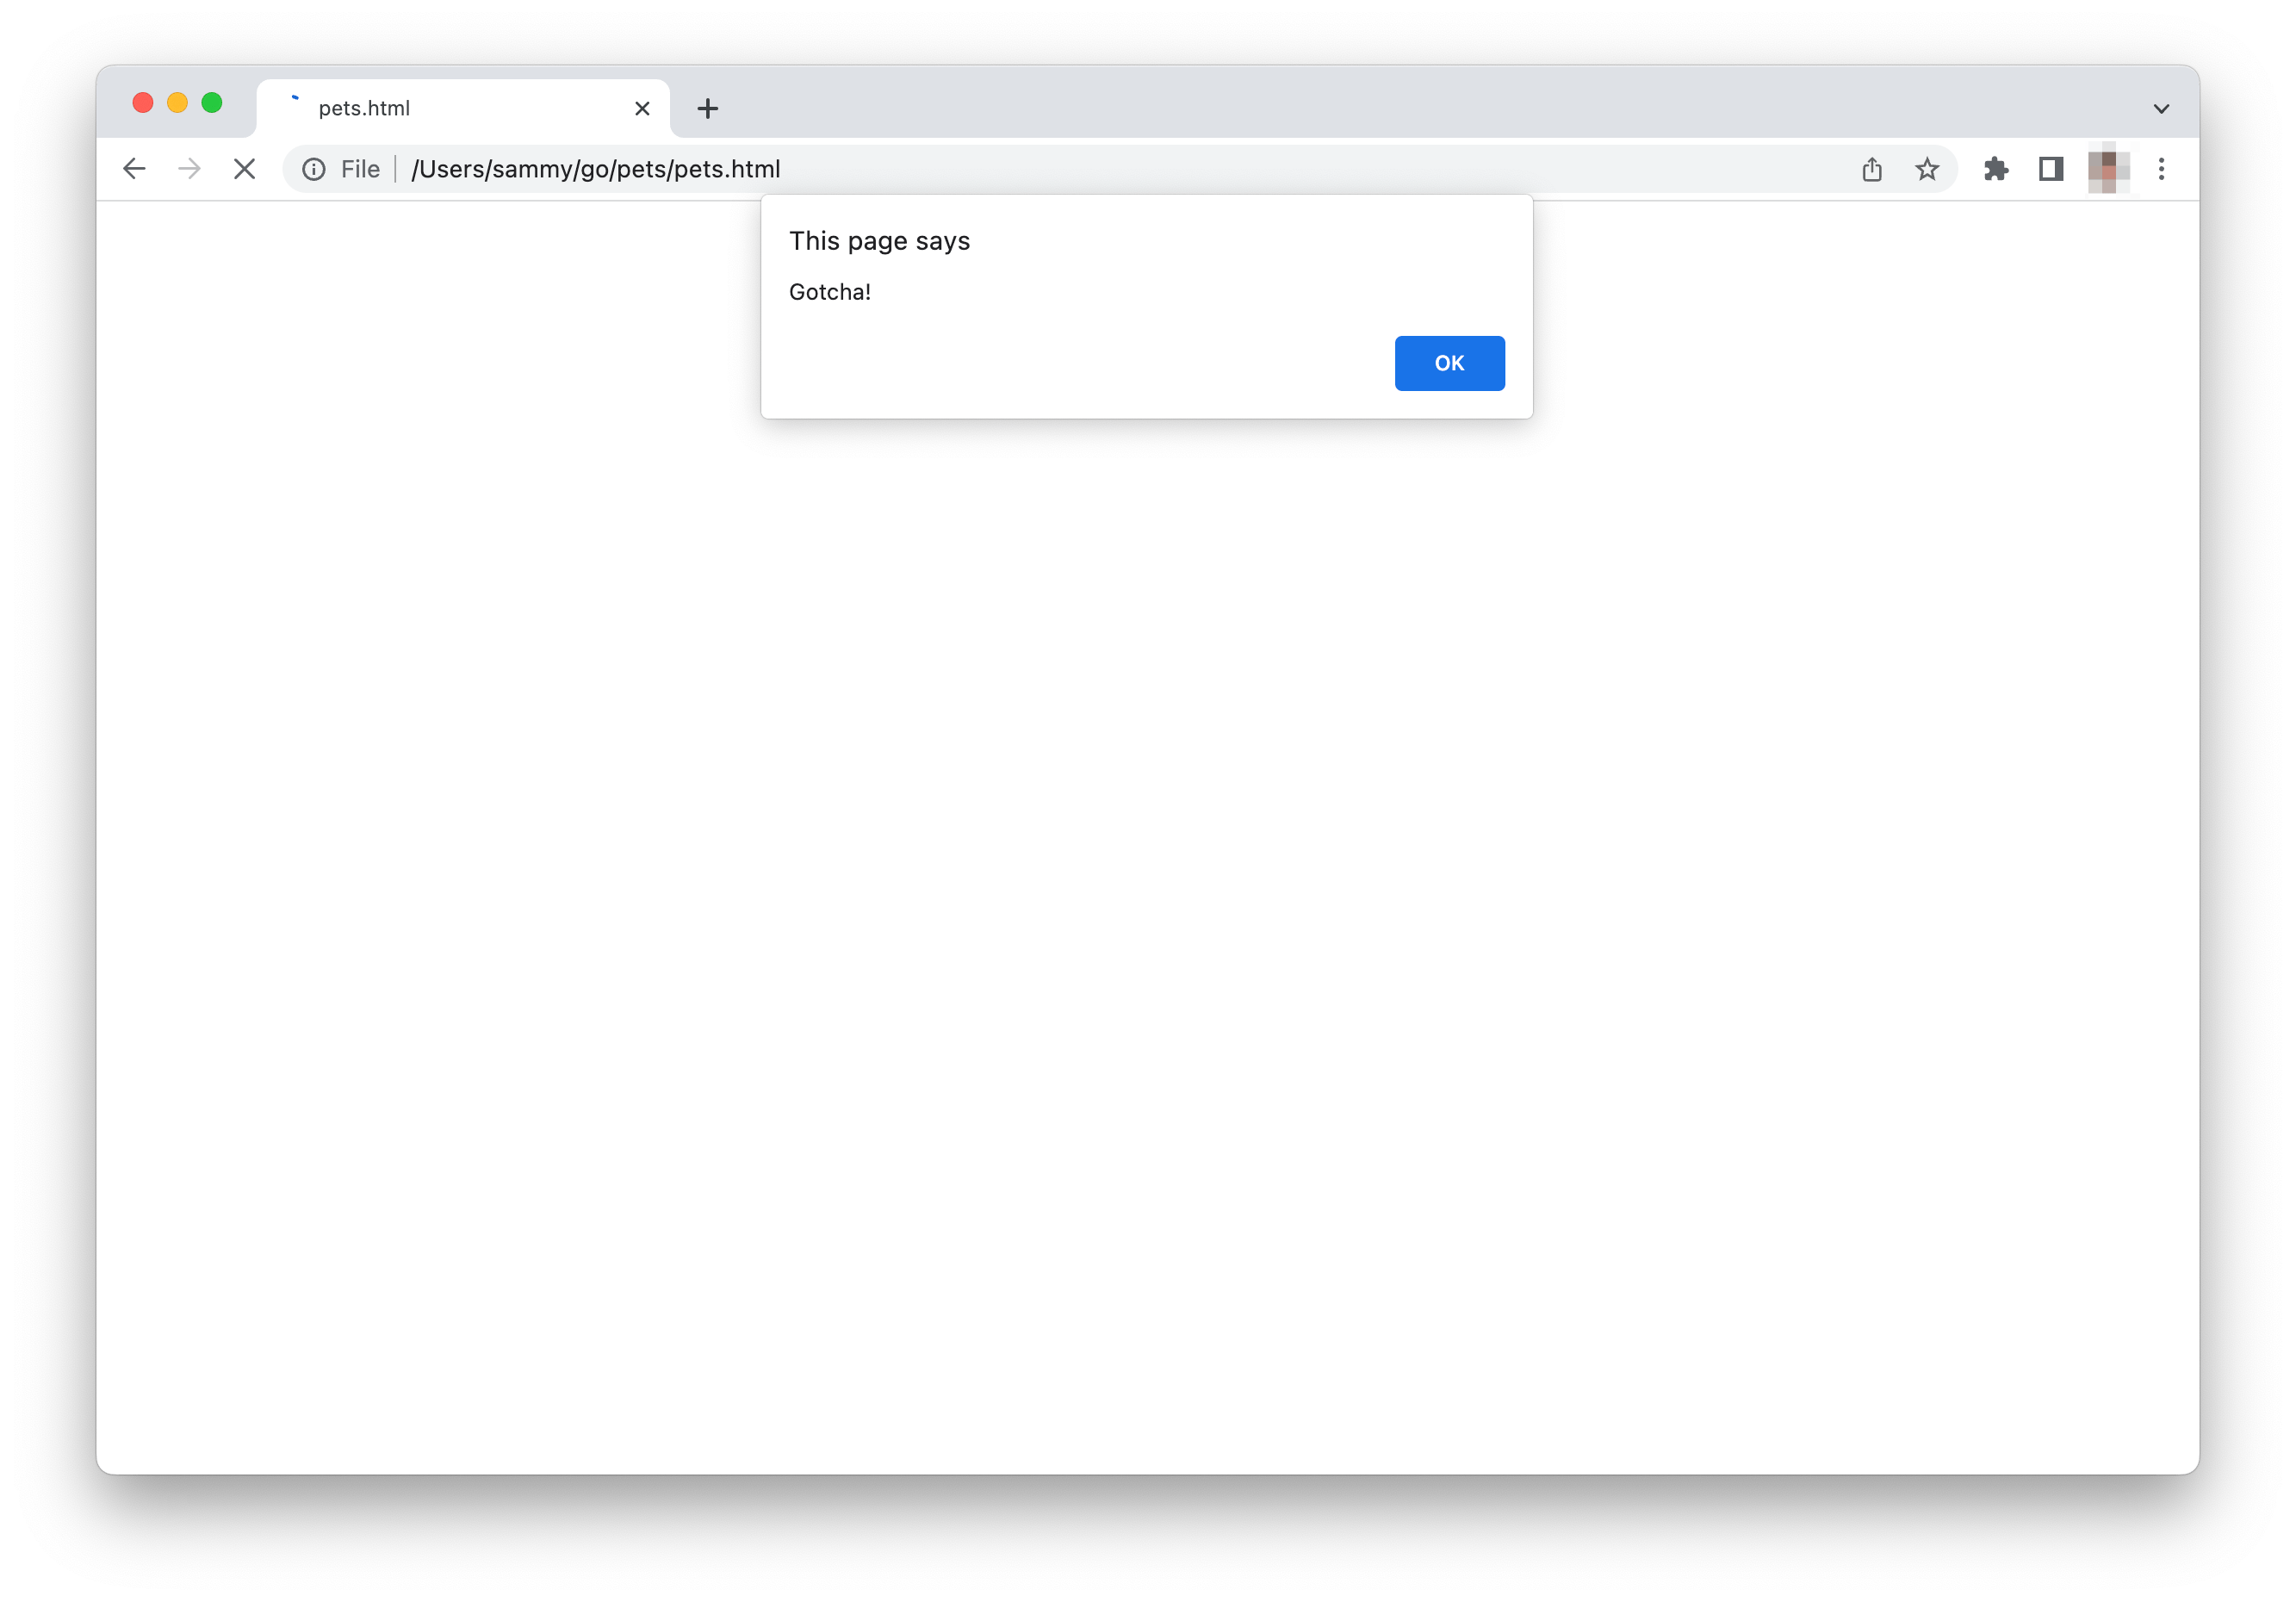
The browser has run the injected script. This is why you should never use the text/template package to generate HTML, especially when you cannot fully trust the source of your templates’ data.
Aside from escaping HTML characters in data, the html/template package works just like text/template and has the same base name (template), which means all you have to do to make your template injection-safe is replace the text/template import with html/template. Edit pets.go and do that now:
package main

import (
	"os"
	"strings"
	"html/template"
)
. . .
Save the file and run it one last time, overwriting pets.html. Then refresh the HTML file in your browser:
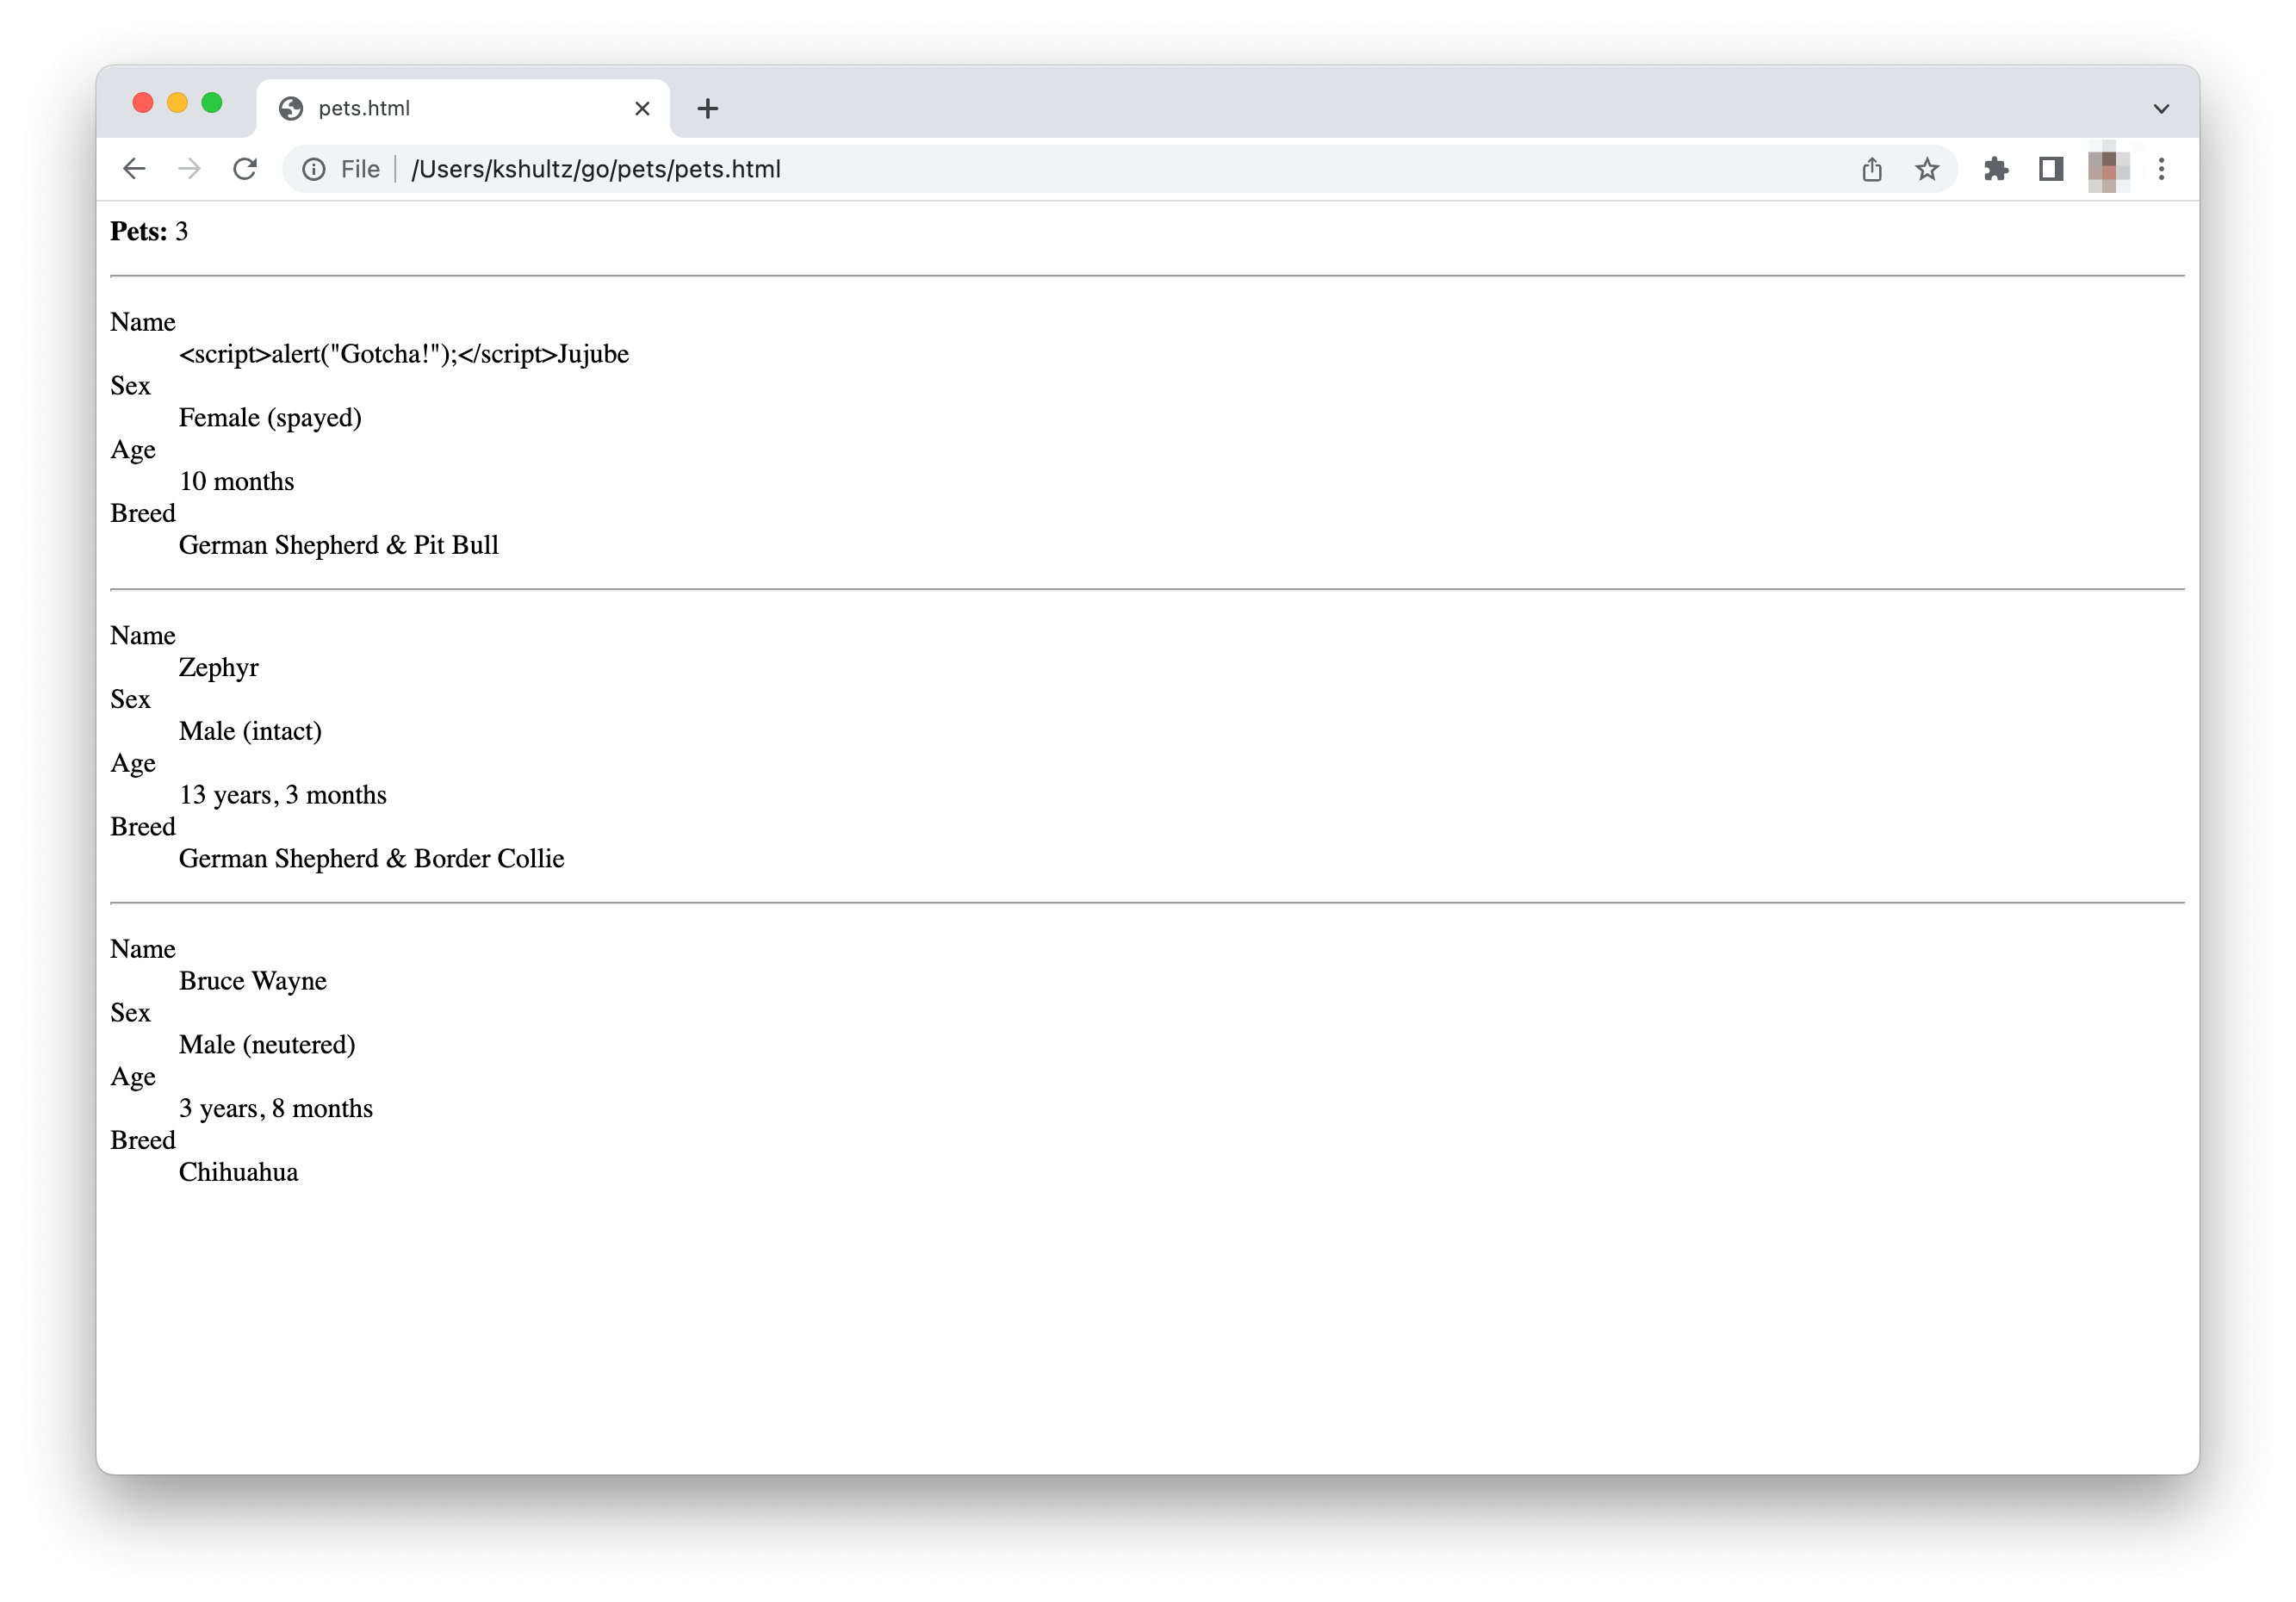
The html/template package has rendered the injected script as just text in the webpage. Open pets.html in your text editor (or view page source in your browser) and look at the first dog Jujube:
. . .
<dl>
<dt>Name</dt>
<dd><script>alert("Gotcha!");</script>Jujube</dd>
<dt>Sex</dt>
<dd>Female (spayed)</dd>
<dt>Age</dt>
<dd>10 months</dd>
<dt>Breed</dt>
<dd>German Shepherd & Pit Bull</dd>
</dl>
. . .
The html package replaced the angle brackets and quote characters in Jujube’s name, and also the ampersand in the breed.
Conclusion
Go Templates are a convenient tool for wrapping any text around any data. You can use them in your command-line tools to format output, in your web applications to render HTML, and more. In this tutorial, you used Go’s built-in template packages to print well-formatted text and an HTML page from the same data. To learn more about how to use these packages, check out the documentation for text/template and html/template.
Thanks for learning with the DigitalOcean Community. Check out our offerings for compute, storage, networking, and managed databases.
Tutorial Series: How To Code in Go
Go (or GoLang) is a modern programming language originally developed by Google that uses high-level syntax similar to scripting languages. It is popular for its minimal syntax and innovative handling of concurrency, as well as for the tools it provides for building native binaries on foreign platforms.
Browse Series: 53 tutorials
About the author(s)
Still looking for an answer?
This textbox defaults to using Markdown to format your answer.
You can type !ref in this text area to quickly search our full set of tutorials, documentation & marketplace offerings and insert the link!
 This work is licensed under a Creative Commons Attribution-NonCommercial- ShareAlike 4.0 International License.
Become a contributor for community
Get paid to write technical tutorials and select a tech-focused charity to receive a matching donation.

DigitalOcean Documentation
Full documentation for every DigitalOcean product.

Resources for startups and AI-native businesses
The Wave has everything you need to know about building a business, from raising funding to marketing your product.
The developer cloud
Scale up as you grow — whether you're running one virtual machine or ten thousand.

Start building today
From GPU-powered inference and Kubernetes to managed databases and storage, get everything you need to build, scale, and deploy intelligent applications.
