By Joe Keegan and Anish Singh Walia
")
Introduction
IPSec has been the de facto standard for secure site-to-site tunnels for decades, traditionally requiring manual configuration of security appliances. Today, infrastructure-as-code (IaC) frameworks like Terraform let us encapsulate that complexity in reusable modules. As part of DigitalOcean’s focus on being simple and developer-friendly we have published a Terraform module allowing you to quickly and reliably deploy a Droplet, pre-configured with strongSwan, along with a reserved public IP making the Droplet act like a dedicated VPN appliance.
In this tutorial, we’ll demonstrate how to use this Terraform module to establish a secure site-to-site IPSec VPN tunnel between your DigitalOcean VPC and an AWS VPC. By following these steps, you’ll provision a VPN gateway on DigitalOcean and configure the AWS-side resources, such as Customer Gateway, Virtual Private Gateway, and routing to create a private, encrypted link for your hybrid-cloud workloads.
This tutorial uses a Reference Architecture (RA) published as part of our Scale with Simplicity library showing off the site-to-site-vpn-aws RA. This RA utilizes our terraform-digitalocean-ipsec-gateway module to create an IPSec VPN with AWS. While the RA and this tutorial is AWS focused the terraform-digitalocean-ipsec-gateway module can be used to create IPSec-based VPNs when using other cloud providers or even on premise VPN Gateways.
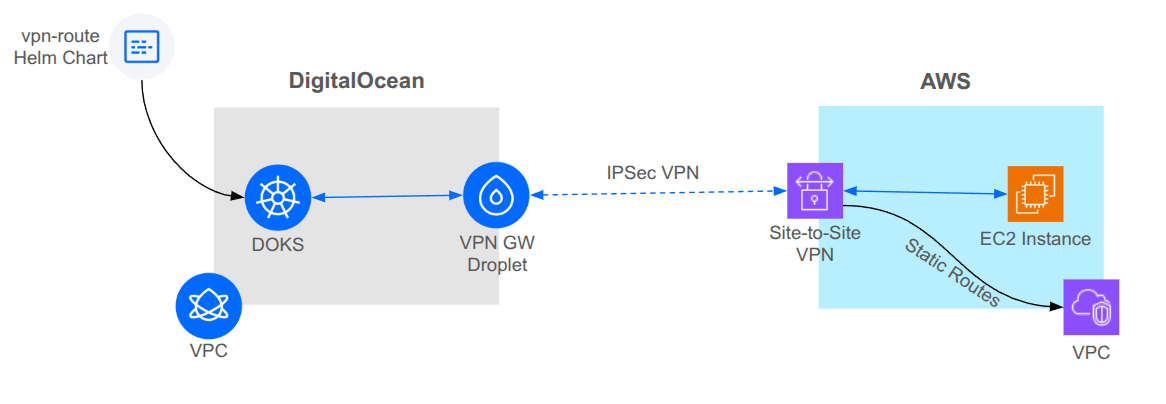
This diagram provides an overview of what we will build in this tutorial. For more details, please see the site-to-site-vpn-aws RA.
Key Takeaways
By following this tutorial, you will:
- Gain hands-on experience using Terraform to automate the deployment of a secure IPSec VPN tunnel between a DigitalOcean VPC and an AWS VPC, enabling seamless, private connectivity for your hybrid-cloud workloads.
- Understand all prerequisites, including required accounts, credentials, permissions, and CLI tools, as well as important considerations around Droplet sizing, network throughput, and VPN performance limitations.
- Learn how to provision and configure a DigitalOcean Droplet as a dedicated IPSec VPN Gateway using a reusable Terraform module, including how to assign a reserved public IP, configure strongSwan, and set up secure routing.
- Discover how to configure the necessary AWS-side resources—such as Customer Gateway, Virtual Private Gateway, and route tables—to establish a fully functional site-to-site VPN connection.
- Explore best practices for routing traffic between your VPCs, including how to update Droplet and AWS route tables, leverage the DOKS Routing Agent for Kubernetes clusters, and validate connectivity end-to-end.
- Understand cost considerations, security implications, and how to safely tear down resources when your testing or deployment is complete.
- Be equipped to extend this pattern to additional regions, cloud providers, or on-premises environments by reusing and adapting the provided Terraform modules and reference architectures.
Prerequisites
Before you begin, make sure you have:
- Accounts & Credentials
- A DigitalOcean account with API token
- An AWS account with IAM user credentials (Access Key ID & Secret) and permissions to create VPCs, EC2, and VPN resources
- CLI Tools Installed
- Terraform ≥ 1.0
- doctl (for troubleshooting & manual checks)
- AWS CLI (to verify AWS side post-deploy)
- kubectl and helm (to optionally validate routing from DOKS cluster)
- Local Environment
- A terminal with bash or similar shell
- Basic familiarity with Terraform workflows (init, plan, apply)
- Git (to clone the Reference Architecture repo)
Droplet and Performance Considerations
DigitalOcean has a wide array of Droplet types and configuration to choose from. When choosing what kind of Droplet to use for your VPN Gateway consider the following:
- VPN performance will be limited to 500 to 800Mbps. While Droplets support either 2Gbps or 10Gbps this is for all of their network flows. Since the IPSec tunnel is a single network flow you will not see the full network performance of the Droplet. This means you should stick to Regular Dedicated CPU Droplets that support 2Gbps.
- You should only consider Shared CPU Droplets if your site-to-site VPN traffic is not business-critical. Non-TCP traffic, such as IPSec, can be dropped or delayed due to the nature of the shared CPU leading to potential network gremlins. If your VPN is for admin related traffic or bulk data transfer then a Shared CPU Droplet is probably fine, but it’s not recommended if you are dealing with interactions between applications or databases.
- Droplet data transfer allowance is always a consideration. Data transfer allowance is pooled between all your Droplets, so it’s often not something you have to think about, but make sure to consider the volume of traffic that will flow through your VPN. You’ll also need to consider costs related to the other side of the VPN connection which can fluctuate depending on the traffic sent over the VPN.
- Given all this, the smallest CPU-Optimized Droplet is a good candidate, currently that would be a c-2 Droplet.
Routing Considerations
Routing to your VPN Gateway is done on a Droplet-by-Droplet basis meaning that you’ll have to configure a route on any Droplet you want to be able to send or receive traffic from the VPN. Using a configuration management tool such as Ansible to configure your Droplets is highly recommended. The DOKS Routing Agent can be used to configure your DOKS nodes with the route.
Step 1 - Clone the Scale With Simplicity Repo
Scale With Simplicity is our GitHub repo that contains ready to deploy reference architectures. Using these Reference Architectures you can deploy a site-to-site VPN between DigitalOcean and AWS in minutes.
git clone https://github.com/digitalocean/scale-with-simplicity.git
cd scale-with-simplicity/reference-architectures/site-to-site-vpn-aws/terraform
Step 2 - Ensure Your Credentials Are Set
Ensure your API Credentials are set and usable.
Export your credentials as Environment Variables
Environment Variables are the recommended way to provide credentials to the Terraform process as the minimizes the change they get checked into your revision control system (i.e. GitHub)
export DIGITALOCEAN_ACCESS_TOKEN="your_do_token_here"
export AWS_ACCESS_KEY_ID="your_access_key"
export AWS_SECRET_ACCESS_KEY="your_secret_key"
Validate that your credentials work as expected
doctl account get
aws sts get-caller-identity
Step 3 - Review Module Files
In this directory you will see the Terraform module files including the main.tf and variables.tf files.
Reviewing the main.tf will show that the following resources are created as part of this Reference Architecture.
DigitalOcean Side
- VPC
- DOKS cluster used for connectivity testing
- The VPN Gateway Droplet using the module
do_vpn_droplet. This is the module that deploys and configures the VPN Gateway Droplet, a reserved IP, and a firewall to limit traffic to the VPN Droplet.
AWS Side
- VPC with a single public subnet
- EC2 instance used for connectivity testing
- Site-to-Site VPN Gateway (Virtual Private Gateway attached to the VPC)
- Customer Gateway configuration pointing at the DigitalOcean Reserved IP.
- Static routes injected into the AWS VPC route table for directing traffic destined to the DigitalOcean VPC and DOKS CIDRs through the VPN.
The star of the show is the do_vpn_droplet module used to deploy the VPN Gateway Droplet. This Reference Architecture shows how to use this module and configure the AWS side, but you can use this module in your own Terraform module. Check out the Readme for the Terraform module in its GitHub Repo for more details on how it works and how to use it in your own Terraform module: terraform-digitalocean-ipsec-gateway.
Step 4 - Create the Input Vars File
Use your favorite editor to create a terraform.tfvars file in the terraform directory, This file will define the input variables used when deploying the reference architecture. Every var is defined and has a description in the variables.tf file.
The file should look something like following example:
name_prefix         = "vpn-test"
do_region           = "nyc3"
droplet_size        = "s-1vcpu-2gb"
aws_region          = "us-east-2"
aws_vpc_cidr        = "192.168.100.0/24"
do_vpc_cidr         = "10.1.0.0/22"
doks_cluster_subnet = "172.16.16.0/20"
doks_service_subnet = "192.168.4.0/22"
# Optional, but update with the Id for a ssh key in your team.
# You can use 'doctl compute ssh-key list' to get the ID.
droplet_ssh_keys    = [1234]
Step 5 - Initialize & Apply Terraform
terraform init
terraform apply -var="vpn_psk=your_secret_here"
This will install all the required providers and modules and then show you what resources will be created in both DigitalOcean and AWS. Providing the VPN Preshared key via the command line minimizes the chance of it getting checked into your revision control system (i.e. GitHub)
If things look OK then enter yes for Terraform to deploy these resources. IMPORTANT: There are costs associated with deploying these resources. This shouldn’t be more than a few dollars an hour, but make sure you understand the cost ramifications before deploying.
It will take between 10 and 15 minutes to deploy and configure all the resources.
WARNING: Changing some config details on the VPN Gateway Droplet such as the Droplet slug, OS, or pre-shared key will cause the VPN Gateway Droplet to be recreated. When this happens its possible the new VPN Gateway Droplet will have a different IP address and the routes on the other Droplets will need to be updated.
Step 6 - Validate Connectivity
Once the terraform apply completes it will output several lines that can be used to validate the connectivity. These lines will look something like this:
aws_instance_ip = "192.168.100.179"
helm_route_install_command = "doctl kubernetes cluster kubeconfig save vpn-test; helm upgrade vpn-route ../helm/vpn-route --install --set awsVpcCidr=192.168.100.0/24 --set vpnGwIp=10.0.0.3"
ping_test_command = "kubectl run -it --rm test-pod --image=nicolaka/netshoot -- ping 192.168.100.179"
Assuming you have doctl, helm and kubectl installed you can copy the command output of helm_route_install_command into your terminal to configure the route in the DOKS cluster. This will use a helm chart in the repo to create a route in the DOKS cluster used by the DOKS Routing Agent.
Once the route is configured you can copy and paste the output of the ping_test_command into your terminal and it will deploy a pod and run a ping to the EC2 instance.
To test connectivity from a non-DOKS Droplet you will need to deploy one connected to the VPC and configure it to route via the VPN Gateway Droplet. How to do this will depend on the OS of the deployed Droplet. The values used to configure the route can be found in the helm_route_install_command with awsVpcCidr being the network and vpnGwIp being the Gateway IP address.
You can also view the site-to-site VPN status on the AWS side either via the console or via the aws ec2 describe-vpn-connections command.
You should be able to ping across the VPN within a few minutes of the terraform apply competing, but in some cases the DO VPC routes do not get injected into the Droplet routing table as expected as part of the cloud-init based configuration. If your pings are still failing its recommended to reboot the Droplet to ensure the VPN and routes are brought up cleanly and the reboot should resolve any connectivity issues.
Note: By default SSH is not allowed to the VPN GW Droplet. If you need to SSH to the Droplet then you will need to add another firewall allowing SSH from your desired sources.
Step 7 - Tear Down
Once you have completed your evaluation and testing using the reference architecture you should use terraform destroy to tear everything down and ensure you are not charged for resources you are not using. Note the vpn_psk doesn’t need to match the value supplied in the apply. Any valid value can be supplied for the destroy to complete.
terraform destroy -var="vpn_psk=your_secret_here"
You may see an error stating that Terraform can’t destroy everything since some resources may still be unused. Wait a minute or two and then run the terraform destroy again to ensure everything is cleaned up.
FAQs
1. Can I use this Terraform-based approach to connect DigitalOcean VPCs to other cloud providers besides AWS?
Yes. The terraform-digitalocean-ipsec-gateway module is designed to be cloud-agnostic. While this tutorial focuses on AWS, you can use the same module to connect a DigitalOcean VPC to any other provider (such as Google Cloud, Azure, or even on-premises infrastructure) as long as the other side supports IPSec VPNs. You will need to adapt the configuration for the peer side (e.g., GCP VPN Gateway, Azure Virtual Network Gateway, or a compatible hardware/software appliance) and ensure that both sides agree on IPSec parameters (encryption, authentication, pre-shared key, etc.). The module’s flexibility allows you to build hybrid and multi-cloud architectures with minimal changes.
2. What are the main security considerations when deploying a site-to-site VPN using this method?
Security is paramount when connecting private networks across clouds. Key considerations include:
- Preshared Key Management: Always use a strong, randomly generated preshared key (PSK) and avoid storing it in version control. Pass it securely via environment variables or CI/CD secrets.
- Firewall Rules: Restrict inbound and outbound traffic to only what is necessary. Limit VPN ports (typically UDP 500 and 4500 for IPSec) to the peer’s public IPs.
- Droplet Hardening: The VPN Gateway Droplet should be regularly updated, run minimal services, and have SSH access disabled or tightly restricted.
- Logging and Monitoring: Enable logging on both the DigitalOcean and AWS sides to monitor for unauthorized access or unusual activity.
- Least Privilege: Only grant the minimum required permissions to Terraform, AWS, and DigitalOcean API tokens.
3. How do I troubleshoot connectivity issues if the VPN tunnel does not come up or traffic does not flow?
Troubleshooting steps include:
- Check Terraform Outputs: Ensure the correct IPs and CIDRs are being used on both sides.
- VPN Status: On AWS, use
aws ec2 describe-vpn-connectionsto check tunnel status. On the Droplet, check strongSwan logs (sudo journalctl -u strongswanor/var/log/syslog). - Firewall and Security Groups: Verify that all required ports (UDP 500/4500, ESP protocol) are open between the two public IPs.
- Routing Tables: Ensure that both DigitalOcean and AWS route tables direct the correct subnets through the VPN gateway.
- Reboot the Droplet: Sometimes, a reboot is needed to apply routes or bring up the VPN cleanly.
- Ping and Traceroute: Use the provided
ping_test_commandandtracerouteto verify end-to-end connectivity.
4. What are the cost implications of running this architecture?
Costs to consider:
- DigitalOcean: You will be charged for the Droplet (VPN Gateway), reserved public IP, and any data transfer over the VPN. The smallest CPU-Optimized Droplet is recommended for performance and cost efficiency.
- AWS: Charges apply for the Virtual Private Gateway, VPN connection, and any associated EC2 or VPC resources. AWS also charges for data transferred over the VPN.
- Data Transfer: Both providers may charge for outbound data. Monitor usage to avoid unexpected bills.
- Idle Resources: Remember to destroy resources when not in use to avoid ongoing charges.
5. Can I extend this setup to support high availability or multiple VPN tunnels?
Yes, with some additional configuration:
- High Availability: Deploy multiple VPN Gateway Droplets in different DigitalOcean regions or availability zones, and configure AWS with multiple Customer Gateways and tunnels. Use BGP or static routing with failover scripts to handle tunnel failover.
- Multiple Tunnels: You can create multiple site-to-site tunnels to connect several VPCs or on-premises networks. Each tunnel will require its own configuration block in Terraform and corresponding peer setup.
- Scaling: For higher throughput, consider using larger Droplet sizes or load balancing traffic across multiple VPN gateways, but note that IPSec performance is limited by single-flow throughput and the Droplet’s CPU.
These advanced patterns require careful planning of routing, failover, and monitoring, but are fully supported by the modular approach described in this tutorial.
Conclusion
You’ve just bootstrapped a fully automated, Terraform-driven IPSec VPN between DigitalOcean and AWS. Your workloads on each side communicated securely over private IPs enabling modern hybrid-cloud architectures for databases, microservices, and beyond. This pattern can be extended to additional regions or cloud providers by reusing the same Terraform modules and adjusting the peer configurations.
Further Reading and References
To continue building on this architecture and expand your Infrastructure-as-Code skills, check out the following resources:
-
Scale With Simplicity: Reference Architectures and Terraform Modules
Explore additional reference architectures and reusable Terraform modules to accelerate and simplify your deployments. -
How To Use Ansible with Terraform for Configuration Management
Learn how to integrate Ansible with Terraform for streamlined configuration management. -
How to Migrate Live AWS EC2 to Droplet
Step-by-step guide for migrating live AWS EC2 instances to DigitalOcean Droplets. -
Migrate Your Current VPS (Linode, Rackspace, AWS EC2) to DigitalOcean
Instructions for migrating from other VPS providers to DigitalOcean. -
Connect DigitalOcean VPC to Amazon Web Services via Megaport
Learn how to connect your DigitalOcean VPC to AWS using Megaport for hybrid cloud networking.
These references will help you deepen your understanding and streamline your future infrastructure projects.
Thanks for learning with the DigitalOcean Community. Check out our offerings for compute, storage, networking, and managed databases.
About the author(s)
A Senior Solutions Architect at DigitalOcean focusing on Cloud Architecture, Kubernetes, Automation and Infrastructure-as-Code.
Anish is a Sr Technical Content Strategist and Team Lead at DigitalOcean with 7+ years of experience as an DevOps SRE at Nutanix and Cloud consultant at AMEX, and technical writing at DOCN, and shipping deep infra and AI inference tutorials that help developers deploy production‑ready applications on DigitalOcean.
Still looking for an answer?
This textbox defaults to using Markdown to format your answer.
You can type !ref in this text area to quickly search our full set of tutorials, documentation & marketplace offerings and insert the link!
 This work is licensed under a Creative Commons Attribution-NonCommercial- ShareAlike 4.0 International License.
Become a contributor for community
Get paid to write technical tutorials and select a tech-focused charity to receive a matching donation.

DigitalOcean Documentation
Full documentation for every DigitalOcean product.

Resources for startups and AI-native businesses
The Wave has everything you need to know about building a business, from raising funding to marketing your product.
The developer cloud
Scale up as you grow — whether you're running one virtual machine or ten thousand.

Start building today
From GPU-powered inference and Kubernetes to managed databases and storage, get everything you need to build, scale, and deploy intelligent applications.
