By Savic and Caitlin Postal
Not using Ubuntu 22.04?
Choose a different version or distribution.
The author selected the Free and Open Source Fund to receive a donation as part of the Write for DOnations program.
Introduction
Vuls is an open-source, agentless vulnerability scanner written in Go. It automates security vulnerability analysis of the software installed on a system, which can be a burdensome task for system administrators to do manually in a production environment. Vuls uses multiple vulnerability databases, including the National Vulnerability Database (NVD). Light on resources, Vuls can scan multiple systems at once and send reports via email or Slack. It has three scan modes (fast, fast root, and deep), which you can select according to the situation.
Vuls is not a broad IT security scanner; for example, it does not monitor network traffic or protect against brute-force login attacks. However, Vuls provides a way to automate vulnerability reporting for Linux packages. When the databases Vuls uses are informed of a fix to certain vulnerabilities, Vuls will also pull this remediation information into its reports. When generating reports, Vuls prioritizes the most urgent vulnerabilities using the established ranking system from the database.
In this tutorial, you’ll deploy Vuls to an Ubuntu 22.04 server. This process includes building Vuls and its dependencies from source code, configuring scanning and reporting to Slack, and optionally connecting it to target machines to enable remote scanning. In the end, you’ll have an automated vulnerability reporting system in place that alerts you to vulnerabilities and eliminates the need for manual checks.
Prerequisites
To complete this tutorial, you’ll need:
- A server with at least 2 GB RAM running Ubuntu 22.04 with root access, and a secondary, non-root account. You can set this up by following this initial server setup guide. For this tutorial, the non-root user is
sammy. - A Slack workspace you’re a member of. To learn how to create a workspace, visit the official docs.
- (Optional) Multiple servers running (preferably) Ubuntu 22.04 with root access and a secondary, non-root account, if you want to set up Vuls to scan them remotely. In this tutorial, the secondary account is
sammy-shark.The secondary account must have an SSH key configured for authentication, which you can do by following the Vuls product docs.
Step 1 — Installing Dependencies
In this section, you’ll create a folder to store Vuls data, install the latest version of the Go programming language, and install other packages Vuls and its dependencies require.
For this tutorial, you’ll store all Vuls-related data in the /usr/share/vuls-data directory. Create it by running the following command:
- sudo mkdir /usr/share/vuls-data
To make it accessible to sammy, run the following command:
- sudo chown -R sammy /usr/share/vuls-data
You’ve now created the vuls-data folder, which will be your workspace. Before you continue installing the required packages, first update the package manager cache:
- sudo apt update
To download and compile the dependencies, you’ll install git, gcc, make, sqlite, debian-goodies and wget. sqlite is a database system, which you’ll use here for storing vulnerability information. debian-goodies contains the checkrestart utility, which provides information on what packages can and should be restarted at any given moment in time.
You can install them all in one command:
- sudo apt install sqlite git debian-goodies gcc make wget -y
You have now installed the required packages and can proceed with installing Go and the related programs that Vuls will use.
Installing Go
Install Go using the snap package manager by running the following command:
- sudo snap install go --classic
You use snap to install Go since it installs the latest version of the language, unlike apt which may install an older version. Working with an older version is not recommended and may prevent you from completing this tutorial.
In order to work, Go requires a few environment variables that you’ll set up: GOPATH and PATH. GOPATH specifies the working directory for Go. PATH, which contains directories in which programs are placed, must be extended to tell the system where to find Go itself.
These environment variables need to be set each time the user logs on. To automate this, you will create a new executable file called go-env.sh under /etc/profile.d. This will result in the directory executing every time a user logs on.
Create go-env.sh using your text editor:
- sudo nano /etc/profile.d/go-env.sh
Add the following commands to the file:
export GOPATH=$HOME/go
export PATH=$PATH:$GOPATH/bin:/snap/bin
The export command sets the given environment variable to the desired value. Here, you use it to populate GOPATH and PATH with appropriate values.
Save and close the file.
Currently, go-env.sh is not executable. To fix this, mark it as executable by running the following command:
- sudo chmod +x /etc/profile.d/go-env.sh
To avoid needing to log in again, you can reload go-env.sh by running:
- source /etc/profile.d/go-env.sh
The source command reloads the given file into the current shell while preserving its state.
You’ve now installed the Go language, set up its environment variables, and installed packages that you’ll require later. Next, you’ll download and compile the Go programs that Vuls requires. Those programs are go-cve-dictionary and goval-dictionary, which Vuls uses for querying vulnerability databases.
Installing and Running go-cve-dictionary
In this section, you will download and compile go-cve-dictionary, a Go package that provides access to the National Vulnerability Database. Then, you will run it to fetch vulnerability data that Vuls can use. The NVD is the US government’s repository of publicly reported cybersecurity vulnerabilities, containing vulnerability IDs (CVE — Common Vulnerabilities and Exposures), summaries, and impact analysis, and it is available in a machine-readable format.
Go stores packages under $GOPATH/src/. You can extend this further with the use of subdirectories to note origin. As an example, packages from GitHub made by the user example-user would be stored under $GOPATH/src/github.com/example-user.
You’ll first install go-cve-dictionary by cloning the Go package from GitHub and compiling it afterwards.
Start by creating a directory to store it, according to the example path:
- mkdir -p $GOPATH/src/github.com/vulsio
Navigate to it by running:
- cd $GOPATH/src/github.com/vulsio
Now you’ll clone go-cve-dictionary from GitHub to your server by running:
- git clone https://github.com/vulsio/go-cve-dictionary.git
Then, navigate to the package root:
- cd go-cve-dictionary
Finally, compile and install it by running the following command:
- make install
Keep in mind that this command may take some time to finish.
To make it available system wide, copy it to the /usr/local/bin:
- sudo cp $GOPATH/bin/go-cve-dictionary /usr/local/bin
go-cve-dictionary requires access to a log output directory; by default, it is /var/log/vuls. Create it by running:
- sudo mkdir /var/log/vuls
Right now, the log directory is readable by everyone. Restrict access to the current user with the following command:
- sudo chmod 700 /var/log/vuls
Setting the permission flags to 700 restricts access to only the owner.
To make it accessible to sammy, or another user, run the following command:
- sudo chown -R sammy /var/log/vuls
Next, you’ll fetch vulnerability data from the NVD and store it in your Vuls workspace (/usr/share/vuls-data):
- go-cve-dictionary fetch nvd --dbpath /usr/share/vuls-data/cve.sqlite3
This command will fetch NVD vulnerability data from year 2002 to the current year and store it in a database under /usr/share/vuls-data.
Note: This command will take a long time to finish, and may fail if your server has less than 2 GB of RAM.
In this section, you downloaded and installed go-cve-dictionary and then fetched NVD data for Vuls to use. You’ll now download and install goval-dictionary and fetch OVAL data for Ubuntu.
Installing and Running goval-dictionary
In this section, you will download and compile goval-dictionary, a Go package that provides access to the OVAL database for Ubuntu. You’ll then run it and fetch vulnerability data for Vuls to use. OVAL stands for Open Vulnerability and Assessment Language, which is an open language used to express checks for determining whether software vulnerabilities exist on a given system.
Navigate to the $GOPATH/src/github.com/vulsio folder:
- cd $GOPATH/src/github.com/vulsio
Clone the package from GitHub by running the following command:
- git clone https://github.com/vulsio/goval-dictionary.git
Enter the package folder:
- cd goval-dictionary
Compile and install it with make:
- make install
Copy it to /usr/local/bin to make it globally accessible:
- sudo cp $GOPATH/bin/goval-dictionary /usr/local/bin
Then, fetch the OVAL data for Ubuntu 22 by running the following command:
- sudo goval-dictionary fetch ubuntu --dbpath=/usr/share/vuls-data/oval.sqlite3 22
Here, you downloaded and installed goval-dictionary and then fetched the OVAL data for Ubuntu. Next, you’ll download and install gost and fetch the Debian security tracker data.
Installing and Running gost
In this section, you will download and compile gost, a Go package that provides access to the Debian security bug tracker. You will then run it and fetch vulnerability data for Vuls to use. The Ubuntu security tracker collects all information about the vulnerability status of packages distributed with Ubuntu.
You’ll store this package in the same directory as before. Navigate to it by running the following command:
- cd $GOPATH/src/github.com/vulsio
Clone the package from GitHub by running:
- git clone https://github.com/vulsio/gost.git
When it finishes, enter the package folder:
- cd gost
Compile and install it with make:
- make install
Copy it to /usr/local/bin to make it globally accessible:
- sudo cp $GOPATH/bin/gost /usr/local/bin
Then, create a log file directory for gost:
- sudo mkdir /var/log/gost
Restrict access to the current user with the following command:
- sudo chmod 700 /var/log/gost
Setting the permission flags to 700 restricts access to only the owner. To make it accessible to sammy, or another user, run the following command:
- sudo chown -R sammy /var/log/gost
Then, fetch the Ubuntu security tracker data by running:
- gost fetch ubuntu --dbpath=/usr/share/vuls-data/gost.sqlite3
The output may be long. It is possible that it won’t clear in the terminal, in which case you can run the clear command.
You just downloaded and installed gost, then fetched the data for Debian. In the next step, you’ll download and install Vuls.
Step 2 — Downloading and Configuring Vuls
With all of the dependencies installed, you’ll now download and compile Vuls from source code. You will also configure it to scan the local machine.
Create a new directory that contains the path to the Vuls repository with this command:
- mkdir -p $GOPATH/src/github.com/future-architect
Navigate to it:
- cd $GOPATH/src/github.com/future-architect
Clone Vuls from GitHub by running the following command:
- git clone https://github.com/future-architect/vuls.git
Enter the package folder:
- cd vuls
Compile and install it at the same time by running:
- make install
Remember that it may take some time for this command to complete.
Copy it to /usr/local/bin to make it globally accessible:
- sudo cp $GOPATH/bin/vuls /usr/local/bin
Now, you’ll create a configuration file for Vuls. Navigate back to /usr/share/vuls-data:
- cd /usr/share/vuls-data
Vuls stores its configuration in a TOML file, which you’ll call config.toml. Create it using your text editor:
- sudo nano config.toml
Enter the following configuration:
[cveDict]
type = "sqlite3"
SQLite3Path = "/usr/share/vuls-data/cve.sqlite3"

[ovalDict]
type = "sqlite3"
SQLite3Path = "/usr/share/vuls-data/oval.sqlite3"

[gost]
type = "sqlite3"
SQLite3Path = "/usr/share/vuls-data/gost.sqlite3"

[servers]

[servers.localhost]
host = "localhost"
port = "local"
scanMode = [ "fast" ]
#scanMode = ["fast", "fast-root", "deep", "offline"]
The first two sections of this configuration (cveDict, ovalDict, and gost) point Vuls to the vulnerability databases you just added. The servers section marks the start of server-related information. Separate sections will group information about each server. The only server Vuls will scan with this outlined configuration is the local server: localhost.
Vuls provides four scan modes:
- Fast mode (default) scans without root privileges, has no dependencies, and is very light on the target server.
- Fast root mode scans with root privileges and can detect upgraded but not yet restarted processes.
- Deep scan mode is the same as fast root mode but checks changelogs, which can lead to a high load on the target server.
- Offline mode scans the machine without internet access and can be used in conjunction with other modes.
Save and close the file.
To test the validity of the configuration file, run the following command:
- vuls configtest
You will receive an output similar to this:
Output[Jan  5 20:24:29]  INFO [localhost] vuls-v0.22.0-build-20230105_201926_554ecc4
[Jan  5 20:24:29]  INFO [localhost] Validating config...
[Jan  5 20:24:29]  INFO [localhost] Detecting Server/Container OS...
[Jan  5 20:24:29]  INFO [localhost] Detecting OS of servers...
[Jan  5 20:24:29]  INFO [localhost] (1/1) Detected: localhost: ubuntu 22.10
[Jan  5 20:24:29]  INFO [localhost] Detecting OS of containers...
[Jan  5 20:24:29]  INFO [localhost] Checking Scan Modes...
[Jan  5 20:24:29]  INFO [localhost] Checking dependencies...
[Jan  5 20:24:29]  INFO [localhost] Dependencies... Pass
[Jan  5 20:24:29]  INFO [localhost] Checking sudo settings...
[Jan  5 20:24:29]  INFO [localhost] sudo ... No need
[Jan  5 20:24:29]  INFO [localhost] It can be scanned with fast scan mode even if warn or err messages are displayed due to lack of dependent packages or sudo settings in fast-root or deep scan mode
[Jan  5 20:24:29]  INFO [localhost] Scannable servers are below...
localhost
You’ve entered the configuration correctly, and Vuls has detected that it can scan the local server.
You’ve installed and configured Vuls to scan the local server. In the next step, you will run a local scan and view the generated report.
Step 3 — Running a Local Scan
In this step, you will run a local scan and then view the generated vulnerability report. By now, you have configured only the local server, which Vuls correctly detected in the last step. The default scan mode, if not explicitly specified, is fast.
To run a scan, execute the following command:
- vuls scan
The output will be similar to this:
[Jan  5 20:26:14]  INFO [localhost] vuls-v0.22.0-build-20230105_201926_554ecc4
[Jan  5 20:26:14]  INFO [localhost] Start scanning
[Jan  5 20:26:14]  INFO [localhost] config: /usr/share/vuls-data/config.toml
[Jan  5 20:26:14]  INFO [localhost] Validating config...
[Jan  5 20:26:14]  INFO [localhost] Detecting Server/Container OS...
[Jan  5 20:26:14]  INFO [localhost] Detecting OS of servers...
[Jan  5 20:26:14]  INFO [localhost] (1/1) Detected: localhost: ubuntu 22.10
[Jan  5 20:26:14]  INFO [localhost] Detecting OS of containers...
[Jan  5 20:26:14]  INFO [localhost] Checking Scan Modes...
[Jan  5 20:26:14]  INFO [localhost] Detecting Platforms...
[Jan  5 20:26:14]  INFO [localhost] (1/1) localhost is running on other
[Jan  5 20:26:14]  INFO [localhost] Scanning OS pkg in fast mode
[Jan  5 20:26:14]  INFO [localhost] Scanning listen port...
[Jan  5 20:26:14]  INFO [localhost] Using Port Scanner: Vuls built-in Scanner


Scan Summary
================
localhost       ubuntu22.10     695 installed


To view the detail, vuls tui is useful.
To send a report, run vuls report -h.
Vuls has logged what it did in the process. To view a report of vulnerabilities it has identified, run:
- vuls tui
Vuls divides the report view into four panels:
- Scanned machines, located on the upper left, lists machines that Vuls scanned.
- Found vulnerabilities, located right of the machine list, shows the vulnerabilities Vuls found in installed packages.
- Detailed information, taking up the left part of the screen, shows detailed information about the vulnerability, pulled from the databases.
- Affected packages, located right of the detailed information, shows what the affected package versions are, and if there is a fixed version.
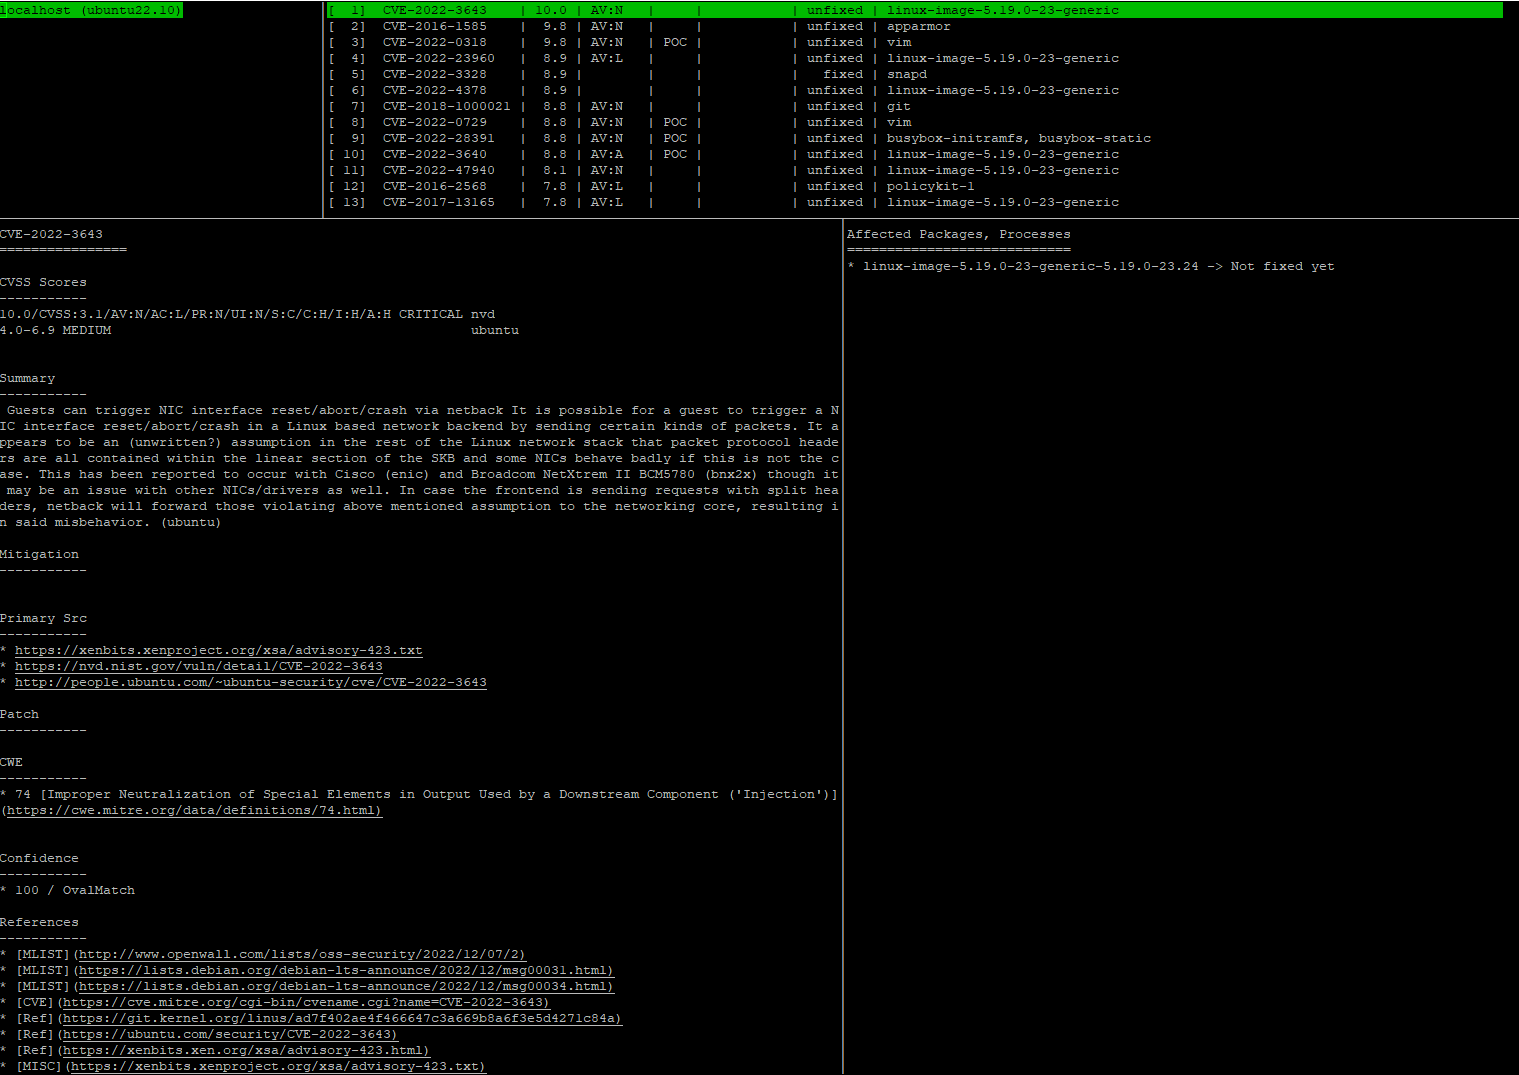
You can cycle your cursor through each of the panels by pressing ENTER. You can navigate within each panel using the keyboard arrows. When you’re done, press CTRL+C to exit.
In this step, you ran a local scan and inspected the results. In the next (optional) section, you’ll configure Vuls to scan multiple target machines.
Step 4 — (Optional) Configuring Multiple Target Machines
In this section, you’ll configure Vuls to scan multiple target machines. This process entails configuring /etc/sudoers on the target machines and configuring Vuls to scan that target.
You can add as many servers as you wish, provided you have the the target server’s IP address, root access to the target server, and an available account on the target server (sammy-shark in this tutorial).
You can only use a non-root user account on the target server for scanning in fast mode. To enable scanning in fast root and deep modes, you’ll need to edit the /etc/sudoers file on the target machine(s). The sudoers file controls which users can run what commands and whether you need a password for specified commands.
visudo is the utility for defining rules for access and privileged access, and you can only run it as root. Because of the importance of sudoers, the file will give a warning if you try to exit with errors.
On the target server, log in as root and open sudoers for editing by running visudo:
- visudo
Add this line to the end of the file:
sammy-shark ALL=(ALL) NOPASSWD: /usr/bin/apt-get update, /usr/bin/stat *, /usr/sbin/checkrestart
This line instructs sudo to allow user sammy-shark to run apt-get update, checkrestart, and every command available from stat, without providing a password.
Save and close the file. If you made a syntax error in the process, visudo will inform you and offer to edit it again or exit.
Note: By adding the sammy-shark user in sudoers, you are allowing Vuls to scan using fast root and deep modes. If you want to allow those modes for the local machine (localhost) too, you can edit sudoers on localhost. For more information on sudoers, you can review our tutorial on How To Edit the Sudoers Files.
Vuls uses the checkrestart utility to check for packages that are updated but require restart. To ensure the target server has it, install it on your secondary server(s) by running the following command:
- apt install debian-goodies -y
That is all you need to do on the target server. You can now log out from the target and return to your initial server.
To add a new server for scanning, open config.toml and add the following lines under the [servers] mark:
[servers.target_name]
host = "target_ip"
port = "22"
user = "account_username"
keyPath = "/home/sammy/.ssh/id_rsa"
scanMode = [ "deep" ] # "fast", "fast-root" or "deep"
The lines above are a template for adding new servers. Remember to replace target_name with your desired name, target_ip with the IP of the target server, account_username with the username (this tutorial uses sammy-shark), and supply the path of your private RSA key for user sammy. Vuls does not support SSH password authentication, so specifying a keyPath is necessary.
Save and close the file.
Next, for each target server you’ve added, you’ll confirm the RSA keys on the local machine. To achieve this, you’ll log in to the target server from your first server with the appropriate key, like so:
- ssh sammy-shark@target_ip -i /home/sammy/.ssh/id_rsa
Remember to input the path of your private RSA key. When asked whether you want to continue connecting, enter yes, then log out by pressing CTRL + D.
Note: If you get an error about key file permissions being too open, set them to 600 by running the following command:
- chmod 600 account_rsa_key
Setting permissions to 600 ensures that only the owner can read and write the key file.
To check the validity of the new configuration, run the following command:
- vuls configtest
The output will detail everything that Vuls checked, such as dependencies, superuser access, and OS versions. If there are any errors, check your config.toml against the configuration provided earlier in this section.
In this step, you added more servers to your Vuls configuration, marking them for scanning. In the next section, you will configure Vuls to periodically scan and send reports to a Slack workspace.
Step 5 — Configuring Periodic Scanning and Reporting to Slack
You will now configure Vuls to send reports to Slack and set a cron job to run Vuls scans periodically.
To use Slack integration, you’ll need to have an incoming webhook on Slack for your workspace. Incoming webhooks allow an application to provide real-time information from other applications. In this case, you’ll configure Vuls to report to your Slack channel.
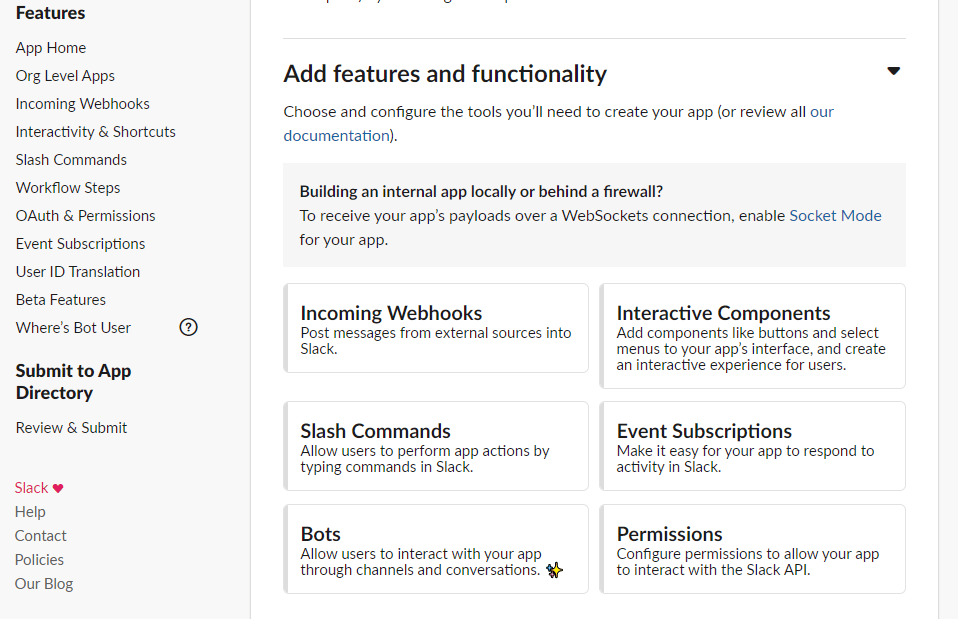
If you haven’t created a webhook, you’ll first need to create an app for your workspace. To do so, first log in to Slack and navigate to Slack’s app creation page. Select a name that you’ll recognize, select the desired workspace, and press Create App.
You’ll be redirected to the settings page for the new app. Select the Incoming Webhooks item on the left navigation bar.
Enable webhooks by toggling the switch button next to the title Activate Incoming Webhooks to On.
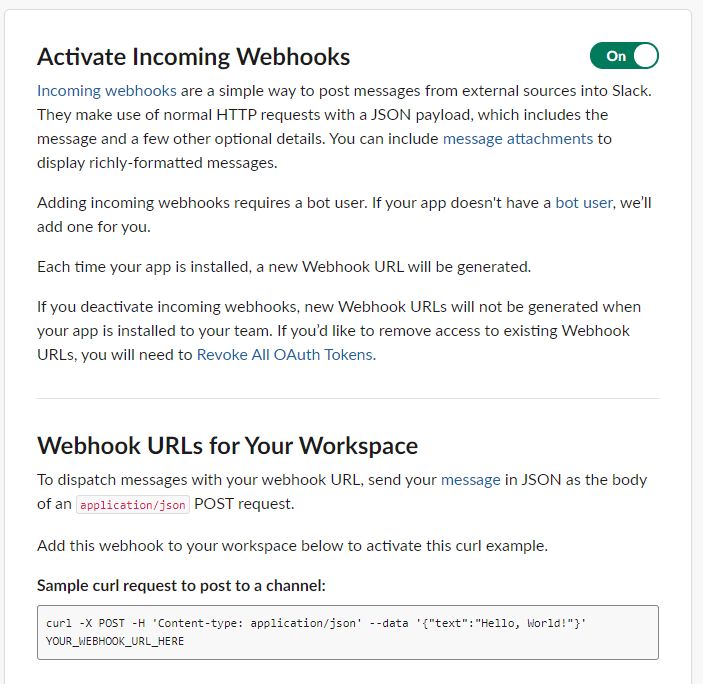
A new section will load on the page once activated. Scroll to and then press the Add New Webhook to Workspace button. A new page will open to request access to your workspace. Select the channel you want the reports to be sent to and press Allow.
You’ll be redirected back to the settings page for webhooks, and a new webhook will now be listed in the table under Webhook URL. Click on Copy to copy the URL and make note of it for later use.
Back in your terminal for your initial server, open config.toml for editing:
- sudo nano config.toml
Add the following lines:
[slack]
hookURL      = "your_hook_url"
channel      = "#your_channel_name"
authUser     = "your_username"
#notifyUsers  = ["@username"]
Replace the your_hook_URL with the webhook URL you noted, your_channel_name with the name of the desired channel, and your_username with the username of the Slack user that created the webhook. Save and close the file.
To test the integration, you can generate a report by running vuls report:
- sudo vuls report -to-slack
Vuls will take a few moments to run and exit. If it returns an error, check what you’ve entered against the preceding lines.
Check your Slack app to confirm that Vuls has successfully sent the report to the channel indicated.

Now that you’ve configured reporting, you can set up scheduled scans. cron is a time-based job scheduler that comes built with every Ubuntu machine. It is configured via the crontab file, which defines in precise syntax when a command should run. To help with editing, you’ll use the crontab utility, which opens the current crontab file in an editor.
Open the current crontab file by running the following command:
- crontab -e
When prompted, select your preferred text editor from the list.
Add the following line to the end of the file:
0 0 * * * vuls scan -config=/usr/share/vuls-data/config.toml; vuls report -config=/usr/share/vuls-data/config.toml > /dev/null 2>&1
This line instructs cron to run vuls scan and vuls report with the given configuration every day at noon (denoted by 0 0 * * * in cron syntax).
Save and close the file.
In this step, you have connected Vuls to your Slack workspace and configured cron to run a Vuls scan and report it to Slack every day at noon.
Conclusion
You have now successfully set up Vuls with automated scanning and reporting on an Ubuntu 22.04 server. For more reporting options, as well as troubleshooting, visit the Vuls documentation.
With Vuls, vulnerability assessment becomes more seamless in production environments. As an alternative to setting up cron, it is also possible to use Vuls in a continuous deployment workflow, as its scans are lightweight and you can run them as needed. You could also consider implementing a firewall with Vuls to restrict access and reduce the need for root access.
Thanks for learning with the DigitalOcean Community. Check out our offerings for compute, storage, networking, and managed databases.
About the author(s)
Expert in cloud topics including Kafka, Kubernetes, and Ubuntu.
Still looking for an answer?
This textbox defaults to using Markdown to format your answer.
You can type !ref in this text area to quickly search our full set of tutorials, documentation & marketplace offerings and insert the link!
The content for updating /etc/sudoers is out of date and requires additional permissions per https://vuls.io/docs/en/usage-configtest.html#etcsudoers
 This work is licensed under a Creative Commons Attribution-NonCommercial- ShareAlike 4.0 International License.
Become a contributor for community
Get paid to write technical tutorials and select a tech-focused charity to receive a matching donation.

DigitalOcean Documentation
Full documentation for every DigitalOcean product.

Resources for startups and AI-native businesses
The Wave has everything you need to know about building a business, from raising funding to marketing your product.
The developer cloud
Scale up as you grow — whether you're running one virtual machine or ten thousand.

Start building today
From GPU-powered inference and Kubernetes to managed databases and storage, get everything you need to build, scale, and deploy intelligent applications.
