By Gbadebo Bello and Timothy Nolan

The author selected the Free and Open Source Fund to receive a donation as part of the Write for DOnations program.
Introduction
End-to-end testing (e2e for short) is a process in which the entire lifecycle of an application is tested from a user’s perspective in a production-like scenario. This process typically involves deploying a script to automatically navigate through the application’s interface as a normal user would, testing for specific features and behaviors along the way. In Node.js development, you can use a combination of the Chrome API Puppeteer and the JavaScript testing framework Jest to automate e2e testing, allowing you to ensure that the user interface (UI) of your application is still functioning as you fix bugs and add new features.
In this tutorial, you will write an e2e test that validates that the account creation and login features of a sample webpage work as intended. First, you will write a basic Puppeteer script to open up a browser and navigate to a test webpage, then you will configure presets that make the browser and page instance globally available. Next, you will clone the mock-auth sample application from the DigitalOcean Community repository on GitHub and serve the application locally. This sample application will provide the user with an interface to create an account and log in to that account. Finally, you will adjust your Puppeteer scripts to fill the account creation and login forms and click the submit buttons, then you will write unit tests in Jest to validate that the scripts work as expected.
Warning: The ethics and legality of web scraping are complex and constantly evolving. They also differ based on your location, the data’s location, and the website in question. This tutorial scrapes a locally served sample application that was specifically designed to test scraper applications. Scraping any other domain falls outside the scope of this tutorial.
Prerequisites
Before you begin this guide you’ll need the following:
- Node.js version
14.16.0or greater installed on your computer. To install this on macOS or Ubuntu 20.04, follow the steps in How To Install Node.js and Create a Local Development Environment on macOS or the Option 2 — Installing Node.js with Apt Using a NodeSource PPA section of How To Install Node.js on Ubuntu 20.04. - A local desktop environment with the Chrome web browser installed. Since the Puppeteer scripts used in this tutorial are not run in headless mode, a desktop environment is needed to run the tests.
- Some familiarity with Puppeteer and the APIs it provides. You can follow our How To Scrape a Website Using Node.js and Puppeteer to learn how to use Puppeteer.
- Some experience writing unit tests in Jest. Check out Jest’s official documentation to learn more about this topic.
Step 1 — Initiating your Testing Program
In this step, you will create a directory for the Node.js testing program and install the required dependencies. This tutorial uses three dependencies, which you will install using npm, Node.js’s default package manager. These dependencies will enable you to use Jest and Puppeteer together.
First, create a folder for this project and navigate into that folder. This tutorial will use end-to-end-test-tutorial as the name of the project:
- mkdir end-to-end-test-tutorial
- cd end-to-end-test-tutorial
You will run all subsequent commands in this directory.
You can now initialize npm in your directory so that it can keep track of your dependencies. Initialize npm for your project with the following command:
- npm init
This command will present a sequence of prompts. You can press ENTER to every prompt, or you can add personalized descriptions. Make sure to press ENTER and leave the default values in place when prompted for entry point: and test command:. Alternately, you can pass the -y flag to npm and it will submit all the default values for you.
Filling out these prompts will create a package.json file for you, which will manage your project’s dependencies and some additional metadata.
You will then be prompted to save the file. Type yes and press ENTER. npm will save this output as your package.json file.
Now you can install your dependencies. The three dependencies you need for this tutorial are:
jest: A unit testing library.puppeteer: A high-level abstraction API over Chrome Devtools protocol.jest-puppeteer: A package that helps you set up Jest properly with Puppeteer.
Install these dependencies using npm:
- npm install --save jest puppeteer jest-puppeteer
When you run this command, it will install Jest, Puppeteer, a compatible version of the Chromium browser, and the jest-puppeteer library.
Note: On Linux machines, Puppeteer might require some additional dependencies. If you are using Ubuntu 20.04, check the Debian Dependencies dropdown inside the Chrome headless doesn’t launch on UNIX section of Puppeteer’s troubleshooting docs. You can also use the following command to help find any missing dependencies:
- ldd ~/end-to-end-test-tutorial/node_modules/puppeteer/.local-chromium/linux-970485/chrome-linux/chrome | grep not
In this command you are using ldd on your project’s installation of Chrome to find the program’s dependencies, then piping the results to grep to find all the dependencies that contain the word not. This will show you the dependencies that are not installed. Note that your individual path to the chrome module may vary.
With the required dependencies installed, your package.json file will have them included as a part of its dependencies. You can verify this by opening it in your preferred text editor:
- nano package.json
This will show you a file similar to the following:
{
  "name": "end-to-end-test-tutorial",
  "version": "1.0.0",
  "description": "",
  "main": "index.js",
  "scripts": {
    "test": "echo \"Error: no test specified\" && exit 1"
  },
  "author": "",
  "license": "ISC",
  "dependencies": {
    "jest": "^27.5.1",
    "jest-puppeteer": "^6.1.0",
    "puppeteer": "^13.5.0"
  }
}
This confirms that the dependencies have been installed.
With your testing program initiated and the dependencies set up, you will next configure it and add in an initial Puppeteer script to ensure that everything has been set up properly.
Step 2 — Configuring your Testing Program
The manual way of testing a website is to use a browser to surf through a web page, clicking buttons, scrolling through pages, and confirming that the correct pages and texts are being rendered on each interaction. These are the same procedures involved in writing automated end-to-end tests: a browser will programmatically open a web page and navigate the interface, and a testing library will assert that the browser got the expected behavior or output from the web page. In this step, you will configure Jest and Puppeteer to carry out these procedures in your Node.js application, then test the configuration with a Puppeteer script that visits www.google.com.
First, create a few folders to give structure to your testing application:
- mkdir actions
- mkdir logs
- mkdir specs
- mkdir utils
The actions folder will hold the Puppeteer scripts that will crawl your local web page, specs will hold the tests themselves, and utils will hold helper files like mock credential generation. Although not used in this tutorial, it is a best practice to create a logs folder to hold the results of your tests.
Once you’ve made these directories, create and open a jest.config.js file in your preferred editor:
- nano jest.config.js
Add these configurations to the file:
module.exports = {
  preset: 'jest-puppeteer',
  roots: [ 'specs' ],
};
This is a Jest configuration file, set up to tell Jest to use the preset configuration of the jest-puppeteer library you installed. It also designates the specs folder as the location of the test scripts you will write later in this tutorial.
Save and exit from the file. Next, from the root directory, create and open the jest-puppeteer.config.js file:
- nano jest-puppeteer.config.js
Add these configurations to the file:
module.exports = {
  launch: {
    headless: false,
      args: [ "--window-size=1366,768" ],
  },
  browser: 'chromium',
}
These configurations define how the browser will open to test the web page. headless determines if the browser runs with or without an interface; in this case, you are configuring Puppeteer to open the window in your desktop environment. args is used to pass relevant Puppeteer arguments to the browser instance. In this case, you’re using it to specify the window size of the browser opened. Finally, browser specifies the browser to use. For this tutorial, this is Chromium, but it could be Firefox if you have puppeteer-firefox installed.
Save and exit the file.
With the specs folder set as the folder that holds all of your tests, you will now create a basic test file in that folder.
Navigate to the specs folder and create a users.test.js file. Open the users.test.js file and add the following code to test the functionality of your application:
jest.setTimeout(60000)

describe('Basic authentication e2e tests', () => {
  beforeAll( async () => {
  // Set a definite size for the page viewport so view is consistent across browsers
    await page.setViewport( {
      width: 1366,
      height: 768,
      deviceScaleFactor: 1
    } );

    await page.goto('https://www.google.com');

    await page.waitFor(5000);
    } );

  it( 'Should be truthy', async () => {
    expect( true ).toBeTruthy();
  })
});
In this code, you first set Jest’s default timeout to 60 seconds with the setTimeout() method. Jest has a default timeout of five seconds at which a test must pass or fail, or the test will return an error. Since browser interactions often take longer than five seconds to run, you set it to 60 seconds to accommodate the time lapse.
Next, the describe block groups related tests with each other using the describe keyword. Within that, the beforeAll script allows you to run specific code before every test in this block. This holds code like variables that are local to this test block but global to all tests it contains. Here, you are using it to set the viewport of the page opened in the browser to the size of the browser specified in jest-puppeteer.config.js. Then you use the page object to navigate to www.google.com and wait for five seconds, so that you can see the page after it loads and before the browser closes. The page object is globally available in all test suites.
Next, you created a mock test to validate that the script you have written works. It checks if the boolean true is a truthy value, which will always be the case if all is working correctly.
Save and exit from the file.
Now, you need a way to run the test to see if it works as expected. Open your package.json file and modify the scripts section as shown in the following code block:
{
  "name": "Doe's-e2e-test",
  "version": "1.0.0",
  "description": "An end to end test",
  "main": "index.js",
  "scripts": {
    "e2e": "jest"
  },
  "keywords": [],
  "author": "John Doe",
  "license": "MIT"
}
This will make the keyword e2e call the jest command to run the test. After the file has been saved, run your e2e test in your terminal with the following command:
- npm run e2e
Once you run this command, a new browser window will open, navigate to Google, then print the following output on the console:
Output
> jest

 PASS  specs/users.test.js (13.772s)
  Basic authentication e2e tests
    √ Should be truthy (3ms)

Test Suites: 1 passed, 1 total
Tests:       1 passed, 1 total
Snapshots:   0 total
Time:        14.221s, estimated 16s
Ran all test suites.
This shows that both Puppeteer and Jest are working properly. You’re now ready to start writing tests for web pages. But first, you will set up the sample web page so that you have an interface to test.
Step 3 — Running the Sample Web Interface
In this step, you will clone a sample application from the DigitalOcean Community GitHub repository, then run it locally with the Live Server development server. This will give you a user interface to test with your Node.js application.
Note: This tutorial will only inspect this sample UI from a user’s perspective; the development required to build out the user interface is beyond the scope of this tutorial. If you are interested in developing UI login authentication pages, check out our How To Add Login Authentication to React Applications tutorial.
First, open a new terminal and run the following git command outside of your testing application:
- git clone https://github.com/do-community/mock-auth.git
This will clone the user interface from the DigitalOcean repository. This code contains HTML, CSS, and JavaScript that create a mock authentication interface.
Next, install Live Server globally with the following command:
- npm install -g live-server
Note: On some systems such as Ubuntu 20.04, installing an npm package globally can result in a permission error, which will interrupt the installation. Since it is a security best practice to avoid using sudo with npm install, you can instead resolve this by changing npm’s default directory. If you encounter an EACCES error, follow the instructions at the official npm documentation.
Live Server is a light development server with live reload capability. It will take your static HTML pages and make them available on localhost.
Next, navigate into the mock-auth sample interface:
- cd mock-auth
Then start the application on a local development server with the following command:
- live-server
A web page will open in your default browser at http://127.0.0.1:8080 that will render as the following image:
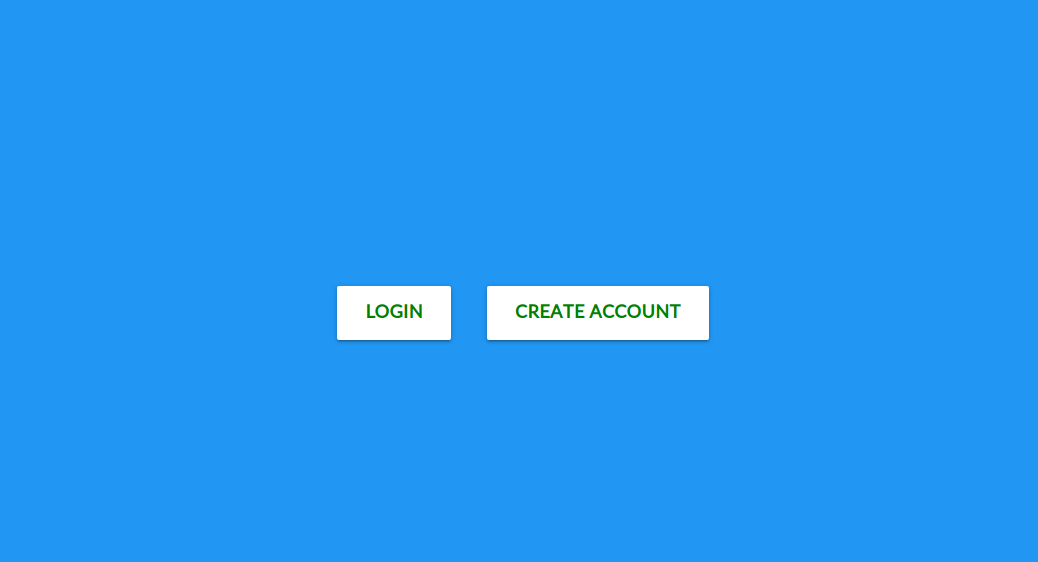
This is the UI that your testing program will interact with. If you click on the Login button, the browser will load a login form with fields for Username and Password. Selecting the Create Account button will lead you to a Create Account form, with fields for Fullname, Username, and Password. In the next steps, you will write tests to navigate through each of these interfaces, ensuring that account creation and logging in work as expected.
Step 4 — Testing Account Creation
When you create an account on websites, the most common behavior is that the website navigates you to a welcome page that has your name and some relevant information about your newly created account. In this step, you will validate that the account creation page on the sample web application works in this way. To do this, you will write a script in the actions folder to navigate the interface, then write a test that uses that action to validate the functionality.
First, return to the terminal that has your testing program in it and create a script to crawl the Create Account page of the sample web application. This tutorial will name this file createAccount.js:
- nano actions/createAccount.js
Once this file is open, add in the following code:
const chalk = require( 'chalk' );

class createAccount {
  constructor( page ) {
    this.url = "http://127.0.0.1:8080/"
    this.page = page;
    this.signupBtn = '#signup';
    this.signupBody = '#signupBody';
    this.fullnameField = '#fullname';
    this.usernameField = '#username';
    this.passwordField = '#password';
    this.loginPageBtn = '#loginBtn';
    this.signupPageBtn = '#signupBtn';
  }
}

module.exports = ( page ) => new createAccount( page );
This snippet first imports the chalk module, which will be used later to format error messages in the terminal. This is not necessary, but will make your error reporting more legible. Next, you create a class called createAccount. The constructor takes a page parameter, then sets the homepage URL for the sample web application and sets the properties of the object as the ID references to the HTML elements your program will interact with on the DOM. Finally, your code exports a function that creates a new instance of the createAccount class.
Next, you will add a signup method to the createAccount class that will help you perform various actions on the page. Add the following highlighted code to your file:
...
    this.signupPageBtn = '#signupBtn';
  }

  async signup( fullname, username, password ) {
    try {
      await this.page.goto( this.url );
      await this.page.waitFor( this.signupBtn );
      await this.page.click( this.signupBtn );
      // Wait for the signupBody on the signup page to load
      await this.page.waitFor( this.signupBody );

      // Type the login credentials into the input fields
      await this.page.type( this.fullnameField, fullname );
      await this.page.waitFor( 1000 );
      await this.page.type( this.usernameField, username );
      await this.page.waitFor( 1000 );
      await this.page.type( this.passwordField, password );
      await this.page.waitFor( 1000 );

      // Click then create account button
      await this.page.click( this.signupPageBtn );

      // Wait for homepage to load
      await this.page.waitFor( '#firstname' );
      await this.page.waitFor( 2000 );

      const firstname = await this.page.$eval( '#homeBody #firstname', el =>  el.textContent );

      return firstname;
    } catch ( err ) {
      console.log( chalk.red( 'ERROR => ', err ) );
    }
  }
}

module.exports = ( page ) => new createAccount( page );
Here, you are declaring the signup method as asynchronous with the async keyword. This function uses a try...catch block to go to the URL of the web application and navigate through the interface. Some of the methods used on the page object are:
-
page.goto(url): Navigates the browser to a specified URL. -
page.waitFor(milliseconds or element): Delays other actions on the page for the specified milliseconds, or until an element has loaded. -
page.click(selector): Clicks on an element on the page. -
page.type(selector, text): Types text in a specified input field. -
page.$eval(selector, callback(element)): Selects an element and runs the callback function on it.
With these methods, the signup function first navigates the page to the base URL, then waits for the signup button to load. It then clicks this button and waits for the body of the signup form to load. It types in the fullname, username, and password in their respective fields at intervals of one second. Then, it clicks the signup button and waits for the welcome page to load. The page.$eval() method is used to fetch the name displayed on the welcome page, which is returned from this method.
Save and exit from the file.
Now, you will write tests to validate that the account creation works as expected. But before you proceed, you have to decide what credentials to create a new account with. For this, you will create a new module.
Create a credentials.js file in the utils folder:
- nano utils/credentials.js
Add the following code to the file:
module.exports = ( user ) => {
  let username = `${user}-${Math.random()}`
  let password = `${Math.random()}`;
  // Make sure both usernames and passwords are strings
  username = String( username );
  password = String( password );
  const fullname = "John Doe"
  let credential = { fullname, username, password };
  return credential;
}
This code generates a random username, password, and a hard-coded fullname, then returns the generated credentials as a JSON object. You can change the hard-coded name to your name of choice, but often the unique entity when creating an account is the username.
Save and exit from credentials.js.
Next, navigate to the specs folder and open the users.test.js file in your editor. Modify the code as shown here:
let credentials = require( '../utils/credentials' );

jest.setTimeout(60000);

describe('Basic authentication e2e tests', () => {
  let credential;
  beforeAll( async () => {
  // Set a definite site for the page viewport so view is consistent across browsers
    await page.setViewport( {
      width: 1366,
      height: 768,
      deviceScaleFactor: 1
    } );

    credential = credentials( 'User' );

    await page.goto('https://www.google.com');

    await page.waitFor(5000);
  } );

  it( 'Should be truthy', async () => {
    expect( true ).toBeTruthy();
  })
} );
Here you imported the credentials module that you created earlier, then created a credential variable globally available to all tests in that block and assigned the generated credentials to that variable using the beforeAll block, which runs before every test in this block.
Now, you can write the test that actually does the validation by modifying the code as shown here:
let credentials = require( '../utils/credentials' );
let createAccount = require( '../actions/createAccount' );

jest.setTimeout(60000);

describe('Basic authentication e2e tests', () => {
  let credential;
  beforeAll( async () => {
  // Set a definite site for the page viewport so view is consistent across browsers
    await page.setViewport( {
      width: 1366,
      height: 768,
      deviceScaleFactor: 1
    } );

    credential = credentials( 'User' );
    createAccount = await createAccount( page );
  } );

  it( 'Should be able to create an account', async () => {
    const firstname = await createAccount.signup( credential.fullname, credential.username, credential.password );
    page.waitFor( 1000 );
    expect( credential.fullname ).toContain( firstname );
  })

} );
You have now imported the createAccount module and called the signup method to get the fullname displayed on the welcome page once the program has navigated the interface. The code then asserts that this fullname is the same as the fullname generated before the test method was called.
Save the script, then run it using the command npm run e2e:
- npm run e2e
The Chrome browser will open and automatically create an account with the generated credentials. Once the test is finished, the following output will be logged to your console:
Output> jest

 PASS  specs/users.test.js (28.881s)
  Basic authentication e2e tests
    √ Should be able to create an account (26273ms)

Test Suites: 1 passed, 1 total
Tests:       1 passed, 1 total
Snapshots:   0 total
Time:        29.087s
Ran all test suites.
This script has now validated the account creation process.
In this step, you wrote a script that crawls the sample web application and creates an account automatically. You then asserted that the process works as expected by writing a unit test for the crawler scripts. In the next step, you will do the same for the login feature.
Step 5 — Testing the Login Process
In this step, you will assert that the login feature works as it should. This step is similar to the create account step in that you will first create a web crawler script to navigate the login page, then write a unit test to confirm that the functionality is working as expected.
First, create and open a loginAccount.js file in your preferred editor:
- nano actions/loginAccount.js
Then add the following code to traverse the login page:
const chalk = require( 'chalk' );

class LoginAccount {
  constructor( page ) {
    this.url = "http://127.0.0.1:8080/"
    this.page = page;
    this.loginBtn = '#login';
    this.loginBody = '#loginBody';
    this.usernameField = '#username';
    this.passwordField = '#password';
    this.loginPageBtn = '#loginBtn';
  }

  async login( username, password ) {
    try {
      await this.page.goto( this.url );
      await this.page.waitFor( this.loginBtn );
      await this.page.click( this.loginBtn );
      // Wait for the loginBody on the login page to load
      await this.page.waitFor( this.loginBody );

      // Type the login credentials into the input fields
      await this.page.type( this.usernameField, username );
      await this.page.waitFor( 1000 );

      await this.page.type( this.passwordField, password );
      await this.page.waitFor( 1000 );

      await this.page.click( this.loginPageBtn );

      // Wait for homepage to load
      await this.page.waitFor( '#firstname' );
      await this.page.waitFor( 2000 );

      const firstname = await this.page.$eval( '#homeBody #firstname', el =>  el.textContent );

      return firstname;
    } catch ( err ) {
      console.log( chalk.red( 'ERROR => ', err ) );
    }
  }
}

module.exports = ( page ) => new LoginAccount( page );
This code is similar to the createAccount.js file. First, you created a LoginAccount class and exported a function that takes in the page object as a parameter. The constructor contains ID references to several HTML elements to interact with on the DOM.
The LoginAccount class has an asynchronous login method that takes in the username and password as parameters and helps you perform various actions on the page. The code first navigates to the URL of your sample web application, then clicks the button that loads the login page. When the login page has been loaded, it fills the form with the username and password passed in to the login method, then submits it by clicking the Login button. If the login was successful, it loads the welcome page and returns the first name, which you will pass in to your unit test.
Save and exit from the file.
Next, open up your users.test.js file again and modify it as follows:
let credentials = require( '../utils/credentials' );
let createAccount = require( '../actions/createAccount' );
let loginAccount = require( '../actions/loginAccount' );


jest.setTimeout(60000);

describe('Basic authentication e2e tests', () => {
  let credential;
  beforeAll( async () => {
  // Set a definite site for the page viewport so view is consistent across browsers
    await page.setViewport( {
      width: 1366,
      height: 768,
      deviceScaleFactor: 1
    } );

    credential = credentials( 'User' );
    createAccount = await createAccount( page );
    loginAccount = await loginAccount( page );
  } );

  it( 'Should be able to create an account', async () => {
    const firstname = await createAccount.signup( credential.fullname,
    credential.username, credential.password );
    page.waitFor( 1000 );
    expect( credential.fullname ).toContain( firstname );
  })

  it( 'Should be able to log in after a successful account creation', async () => {
    const firstname = await loginAccount.login( credential.username, credential.password );
    page.waitFor( 1000 );
    expect( credential.fullname ).toContain( firstname );
  } );

} );
In this code, you imported the loginAccount module, called the web crawler function on the page, then created a new test assertion that passes if the name on the Login page is contained in the generated credentials.
Save the file, then run npm run e2e from the terminal:
- npm run e2e
The web crawler will open a browser, navigate to the Login page, and enter the credentials, then the test script will run to find out if the web crawler made it to the welcome page.
The following will be logged to the terminal:
Output> jest

 PASS  specs/users.test.js (48.96s)
  Basic authentication e2e tests
    √ Should be able to create an account (21534ms)
    √ Should be able to log in after a successful account creation (12899ms)

Test Suites: 1 passed, 1 total
Tests:       2 passed, 2 total
Snapshots:   0 total
Time:        52.426s
Ran all test suites.
This shows that the test for a successful login passes as expected. However, the test is not yet complete; the program still needs to be able to handle unsuccessful login attempts.
If a wrong username and password combination is provided, an alert prompt pops up with the message Invalid username or password inputted. To test the alert box message, you can listen to a dialog event on the page object. The presence of the alert box indicates that an unsuccessful login attempt was just made.
To implement this, modify the users.test.js script as shown here:
let credentials = require( '../utils/credentials' );
let createAccount = require( '../actions/createAccount' );
let loginAccount = require( '../actions/loginAccount' );


jest.setTimeout(60000);

describe('Basic authentication e2e tests', () => {
  let credential;
  beforeAll( async () => {
  // Set a definite site for the page viewport so view is consistent across browsers
    await page.setViewport( {
      width: 1366,
      height: 768,
      deviceScaleFactor: 1
    } );

    credential = credentials( 'User' );
    createAccount = await createAccount( page );
    loginAccount = await loginAccount( page );
  } );

  it( 'Should be able to create an account', async () => {
    const firstname = await createAccount.signup( credential.fullname, credential.username, credential.password );
    page.waitFor( 1000 );
    expect( credential.fullname ).toContain( firstname );
  })

  it( 'Should be able to log in after a successful account creation', async () => {
    const firstname = await loginAccount.login( credential.username,
    credential.password );
    page.waitFor( 1000 );
    expect( credential.fullname ).toContain( firstname );
  } );

  it( 'Should not login on wrong credentials', async () => {
    try {
      page.on( 'dialog', dialog => {
        expect( dialog.message() ).toBe( 'Invalid username or password inputted' );
        dialog.accept();
      });

      await page.goto( 'http://127.0.0.1:8080/login.html' );
      await page.type( '#username', 'username' );
      await page.type( '#password', 'password' );
      await page.click( '#loginBtn' );
      await page.waitFor(5000) //Wait for the dialog to accept the prompt before proceeding

    } catch(err){
      console.log("An error occured while trying to login => ", err)
    }
  })

} );
In this code, you’ve added a new assertion that first sets up an event listener for the dialog event before performing any page interactions. If the web crawler clicks the button before listening to the dialog event, the dialog would have popped up before the event was bubbled.
Next, the code navigates to the login.html page and enters username and password as the credentials. Since these credentials do not match with those entered when you created an account, this will cause an error, which will trigger the dialog box that your assertion is waiting for. Finally, note that you added a five second delay at the end. This is to ensure that the dialog event accepts the dialog before jest-puppeteer closes the page. The page is closed once there are no longer tests available to run.
Save your users.test.js file and run the test:
- npm run e2e
Next, observe that all tests pass:
Output PASS  specs/users.test.js (25.736 s)
  Basic authentication e2e tests
    ✓ Should be able to create an account (11987 ms)
    ✓ Should be able to log in after a successful account creation (8196 ms)
    ✓ Should not login on wrong credentials (5168 ms)

Test Suites: 1 passed, 1 total
Tests:       3 passed, 3 total
Snapshots:   0 total
Time:        25.826 s, estimated 27 s
Ran all test suites.
This shows that the sample web application is working as expected.
Conclusion
In this tutorial, you used Puppeteer and Jest to write automated tests for a sample web application with account creation and login functionality. You configured Puppeteer and Jest to work together, then wrote scripts to navigate the web application UI and return the values of HTML elements it encountered. Finally, you tested whether those values matched the expected values of the actions you were testing.
End-to-end testing is not only a useful way to test your UI; you can also use it to ascertain that other key functionalities in your web application work as expected. For example, you can use device emulation and network throttling to run performance tests across several devices. For more information on end-to-end testing, check out the official docs for Puppeteer and Jest.
Thanks for learning with the DigitalOcean Community. Check out our offerings for compute, storage, networking, and managed databases.
About the author(s)
Gbadebo is a software engineer that is extremely passionate about JavaScript technologies, Open Source Development and community advocacy.
Former Senior Technical Editor at DigitalOcean, fiction writer and podcaster elsewhere, always searching for the next good nautical pun! Areas of expertise include Node.js, PostgreSQL, CSS, JavaScript.
Still looking for an answer?
This textbox defaults to using Markdown to format your answer.
You can type !ref in this text area to quickly search our full set of tutorials, documentation & marketplace offerings and insert the link!
These keyboards were carefully restored over a period of ten years. Each one was then multi-sampled and analyzed by the renowned Spectrasonics Keyscape Sound Development Team. Each patch has its own unique controls and effects processing that allows you to create custom sounds. These captivating and expressive sounds will get you excited to play! Use it to power your next project. at plugintopc
This comment has been deleted
 This work is licensed under a Creative Commons Attribution-NonCommercial- ShareAlike 4.0 International License.
Become a contributor for community
Get paid to write technical tutorials and select a tech-focused charity to receive a matching donation.

DigitalOcean Documentation
Full documentation for every DigitalOcean product.

Resources for startups and AI-native businesses
The Wave has everything you need to know about building a business, from raising funding to marketing your product.
The developer cloud
Scale up as you grow — whether you're running one virtual machine or ten thousand.

Start building today
From GPU-powered inference and Kubernetes to managed databases and storage, get everything you need to build, scale, and deploy intelligent applications.
