
Introduction
Imagine you’re working on a growing Kubernetes platform. You need to expose services securely, manage traffic efficiently, and scale without complexity. Historically, Kubernetes users turned to Ingress resources to expose HTTP and HTTPS applications. But as requirements evolve, think traffic shaping, multi-team environments, advanced routing. The limitations of Ingress become painfully real.
This is where the Gateway API comes in. It is a set of Kubernetes Resources that provide a modern, role-oriented, and extensible approach to traffic routing that fixes Ingress’s shortcomings and paves the way for flexible, scalable architecture.
In this guide, we’ll explore how to deploy a simple web service exposed through the Cilium powered Gateway Resource via HTTPS along with the controllers found in many Kubernetes deployment such as cert-manager utilizing Let’s Encrypt and external-dns.
Please go through the previous tutorial Kubernetes Gateway API: Replace Ingress with Cilium Gateway for HTTP Traffic to better understand the Gateway resource, the value it brings and how to do a simple deployment supporting HTTP traffic.
In this tutorial, we’ll explore how to securely expose an application using HTTPS and the Gateway API, backed by cert-manager and Let’s Encrypt.
Key Takeaways
- Modern HTTPS Routing with Gateway API: Learn how to use the Kubernetes Gateway API and Cilium Gateway to securely expose services over HTTPS, moving beyond traditional Ingress limitations.
- Automated TLS with cert-manager & Let’s Encrypt: Set up cert-manager to automatically request and manage TLS certificates using the HTTP-01 challenge for domain validation.
- Step-by-Step Deployment: Deploy a sample multi-service application (Bookinfo) and expose it securely via Gateway API.
- DNS Integration: Configure DNS records to point your domain to the Gateway, enabling external access to your services.
- Best Practices for Scalability: Apply recommended practices for reliable, scalable, and maintainable HTTPS traffic management on DigitalOcean Kubernetes (DOKS).
- Hands-on YAML Examples: Use provided manifests and Helm commands to install and configure all required components.
- Replace Ingress with Gateway: Understand the advantages of Gateway API over Ingress for advanced routing, multi-team environments, and future-proofing your Kubernetes networking.
Note: Replace example domains (like dolearn.xyz) with your own domain throughout the tutorial.
Cert-manager and Let’s Encrypt Integration
This tutorial leverages cert-manager to dynamically request and manage production-ready TLS certificates from Let’s Encrypt.
In this tutorial we will utilize an HTTP-01 challenge as part of the certification request process. This challenge is used by cert-manager and Let’s Encrypt to validate control of the FQDN for certificate issuance. This tutorial references the HTTP-01 challenge throughout, and understanding how it works will be helpful.
Prerequisites
- A running VPC Native DigitalOcean Kubernetes cluster(version 1.33+)
- kubectl installed and configured to talk to your cluster.
- The Gateway API CRDs installed (DOKS includes Cilium,which support this by default)
- A registered domain name and DNS access.
Note that in domain dolearn.xyz is used in the examples, be sure to replace those references with your own domain.
Step 1: Deploy a Sample APP
kubectl apply -f https://raw.githubusercontent.com/istio/istio/release-1.11/samples/bookinfo/platform/kube/bookinfo.yaml
Applying the bookinfo.yaml manifest spins up the four Bookinfo microservices—productpage, details, reviews, and ratings—with the core
- Services on port 9080 to make each microservice discoverable.
- Deployments to run the Pods (details and ratings have v1, productpage has v1, and reviews has v1, v2, and v3).
- ServiceAccounts to give each service its own identity.
Step 2. Install the Cert Manager via Helm
Before you can automatically provision TLS certificates for your applications, you need to install cert-manager. cert-manager is a Kubernetes add-on that automates the management and issuance of TLS certificates from various sources, including Let’s Encrypt. In this tutorial, cert-manager will be responsible for requesting and renewing certificates for your domains, which is essential for enabling secure HTTPS traffic through the Gateway API.
We’ll use Helm, the Kubernetes package manager, to install cert-manager. This approach ensures you get the latest stable version and makes future upgrades easier. The following commands will add the official Jetstack Helm repository, update your local chart information, and install cert-manager with support for the Gateway API enabled.
helm repo add jetstack https://charts.jetstack.io
helm repo update
helm install cert-manager jetstack/cert-manager \
    --namespace cert-manager \
    --set crds.enabled=true \
    --create-namespace \
    --set config.apiVersion="controller.config.cert-manager.io/v1alpha1" \
    --set config.kind="ControllerConfiguration" \
    --set config.enableGatewayAPI=true --wait
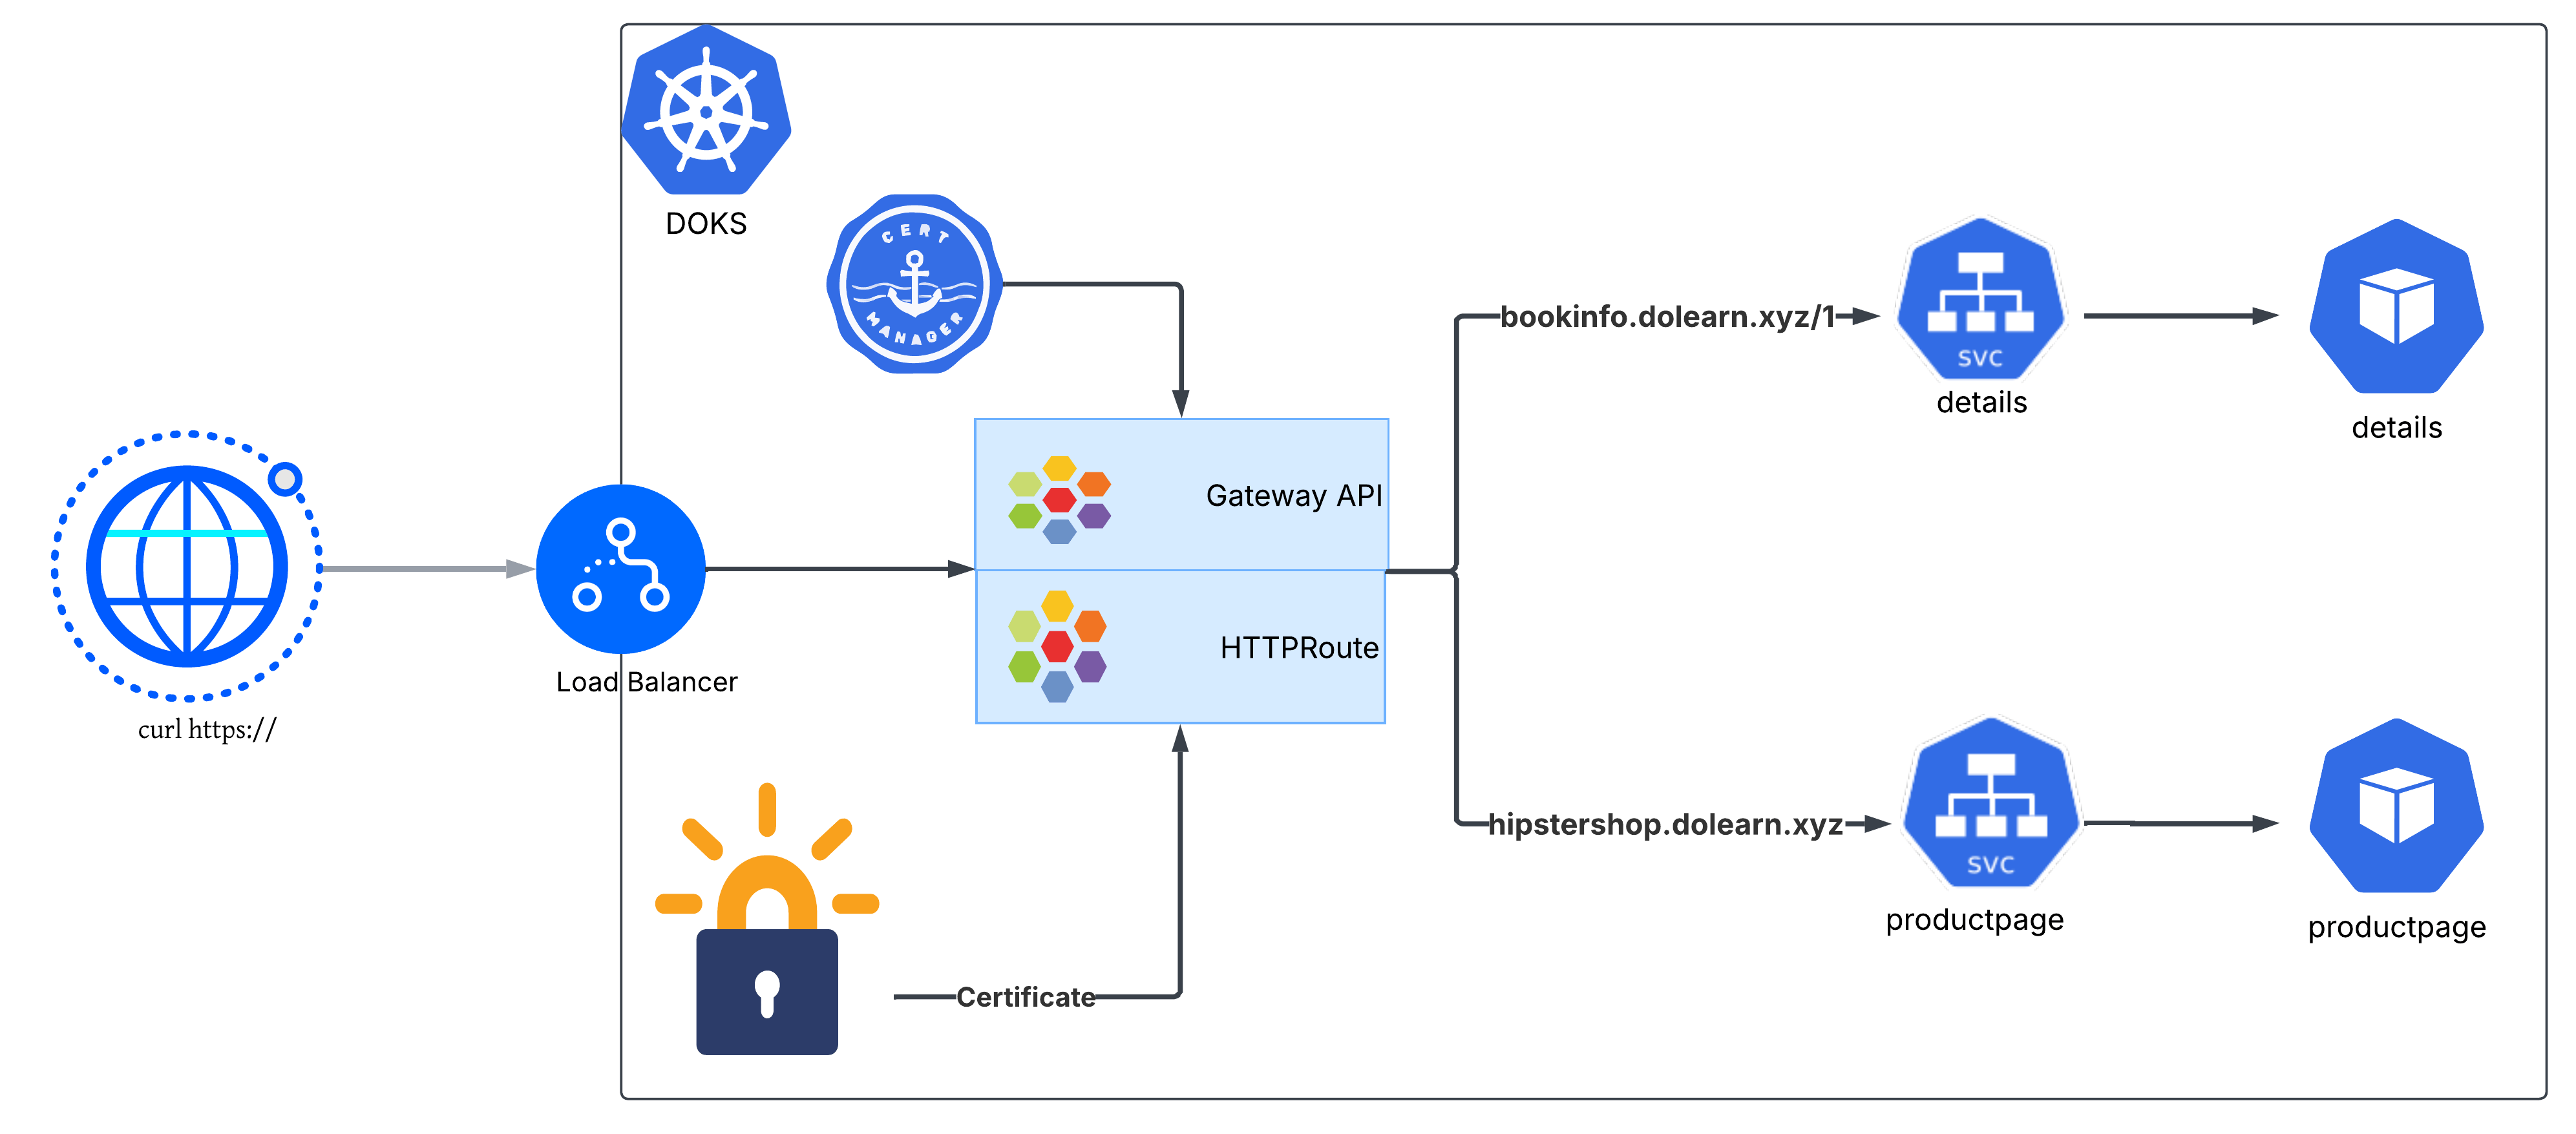
Step 3: Create the Gateway
When you create a Gateway, you also decide how it will be shared:
- Dedicated Gateway: Deployed in the same namespace as the application and its HTTPRoutes. This model works well when each team or app owns its own Gateway.
- Shared Gateway: Deployed in a different namespace and shared across multiple apps. In this case, the Gateway owner must explicitly allow other namespaces to attach routes using the allowedRoutes field.
For our use case, let’s create a Dedicated Gateway which defines listeners for:
- TLS/HTTPS (port 443) for each hostname.
- HTTP (port 80) only to handle HTTP-01 ACME challenge traffic.
apiVersion: gateway.networking.k8s.io/v1
kind: Gateway
metadata:
  name: tls-gateway
spec:
  gatewayClassName: cilium
  listeners:

  - name: https-1
    protocol: HTTPS
    port: 443
    hostname: "bookinfo.dolearn.xyz"
    tls:
      certificateRefs:
       - kind: Secret
         name: gateway-tls-secret
  - name: https-2
    protocol: HTTPS
    port: 443
    hostname: "hipstershop.dolearn.xyz"
    tls:
      certificateRefs:
       - kind: Secret
         name: gateway-tls-secret


  - name: http #  created for the purpose of solving HTTP-01 challenges
    protocol: HTTP
    port: 80
    hostname: "bookinfo.dolearn.xyz"
    allowedRoutes:
      namespaces:
        from: Same  # Any HTTPRoute in same namespace can bind to this Gateway listener.

  - name: http-2 # created for the purpose of solving HTTP-01 challenges
    protocol: HTTP
    port: 80
    hostname: "hipstershop.dolearn.xyz"
    allowedRoutes:
      namespaces:
        from: Same  # Any HTTPRoute in same namespace can bind to this Gateway listener.
The Gateway and the app’s HTTPRoutes live in the same namespace. Only the sample-app team can attach routes to it, which keeps routing isolated and prevents other teams/namespaces from using this entry point.
Once the above manifest is applied, two resources will be created. The Gateway and the Service of type LoadBalancer. Note it can take a few minutes for the load balancer to be created and for its IP address to be displayed.
kubectl get gateway
NAME          CLASS    ADDRESS   PROGRAMMED   AGE
tls-gateway   cilium             True         7s
kubectl get svc -o wide | grep LoadBalancer
cilium-gateway-tls-gateway LoadBalancer 10.108.88.49 167.172.14.164 443:32269/TCP,80:30298/TCP 21s <none>
Step 4: Create the HTTPRoute
Once you have a Gateway in place, the next step is to define HTTPRoutes—these tell the Gateway how to direct incoming requests to your application services.
apiVersion: gateway.networking.k8s.io/v1
kind: HTTPRoute
metadata:
  name: https-app-route-1
spec:
  parentRefs:
  - name: tls-gateway
    sectionName: https-1
  hostnames:
  - "bookinfo.dolearn.xyz"
  rules:
  - matches:
    - path:
        type: PathPrefix
        value: /details
    backendRefs:
    - name: details
      port: 9080
---
apiVersion: gateway.networking.k8s.io/v1
kind: HTTPRoute
metadata:
  name: https-app-route-2
spec:
  parentRefs:
  - name: tls-gateway
    sectionName: https-2
  hostnames:
  - "hipstershop.dolearn.xyz"
  rules:
  - matches:
    - path:
        type: PathPrefix
        value: /
    backendRefs:
    - name: productpage
      port: 9080
What it does?
- Links to a Gateway
parentRefspoints to the Gatewaytls-gatewayin thesamenamespace.- This tells the cluster which Gateway should process these routes.
- Defines hostnames
3. Requests for
bookinfo.dolearn.xyzandhipstershop.dolearn.xyzwill be matched by this HTTPRoute. - Sets routing rules
4. First rule: Requests with paths starting with
/detailsgo to thedetailsservice on port 9080. 5. Second rule: - Matches requests where the path starts with / (i.e., all paths). - Routes these requests to the productpage service on port 9080.
Step 5: Setting up ExternalDNS with DigitalOcean[Optional]
ExternalDNS automates the management of DNS records in your provider (in this case, DigitalOcean) based on Kubernetes resources such as Services, Ingresses, and Gateway API routes.
1. Create a DigitalOcean API Token
You’ll need a Personal Access Token with write access to manage DNS records.
2. Store the Token as a Kubernetes Secret
Create a Kubernetes Secret that ExternalDNS will use to authenticate with DigitalOcean:
kubectl create secret generic digitalocean-dns \
  --from-literal=access-token=<YOUR_DIGITALOCEAN_TOKEN>
3. Add the ExternalDNS Helm Repository
helm repo add external-dns https://kubernetes-sigs.github.io/external-dns/
helm repo update
4. Configure Values for Helm Deployment
env: # Passes the DigitalOcean token from the secret
  - name: DO_TOKEN
    valueFrom:
      secretKeyRef:
        name: digitalocean-dns
        key: access-token

provider: # ExternalDNS provider configuration
  name: digitalocean

policy: sync # Ensures ExternalDNS continuously reconciles DNS records
txtOwnerId: gateway-api # Ensures ExternalDNS does not conflict others using this domain

sources: # Kubernetes resources to watch and create DNS records for
  - service
  - ingress
  - gateway-grpcroute
  - gateway-httproute
5. Install ExternalDNS
Deploy ExternalDNS using Helm
helm install external-dns external-dns/external-dns -f values.yaml
6. Verify DNS Records
After deployment, ExternalDNS should automatically create DNS records for your Services/Ingresses.
You can verify with:
$ dig +short hipstershop.dolearn.xyz
167.172.14.164
$ dig +short bookinfo.dolearn.xyz
167.172.14.164
Reference: https://kubernetes-sigs.github.io/external-dns/latest/
Alternatively, you can manually add the DNS records: https://docs.digitalocean.com/products/networking/dns/how-to/manage-records/
Step 6: Create an Issuer and a Certificate
An Issuer in cert-manager defines where and how to obtain certificates. In this example, we’ll use Let’s Encrypt with the HTTP-01 challenge.
The HTTP-01 challenge works by temporarily creating an HTTP endpoint under your domain (e.g. http://example.com/.well-known/acme-challenge/…).
Let’s Encrypt then checks this endpoint to confirm that you own the domain. Once verified, it issues a certificate.
apiVersion: cert-manager.io/v1
kind: Issuer
metadata:
  name: letsencrypt-gateway
spec:
  acme:
    email: your-email@example.com # Replace this with your email address
    server: https://acme-v02.api.letsencrypt.org/directory
    privateKeySecretRef:
      name: letsencrypt-gateway-account-key
    solvers:
      # Use the HTTP-01 challenge provider
      - http01:
          gatewayHTTPRoute:
            parentRefs:
              - name: tls-gateway
                kind: Gateway
Now, we’ll create a Certificate resource. This tells cert-manager which domain we want a TLS cert for, and which Issuer should handle it.
apiVersion: cert-manager.io/v1
kind: Certificate
metadata:
  name: letsencrypt-certificate
spec:
  secretName: gateway-tls-secret
  dnsNames:
    - bookinfo.dolearn.xyz
    - hipstershop.dolearn.xyz
  issuerRef:
    name: letsencrypt-gateway
    kind: Issuer
How to Verify that the certificate is issued
kubectl get certificate
NAME                        READY   SECRET               AGE
letsencrypt-certificate  True    gateway-tls-secret   3h32m
Note
When creating a Gateway and requesting a certificate using the HTTP-01 challenge, cert-manager performs a self-check by making an HTTP request to the challenge endpoint to verify it’s publicly accessible.
There can be a delay before the DNS record is created by ExternalDNS and fully propagated. During this time, HTTP-01 challenge propagation might take some time, causing temporary failures in the self-check.
Cert-manager handles this gracefully by retrying the self-check periodically. Once the DNS record becomes available and resolves correctly, the self-check succeeds, allowing the HTTP-01 challenge to complete and the certificate to be issued.
Step 7: Make HTTPS Requests
Now, let’s test this by making HTTPS requests to the app using the service.
 curl https://bookinfo.dolearn.xyz/details/1
{"id":1,"author":"William Shakespeare","year":1595,"type":"paperback","pages":200,"publisher":"PublisherA","language":"English","ISBN-10":"1234567890","ISBN-13":"123-1234567890"}%
$ curl https://hipstershop.dolearn.xyz/
<!DOCTYPE html>
<html>
  <head>
    <title>Simple Bookstore App</title>
<meta charset="utf-8">
<meta http-equiv="X-UA-Compatible" content="IE=edge">
<meta name="viewport" content="width=device-width, initial-scale=1">

<!-- Latest compiled and minified CSS -->
<link rel="stylesheet" href="static/bootstrap/css/bootstrap.min.css">

<!-- Optional theme -->
<link rel="stylesheet" href="static/bootstrap/css/bootstrap-theme.min.css">

  </head>
  <body>


<p>
    <h3>Hello! This is a simple bookstore application consisting of three services as shown below</h3>
</p>

<table class="table table-condensed table-bordered table-hover"><tr><th>name</th><td>http://details:9080</td></tr><tr><th>endpoint</th><td>details</td></tr><tr><th>children</th><td><table class="table table-condensed table-bordered table-hover"><tr><th>name</th><th>endpoint</th><th>children</th></tr><tr><td>http://details:9080</td><td>details</td><td></td></tr><tr><td>http://reviews:9080</td><td>reviews</td><td><table class="table table-condensed table-bordered table-hover"><tr><th>name</th><th>endpoint</th><th>children</th></tr><tr><td>http://ratings:9080</td><td>ratings</td><td></td></tr></table></td></tr></table></td></tr></table>

<p>
    <h4>Click on one of the links below to auto generate a request to the backend as a real user or a tester
    </h4>
</p>
<p><a href="/productpage?u=normal">Normal user</a></p>
<p><a href="/productpage?u=test">Test user</a></p>


<!-- Latest compiled and minified JavaScript -->
<script src="static/jquery.min.js"></script>

<!-- Latest compiled and minified JavaScript -->
<script src="static/bootstrap/js/bootstrap.min.js"></script>

  </body>
</html>
Step 8: Create and test HTTP to HTTPS redirect
With the configuration so far if someone was to try and access the URLs using HTTP they would receive a 404. We need to create HTTPRoute objects that will redirect HTTP requests to the secure HTTPS URLs. This can be done by applying the following to your cluster:
apiVersion: gateway.networking.k8s.io/v1
kind: HTTPRoute
metadata:
  name: https-1-redirect
spec:
  hostnames:
    - bookinfo.dolearn.xyz
  parentRefs:
    - group: gateway.networking.k8s.io
      kind: Gateway
      name: tls-gateway
      sectionName: http
  rules:
    - filters:
        - requestRedirect:
            port: 443
            scheme: https
            statusCode: 301
          type: RequestRedirect
      matches:
        - path:
            type: PathPrefix
            value: /
---
apiVersion: gateway.networking.k8s.io/v1
kind: HTTPRoute
metadata:
  name: https-2-redirect
spec:
  hostnames:
    - hipstershop.dolearn.xyz
  parentRefs:
    - group: gateway.networking.k8s.io
      kind: Gateway
      name: tls-gateway
      sectionName: http-2
  rules:
    - filters:
        - requestRedirect:
            port: 443
            scheme: https
            statusCode: 301
          type: RequestRedirect
      matches:
        - path:
            type: PathPrefix
            value: /
Now when you curl the http url you can see the redirect and then using -L will follow that redirect to the https URL.
https$ curl -Lv http://bookinfo.dolearn.xyz/details/1
*   Trying 167.172.14.164:80...
* Connected to bookinfo.dolearn.xyz (167.172.14.164) port 80 (#0)
> GET /details/1 HTTP/1.1
> Host: bookinfo.dolearn.xyz
> User-Agent: curl/7.81.0
> Accept: */*
>
* Mark bundle as not supporting multiuse
< HTTP/1.1 301 Moved Permanently
< location: https://bookinfo.dolearn.xyz:443/details/1
< date: Thu, 11 Sep 2025 18:20:19 GMT
< server: envoy
< content-length: 0
<
* Connection #0 to host bookinfo.dolearn.xyz left intact
* Clear auth, redirects to port from 80 to 443
* Issue another request to this URL: 'https://bookinfo.dolearn.xyz:443/details/1'
*   Trying 167.172.14.164:443...
* Connected to bookinfo.dolearn.xyz (167.172.14.164) port 443 (#1)
<SNIP>
Frequently Asked Questions (FAQs)
1. What is the difference between Gateway API and Ingress?
The Gateway API is the modern successor to Ingress, offering several advantages:
- Role-based access control: Different teams can manage different aspects of traffic routing
- Better extensibility: More flexible and programmable than Ingress
- Multi-team support: Allows multiple teams to manage routes without conflicts
- Advanced features: Built-in support for traffic splitting, header matching, and complex routing rules
2. Why use Cilium with Gateway API?
Cilium provides:
- High performance: eBPF-based networking for better performance than traditional iptables
- Built-in security: Network policies and service mesh capabilities
- Gateway API support: Native implementation of Gateway API specifications
- Production-ready: Used by major cloud providers and enterprises
3. How does cert-manager work with Gateway API?
Cert-manager integrates with Gateway API through:
- HTTP-01 challenges: Uses temporary HTTP endpoints to verify domain ownership
- Automatic renewal: Handles certificate renewal before expiration
- Multiple issuers: Supports Let’s Encrypt, HashiCorp Vault, and other certificate authorities
- Gateway integration: Directly provisions certificates for Gateway resources
4. What happens if DNS propagation is slow?
ExternalDNS and cert-manager handle delays gracefully:
- ExternalDNS: Continuously retries DNS record creation
- cert-manager: Retries HTTP-01 challenges periodically
- Self-check mechanism: Verifies public accessibility before proceeding
- Typical delay: 1-5 minutes for DNS propagation
5. Can I use multiple domains with one Gateway?
Yes, you can configure multiple hostnames in a single Gateway:
- Multiple listeners: Each hostname gets its own listener configuration
- Shared certificates: Use wildcard certificates or SAN certificates
- Separate routes: Each domain can have different HTTPRoute configurations
- Load balancer efficiency: Single load balancer handles multiple domains
6. How do I troubleshoot certificate issues?
Common troubleshooting steps:
- Check certificate status:
kubectl get certificate - View cert-manager logs:
kubectl logs -n cert-manager deployment/cert-manager - Verify DNS resolution:
dig your-domain.com - Check HTTP-01 challenge: Visit
http://your-domain.com/.well-known/acme-challenge/ - Review Gateway status:
kubectl describe gateway your-gateway
7. Is this setup production-ready?
This tutorial provides a production-ready foundation with:
- Automated certificate management: No manual certificate renewal needed
- DNS automation: Automatic DNS record management
- Security best practices: HTTP to HTTPS redirects
- Monitoring: Built-in health checks and status reporting
- Scalability: Can handle multiple domains and services
Conclusion
By following this tutorial, you’ve deployed a sample application, exposed it through a Gateway, and secured it with HTTPS using cert-manager. With the Gateway API, routing, TLS termination, and certificate management become more flexible and Kubernetes-native compared to traditional Ingress.
This foundation can be extended further, whether it’s adding canary traffic splitting, cross-namespace routing, or advanced policies like header matching and rate limiting. With HTTPS in place, your workloads are ready for production traffic, and you now have a modern, scalable way to manage networking in Kubernetes.
Ready to take your Kubernetes networking to the next level? Deploy your applications on DigitalOcean Kubernetes and experience the power of modern traffic routing with Gateway API and Cilium.
Next Steps
Now that you have a solid Gateway API foundation, consider these advanced implementations:
Kubernetes Gateway API Tutorial: Replace Ingress with Cilium Gateway for HTTP Traffic
DOKS Operational Readiness, Part 2: Enable HTTPS Configure OAuth authentication with external providers Set up Prometheus monitoring for Gateway metrics
Explore our comprehensive Kubernetes tutorial library covering everything from basics to enterprise patterns.
Join the DigitalOcean Community to share your Gateway API implementations and learn from other developers.
Thanks for learning with the DigitalOcean Community. Check out our offerings for compute, storage, networking, and managed databases.
About the author(s)
A Senior Solutions Architect at DigitalOcean focusing on Cloud Architecture, Kubernetes, Automation and Infrastructure-as-Code.
I help Businesses scale with AI x SEO x (authentic) Content that revives traffic and keeps leads flowing | 3,000,000+ Average monthly readers on Medium | Sr Technical Writer(Team Lead) @ DigitalOcean | Ex-Cloud Consultant @ AMEX | Ex-Site Reliability Engineer(DevOps)@Nutanix
Still looking for an answer?
This textbox defaults to using Markdown to format your answer.
You can type !ref in this text area to quickly search our full set of tutorials, documentation & marketplace offerings and insert the link!
Hi, Thank you for the awesome explanation. I am trying to migrate from ingress-nginx into Gateway API ingress. But I am having an issue regarding Loadbancer IP. When we create gateway, it will automatically create Loadbalancer service IP but I need to pass my static public IP. And I don’t find any arguments to pass it. Even I checked few helm charts as well but I didn’t find anything. Could you please help me sort this out? Thanks in advance.
Regards, Khopithan
 This work is licensed under a Creative Commons Attribution-NonCommercial- ShareAlike 4.0 International License.
Become a contributor for community
Get paid to write technical tutorials and select a tech-focused charity to receive a matching donation.

DigitalOcean Documentation
Full documentation for every DigitalOcean product.

Resources for startups and AI-native businesses
The Wave has everything you need to know about building a business, from raising funding to marketing your product.
The developer cloud
Scale up as you grow — whether you're running one virtual machine or ten thousand.

Start building today
From GPU-powered inference and Kubernetes to managed databases and storage, get everything you need to build, scale, and deploy intelligent applications.
