Sr Technical Content Strategist and Team Lead

Introduction
Photogrammetry is the process of creating 3D models from 2D images. By taking multiple photographs from different angles, we can reconstruct the 3D geometry of an object or scene. This method extracts 3D information from photographs by determining their spatial relationships. Photogrammetry is widely used in various fields, such as architecture, archaeology, surveying, gaming, and real estate.
In this tutorial, you will learn to set up a photogrammetry pipeline using COLMAP, a photogrammetry tool, on an Ubuntu 24.04 GPU Droplet. You will process the famous South Building dataset to generate a 3D model using Structure from Motion (SfM) and dense reconstruction, and finally view the model using an 3D viewer.
GPU Droplet speeds up photogrammetry by quickly handling tasks like dense reconstruction and stereo fusion. This makes the process more efficient and reduces the time it takes to complete.
Prerequisites
To follow this tutorial, you will need:
- A DigitalOcean Cloud account.
- A GPU Droplet running Ubuntu 24.04.
- Familiarity with the Linux command line. To learn more, you can visit this guide on Linux command line primer.
Step 1 - Set Up the GPU Droplet
1.Create a New Project - You will need to create a new project from the cloud control panel and tie it to a GPU Droplet.
2.Create a GPU Droplet - Log into your DigitalOcean account, create a new GPU Droplet, and choose Ubuntu 24.04 as the OS. You can refer to our official documentation on how to create a GPU Droplet.
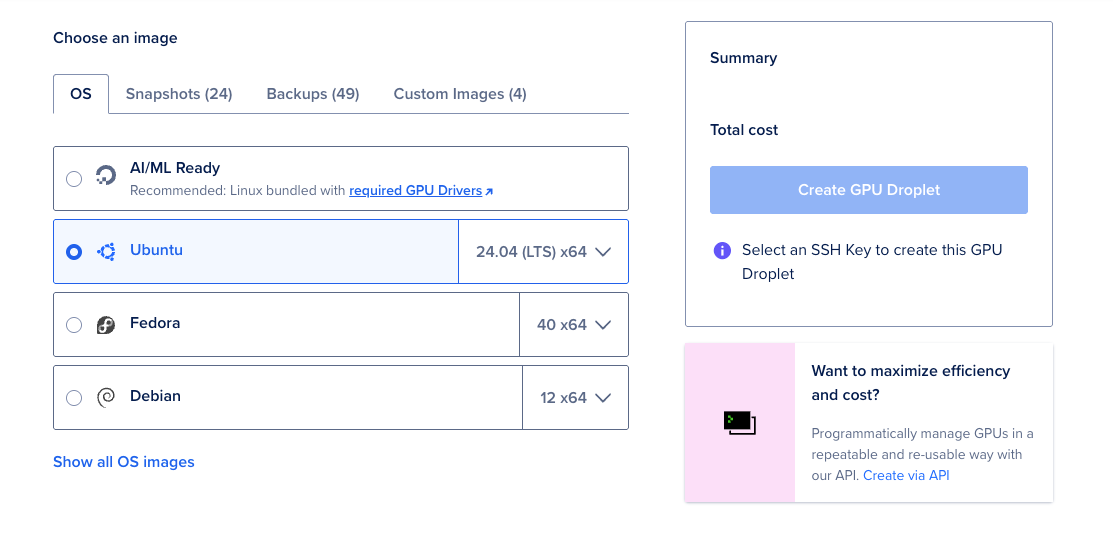
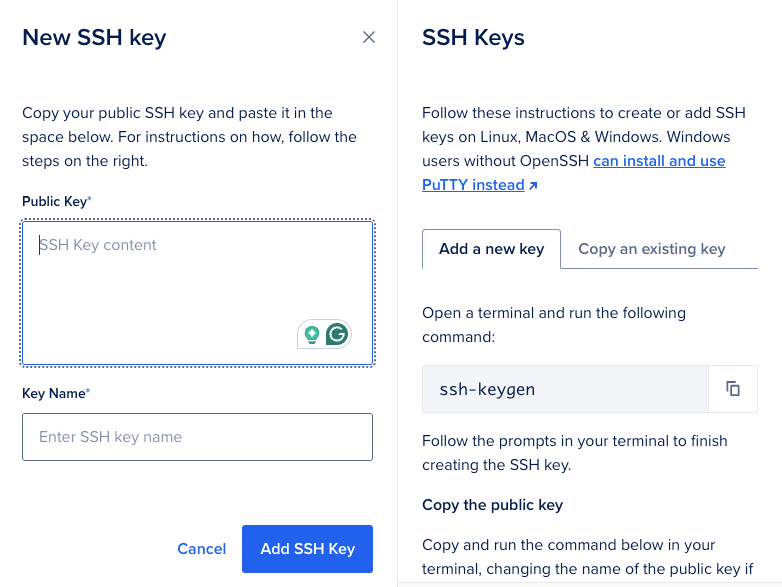
3.Add an SSH Key for authentication - An SSH key is required to authenticate with the GPU Droplet and by adding the SSH key, you can login to the GPU Droplet from your terminal.
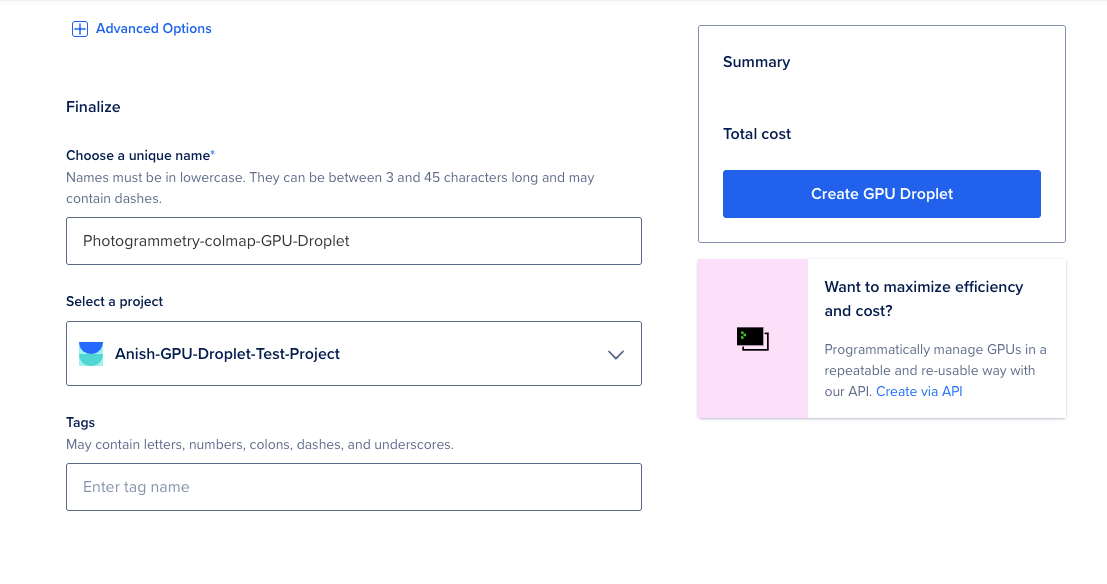
4.Finalize and Create the GPU Droplet - Once all of the above steps are completed, finalize and create a new GPU Droplet.
Step 2 - Install NVIDIA Drivers and CUDA
In this step, login to your GPU Droplet either from the web console or from your terminal via SSH.
root@<GPU_droplet_public_ip>
First, let’s update the package repository and install prerequisites:
sudo apt update
sudo apt install build-essential dkms
Now, add the NVIDIA package repository:
sudo add-apt-repository ppa:graphics-drivers/ppa
sudo apt update
Next, let’s install the NVIDIA drivers:
sudo apt install nvidia-driver-535 nvidia-dkms-535
Now, let’s install the CUDA toolkit:
sudo apt-get install -y \
    nvidia-cuda-toolkit \
    nvidia-cuda-toolkit-gcc
You will need to reboot the GPU Droplet, after the installation of NVIDIA drivers and the CUDA toolkit:
sudo reboot
Once the system is rebooted, you can verify the installation of the NVIDIA driver and CUDA version with:
nvidia-smi
This command should display the details of your NVIDIA GPU and the driver version.
Output+---------------------------------------------------------------------------------------+
| NVIDIA-SMI 535.183.01             Driver Version: 535.183.01   CUDA Version: 12.2     |
|-----------------------------------------+----------------------+----------------------+
| GPU  Name                 Persistence-M | Bus-Id        Disp.A | Volatile Uncorr. ECC |
| Fan  Temp   Perf          Pwr:Usage/Cap |         Memory-Usage | GPU-Util  Compute M. |
|                                         |                      |               MIG M. |
|=========================================+======================+======================|
|   0  NVIDIA H100 80GB HBM3          Off | 00000000:00:09.0 Off |                    0 |
| N/A   28C    P0              67W / 700W |      0MiB / 81559MiB |      0%      Default |
|                                         |                      |             Disabled |
+-----------------------------------------+----------------------+----------------------+

+---------------------------------------------------------------------------------------+
| Processes:                                                                            |
|  GPU   GI   CI        PID   Type   Process name                            GPU Memory |
|        ID   ID                                                             Usage      |
|=======================================================================================|
|  No running processes found                                                           |
+---------------------------------------------------------------------------------------+
Verify the installation of CUDA:
nvcc --version
You should see information about the installed version of CUDA.
Outputnvcc: NVIDIA (R) Cuda compiler driver
Copyright (c) 2005-2023 NVIDIA Corporation
Built on Fri_Jan__6_16:45:21_PST_2023
Cuda compilation tools, release 12.0, V12.0.140
Build cuda_12.0.r12.0/compiler.32267302_0
Note: From the above outputs, please make sure that the CUDA version from the output of the command nvidia-smi and the command nvcc -v matches.
Step 3 - Install COLMAP
COLMAP is a general-purpose Structure-from-Motion (SfM) and Multi-View Stereo (MVS) pipeline with a graphical and command-line interface. It offers a wide range of features for reconstruction of ordered and unordered image collections.
By default, COLMAP runs one feature extraction/matching thread per CUDA-enabled GPU and this usually gives the best performance as compared to running multiple threads on the same GPU.
First, install the dependencies for COLMAP:
sudo apt-get install \
    git \
    cmake \
    ninja-build \
    build-essential \
    libboost-program-options-dev \
    libboost-filesystem-dev \
    libboost-graph-dev \
    libboost-system-dev \
    libeigen3-dev \
    libflann-dev \
    libfreeimage-dev \
    libmetis-dev \
    libgoogle-glog-dev \
    libgtest-dev \
    libgmock-dev \
    libsqlite3-dev \
    libglew-dev \
    qtbase5-dev \
    libqt5opengl5-dev \
    libcgal-dev \
    libceres-dev
Now, let’s clone the COLMAP repository from GitHub to configure and compile COLMAP:
git clone https://github.com/colmap/colmap.git
cd colmap
mkdir build
cd build
cmake .. -GNinja
ninja
sudo ninja install
Verify that COLMAP is installed by running:
colmap -h
You should see the COLMAP help information.
OutputCOLMAP 3.11.0.dev0 -- Structure-from-Motion and Multi-View Stereo
(Commit 4ae4a88b on 2024-10-04 with CUDA)

Usage:
  colmap [command] [options]

Documentation:
  https://colmap.github.io/

Example usage:
  colmap help [ -h, --help ]
  colmap gui
  colmap gui -h [ --help ]
  colmap automatic_reconstructor -h [ --help ]
  colmap automatic_reconstructor --image_path IMAGES --workspace_path WORKSPACE
  colmap feature_extractor --image_path IMAGES --database_path DATABASE
  colmap exhaustive_matcher --database_path DATABASE
  colmap mapper --image_path IMAGES --database_path DATABASE --output_path MODEL
  ...

Available commands:
  help
  gui
  automatic_reconstructor
  bundle_adjuster
  color_extractor
  database_cleaner
  database_creator
  database_merger
  delaunay_mesher
  exhaustive_matcher
  feature_extractor
  feature_importer
  hierarchical_mapper
  image_deleter
  image_filterer
  image_rectifier
  image_registrator
  image_undistorter
  image_undistorter_standalone
  mapper
  matches_importer
  model_aligner
  model_analyzer
  model_comparer
  model_converter
  model_cropper
  model_merger
  model_orientation_aligner
  model_splitter
  model_transformer
  patch_match_stereo
  point_filtering
  point_triangulator
  pose_prior_mapper
  poisson_mesher
  project_generator
  rig_bundle_adjuster
  sequential_matcher
  spatial_matcher
  stereo_fusion
  transitive_matcher
  vocab_tree_builder
  vocab_tree_matcher
  vocab_tree_retriever
Step 4 - Download the South Building Dataset
You will use the South Building dataset from the COLMAP datasets page.
Let’s create a directory for the dataset:
mkdir -p /root/datasets/
cd /root/datasets/
Now, download the South Building dataset (0.42GB):
wget https://demuc.de/colmap/datasets/south-building.zip
unzip south-building.zip
Note: This dataset already has some necessary files present which are generated during the Photogrammetry process as you will perform below. You can remove them proactively to avoid any issues during the below steps:
rm /root/datasets/south-building/database.db
rm -rf /root/datasets/south-building/dense
This will extract the images inside the directory /root/datasets/south-building.
Step 5 - Building a COLMAP Photogrammetry Pipeline
You can now start processing the images using COLMAP’s command line executables and functions. The COLMAP pipeline consists of several key steps. In this step you learn each of these steps and what they do.
First and foremost let’s set the path to the image dataset as an environment variable as you will need this in the following steps:
DATASET_PATH=/root/datasets/south-building
Verify the value of the DATASET_PATH variable:
echo $DATASET_PATH
Output/root/datasets/south-building
Feature Extraction
The first step in the COLMAP pipeline is feature extraction. During this step, COLMAP detects keypoints in each image using the SIFT (Scale-Invariant Feature Transform) algorithm.
Use the following command:
colmap feature_extractor \
   --database_path $DATASET_PATH/features.db \
   --image_path $DATASET_PATH/images
This step detects keypoints in each image and stores them in the features.db file, which this command will automatically generate after completion of the process.
In the above command:
--database_path: Specifies where the features and matches will be stored (a SQLite database).--image_path: The path to the folder containing the South Building dataset images.
You should observe the following output:
Output==============================================================================
Feature extraction
==============================================================================
I20241007 10:26:29.778565 112692 feature_extraction.cc:258] Processed file [126/128]
I20241007 10:26:29.778585 112692 feature_extraction.cc:261]   Name:            P1180345.JPG
I20241007 10:26:29.778592 112692 feature_extraction.cc:270]   Dimensions:      3072 x 2304
I20241007 10:26:29.778601 112692 feature_extraction.cc:273]   Camera:          #1 - SIMPLE_RADIAL
I20241007 10:26:29.778609 112692 feature_extraction.cc:276]   Focal Length:    2457.60px (Prior)
I20241007 10:26:29.778620 112692 feature_extraction.cc:280]   Features:        12917
I20241007 10:26:29.806203 112692 feature_extraction.cc:258] Processed file [127/128]
I20241007 10:26:29.806223 112692 feature_extraction.cc:261]   Name:            P1180346.JPG
I20241007 10:26:29.806231 112692 feature_extraction.cc:270]   Dimensions:      3072 x 2304
I20241007 10:26:29.806238 112692 feature_extraction.cc:273]   Camera:          #1 - SIMPLE_RADIAL
I20241007 10:26:29.806245 112692 feature_extraction.cc:276]   Focal Length:    2457.60px (Prior)
I20241007 10:26:29.806254 112692 feature_extraction.cc:280]   Features:        10936
I20241007 10:26:29.837088 112692 feature_extraction.cc:258] Processed file [128/128]
I20241007 10:26:29.837108 112692 feature_extraction.cc:261]   Name:            P1180347.JPG
I20241007 10:26:29.837116 112692 feature_extraction.cc:270]   Dimensions:      3072 x 2304
I20241007 10:26:29.837123 112692 feature_extraction.cc:273]   Camera:          #1 - SIMPLE_RADIAL
I20241007 10:26:29.837132 112692 feature_extraction.cc:276]   Focal Length:    2457.60px (Prior)
I20241007 10:26:29.837141 112692 feature_extraction.cc:280]   Features:        14988
I20241007 10:26:29.851410 112670 timer.cc:91] Elapsed time: 0.111 [minutes]
The next step is to match the features of the images.
Image Matching
In this step you will perform image matching, where COLMAP matches features between pairs of images.
colmap exhaustive_matcher \
   --database_path $DATASET_PATH/features.db
In the above command:
--database_path: is the path to the database created during the previous feature extraction step. This database contains the features extracted from each image.
The exhaustive matcher compares each image with every other image to find matching points between them, which is crucial for the 3D reconstruction process.
You should observe the following output:
Output==============================================================================
Feature matching
==============================================================================
I20241007 10:39:56.524787 112923 sift.cc:1426] Creating SIFT GPU feature matcher
I20241007 10:39:56.679742 112922 pairing.cc:168] Generating exhaustive image pairs...
I20241007 10:39:56.679785 112922 pairing.cc:201] Matching block [1/3, 1/3]
I20241007 10:39:59.968668 112922 feature_matching.cc:46] in 3.289s
I20241007 10:39:59.973086 112922 pairing.cc:201] Matching block [1/3, 2/3]
I20241007 10:40:03.933087 112922 feature_matching.cc:46] in 3.960s
I20241007 10:40:03.934145 112922 pairing.cc:201] Matching block [1/3, 3/3]
I20241007 10:40:04.890079 112922 feature_matching.cc:46] in 0.956s
I20241007 10:40:04.893419 112922 pairing.cc:201] Matching block [2/3, 1/3]
I20241007 10:40:11.315909 112922 feature_matching.cc:46] in 6.423s
I20241007 10:40:11.317560 112922 pairing.cc:201] Matching block [2/3, 2/3]
I20241007 10:40:15.306492 112922 feature_matching.cc:46] in 3.989s
I20241007 10:40:15.321022 112922 pairing.cc:201] Matching block [2/3, 3/3]
I20241007 10:40:16.576953 112922 feature_matching.cc:46] in 1.256s
I20241007 10:40:16.577368 112922 pairing.cc:201] Matching block [3/3, 1/3]
I20241007 10:40:19.138069 112922 feature_matching.cc:46] in 2.561s
I20241007 10:40:19.139942 112922 pairing.cc:201] Matching block [3/3, 2/3]
I20241007 10:40:21.759231 112922 feature_matching.cc:46] in 2.619s
I20241007 10:40:21.766156 112922 pairing.cc:201] Matching block [3/3, 3/3]
I20241007 10:40:22.669615 112922 feature_matching.cc:46] in 0.903s
I20241007 10:40:22.670549 112922 timer.cc:91] Elapsed time: 0.436 [minutes]
Sparse Reconstruction (Structure from Motion)
Once the image matching is complete, you will perform Structure from Motion (SfM) to generate a sparse 3D point cloud. This step computes the camera poses and reconstructs a sparse point cloud based on the matched features.
Structure from motion (SfM) is the process of estimating the 3-D structure of a scene from a set of 2-D images. SfM is used in many applications, such as 3-D scanning, augmented reality, and visual simultaneous localization and mapping (vSLAM).
mkdir -p $DATASET_PATH/sparse
colmap mapper \
    --database_path $DATASET_PATH/features.db \
    --image_path $DATASET_PATH/images \
    --output_path $DATASET_PATH/sparse
In the above command:
--database_path: Path to the database containing the feature matches.--image_path: Path to the dataset images.--output_path: Directory where the sparse 3D reconstruction will be saved.
This step generates a sparse point cloud and stores it in the sparse/ directory. It also outputs the estimated camera poses and scene structure.
You should observe the following output:
OutputI20241007 10:48:07.338281 112969 incremental_mapper.cc:237] Loading database
I20241007 10:48:07.339139 112969 database_cache.cc:66] Loading cameras...
I20241007 10:48:07.339165 112969 database_cache.cc:76]  1 in 0.000s
I20241007 10:48:07.339171 112969 database_cache.cc:84] Loading matches...
I20241007 10:48:07.352996 112969 database_cache.cc:90]  2575 in 0.014s
I20241007 10:48:07.353032 112969 database_cache.cc:106] Loading images...
I20241007 10:48:07.391850 112969 database_cache.cc:156]  128 in 0.039s (connected 128)
I20241007 10:48:07.391886 112969 database_cache.cc:167] Loading pose priors...
I20241007 10:48:07.392081 112969 database_cache.cc:178]  0 in 0.000s
I20241007 10:48:07.392092 112969 database_cache.cc:187] Building correspondence graph...
I20241007 10:48:07.574220 112969 database_cache.cc:216]  in 0.182s (ignored 0)
I20241007 10:48:07.574483 112969 timer.cc:91] Elapsed time: 0.004 [minutes]
I20241007 10:48:07.585919 112969 incremental_mapper.cc:282] Finding good initial image pair
I20241007 10:48:07.979120 112969 incremental_mapper.cc:306] Initializing with image pair #71 and #68
I20241007 10:50:36.104980 112969 incremental_mapper.cc:390] Registering image #13 (126)
I20241007 10:50:36.105013 112969 incremental_mapper.cc:393] => Image sees 439 / 1047 points
I20241007 10:50:36.420789 112969 incremental_mapper.cc:390] Registering image #116 (127)
I20241007 10:50:36.420820 112969 incremental_mapper.cc:393] => Image sees 409 / 1342 points
I20241007 10:50:36.721102 112969 incremental_mapper.cc:390] Registering image #14 (128)
I20241007 10:50:36.721136 112969 incremental_mapper.cc:393] => Image sees 519 / 1340 points
I20241007 10:50:36.997920 112969 incremental_mapper.cc:42] Retriangulation and Global bundle adjustment
I20241007 10:50:43.497357 112969 timer.cc:91] Elapsed time: 2.603 [minutes]
Image Undistortion
Before proceeding to dense reconstruction, the images must be undistorted to remove any camera lens distortions.
This step prepares the images for dense reconstruction by undistorting them and saving them inside the dense/ directory.
mkdir $DATASET_PATH/dense
colmap image_undistorter \
    --image_path $DATASET_PATH/images \
    --input_path $DATASET_PATH/sparse/0 \
    --output_path $DATASET_PATH/dense \
    --output_type COLMAP \
    --max_image_size 2000
In the above command:
--image_path: Path to the original images.--input_path: Path to the sparse reconstruction output.--output_path: Directory where the undistorted images will be stored.--output_type COLMAP: Specifies that the output format should be compatible with COLMAP.--max_image_size 2000: This option sets the maximum size (in pixels) for the largest dimension (either width or height) of the images during the undistortion process.
You should observe the following output:
OutputI20241007 10:56:45.911012 118982 misc.cc:44]
==============================================================================
Reading reconstruction
==============================================================================
I20241007 10:56:46.049121 118982 image.cc:347] => Reconstruction with 128 images and 84534 points
I20241007 10:56:46.049175 118982 misc.cc:44]
==============================================================================
Image undistortion
==============================================================================
I20241007 10:56:48.766614 118982 undistortion.cc:214] Undistorting image [59/128]
I20241007 10:56:48.768337 118982 undistortion.cc:214] Undistorting image [60/128]
I20241007 10:56:48.856706 118982 undistortion.cc:214] Undistorting image [61/128]
I20241007 10:56:49.596917 118982 undistortion.cc:214] Undistorting image [62/128]
I20241007 10:56:49.597055 118982 undistortion.cc:214] Undistorting image [63/128]
I20241007 10:56:49.597066 118982 undistortion.cc:214] Undistorting image [64/128]
I20241007 10:56:49.597074 118982 undistortion.cc:214] Undistorting image [65/128]
I20241007 10:56:49.597185 118982 undistortion.cc:214] Undistorting image [66/128]
I20241007 10:56:49.600149 118982 undistortion.cc:214] Undistorting image [67/128]
I20241007 10:56:49.601222 118982 undistortion.cc:214] Undistorting image [68/128]
I20241007 10:56:49.605536 118982 undistortion.cc:214] Undistorting image [69/128]
I20241007 10:56:49.609879 118982 undistortion.cc:214] Undistorting image [70/128]
I20241007 10:56:49.612232 118982 undistortion.cc:214] Undistorting image [71/128]
I20241007 10:56:49.612267 118982 undistortion.cc:214] Undistorting image [72/128]
I20241007 10:56:49.612289 118982 undistortion.cc:214] Undistorting image [73/128]
I20241007 10:56:49.612311 118982 undistortion.cc:214] Undistorting image [74/128]
I20241007 10:56:49.612334 118982 undistortion.cc:214] Undistorting image [75/128]
I20241007 10:56:49.612357 118982 undistortion.cc:214] Undistorting image [76/128]
I20241007 10:56:49.616092 118982 undistortion.cc:214] Undistorting image [77/128]
I20241007 10:56:49.616670 118982 undistortion.cc:214] Undistorting image [78/128]
I20241007 10:56:49.642452 118982 undistortion.cc:214] Undistorting image [79/128]
I20241007 10:56:49.644358 118982 undistortion.cc:214] Undistorting image [80/128]
I20241007 10:56:49.732167 118982 undistortion.cc:214] Undistorting image [81/128]
I20241007 10:56:50.469224 118982 undistortion.cc:214] Undistorting image [82/128]
I20241007 10:56:50.482945 118982 undistortion.cc:214] Undistorting image [83/128]
I20241007 10:56:50.482987 118982 undistortion.cc:214] Undistorting image [84/128]
I20241007 10:56:50.482996 118982 undistortion.cc:214] Undistorting image [85/128]
I20241007 10:56:50.483004 118982 undistortion.cc:214] Undistorting image [86/128]
I20241007 10:56:50.483011 118982 undistortion.cc:214] Undistorting image [87/128]
I20241007 10:56:50.483019 118982 undistortion.cc:214] Undistorting image [88/128]
I20241007 10:56:50.483026 118982 undistortion.cc:214] Undistorting image [89/128]
I20241007 10:56:50.484054 118982 undistortion.cc:214] Undistorting image [90/128]
I20241007 10:56:50.488268 118982 undistortion.cc:214] Undistorting image [91/128]
I20241007 10:56:50.493851 118982 undistortion.cc:214] Undistorting image [92/128]
I20241007 10:56:50.493881 118982 undistortion.cc:214] Undistorting image [93/128]
I20241007 10:56:50.493891 118982 undistortion.cc:214] Undistorting image [94/128]
I20241007 10:56:50.493899 118982 undistortion.cc:214] Undistorting image [95/128]
I20241007 10:56:50.493903 118982 undistortion.cc:214] Undistorting image [96/128]
I20241007 10:56:50.499060 118982 undistortion.cc:214] Undistorting image [97/128]
I20241007 10:56:50.499075 118982 undistortion.cc:214] Undistorting image [98/128]
I20241007 10:56:50.519201 118982 undistortion.cc:214] Undistorting image [99/128]
I20241007 10:56:50.520592 118982 undistortion.cc:214] Undistorting image [100/128]
I20241007 10:56:50.607587 118982 undistortion.cc:214] Undistorting image [101/128]
I20241007 10:56:51.344902 118982 undistortion.cc:214] Undistorting image [102/128]
I20241007 10:56:51.352843 118982 undistortion.cc:214] Undistorting image [103/128]
I20241007 10:56:51.358783 118982 undistortion.cc:214] Undistorting image [104/128]
I20241007 10:56:51.358808 118982 undistortion.cc:214] Undistorting image [105/128]
I20241007 10:56:51.361234 118982 undistortion.cc:214] Undistorting image [106/128]
I20241007 10:56:51.361248 118982 undistortion.cc:214] Undistorting image [107/128]
I20241007 10:56:51.361255 118982 undistortion.cc:214] Undistorting image [108/128]
I20241007 10:56:51.382604 118982 undistortion.cc:214] Undistorting image [109/128]
I20241007 10:56:51.382679 118982 undistortion.cc:214] Undistorting image [110/128]
I20241007 10:56:51.382704 118982 undistortion.cc:214] Undistorting image [111/128]
I20241007 10:56:51.382725 118982 undistortion.cc:214] Undistorting image [112/128]
I20241007 10:56:51.385625 118982 undistortion.cc:214] Undistorting image [113/128]
I20241007 10:56:51.385653 118982 undistortion.cc:214] Undistorting image [114/128]
I20241007 10:56:51.385674 118982 undistortion.cc:214] Undistorting image [115/128]
I20241007 10:56:51.385700 118982 undistortion.cc:214] Undistorting image [116/128]
I20241007 10:56:51.385722 118982 undistortion.cc:214] Undistorting image [117/128]
I20241007 10:56:51.385749 118982 undistortion.cc:214] Undistorting image [118/128]
I20241007 10:56:51.408337 118982 undistortion.cc:214] Undistorting image [119/128]
I20241007 10:56:51.408371 118982 undistortion.cc:214] Undistorting image [120/128]
I20241007 10:56:51.488456 118982 undistortion.cc:214] Undistorting image [128/128]
I20241007 10:56:52.245260 118982 undistortion.cc:227] Writing reconstruction...
I20241007 10:56:52.518358 118982 undistortion.cc:232] Writing configuration...
I20241007 10:56:52.518687 118982 undistortion.cc:236] Writing scripts...
I20241007 10:56:52.518774 118982 timer.cc:91] Elapsed time: 0.108 [minutes]
Dense Reconstruction
Next, we perform dense reconstruction, which generates a dense 3D point cloud from the images.
The below command computes a dense point cloud using the PatchMatch Stereo algorithm.
colmap patch_match_stereo \
    --workspace_path $DATASET_PATH/dense \
    --workspace_format COLMAP \
    --PatchMatchStereo.geom_consistency true
You should observe the following output:
Output==============================================================================
Processing view 128 / 128 for P1180347.JPG
==============================================================================
I20241007 12:22:59.582113 119102 patch_match.cc:490] Reading inputs...
I20241007 12:23:00.053587 119102 misc.cc:51]
PatchMatch::Problem
-------------------
I20241007 12:23:00.053635 119102 patch_match.cc:82] ref_image_idx: 0
I20241007 12:23:00.053645 119102 patch_match.cc:84] src_image_idxs:
I20241007 12:23:00.053653 119102 patch_match.cc:87] 53
I20241007 12:23:00.053660 119102 patch_match.cc:87] 125
I20241007 12:23:00.053666 119102 patch_match.cc:87] 54
I20241007 12:23:00.053673 119102 patch_match.cc:87] 30
I20241007 12:23:00.053681 119102 patch_match.cc:87] 59
I20241007 12:23:00.053689 119102 patch_match.cc:87] 56
I20241007 12:23:00.053695 119102 patch_match.cc:87] 27
I20241007 12:23:00.053704 119102 patch_match.cc:87] 122
I20241007 12:23:00.053714 119102 patch_match.cc:87] 51
I20241007 12:23:00.053722 119102 patch_match.cc:87] 123
I20241007 12:23:00.053730 119102 patch_match.cc:87] 52
I20241007 12:23:00.053736 119102 patch_match.cc:87] 57
I20241007 12:23:00.053745 119102 patch_match.cc:87] 28
I20241007 12:23:00.053751 119102 patch_match.cc:87] 127
I20241007 12:23:00.053766 119102 patch_match.cc:87] 124
I20241007 12:23:00.053774 119102 patch_match.cc:87] 126
I20241007 12:23:00.053782 119102 patch_match.cc:87] 26
I20241007 12:23:00.053789 119102 patch_match.cc:87] 55
I20241007 12:23:00.053797 119102 patch_match.cc:87] 58
I20241007 12:23:00.053803 119102 patch_match.cc:89] 29
I20241007 12:23:00.053813 119102 misc.cc:51]
PatchMatchOptions
-----------------
I20241007 12:23:00.053828 119102 patch_match.cc:54] max_image_size: -1
I20241007 12:23:00.053836 119102 patch_match.cc:55] gpu_index: 0
I20241007 12:23:00.053844 119102 patch_match.cc:56] depth_min: 0.69764
I20241007 12:23:00.053859 119102 patch_match.cc:57] depth_max: 2.41436
I20241007 12:23:00.053867 119102 patch_match.cc:58] window_radius: 5
I20241007 12:23:00.053875 119102 patch_match.cc:59] window_step: 1
I20241007 12:23:00.053882 119102 patch_match.cc:60] sigma_spatial: 5
I20241007 12:23:00.053892 119102 patch_match.cc:61] sigma_color: 0.2
I20241007 12:23:00.053900 119102 patch_match.cc:62] num_samples: 15
I20241007 12:23:00.053910 119102 patch_match.cc:63] ncc_sigma: 0.6
I20241007 12:23:00.053921 119102 patch_match.cc:64] min_triangulation_angle: 1
I20241007 12:23:00.053929 119102 patch_match.cc:65] incident_angle_sigma: 0.9
I20241007 12:23:00.053937 119102 patch_match.cc:66] num_iterations: 5
I20241007 12:23:00.053946 119102 patch_match.cc:67] geom_consistency: 1
I20241007 12:23:00.053956 119102 patch_match.cc:68] geom_consistency_regularizer: 0.3
I20241007 12:23:00.053964 119102 patch_match.cc:69] geom_consistency_max_cost: 3
I20241007 12:23:00.053975 119102 patch_match.cc:70] filter: 1
I20241007 12:23:00.053985 119102 patch_match.cc:71] filter_min_ncc: 0.1
I20241007 12:23:00.053993 119102 patch_match.cc:72] filter_min_triangulation_angle: 3
I20241007 12:23:00.054003 119102 patch_match.cc:73] filter_min_num_consistent: 2
I20241007 12:23:00.054011 119102 patch_match.cc:74] filter_geom_consistency_max_cost: 1
I20241007 12:23:00.054020 119102 patch_match.cc:75] write_consistency_graph: 0
I20241007 12:23:00.054028 119102 patch_match.cc:76] allow_missing_files: 0
I20241007 12:23:00.054037 119102 misc.cc:51]
PatchMatch::Run
---------------
I20241007 12:23:00.376771 119102 cudacc.cc:51] Initialization: 0.1175s
I20241007 12:23:01.043998 119102 cudacc.cc:51]  Sweep 1: 0.6672s
I20241007 12:23:01.944828 119102 cudacc.cc:51]  Sweep 2: 0.9008s
I20241007 12:23:02.594894 119102 cudacc.cc:51]  Sweep 3: 0.6500s
I20241007 12:23:03.478672 119102 cudacc.cc:51]  Sweep 4: 0.8837s
I20241007 12:23:03.478729 119102 cudacc.cc:51] Iteration 1: 3.1019s
I20241007 12:23:04.118643 119102 cudacc.cc:51]  Sweep 1: 0.6399s
I20241007 12:23:04.971732 119102 cudacc.cc:51]  Sweep 2: 0.8530s
I20241007 12:23:05.600572 119102 cudacc.cc:51]  Sweep 3: 0.6288s
I20241007 12:23:06.439204 119102 cudacc.cc:51]  Sweep 4: 0.8386s
I20241007 12:23:06.439258 119102 cudacc.cc:51] Iteration 2: 2.9605s
I20241007 12:23:07.050969 119102 cudacc.cc:51]  Sweep 1: 0.6117s
I20241007 12:23:07.862507 119102 cudacc.cc:51]  Sweep 2: 0.8115s
I20241007 12:23:08.464685 119102 cudacc.cc:51]  Sweep 3: 0.6021s
I20241007 12:23:09.266883 119102 cudacc.cc:51]  Sweep 4: 0.8021s
I20241007 12:23:09.266938 119102 cudacc.cc:51] Iteration 3: 2.8277s
I20241007 12:23:09.861644 119102 cudacc.cc:51]  Sweep 1: 0.5947s
I20241007 12:23:10.642392 119102 cudacc.cc:51]  Sweep 2: 0.7807s
I20241007 12:23:11.225575 119102 cudacc.cc:51]  Sweep 3: 0.5831s
I20241007 12:23:11.996281 119102 cudacc.cc:51]  Sweep 4: 0.7707s
I20241007 12:23:11.996337 119102 cudacc.cc:51] Iteration 4: 2.7294s
I20241007 12:23:12.577554 119102 cudacc.cc:51]  Sweep 1: 0.5812s
I20241007 12:23:13.330368 119102 cudacc.cc:51]  Sweep 2: 0.7528s
I20241007 12:23:13.900084 119102 cudacc.cc:51]  Sweep 3: 0.5697s
I20241007 12:23:14.721855 119102 cudacc.cc:51]  Sweep 4: 0.8217s
I20241007 12:23:14.721902 119102 cudacc.cc:51] Iteration 5: 2.7256s
I20241007 12:23:14.721928 119102 cudacc.cc:51] Total: 14.4629s
I20241007 12:23:14.721940 119102 patch_match.cc:533]
Writing geometric output for P1180347.JPG
I20241007 12:23:14.981747 119097 timer.cc:91] Elapsed time: 33.683 [minutes]
Note: This step will take some time to complete, as computing a dense point cloud of every 128 images is computationally intensive.
In the above command:
--workspace_path: Path to the undistorted images and sparse reconstruction.--workspace_format COLMAP: Specifies the workspace format for dense reconstruction.--PatchMatchStereo.geom_consistency true: It enables geometric consistency checking during the dense reconstruction process. It enforces multi-view consistency by verifying that the computed depth maps are consistent when viewed from different perspectives.
Stereo Fusion (Mesh Generation)
Finally, you will generate a 3D mesh from the dense point cloud using stereo fusion.
colmap stereo_fusion \
    --workspace_path $DATASET_PATH/dense \
    --workspace_format COLMAP \
    --input_type geometric \
    --output_path $DATASET_PATH/dense/fused.ply
You should observe the following output:
OutputStereoFusion::Options
---------------------
I20241007 12:45:03.678233 120227 fusion.cc:90] mask_path:
I20241007 12:45:03.678241 120227 fusion.cc:91] max_image_size: -1
I20241007 12:45:03.678244 120227 fusion.cc:92] min_num_pixels: 5
I20241007 12:45:03.678247 120227 fusion.cc:93] max_num_pixels: 10000
I20241007 12:45:03.678251 120227 fusion.cc:94] max_traversal_depth: 100
I20241007 12:45:03.678253 120227 fusion.cc:95] max_reproj_error: 2
I20241007 12:45:03.678261 120227 fusion.cc:96] max_depth_error: 0.01
I20241007 12:45:03.678265 120227 fusion.cc:97] max_normal_error: 10
I20241007 12:45:03.678268 120227 fusion.cc:98] check_num_images: 50
I20241007 12:45:03.678272 120227 fusion.cc:99] use_cache: 0
I20241007 12:45:03.678274 120227 fusion.cc:100] cache_size: 32
I20241007 12:45:03.678278 120227 fusion.cc:103] bbox_min: -3.40282e+38 -3.40282e+38 -3.40282e+38
I20241007 12:45:03.678285 120227 fusion.cc:104] bbox_max: 3.40282e+38 3.40282e+38 3.40282e+38
I20241007 12:45:03.678292 120227 fusion.cc:154] Reading workspace...
I20241007 12:45:03.832470 120227 workspace.cc:98] Loading workspace data with 20 threads...
I20241007 12:45:05.393256 120227 timer.cc:91] Elapsed time: 0.026 [minutes]
I20241007 12:45:05.393828 120227 fusion.cc:189] Reading configuration...
I20241007 12:45:05.792424 120227 fusion.cc:257] Starting fusion with 20 threads
I20241007 12:45:05.793843 120227 fusion.cc:293] Fusing image [1/128] with index 0
I20241007 12:45:07.120609 120227 fusion.cc:320]  in 1.327s (423138 points)
I20241007 12:45:57.349324 120227 fusion.cc:320]  in 0.178s (5715133 points)
I20241007 12:45:57.353614 120227 fusion.cc:293] Fusing image [127/128] with index 68
I20241007 12:45:57.518211 120227 fusion.cc:320]  in 0.165s (5715134 points)
I20241007 12:45:57.522936 120227 fusion.cc:293] Fusing image [128/128] with index 96
I20241007 12:45:57.734925 120227 fusion.cc:320]  in 0.212s (5715134 points)
I20241007 12:45:58.217330 120227 fusion.cc:347] Number of fused points: 5715134
I20241007 12:45:58.217367 120227 timer.cc:91] Elapsed time: 0.909 [minutes]
I20241007 12:45:58.767601 120227 mvs.cc:203] Writing output: /root/datasets/south-building/dense/fused.ply
In the above command:
--workspace_path: Path to the dense reconstruction results.--workspace_format COLMAP: Specifies the format of the workspace.--output_path: Path to save the final.plyfile containing the fused 3D mesh.
The final 3D model will be saved as fused.ply in the /root/datasets/south-building/dense directory.
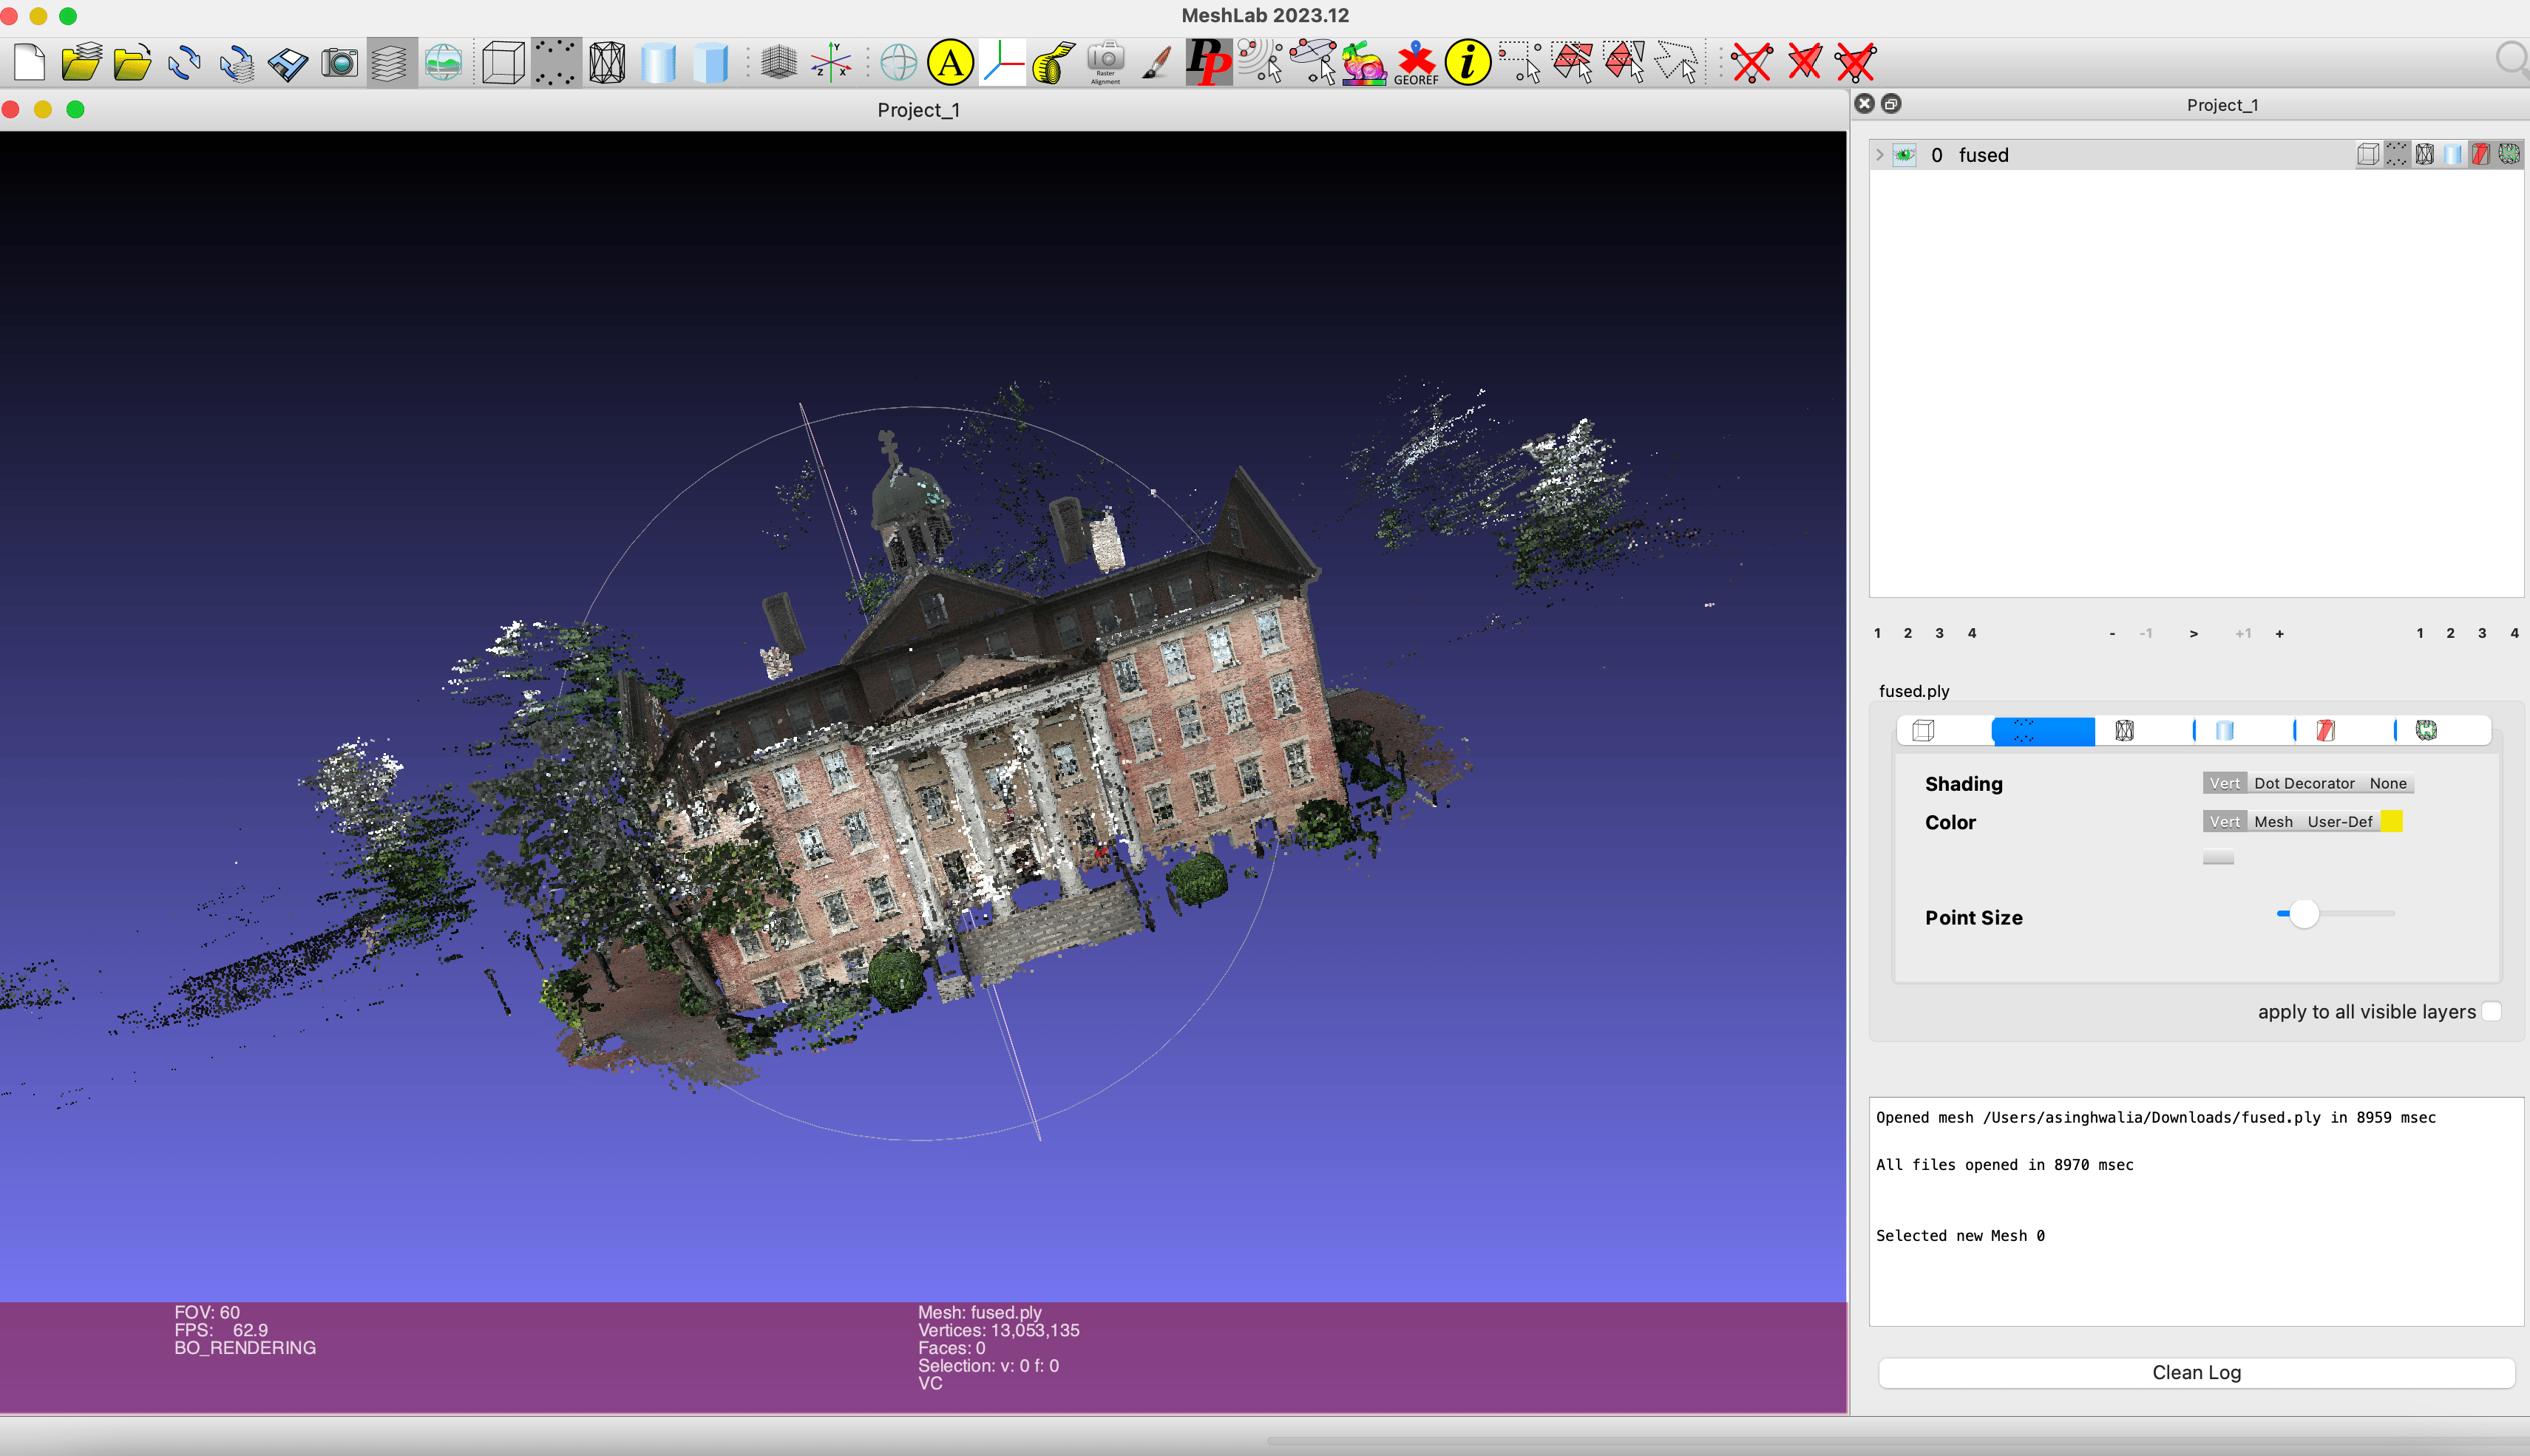
Step 6 - Visualize the Results
Once the process is complete, you can visualize the 3D model using a 3D viewer such as MeshLab or CloudCompare. You can download the fused.ply file to your local machine using scp:
scp root@your_droplet_ip:/root/datasets/south-building/dense/fused.ply /path/to/local/machine
Open the .ply file in MeshLab or CloudCompare to view the 3D model.
Conclusion
In this tutorial, you learned how to use COLMAP to create a photogrammetry pipeline for the South Building dataset. This includes feature extraction, image matching, sparse and dense reconstruction, and mesh generation using COLMAP’s CLI.
Running the photogrammetry pipeline on a GPU Droplet accelerates tasks like dense reconstruction and stereo fusion, reducing processing time and improving efficiency. This is valuable for industries such as architecture, archaeology, gaming, surveying, and real estate, as it allows for quick and accurate 3D model creation from 2D images.
Thanks for learning with the DigitalOcean Community. Check out our offerings for compute, storage, networking, and managed databases.
About the author
Anish is a Sr Technical Content Strategist and Team Lead at DigitalOcean with 7+ years of experience as an DevOps SRE at Nutanix and Cloud consultant at AMEX, and technical writing at DOCN, and shipping deep infra and AI inference tutorials that help developers deploy production‑ready applications on DigitalOcean.
Still looking for an answer?
This textbox defaults to using Markdown to format your answer.
You can type !ref in this text area to quickly search our full set of tutorials, documentation & marketplace offerings and insert the link!
 This work is licensed under a Creative Commons Attribution-NonCommercial- ShareAlike 4.0 International License.
Become a contributor for community
Get paid to write technical tutorials and select a tech-focused charity to receive a matching donation.

DigitalOcean Documentation
Full documentation for every DigitalOcean product.

Resources for startups and AI-native businesses
The Wave has everything you need to know about building a business, from raising funding to marketing your product.
The developer cloud
Scale up as you grow — whether you're running one virtual machine or ten thousand.

Start building today
From GPU-powered inference and Kubernetes to managed databases and storage, get everything you need to build, scale, and deploy intelligent applications.
