By Zeb Girouard and Bradley Kouchi

はじめに
React Navigationは、React Nativeアプリケーションでルーティングとナビゲーションを行うための一般的なライブラリです。
このライブラリは、複数の画面間をナビゲートしたり、画面間でデータを共有する際の問題を解決するのに役立ちます。
このチュートリアルを終了すると、基本的なソーシャルネットワークが作成されます。ユーザーのつながりの数が表示され、さらに友達とつながる方法が提供されます。このサンプルアプリケーションを使用して、react-navigationを使用したモバイルアプリケーション画面のナビゲート方法を説明します。
前提条件
このチュートリアルを完了する には 、 次のものが必要です。
- Node.jsのローカル開発環境。How to Install Node.js and Create a Local Development Environment(Node.js をインストールしてローカル開発環境を作成する方法)に従って実行します。
- 新しいReact Nativeプロジェクトを作成し、iOSまたはAndroidシミュレータを使用するための環境設定に精通していると、役立つ場合があります。
**注:**過去にreact-navigationを使用したことがある場合は、いくつかの違いが生じる可能性があります。3.xからの移行および4.xからの移行に関するガイドについては、ドキュメントを参照してください。
このチュートリアルは、Node v14.7.0、npm v6.14.7、react v16.13.1、react-native v0.63.2、@react-navigation/native v5.7.3、および@react-navigation/stack v5.9.0で検証済です。
ステップ 1 — 新しいReact Nativeアプリを作成する
まず、端末に次のコマンドを入力して、新しいReact Nativeアプリを作成します。
- npx react-native init MySocialNetwork --version 0.63.2
次に、新しいディレクトリに移動します。
- cd MySocialNetwork
次に、iOS用のアプリケーションを起動します。
- npm run ios
または、Android用は次のとおりです。
- npm run android
**注:**問題が発生した場合は、React Native CLIのトラブルシューティングの問題を参照してください。
これにより、スケルトンプロジェクトが作成されます。今のところ、ソーシャルネットワークのようには見えません。これを修正しましょう。
App.jsを開きます。
- nano App.js
App.jsの内容を次のコードに置き換えて、ウェルカムメッセージを表示します。
import React from 'react';
import { StyleSheet, Text, View } from 'react-native';

class App extends React.Component {
  render() {
    return (
      <View style={styles.container}>
        <Text>Welcome to MySocialNetwork!</Text>
      </View>
    );
  }
}

const styles = StyleSheet.create({
  container: {
    flex: 1,
    backgroundColor: '#fff',
    alignItems: 'center',
    justifyContent: 'center',
  },
});

export default App;
ファイルを保存します。これで、アプリケーションを実行すると、**Welcome to MySocialNetwork!**というメッセージがシミュレータに表示されます。
次のステップでは、アプリケーションにさらに画面を追加します。
ステップ 2 — HomeScreenとFriendsScreenを作成する
HomeScreenとFriendsScreenを作成する現在、ウェルカムメッセージを表示する単一の画面があります。このステップでは、アプリケーション用にHomeScreenとFriendsScreenの、2つの画面を作成します。
HomeScreen
アプリには、HomeScreenが必要です。HomeScreenには、すでにネットワークにいる友達の数が表示されます。
App.jsからコードを取得し、HomeScreen.jsという新しいファイルに追加します。
- cp App.js HomeScreen.js
HomeScreen.jsを開きます。
- nano HomeScreen.js
Appの代わりにHomeScreenを使用するように、HomeScreen.jsを変更します。
import React from 'react';
import { StyleSheet, Text, View } from 'react-native';

class HomeScreen extends React.Component {
  render() {
    return (
      <View style={styles.container}>
        <Text>You have (undefined) friends.</Text>
      </View>
    );
  }
}

// ...

export default HomeScreen;
このコードを実行すると、**You have (undefined) friends.**というプレースホルダーメッセージが生成されます。後で値を指定します。
FriendsScreen
アプリには、FriendsScreenも必要です。FriendsScreenでは、新しい友達を追加することができます。
App.jsからコードを取得し、FriendsScreen.jsという新しいファイルに追加します。
- cp App.js FriendsScreen.js
FriendsScreen.jsを開きます。
- nano FriendsScreen.js
Appの代わりにFriendsScreenを使用するように、FriendsScreen.jsを変更します。
import React from 'react';
import { StyleSheet, Text, View } from 'react-native';

class FriendsScreen extends React.Component {
  render() {
    return (
      <View style={styles.container}>
        <Text>Add friends here!</Text>
      </View>
    );
  }
}

// ...

export default FriendsScreen;
このコードを実行すると、**Add friends here!**というメッセージが生成されます。
この時点で、HomeScreenとFriendsScreenが作成されています。ただし、これらの画面間をナビゲートする方法はありません。次のステップで、この機能を構築します。
ステップ 3 — React NavigationでStackNavigatorを使用する
StackNavigatorを使用する画面間をナビゲートするには、StackNavigatorを使用します。StackNavigatorは、コールスタックとまったく同じように機能します。ナビゲートする各画面は、スタックの一番上にプッシュされます。戻るボタンを押すたびに、その画面はスタックの一番上からポップされます。
まず、@react-navigation/nativeをインストールします。
- npm install @react-navigation/native@5.7.3
次に、@react-navigation/stackとピア依存関係をインストールします。
- npm install @react-navigation/stack@5.9.0 @react-native-community/masked-view@0.1.10 react-native-screens@2.10.1 react-native-safe-area-context@3.1.4 react-native-gesture-handler@1.7.0
**注:**iOS用に開発している場合は、iosディレクトリにナビゲートしてpodインストールの実行が必要な場合があります。
次に、App.jsに再度アクセスします。
- nano App.js
App.jsにNavigationContainerとcreateStackNavigatorを追加します。
import 'react-native-gesture-handler';
import React from 'react';
import { StyleSheet } from 'react-native';
import { NavigationContainer } from '@react-navigation/native';
import { createStackNavigator } from '@react-navigation/stack';

const Stack = createStackNavigator();
次に、renderの内容を置き換えます。
// ...

class App extends React.Component {
  render() {
    return (
      <NavigationContainer>
        <Stack.Navigator>
        </Stack.Navigator>
      </NavigationContainer>
    );
  }
}

// ...
<Stack.Navigator>の内部にネストさせて、HomeScreenを追加します。
import 'react-native-gesture-handler';
import React from 'react';
import { StyleSheet } from 'react-native';
import { NavigationContainer } from '@react-navigation/native';
import { createStackNavigator } from '@react-navigation/stack';
import HomeScreen from './HomeScreen';

const Stack = createStackNavigator();

class App extends React.Component {
  render() {
    return (
      <NavigationContainer>
        <Stack.Navigator>
          <Stack.Screen
            name="Home"
            component={HomeScreen}
          />
        </Stack.Navigator>
      </NavigationContainer>
    );
  }
}

// ...
このコードは、HomeScreenという1つの画面のみを使用して、ナビゲーター用の非常に小さなスタックを作成します。
<Stack.Navigator>の内部にネストさせて、FriendsScreenを追加します。
import 'react-native-gesture-handler';
import React from 'react';
import { StyleSheet } from 'react-native';
import { NavigationContainer } from '@react-navigation/native';
import { createStackNavigator } from '@react-navigation/stack';
import HomeScreen from './HomeScreen';
import FriendsScreen from './FriendsScreen';

const Stack = createStackNavigator();

class App extends React.Component {
  render() {
    return (
      <NavigationContainer>
        <Stack.Navigator>
          <Stack.Screen
            name="Home"
            component={HomeScreen}
          />
          <Stack.Screen
            name="Friends"
            component={FriendsScreen}
          />
        </Stack.Navigator>
      </NavigationContainer>
    );
  }
}

// ...
このコードは、FriendsScreenをナビゲーターに追加します。
**注:**これは、以前のバージョンのReact NavigationでcreateStackNavigatorが使用されていた方法とは異なります。
これで、ナビゲーターは2つの画面を認識します。
HomeScreenとFriendsScreenにボタンを追加する
最後に、2つの画面間を移動するボタンを追加します。
HomeScreen.jsに、次のコードを追加します。
import React from 'react';
import { StyleSheet, Text, View, Button } from 'react-native';

class HomeScreen extends React.Component {
  render() {
    return (
      <View style={styles.container}>
        <Text>You have (undefined) friends.</Text>

        <Button
          title="Add some friends"
          onPress={() =>
            this.props.navigation.navigate('Friends')
          }
        />
      </View>
    );
  }
}

// ...
FriendsScreen.jsに、次のコードを追加します。
import React from 'react';
import { StyleSheet, Text, View, Button } from 'react-native';

class FriendsScreen extends React.Component {
  render() {
    return (
      <View style={styles.container}>
        <Text>Add friends here!</Text>

        <Button
          title="Back to home"
          onPress={() =>
            this.props.navigation.navigate('Home')
          }
        />
      </View>
    );
  }
}

// ...
this.props.navigationについて説明しましょう。StackNavigatorに画面が含まれている限り、navigationオブジェクトから多くの便利なプロパティが自動的に引き継がれます。この場合、navigateを使用して別のページに移動しました。
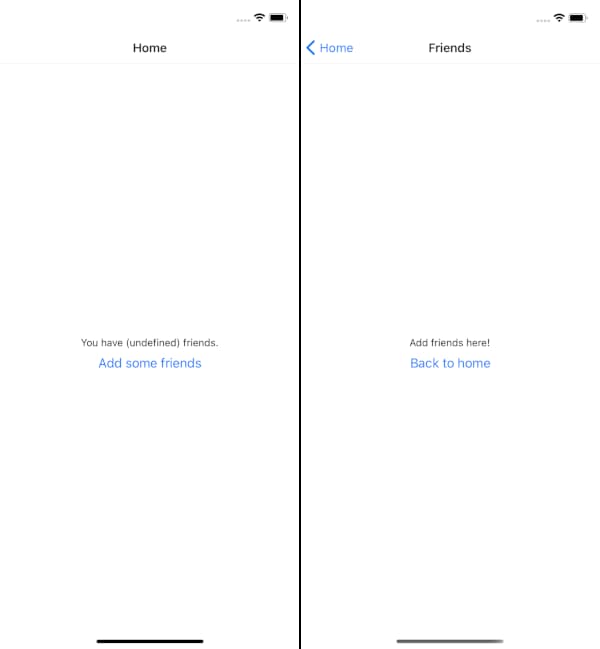
ここでシミュレータを開くと、HomeScreenとFriendsScreenの間をナビゲートできます。
ステップ 4 — コンテキストを使用して他の画面にデータを渡す
コンテキストを使用して他の画面にデータを渡すこのステップでは、Alice、Bob、Sammy、という友達になる可能性のある人達の配列と、現在の友達の空の配列を作成します。また、ユーザーが、友達になる可能性のある人達を、現在の友達に追加する機能も作成します。
App.jsを開きます。
- nano App.js
コンポーネントのstateに、possibleFriendsとcurrentFriendsを追加します。
// ...

class App extends React.Component {
  constructor(props) {
    super(props)
    this.state = {
      possibleFriends: [
        'Alice',
        'Bob',
        'Sammy',
      ],
      currentFriends: [],
    }
  }

  // ...
}

// ...
次に、関数を追加して、友達になる可能性のある人達を、現在の友達リストに移動します。
// ...

class App extends React.Component {
  constructor(props) {
    super(props)
    this.state = {
      possibleFriends: [
        'Alice',
        'Bob',
        'Sammy',
      ],
      currentFriends: [],
    }
  }

  addFriend = (index) => {
    const {
      currentFriends,
      possibleFriends,
    } = this.state

    // Pull friend out of possibleFriends
    const addedFriend = possibleFriends.splice(index, 1)

    // And put friend in currentFriends
    currentFriends.push(addedFriend)

    // Finally, update the app state
    this.setState({
      currentFriends,
      possibleFriends,
    })
  }

  // ...
}

// ...
この時点で、友達を追加する機能の構築が完了しました。
アプリにFriendsContextを追加する
これでApp.jsに友達を追加できるようになりましたが、FriendsScreen.jsに友達を追加して、HomeScreen.jsに表示させたいと思うでしょう。このプロジェクトはReactで構築されているため 、コンテキストを使用してこの機能を画面に挿入できます。
**注:**以前のバージョンのReact Navigationでは、screenPropsを使用して画面間でデータを共有することができました。現在のバージョンのReact Navigationでは、React Contextを使用して画面間でデータを共有することをお勧めします。
循環参照を回避するために、新しいFriendsContextファイルが必要になります。
- nano FriendsContext.js
FriendsContextをエクスポートします。
import React from 'react';

export const FriendsContext = React.createContext();
App.jsを開きます。
- nano App.js
FriendsContextを追加します。
import 'react-native-gesture-handler';
import React from 'react';
import { StyleSheet } from 'react-native';
import { NavigationContainer } from '@react-navigation/native';
import { createStackNavigator } from '@react-navigation/stack';
import { FriendsContext } from './FriendsContext';
import Home from './Home';
import Friends from './Friends';

const Stack = createStackNavigator();

class App extends React.Component {
  // ...

  render() {
    return (
      <FriendsContext.Provider>
        <NavigationContainer>
          <Stack.Navigator>
            <Stack.Screen
              name="Home"
              component={Home}
            />
            <Stack.Screen
              name="Friends"
              component={Friends}
            />
          </Stack.Navigator>
        </NavigationContainer>
      </FriendsContext.Provider>
    );
  }
}

// ...
このコードはFriendsContextを新しいContextオブジェクトとして設定し、Context.ProviderコンポーネントにNavigationContainerをラップして、コンポーネントツリー内のすべての子がコンテキストの変更をサブスクライブできるようにします。
ViewまたはTextを使用しなくなったため、react-nativeからこれらのインポートを削除できます。
利用者がデータにアクセスできるようにするには、valueを指定する必要があります。
// ...

class App extends React.Component {
  // ...

  render() {
    return (
      <FriendsContext.Provider
        value={
          {
            currentFriends: this.state.currentFriends,
            possibleFriends: this.state.possibleFriends,
            addFriend: this.addFriend
          }
        }
      >
        <NavigationContainer>
          <Stack.Navigator>
            <Stack.Screen
              name="Home"
              component={Home}
            />
            <Stack.Screen
              name="Friends"
              component={Friends}
            />
          </Stack.Navigator>
        </NavigationContainer>
      </FriendsContext.Provider>
    );
  }
}

// ...
これにより、HomeScreenとFriendsScreenは、currentFriendsとpossibleFriendsのコンテキスト変更を参照できます。
これで、画面のコンテキストを参照する作業に取り組むことができます。
HomeScreenにFriendsContextを追加する
このステップでは、現在の友達の数を表示するようにアプリケーションを設定します。
HomeScreen.jsを開きます。
- nano HomeScreen.js
そして、FriendsContextを追加します。
import React from 'react';
import { StyleSheet, Text, View, Button } from 'react-native';
import { FriendsContext } from './FriendsContext';

class HomeScreen extends React.Component {
  // ...
}
HomeScreen.contextType = FriendsContext;

// ...
このコードは、Class.contextTypeを設定します。これで、画面のコンテキストにアクセスできます。
たとえば、HomeScreen画面にcurrentFriendsの数を表示してみましょう。
import React from 'react';
import { StyleSheet, Text, View, Button } from 'react-native';
import { FriendsContext } from './FriendsContext';

class Home extends React.Component {
  render() {
    return (
      <View style={styles.container}>
        <Text>You have { this.context.currentFriends.length } friends!</Text>

        <Button
          title="Add some friends"
          onPress={() =>
            this.props.navigation.navigate('Friends')
          }
        />
      </View>
    );
  }
}
HomeScreen.contextType = FriendsContext;

// ...
シミュレータで再度アプリを開いてHomeScreenを表示すると、**You have 0 friends!**というメッセージが表示されます。
FriendsScreenにFriendsContextを追加する
このステップでは、友達になる可能性のある人達を表示し、現在の友達に追加するためのボタンを指定するようにアプリケーションを設定します。
次に、FriendsScreen .jsを開きます。
- nano FriendsScreen.js
そして、FriendsContextを追加します。
import React from 'react';
import { StyleSheet, Text, View, Button } from 'react-native';
import { FriendsContext } from './FriendsContext';

class FriendsScreen extends React.Component {
  // ...
}
FriendsScreen.contextType = FriendsContext;

// ...
このコードは、Class.contextTypeを設定します。
ここで、FriendsScreen.jsに友達を追加するボタンを作成します。
import React from 'react';
import { StyleSheet, Text, View, Button } from 'react-native';
import { FriendsContext } from './FriendsContext';

class Friends extends React.Component {
  render() {
    return (
      <View style={styles.container}>
        <Text>Add friends here!</Text>

        {
          this.context.possibleFriends.map((friend, index) => (
            <Button
              key={ friend }
              title={ `Add ${ friend }` }
              onPress={() =>
                this.context.addFriend(index)
              }
            />
          ))
        }

        <Button
          title="Back to home"
          onPress={() =>
            this.props.navigation.navigate('Home')
          }
        />
      </View>
    );
  }
}
FriendsScreen.contextType = FriendsContext;

// ...
シミュレータで再度アプリを開いてFriendsScreenを表示すると、追加する友達のリストが表示されます。
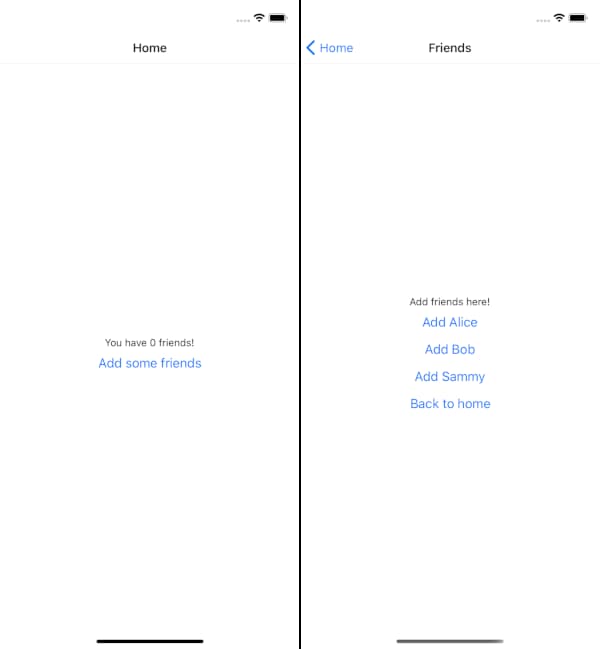
FriendsScreenにアクセスし、ボタンをクリックして友達を追加するとpossibleFriendsが減少しているリストが表示されます。HomeScreenにアクセスすると、友達の数が増加していることが分かります。
これで、画面間をナビゲートして、データの共有ができるようになりました。
まとめ
このチュートリアルでは、複数の画面を使用してサンプルのReact Nativeアプリケーションを作成しました。React Navigationを使用して、画面間をナビゲートする方法を設計しました。React Contextを使用して、画面間でデータを共有する方法を構築しました。
このチュートリアルの完全なソースコードは、GitHubで入手可能です。
React Navigationの詳細については、ドキュメントを参照してください。
React Navigationが、ルーティングとナビゲーションの唯一の解決策ではありません。React Native Navigation、React Native Router Flux、React Router Nativeもあります。
React について詳しく知りたい場合は、How To Code in React.js(React.js のコーディング方法) シリーズを参照するか、演習とプログラミングプロジェクトの React トピックページをご覧ください。
Thanks for learning with the DigitalOcean Community. Check out our offerings for compute, storage, networking, and managed databases.
About the author(s)
Former Technical Editor at DigitalOcean. Expertise in areas including Vue.js, CSS, React, and more.
Still looking for an answer?
This textbox defaults to using Markdown to format your answer.
You can type !ref in this text area to quickly search our full set of tutorials, documentation & marketplace offerings and insert the link!
 This work is licensed under a Creative Commons Attribution-NonCommercial- ShareAlike 4.0 International License.
Become a contributor for community
Get paid to write technical tutorials and select a tech-focused charity to receive a matching donation.

DigitalOcean Documentation
Full documentation for every DigitalOcean product.

Resources for startups and AI-native businesses
The Wave has everything you need to know about building a business, from raising funding to marketing your product.
The developer cloud
Scale up as you grow — whether you're running one virtual machine or ten thousand.

Start building today
From GPU-powered inference and Kubernetes to managed databases and storage, get everything you need to build, scale, and deploy intelligent applications.
