By Zeb Girouard and Bradley Kouchi

Introduction
React Navigation is a popular library for routing and navigation in a React Native application.
This library helps solve the problem of navigating between multiple screens and sharing data between them.
At the end of this tutorial, you will have a rudimentary social network. It will display the number of connections a user has and provide a way to connect with additional friends. You will use this sample application to explore how to navigate mobile application screens using react-navigation.
Prerequisites
To complete this tutorial, you’ll need:
- A local development environment for Node.js. Follow How to Install Node.js and Create a Local Development Environment.
- Familiarity with setting up your environment to create a new React Native project and use the iOS or Android simulators may be beneficial.
Note: If you worked with react-navigation in the past, you might encounter some differences. You can consult the documentation for guides on migrating from 3.x and migrating from 4.x.
This tutorial was verified with Node v14.7.0, npm v6.14.7, react v16.13.1, react-native v0.63.2, @react-navigation/native v5.7.3, and @react-navigation/stack v5.9.0.
Step 1 — Creating a New React Native App
First, create a new React Native app by entering the following command in your terminal:
- npx react-native init MySocialNetwork --version 0.63.2
Then, navigate to the new directory:
- cd MySocialNetwork
And start the application for iOS:
- npm run ios
Alternatively, for Android:
- npm run android
Note: If you experience any problems, you may need to consult troubleshooting issues for React Native CLI.
This will create a skeleton project for you. It doesn’t look much like a social network right now. Let’s fix that.
Open up App.js:
- nano App.js
Replace the contents of App.js with the following code to display a welcome message:
import React from 'react';
import { StyleSheet, Text, View } from 'react-native';

class App extends React.Component {
  render() {
    return (
      <View style={styles.container}>
        <Text>Welcome to MySocialNetwork!</Text>
      </View>
    );
  }
}

const styles = StyleSheet.create({
  container: {
    flex: 1,
    backgroundColor: '#fff',
    alignItems: 'center',
    justifyContent: 'center',
  },
});

export default App;
Save the file. Now, when you run the application, a Welcome to MySocialNetwork! message will appear in your simulator.
In the next step, you will add more screens to your application.
Step 2 — Creating a HomeScreen and FriendsScreen
HomeScreen and FriendsScreenCurrently, you have a single screen displaying a welcome message. In this step, you will create the two screens for your application: HomeScreen and FriendsScreen.
HomeScreen
Your app will need a HomeScreen. The HomeScreen will display the number of friends already in your network.
Take the code from App.js and add it to a new file called HomeScreen.js:
- cp App.js HomeScreen.js
Open HomeScreen.js:
- nano HomeScreen.js
Modify HomeScreen.js to use HomeScreen instead of App:
import React from 'react';
import { StyleSheet, Text, View } from 'react-native';

class HomeScreen extends React.Component {
  render() {
    return (
      <View style={styles.container}>
        <Text>You have (undefined) friends.</Text>
      </View>
    );
  }
}

// ...

export default HomeScreen;
This code will produce a You have (undefined) friends. placeholder message. You will provide a value later.
FriendsScreen
Your app will also need a FriendsScreen. On the FriendsScreen you will be able to add new friends.
Take the code from App.js and add it to a new file called FriendsScreen.js:
- cp App.js FriendsScreen.js
Open FriendsScreen.js:
- nano FriendsScreen.js
Modify FriendsScreen.js to use FriendsScreen instead of App:
import React from 'react';
import { StyleSheet, Text, View } from 'react-native';

class FriendsScreen extends React.Component {
  render() {
    return (
      <View style={styles.container}>
        <Text>Add friends here!</Text>
      </View>
    );
  }
}

// ...

export default FriendsScreen;
This code will produce an Add friends here! message.
At this point, you have a HomeScreen and FriendsScreen. However, there is no way to navigate between them. You will build this functionality in the next step.
Step 3 — Using StackNavigator with React Navigation
StackNavigator with React NavigationFor navigating between screens, you will use a StackNavigator. A StackNavigator works exactly like a call stack. Each screen you navigate to is pushed to the top of the stack. Each time you hit the back button, the screens pop off the top of the stack.
First, install @react-navigation/native:
- npm install @react-navigation/native@5.7.3
Then, install @react-navigation/stack and its peer dependencies:
- npm install @react-navigation/stack@5.9.0 @react-native-community/masked-view@0.1.10 react-native-screens@2.10.1 react-native-safe-area-context@3.1.4 react-native-gesture-handler@1.7.0
Note: If you are developing for iOS, you may need to navigate to the ios directory and run pod install.
Next, revisit App.js:
- nano App.js
Add NavigationContainer and createStackNavigator to App.js:
import 'react-native-gesture-handler';
import React from 'react';
import { StyleSheet } from 'react-native';
import { NavigationContainer } from '@react-navigation/native';
import { createStackNavigator } from '@react-navigation/stack';

const Stack = createStackNavigator();
Then, replace the contents of render:
// ...

class App extends React.Component {
  render() {
    return (
      <NavigationContainer>
        <Stack.Navigator>
        </Stack.Navigator>
      </NavigationContainer>
    );
  }
}

// ...
Nested inside <Stack.Navigator>, add the HomeScreen:
import 'react-native-gesture-handler';
import React from 'react';
import { StyleSheet } from 'react-native';
import { NavigationContainer } from '@react-navigation/native';
import { createStackNavigator } from '@react-navigation/stack';
import HomeScreen from './HomeScreen';

const Stack = createStackNavigator();

class App extends React.Component {
  render() {
    return (
      <NavigationContainer>
        <Stack.Navigator>
          <Stack.Screen
            name="Home"
            component={HomeScreen}
          />
        </Stack.Navigator>
      </NavigationContainer>
    );
  }
}

// ...
This code creates a very small stack for your navigator with only one screen: HomeScreen.
Nested inside <Stack.Navigator>, add the FriendsScreen:
import 'react-native-gesture-handler';
import React from 'react';
import { StyleSheet } from 'react-native';
import { NavigationContainer } from '@react-navigation/native';
import { createStackNavigator } from '@react-navigation/stack';
import HomeScreen from './HomeScreen';
import FriendsScreen from './FriendsScreen';

const Stack = createStackNavigator();

class App extends React.Component {
  render() {
    return (
      <NavigationContainer>
        <Stack.Navigator>
          <Stack.Screen
            name="Home"
            component={HomeScreen}
          />
          <Stack.Screen
            name="Friends"
            component={FriendsScreen}
          />
        </Stack.Navigator>
      </NavigationContainer>
    );
  }
}

// ...
This code adds the FriendsScreen to the navigator.
Note: This differs from how createStackNavigator was used in previous versions of React Navigation.
Now, the navigator is aware of your two screens.
Adding Buttons to HomeScreen and FriendsScreen
Finally, add buttons to take you between your two screens.
In HomeScreen.js, add the following code:
import React from 'react';
import { StyleSheet, Text, View, Button } from 'react-native';

class HomeScreen extends React.Component {
  render() {
    return (
      <View style={styles.container}>
        <Text>You have (undefined) friends.</Text>

        <Button
          title="Add some friends"
          onPress={() =>
            this.props.navigation.navigate('Friends')
          }
        />
      </View>
    );
  }
}

// ...
In FriendsScreen.js, add the following code:
import React from 'react';
import { StyleSheet, Text, View, Button } from 'react-native';

class FriendsScreen extends React.Component {
  render() {
    return (
      <View style={styles.container}>
        <Text>Add friends here!</Text>

        <Button
          title="Back to home"
          onPress={() =>
            this.props.navigation.navigate('Home')
          }
        />
      </View>
    );
  }
}

// ...
Let’s talk about this.props.navigation. As long as your screen is included in the StackNavigator, it automatically inherits many useful props from the navigation object. In this case, you used navigate to move to a different page.
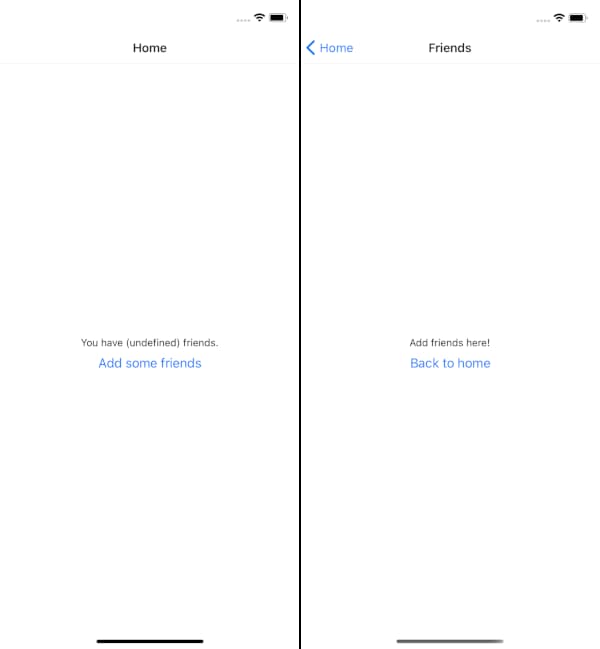
If you open your simulator now, you can navigate between the HomeScreen and FriendsScreen.
Step 4 — Using Context to Pass Data to Other Screens
Context to Pass Data to Other ScreensIn this step, you will create an array of possible friends — Alice, Bob, and Sammy — and an empty array of current friends. You will also create functionality for the user to add possible friends to their current friends.
Open App.js:
- nano App.js
Add possibleFriends and currentFriends to the component’s state:
// ...

class App extends React.Component {
  constructor(props) {
    super(props)
    this.state = {
      possibleFriends: [
        'Alice',
        'Bob',
        'Sammy',
      ],
      currentFriends: [],
    }
  }

  // ...
}

// ...
Next, add a function to move a possible friend into the list of current friends:
// ...

class App extends React.Component {
  constructor(props) {
    super(props)
    this.state = {
      possibleFriends: [
        'Alice',
        'Bob',
        'Sammy',
      ],
      currentFriends: [],
    }
  }

  addFriend = (index) => {
    const {
      currentFriends,
      possibleFriends,
    } = this.state

    // Pull friend out of possibleFriends
    const addedFriend = possibleFriends.splice(index, 1)

    // And put friend in currentFriends
    currentFriends.push(addedFriend)

    // Finally, update the app state
    this.setState({
      currentFriends,
      possibleFriends,
    })
  }

  // ...
}

// ...
At this point, you have finished building the functionality to add friends.
Adding FriendsContext to App
Now you can add friends in App.js, but you will want to add them to FriendsScreen.js and have them display in HomeScreen.js. Since this project is built with React, you can inject this functionality into your screens with context.
Note: In previous versions of React Navigation, it was possible to use screenProps to share data between screens. In the current version of React Navigation, it is recommended to use React Context to share data between screens.
To avoid a circular reference, you will want a new FriendsContext file:
- nano FriendsContext.js
Export FriendsContext:
import React from 'react';

export const FriendsContext = React.createContext();
Open App.js:
- nano App.js
Add the FriendsContext:
import 'react-native-gesture-handler';
import React from 'react';
import { StyleSheet } from 'react-native';
import { NavigationContainer } from '@react-navigation/native';
import { createStackNavigator } from '@react-navigation/stack';
import { FriendsContext } from './FriendsContext';
import Home from './Home';
import Friends from './Friends';

const Stack = createStackNavigator();

class App extends React.Component {
  // ...

  render() {
    return (
      <FriendsContext.Provider>
        <NavigationContainer>
          <Stack.Navigator>
            <Stack.Screen
              name="Home"
              component={Home}
            />
            <Stack.Screen
              name="Friends"
              component={Friends}
            />
          </Stack.Navigator>
        </NavigationContainer>
      </FriendsContext.Provider>
    );
  }
}

// ...
This code establishes FriendsContext as a new Context object and wraps the NavigationContainer in a Context.Provider component so any children in the component tree can subscribe to context changes.
Since you are no longer using View or Text, it is possible to remove those imports from react-native.
You will need to provide a value to make data accessible by consumers:
// ...

class App extends React.Component {
  // ...

  render() {
    return (
      <FriendsContext.Provider
        value={
          {
            currentFriends: this.state.currentFriends,
            possibleFriends: this.state.possibleFriends,
            addFriend: this.addFriend
          }
        }
      >
        <NavigationContainer>
          <Stack.Navigator>
            <Stack.Screen
              name="Home"
              component={Home}
            />
            <Stack.Screen
              name="Friends"
              component={Friends}
            />
          </Stack.Navigator>
        </NavigationContainer>
      </FriendsContext.Provider>
    );
  }
}

// ...
This will allow the HomeScreen and FriendsScreen to reference any context changes to currentFriends and possibleFriends.
Now you can work on referencing the context in your screens.
Adding FriendsContext to HomeScreen
In this step, you will set up the application to display the current friend count.
Open HomeScreen.js:
- nano HomeScreen.js
And add the FriendsContext:
import React from 'react';
import { StyleSheet, Text, View, Button } from 'react-native';
import { FriendsContext } from './FriendsContext';

class HomeScreen extends React.Component {
  // ...
}
HomeScreen.contextType = FriendsContext;

// ...
This code establishes a Class.contextType. You can now access context in your screens.
For instance, let’s make your HomeScreen display how many currentFriends you have:
import React from 'react';
import { StyleSheet, Text, View, Button } from 'react-native';
import { FriendsContext } from './FriendsContext';

class Home extends React.Component {
  render() {
    return (
      <View style={styles.container}>
        <Text>You have { this.context.currentFriends.length } friends!</Text>

        <Button
          title="Add some friends"
          onPress={() =>
            this.props.navigation.navigate('Friends')
          }
        />
      </View>
    );
  }
}
HomeScreen.contextType = FriendsContext;

// ...
If you open your app up again in the simulator and view the HomeScreen, you will see the message: You have 0 friends!.
Adding FriendsContext to FriendsScreen
In this step, you will set up the application to display the possible friends and provide buttons for adding them to the current friends.
Next, open FriendsScreen.js:
- nano FriendsScreen.js
And add the FriendsContext:
import React from 'react';
import { StyleSheet, Text, View, Button } from 'react-native';
import { FriendsContext } from './FriendsContext';

class FriendsScreen extends React.Component {
  // ...
}
FriendsScreen.contextType = FriendsContext;

// ...
This code establishes a Class.contextType.
Now, create a button to add friends in FriendsScreen.js:
import React from 'react';
import { StyleSheet, Text, View, Button } from 'react-native';
import { FriendsContext } from './FriendsContext';

class Friends extends React.Component {
  render() {
    return (
      <View style={styles.container}>
        <Text>Add friends here!</Text>

        {
          this.context.possibleFriends.map((friend, index) => (
            <Button
              key={ friend }
              title={ `Add ${ friend }` }
              onPress={() =>
                this.context.addFriend(index)
              }
            />
          ))
        }

        <Button
          title="Back to home"
          onPress={() =>
            this.props.navigation.navigate('Home')
          }
        />
      </View>
    );
  }
}
FriendsScreen.contextType = FriendsContext;

// ...
If you open your app up again in the simulator and view the FriendsScreen, you will see a list of friends to add.
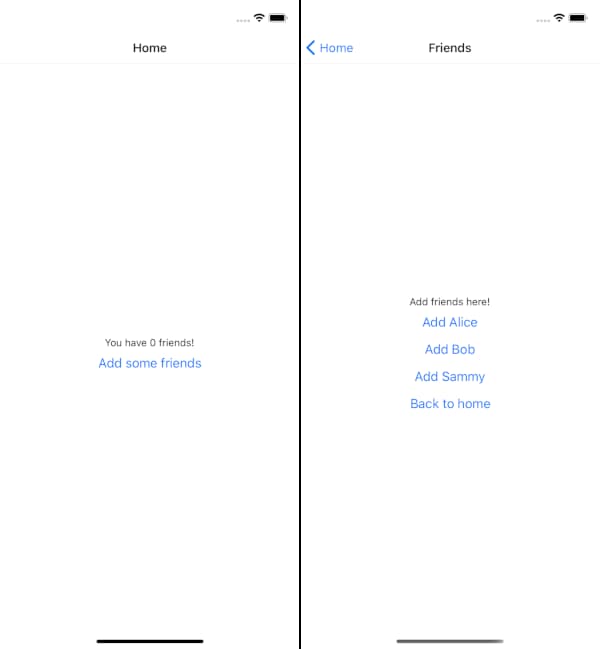
If you visit the FriendsScreen and click on the button to add friends, you will see the list of possibleFriends decrease. If you visit the HomeScreen, you will see the number of friends increase.
You can now navigate between screens and share data between them.
Conclusion
In this tutorial, you have created a sample React Native application with multiple screens. Using React Navigation, you devised a way to navigate between screens. Using React Context, you developed a way to share data between screens.
The complete source code for this tutorial is available on GitHub.
If you want to dig deeper into React Navigation, check out their documentation.
React Navigation is not the only routing and navigation solution. There is also React Native Navigation, React Native Router Flux, and React Router Native.
If you’d like to learn more about React, take a look at our How To Code in React.js series, or check out our React topic page for exercises and programming projects.
Thanks for learning with the DigitalOcean Community. Check out our offerings for compute, storage, networking, and managed databases.
About the author(s)
Former Technical Editor at DigitalOcean. Expertise in areas including Vue.js, CSS, React, and more.
Still looking for an answer?
This textbox defaults to using Markdown to format your answer.
You can type !ref in this text area to quickly search our full set of tutorials, documentation & marketplace offerings and insert the link!
In Passing Logic to Other Screens app.js code sample is not completed and you miss the most important part of the code.
 This work is licensed under a Creative Commons Attribution-NonCommercial- ShareAlike 4.0 International License.
Become a contributor for community
Get paid to write technical tutorials and select a tech-focused charity to receive a matching donation.

DigitalOcean Documentation
Full documentation for every DigitalOcean product.

Resources for startups and AI-native businesses
The Wave has everything you need to know about building a business, from raising funding to marketing your product.
The developer cloud
Scale up as you grow — whether you're running one virtual machine or ten thousand.

Start building today
From GPU-powered inference and Kubernetes to managed databases and storage, get everything you need to build, scale, and deploy intelligent applications.
