By Zeb Girouard and Bradley Kouchi

Introduction
Redux is a predictable state container for JavaScript apps. If Redux is new to you, we recommend looking at our introduction to Redux.
In this article, you will learn how to persist user data using Redux in a React Native application. The application is a mock social network with a HomeScreen displaying a count of connected friends, and a FriendsScreen displaying a list of potential friends to add. You will use Redux to share the state between the two screens.
Prerequisites
To complete this tutorial, you’ll need:
- A local development environment for Node.js. Follow How to Install Node.js and Create a Local Development Environment.
- Familiarity with setting up your environment to create a new React Native project and using the iOS or Android simulators may be beneficial.
This tutorial builds on the topics covered in How To Use Routing with React Navigation in React Native. It is recommended that you read this tutorial for more context around how the project works, but is not required.
This tutorial was verified with Node v14.7.0, npm v6.14.7, react v16.13.1, react-native v0.63.2, @react-navigation/native v5.7.3, @react-navigation/stack v5.9.0, redux v4.0.5, and react-redux v7.2.1.
Step 1 — Setting Up the Project and Installing Redux
ReduxThis tutorial will use a modified version of the code in How To Use Routing with React Navigation in React Native. To get started, clone MySocialNetwork:
- git clone https://github.com/do-community/MySocialNetwork.git
Then, navigate to the project directory:
- cd MySocialNetwork
Change the git branch to redux-starter:
- git checkout redux-starter
Next, install the project dependencies:
- npm install
Then, install the redux and react-redux libraries in the project:
- npm install redux@4.0.5 react-redux@7.2.1
Your project is now set up and your dependencies have been installed.
Step 2 — Creating a Reducer
To connect Redux to your app, you will need to create a reducer and an action.
First, you will create a friends reducer. A reducer is a pure function that takes the previous state and an action as arguments and returns a new state. The reducer is instrumental in keeping the current state of friends updated throughout the app as it changes.
Create the FriendsReducer.js file at the root level of the project:
- nano FriendsReducer.js
Add the following code:
import { combineReducers } from 'redux';

const INITIAL_STATE = {
  current: [],
  possible: [
    'Alice',
    'Bob',
    'Sammy',
  ],
};

const friendsReducer = (state = INITIAL_STATE, action) => {
  switch (action.type) {
    default:
      return state
  }
};

export default combineReducers({
  friends: friendsReducer
});
In this file, you create an INITIAL_STATE variable with possible friends to add to your social network. Then you are exporting friendsReducer as a property called friends.
With your reducer in place, you will need a way to add friends.
Step 3 — Creating an Action
Actions are JavaScript objects that represent payloads of information that send data from your application to the Redux store.
Actions have a type and an optional payload. In this tutorial, the type will be ADD_FRIEND, and the payload will be the array index of a friend you are adding into the current friends array.
Create the FriendsActions.js file at the root level of the project:
- nano FriendsActions.js
Add addFriend:
export const addFriend = friendsIndex => (
  {
    type: 'ADD_FRIEND',
    payload: friendsIndex,
  }
);
When a user clicks on a friend, this code will retrieve the friendsIndex from the friends.possible array. Now you will need to use that index to move this friend into the friends.current array.
Revisit FriendsReducer.js:
- nano FriendsReducer.js
Add ADD_FRIEND:
// ...

const friendsReducer = (state = INITIAL_STATE, action) => {
  switch (action.type) {
    case 'ADD_FRIEND':
      // Pulls current and possible out of previous state
      // We do not want to alter state directly in case
      // another action is altering it at the same time
      const {
        current,
        possible,
      } = state;

      // Pull friend out of friends.possible
      // Note that action.payload === friendIndex
      const addedFriend = possible.splice(action.payload, 1);

      // And put friend in friends.current
      current.push(addedFriend);

      // Finally, update the redux state
      const newState = { current, possible };

      return newState;

    default:
      return state
  }
};

// ...
This code pulls the current and possible friends out of the previous state. Array.splice() retrieves the friend from the array of possible friends. Array.push adds the friend to array of current friends. After ther changes are made, the state is updated.
Now, you have a reducer and an action. You will need to apply the reducer to your app.
Step 4 — Adding the Reducer to the App
You will need to provide the friends state of your app using React Redux’s Provider component.
Open App.js:
- nano App.js
Import Provider, createStore, and friendsReducer:
import 'react-native-gesture-handler';
import React from 'react';
import { Provider } from 'react-redux';
import { createStore } from 'redux';
import { StyleSheet } from 'react-native';
import { NavigationContainer } from '@react-navigation/native';
import { createStackNavigator } from '@react-navigation/stack';
import friendsReducer from './FriendsReducer';
import HomeScreen from './HomeScreen';
import FriendsScreen from './FriendsScreen';

// ...
Add and replace the highlighted code with createStore and Provider:
// ...

const store = createStore(friendsReducer);

class App extends React.Component {
  // ...

  render() {
    return (
      <Provider store={store}>
        <NavigationContainer>
          <Stack.Navigator>
            <Stack.Screen
              name="Home"
              component={HomeScreen}
            />
            <Stack.Screen
              name="Friends"
              component={FriendsScreen}
            />
          </Stack.Navigator>
        </NavigationContainer>
      </Provider>
    )
  }
}
Now friends are accessible within your app, but you still need to add them to the HomeScreen and FriendsScreen.
Step 5 — Adding Redux to the Screens
In this step, you will make friends accessible to your screens with the mapStateToProps function. This function maps the state from the FriendsReducer to the props in the two screens.
Let’s start with HomeScreen.js. Open the HomeScreen.js file:
- nano HomeScreen.js
Add and replace the highlighted lines of code in HomeScreen.js:
import React from 'react';
import { connect } from 'react-redux';
import { StyleSheet, Text, View, Button } from 'react-native';

class HomeScreen extends React.Component {
  render() {
    return (
      <View style={styles.container}>
        <Text>You have (undefined) friends.</Text>

        <Button
          title="Add some friends"
          onPress={() =>
            this.props.navigation.navigate('Friends')
          }
        />
      </View>
    );
  }
}

const styles = StyleSheet.create({
  container: {
    flex: 1,
    backgroundColor: '#fff',
    alignItems: 'center',
    justifyContent: 'center',
  },
});

const mapStateToProps = (state) => {
  const { friends } = state
  return { friends }
};

export default connect(mapStateToProps)(HomeScreen);
This code change adds react-redux and makes friends available to the HomeScreen.
Next, add values for current friends (this.props.friends.current):
class HomeScreen extends React.Component {
  render() {
    return (
      <View style={styles.container}>
        <Text>You have { this.props.friends.current.length } friends.</Text>

        <Button
          title="Add some friends"
          onPress={() =>
            this.props.navigation.navigate('Friends')
          }
        />
      </View>
    );
  }
}
Your HomeScreen will now display the number of current friends. You can now move on to the FriendsScreen.
Open FriendsScreen.js:
- nano FriendsScreen.js
Add and replace the highlighted lines of code in FriendsScreen.js:
import React from 'react';
import { connect } from 'react-redux';
import { StyleSheet, Text, View, Button } from 'react-native';

class FriendsScreen extends React.Component {
  render() {
    return (
      <View style={styles.container}>
        <Text>Add friends here!</Text>

        <Button
          title="Back to home"
          onPress={() =>
            this.props.navigation.navigate('Home')
          }
        />
      </View>
    );
  }
}

const styles = StyleSheet.create({
  container: {
    flex: 1,
    backgroundColor: '#fff',
    alignItems: 'center',
    justifyContent: 'center',
  },
});

const mapStateToProps = (state) => {
  const { friends } = state
  return { friends }
};

export default connect(mapStateToProps)(FriendsScreen);
This code change adds react-redux and makes friends available to the FriendsScreen.
Add values for possible friends (props.friends.possible):
class FriendsScreen extends React.Component {
  render() {
    return (
      <View style={styles.container}>
        <Text>Add friends here!</Text>

        {
          this.props.friends.possible.map((friend, index) => (
            <Button
              key={ friend }
              title={ `Add ${ friend }` }
            />
          ))
        }

        <Button
          title="Back to home"
          onPress={() =>
            this.props.navigation.navigate('Home')
          }
        />
      </View>
    );
  }
}
Now when you navigate to the FriendsScreen, you will see all possible friends from the reducer.
Finally, add the new Redux addFriend action to FriendsScreen.js:
import React from 'react';
import { connect } from 'react-redux';
import { bindActionCreators } from 'redux';
import { StyleSheet, Text, View, Button } from 'react-native';
import { addFriend } from './FriendsActions';

class FriendsScreen extends React.Component {
  render() {
    return (
      <View style={styles.container}>
        <Text>Add friends here!</Text>

        {
          this.props.friends.possible.map((friend, index) => (
            <Button
              key={ friend }
              title={ `Add ${ friend }` }
              onPress={() =>
                this.props.addFriend(index)
              }
            />
          ))
        }

        <Button
          title="Back to home"
          onPress={() =>
            this.props.navigation.navigate('Home')
          }
        />
      </View>
    );
  }
}

// ...

const mapDispatchToProps = dispatch => (
  bindActionCreators({
    addFriend,
  }, dispatch)
);

export default connect(mapStateToProps, mapDispatchToProps)(FriendsScreen);
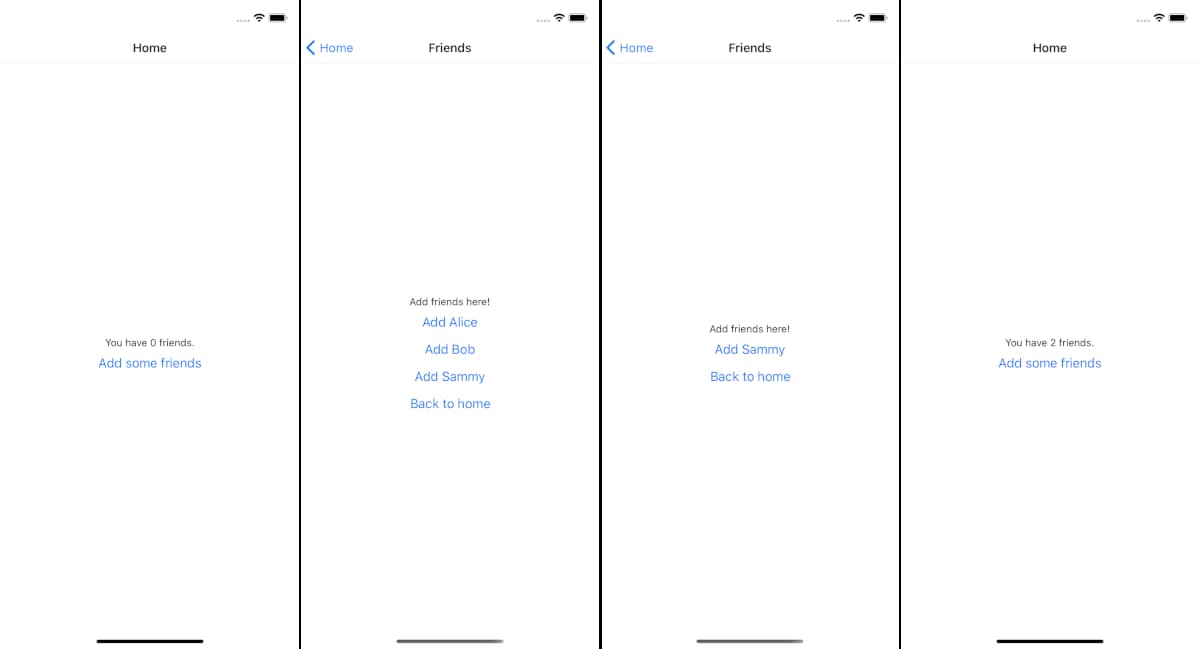
Let’s add two friends to the social network and navigate back to HomeScreen to see how many current friends the user has:
With that, you have moved all the logic from App.js into Redux, which makes your app much more flexible, especially as you add more pages and features like authentication and database integration.
Before we wrap up, let’s clean up the code.
Step 6 — Cleaning Up
Now that you are using Redux, you will no longer need the props you were passing from App.js.
You can take cleaning up a step further by storing your action types in a separate file.
You are using the string 'ADD_FRIEND' in two places: in the action and the friends reducer. This is dangerous, because if you change the string in one place and not the other you could break your application. As your app grows, it makes sense to keep all these action types in a file called types.js.
Create the types.js file in the root level:
- nano types.js
Add the following code:
export const ADD_FRIEND = 'ADD_FRIEND';
Then, revisit FriendsActions.js to use the new ADD_FRIEND:
nano FriendsActions.js
Change the quoted 'ADD_FRIEND' to the variable ADD_FRIEND in your action:
import { ADD_FRIEND } from './types';

export const addFriend = friendsIndex => (
  {
    type: ADD_FRIEND,
    payload: friendsIndex,
  }
);
Then, revisit FriendsReducer.js to also use the new ADD_FRIEND:
- nano FriendsReducer.js
Change the quoted 'ADD_FRIEND' to the variable ADD_FRIEND in your reducer:
import { combineReducers } from 'redux';
import { ADD_FRIEND } from './types';

// ...

const friendsReducer = (state = INITIAL_STATE, action) => {
  switch (action.type) {
    case ADD_FRIEND:
      // ...

    default:
      return state;
  }
};
This makes the application less fragile. When developing your applications, you should be aware of opportunites for consolidating code and avoiding repeating yourself.
Conclusion
In this tutorial, you covered redux, reducers, actions, and scalable data management.
There are a lot more things you can do with Redux, from keeping data in sync with a database, to authentication and keeping track of user permissions.
The complete source code for this tutorial is available on GitHub.
If you’d like to learn more about React, take a look at our How To Code in React.js series, or check out our React topic page for exercises and programming projects.
Thanks for learning with the DigitalOcean Community. Check out our offerings for compute, storage, networking, and managed databases.
About the author(s)
Former Technical Editor at DigitalOcean. Expertise in areas including Vue.js, CSS, React, and more.
Still looking for an answer?
This textbox defaults to using Markdown to format your answer.
You can type !ref in this text area to quickly search our full set of tutorials, documentation & marketplace offerings and insert the link!
Please give me a video tutorial for this it will more transparent and easy to learn as your convenience.
Thanks
What a great job! This is the best tutorial I have ever seen regarding Redux. I have finally understood how all the pieces are connected and how it all works. Thank you so much for this.
 This work is licensed under a Creative Commons Attribution-NonCommercial- ShareAlike 4.0 International License.
Become a contributor for community
Get paid to write technical tutorials and select a tech-focused charity to receive a matching donation.

DigitalOcean Documentation
Full documentation for every DigitalOcean product.

Resources for startups and AI-native businesses
The Wave has everything you need to know about building a business, from raising funding to marketing your product.
The developer cloud
Scale up as you grow — whether you're running one virtual machine or ten thousand.

Start building today
From GPU-powered inference and Kubernetes to managed databases and storage, get everything you need to build, scale, and deploy intelligent applications.
