
Introduction
When setting up a new FreeBSD server, there are a number of optional steps you can take to get your server into a more production-friendly state. In this guide, we will cover some of the most common examples.
We will go over how to set up a simple, easy-to-configure firewall that denies most traffic. We will also make sure that your server’s time zone accurately reflects its location. We will set up NTP polling in order to keep the server’s time accurate and, finally, we will demonstrate how to add some extra swap space to your server.
Before you get started with this guide, you should log in and configure your shell environment the way you’d like it. You can find out how to do this by following this guide.
Note: As of July 1, 2022, DigitalOcean no longer supports the creation of new FreeBSD Droplets through the Control Panel or API. However, you can still spin up FreeBSD Droplets using a custom image. Learn how to import a custom image to DigitalOcean by following our product documentation.
How To Configure a Simple IPFW Firewall
The first task that we will tackle is setting up a simple firewall to secure our server.
FreeBSD actually supports and includes three separate firewalls, each with their own strengths and weaknesses. These are called pf, ipfw, and ipfilter. In this guide, we will be using ipfw because we can easily get up-and-running with a secure, stateful firewall.
Configuring the Basic Firewall
Almost all of our configuration will take place in the /etc/rc.conf file. Open that file with sudo privileges in your editor:
sudo vi /etc/rc.conf
Inside, we will have to add a number of different lines to enable and control how the ipfw firewall will function. Let’s start with the essential rules. Add these to the bottom of the file:
. . .

firewall_enable="YES"
firewall_quiet="YES"
As you may expect, the first line enables the ipfw firewall, starting it automatically at boot and allowing it to be started with the usual service commands.
The second command tells ipfw not to output anything to standard out when it performs certain actions. This might seem like a matter of preference, but it actually affects the functionality of the firewall.
Two factors combine to make this an important option. The first is that the firewall configuration script is executed in the current shell environment, not as a background task. The second is that when the ipfw command reads a configuration script without the “quiet” flag, it reads and outputs each line, in turn, to standard out. When it outputs a line, it immediately executes the associated action.
Most firewall configuration files flush the current rules at the top of the script in order to start with a clean slate. If the ipfw firewall comes across a line like this without the quiet flag, it will immediately flush all rules and revert to its default policy, which is usually to deny all connections. If you are configuring the firewall over SSH, this would drop the connection, close the current shell session, and none of the rules that follow would be processed, effectively locking you out of the server. The quiet flag basically allows the firewall to process the rules as a set instead of implementing each one individually.
After these two lines, we can begin configuring the firewall’s behavior:
. . .

firewall_type="workstation"
firewall_myservices="22 80"
firewall_allowservices="any"
firewall_logdeny="YES"
First, we select “workstation” as the type of firewall we will be configuring. This is a stateful firewall with some good default behavior. It also allows us to easily customize the services we want clients to be able to access by using the firewall_myservices and firewall_allowservices options. Finally, we configure ipfw to log any connections that are denied by the configured rules.
The firewall_myservices option should be set to a list of TCP ports or services, separated by spaces, that should be accessible on your server. You can use the ports, as we have here (we have configured port 22 for our SSH connection, and port 80 for a conventional HTTP web server). You could also use services by name. The services that FreeBSD knows by name are listed in the /etc/services file. For instance, we could change the above to something like this:
firewall_myservices="ssh http"
This would have the same results. If you use SSL on your web server, make sure to add either port 443 or the https service to this list.
The firewall_allowservices list items are the clients that should be allowed to access the provided services. The keyword “any” means that any clients can access these services. If we wanted to limit the clients that could connect to our services, we could do it here.
The firewall_logdeny option tells ipfw to log all connection attempts that are denied to a file located at /var/log/security.
All together, this portion of the /etc/rc.conf file should look like this:
. . .

firewall_enable="YES"
firewall_quiet="YES"
firewall_type="workstation"
firewall_myservices="22 80"
firewall_allowservices="any"
firewall_logdeny="YES"
Remember to adjust the firewall_myservices option to reference the services you wish to expose to clients. When you are finished, save and close the file.
Allowing UDP Connections
The ports and services listed in firewall_myservices option in the /etc/rc.conf file allow access for TCP connections. If you have services that you wish to expose that use UDP, you need to edit the /etc/rc.firewall file:
sudo vi /etc/rc.firewall
We configured our firewall to use the “workstation” firewall type, so look for a section that looks like this:
. . .

[Ww][Oo][Rr][Kk][Ss][Tt][Aa][Tt][Ii][Oo][Nn])

. . .
There is a section within this block that is dedicated to processing the firewall_allowservices and firewall_myservices values that we set. It will look like this:
for i in ${firewall_allowservices} ; do
  for j in ${firewall_myservices} ; do
    ${fwcmd} add pass tcp from $i to me $j
  done
done
After this section, you can add any services or ports that should accept UDP packets by adding lines like this:
${fwcmd} add pass udp from any to me port_num
In the above example, you can leave the “any” keyword if the connection should be allowed for all clients or change it to a specific IP address or network range. The port_num in the above should be replaced by the port number or service name you wish to allow UDP access to. For example, if you’re running a DNS server, you may wish to have a line that looks something like this:
for i in ${firewall_allowservices} ; do
  for j in ${firewall_myservices} ; do
    ${fwcmd} add pass tcp from $i to me $j
  done
done

${fwcmd} add pass udp from 192.168.2.0/24 to me 53
This will allow any client from within the 192.168.2.0/24 network range to access a DNS server operating on the standard port 53. Note that in this example you would also want to open this port up for TCP connections as that is used by DNS servers for longer replies.
Save and close the file when you are finished.
Starting the Firewall
When you are finished with your configuration, you can start the firewall by typing:
sudo service ipfw start
The firewall should come up correctly, blocking unwanted traffic while adhering to your allowed services and ports. This firewall will start automatically at every boot.
We also want to configure a limit on how many denials per IP address we will log. This will prevent our logs from filling up from a single, persistent user. You can do this in the /etc/sysctl.conf file:
sudo vi /etc/sysctl.conf
At the bottom of the file, we can limit for our logging to “5” by adding:
net.inet.ip.fw.verbose_limit=5
Save and close the file when you are finished. This will configure that setting on the next boot.
To implement this same behavior for your currently active session, we can use the sysctl command itself, like this:
sudo sysctl net.inet.ip.fw.verbose_limit=5
This should immediately implement the limit for this boot.
How To Set the Time Zone for your Server
It is a good idea to correctly set the time zone for your server. This is an important step for when we configure NTP time synchronization in the next section.
FreeBSD comes with a menu-based tool called tzsetup for configuring time zones. To set the time zone for your server, call this command with sudo privileges:
sudo tzsetup
You will see the first menu screen, which asks whether your hardware clock is set to UTC or local time:
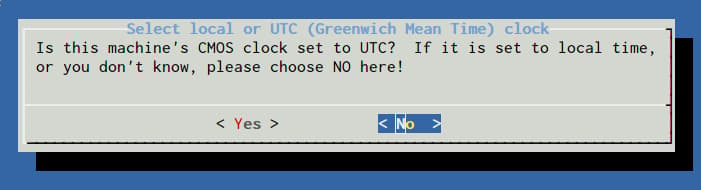
Select “No” here. Next, you will be asked to select the region of the world your server is located in:
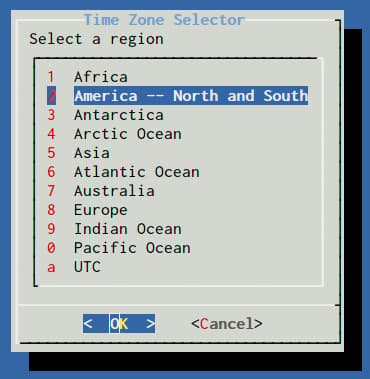
You will need to choose a sub-region or country next:
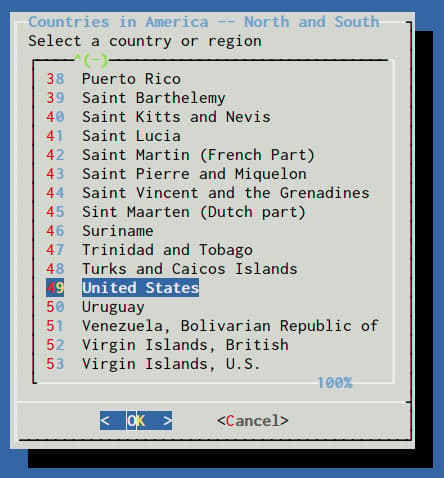
Finally, select the specific time zone that is appropriate for your server:

Confirm the time zone selection that is presented based on your choices.
At this point, your server’s time zone should match the selections you made.
How To Configure NTP to Keep Accurate Time
Now that we have the time zone configured on our server, we can set up NTP, or Network Time Protocol, on our server. This will help keep your server’s time in sync with others throughout the world. This is important for time-sensitive client-server interactions as well as accurate logging.
Again, we can enable the NTP service on our server by adjusting the /etc/rc.conf file. Open this with sudo privileges:
sudo vi /etc/rc.conf
Within this file, add the following line:
ntpd_enable="YES"
We also need to add a second line that will sync the time on our machine with the remote NTP servers at boot. This is necessary because it allows our server to exceed the normal drift limit on initialization. Our server will likely be outside of the drift limit at boot because our time zone will be applied prior to the NTP daemon starting, which will offset our system time:
ntpd_enable="YES"
ntpd_sync_on_start="YES"
If we did not have this line, our NTP daemon would fail when started due to the timezone settings that skew our system time prior in the boot process.
Save and close the file when you are finished.
You can start your ntpd service by typing:
sudo service ntpd start
This will maintain your server’s time by synchronizing with the NTP servers listed in /etc/ntp.conf.
How To Configure Extra Swap Space
You can check how much swap space your server has with the following command:
sudo swapinfo -g
It should show something like this:
Device          1G-blocks     Used    Avail Capacity
/dev/gpt/swapfs         1        0        1     0%
Some users and applications may need more swap space than this. This is easily accomplished by adding a swap file.
The first thing we need to do is to allocate a chunk of the filesystem for the file we want to use for swap. We will use the truncate command, which can quickly allocate space on the fly.
In this guide, we will put the swap file at /swapfile, but you can use any reasonable location within the filesystem. This file will provide an additional 1 Gigabyte of swap space. You can adjust this number by modifying the value given to the -s option.
sudo truncate -s 1G /swapfile
After we allocate the space, we need to lock down access to the file. Normal users should not have any access to the file:
sudo chmod 0600 /swapfile
Next, associate a pseudo-device with our file and configure it to mount at boot by typing:
sudo sh -c 'echo "md99 none swap sw,file=/swapfile,late 0 0" >> /etc/fstab'
The above command adds a line that looks like this to the /etc/fstab file:
md99 none swap sw,file=/swapfile,late 0 0
After the line is added to our /etc/fstab file, we can activate the swap file for the session by typing:
sudo swapon -aqL
We can verify that the swap file is now working by using the swapinfo command again:
sudo swapinfo -g
You should see the additional device (/dev/md99) associated with your swap file:
Device          1G-blocks     Used    Avail Capacity
/dev/gpt/swapfs         1        0        1     0%
/dev/md99               1        0        1     0%
Total                   2        0        2     0%
This swap file will be mounted automatically at each boot.
Conclusion
The steps outlined in this guide can be used to bring your FreeBSD server into a more production-ready state. By configuring basic essentials like a firewall, NTP synchronization, and appropriate swap space, your server can be used as a good base for future installations and services.
Thanks for learning with the DigitalOcean Community. Check out our offerings for compute, storage, networking, and managed databases.
Tutorial Series: Getting Started with FreeBSD
This series will show you how to get started with a FreeBSD cloud server. The first article will explain some of the differences between Linux and FreeBSD. The tutorials that follow cover the basics of FreeBSD security, maintenance, and software installation. If you are new to FreeBSD, this series will help you get up and running quickly.
Browse Series: 7 tutorials
About the author
Former Senior Technical Writer at DigitalOcean, specializing in DevOps topics across multiple Linux distributions, including Ubuntu 18.04, 20.04, 22.04, as well as Debian 10 and 11.
Still looking for an answer?
This textbox defaults to using Markdown to format your answer.
You can type !ref in this text area to quickly search our full set of tutorials, documentation & marketplace offerings and insert the link!
You might want to mention, in the the part about editing the /etc/sysctl.conf file, that any changes made to any “tunables” in that file won’t take effect until after a reboot. Alternatively, a particular tunable might be able to be set dynamically (with the sysctl command at the shell prompt). Performing both of the methods for the same tunable would both change its value on the running system and persist it across reboots. Details on how to do this are in the Handbook..
Thanks for your excellent tutorial.
Thanks for the article. I think a nice addition would be a section detailing configuring locales on FreeBSD. This is something that gave me a little bit of trouble when coming from linux.
Typing sudo sysctl net.inet.ip.fw.verbose_limit=5 actually returns an error:
sysctl: unknown oid 'net.inet.ip.fw.verbose_limit': No such file or directory
So you need to reboot for the modification to sysctl.conf to take effect. In other words, you don’t have to run that command.
If you get a disturbing error after activating ntpd in /var/log/messages like this one:
Feb 12 11:55:06 core ntpd[11441]: bind() fd 22, family AF_INET6, port 123, scope 1, addr fe80::601:3dff:fe86:6601, mcast=0 flags=0x11 fails: Can't assign requested address
Feb 12 11:55:06 core ntpd[11441]: unable to create socket on vtnet0 (2) for fe80::601:3dff:fe86:6601#123
Just add in /etc/rc.conf:
and restart or run:
ifconfig $if inet6 -ifdisabled
Any chance we could stop recommending ipfw? pf is amazing, just as simple, and touted as the best firewall in the world. Ie.:
Firewalling with OpenBSD’s PF packet filter http://home.nuug.no/~peter/pf/en/
Turning away the brutes http://home.nuug.no/~peter/pf/en/bruteforce.html
Giving spammers a hard time http://home.nuug.no/~peter/pf/en/spamd.html
PF in FreeBSD https://www.freebsd.org/doc/en/books/handbook/firewalls-pf.html
ipfw is faster. pf’s features are overkill for common use cases. OpenBSD’s pf is touted as the best firewall in the world but FreeBSD’s and OpenBSD’s implementation of pf diverged long ago. FreeBSD’s grew faster while OpenBSD’s grew more featureful. pf is a great option on FreeBSD but I would recommend ipfw to typical users.
@jellingwood I’ve been a bit careless and locked me out of my server. I’ve started the firewall without allowing UDP connections (I did just the Configuring the Basic Firewall part) and can’t connect anymore. Logging in via the VNC Console doesn’t really help as it asks for a password and I don’t have one (just an SSH key). Any way to regain access to my data? Of course I didn’t do a snapshot before…
In FreeBSD 10.2, it is much simpler to set up UDP ports in the firewall: you can just type x/udp or x/tcp in firewall_myservices, where x is a port number or service name. For ex:
firewall_myservices=“ssh http 3000/udp”
This opens ssh and http (22 and 80) over TCP, and port 3000 over UDP. If a port doesn’t have /tcp or /udp after it, it is assumed to be TCP.
Source: http://lists.freebsd.org/pipermail/svn-src-stable/2015-July/029200.html
ntpd_sync_on_start="YES"
There is no offset at boot if you specify the hardware clock is set to UTC (as it appears to be), before selecting your local timezone.
Thank you, I’m really enjoying your tutorials. So far all of them are easy to follow and well-written :)
 This work is licensed under a Creative Commons Attribution-NonCommercial- ShareAlike 4.0 International License.
Become a contributor for community
Get paid to write technical tutorials and select a tech-focused charity to receive a matching donation.

DigitalOcean Documentation
Full documentation for every DigitalOcean product.

Resources for startups and AI-native businesses
The Wave has everything you need to know about building a business, from raising funding to marketing your product.
The developer cloud
Scale up as you grow — whether you're running one virtual machine or ten thousand.

Start building today
From GPU-powered inference and Kubernetes to managed databases and storage, get everything you need to build, scale, and deploy intelligent applications.
