By Easha Abid
Technical Writer

In today’s fast-paced digital world, reducing human effort takes center stage. The quest to streamline development and deployment has become paramount wherever you look. To keep up with this pace, let’s take a closer look at what CI/CD is and how to configure it in a cloud-deployed application.
Understanding Continuous Integration and Continuous Deployment
Continuous Integration and Continuous Deployment, commonly known as CI/CD, is a common practice of automating deployment processes. CI handles integrating code changes into a shared repository to ensure code remains free of integration issues, while CD goes a step further by automating the deployment of these integrated changes to staging or production environments.
These processes ensure that any code change gets delivered to the users efficiently and reliably.
In the realm of cloud computing, where applications are hosted and scaled dynamically, the need for CI/CD is crucial. Cloud environments emphasize agility, scalability, and rapid iterations. CI/CD aligns perfectly with these principles by allowing developers to deliver continuously changing code to users while maintaining the quality and reliability expected from a cloud-based environment.
Overview of DigitalOcean’s App Platform
DigitalOcean’s App Platform is a Platform-as-a-Service (PaaS) offering that enables developers to build, deploy, and scale applications without getting into the complexities of managing infrastructure. While App Platform is majorly known for simplifying deployment processes, it can also be configured with CI/CD pipelines.
This article is a step-by-step guide on configuring CI/CD pipelines on App Platform for a seamless and worry-free deployment.
Prerequisites
Before setting up CI/CD pipeline on the App Platform, it is important to ensure that you have the following prerequisites in place:
-
DigitalOcean Account: Prior to initiating the configuration process, you need to have a valid DigitalOcean account. For a detailed walkthrough, refer to the Getting Started with DigitalOcean documentation.
-
Version Control Accounts: To access your application’s source code, you will require an account on platforms such as GitHub, GitLab, or DockerHub.
-
Snyk Account for Added Security: Creating a Snyk account for this tutorial is not a mandatory step but it is a recommended approach since Snyk will offer added security to your pipeline.
This tutorial demonstrates a Node.js application deployed on GitHub. If you intend to follow this guide step-by-step, you will additionally need:
- Node.js Installation: Verify that you have Node.js 14.x or a higher version installed on your system. Also, check your
npm --versionprior to moving forward.
Step 1: Create New Application
Note: If you already have an application in place, you can skip to the next step.
To start off, we need an application that works well and can be set up for a CI/CD pipeline on the App Platform.
If you’re new to Node.js, you can refer to this guide and learn what it is and have a basic app ready by the end. Otherwise, you can create your app in any language that you prefer.
Once you have your code in place, you need to make sure you have the following files:
-
App.js - that contains your build code.
var express = require('express'); var path = require('path'); var logger = require('morgan'); var indexRouter = require('./routes/index'); var app = express(); // view engine setup app.set('views', path.join(__dirname, 'views')); app.set('view engine', 'pug'); app.use(logger('dev')); app.use(express.json()); app.use('/', indexRouter); // error handler app.use(function(err, req, res, next) { ... }); module.exports = app; -
Test.js - that contains your test cases.
const assert = require('assert'); const request = require('supertest'); const app = require('../app'); describe('Express App', function () { it('responds to GET / with status code 200', function (done) { request(app) .get('/') .expect(200) .end(function (err, res) { if (err) return done(err); done(); }); }); }); -
Package.json - that contains all internal and external dependencies and scripts your code needs for a successful build.
{ "name": "app", "version": "0.0.0", "private": true, "scripts": { "start": "node ./bin", "test": "mocha" }, "dependencies": { // Dependencies here.. }, "devDependencies": { // Dev dependencies here.. } } -
Package-lock.json - that holds record of every dependency installed for your code.
{
"name": "app",
"version": "0.0.0",
"lockfileVersion": 3,
"requires": true,
"packages": {
    "": {
    "name": "app",
    "version": "0.0.0",
    "devDependencies": {
        // Dev dependencies here..
    }
    },
    "node_modules/xyz": {
        // Modules here..
    },
}
}
This file is automatically created when you install npm, so if you don’t see this file, try running npm install in the app’s main directory.
Tip: Before you deploy this app on GitHub or any similar platform, try running the app locally to make sure it builds successfully.
Step 2: Deploy Application on GitHub
Once you have your application in place, it’s time to deploy it on GitHub. If you are new to GitHub, this guide will help you get started with account creation.
- Login to GitHub account.
- Create a new repository and link it to the path where your application is placed.
- Commit these changes.
Step 3: Create GitHub Actions
GitHub Actions are automated workflows that you can configure in your repository to automate various tasks like building, testing, and deploying your code. Every time your code changes, GitHub Actions ensures that your repository automatically reflects those changes.
We will use GitHub actions to configure Ci/CD pipeline for our application on App Platform.
This is the most vital step in the whole process. Follow these steps to quickly set up GitHub Actions on your repository.
-
Open the repository that contains your application code and click on Actions from the navigation menu.

-
You will be redirected to a Choose a workflow page where you will find multiple sample workflows provided by GitHub. You can choose from these options according to your application or you can also write your own workflow.
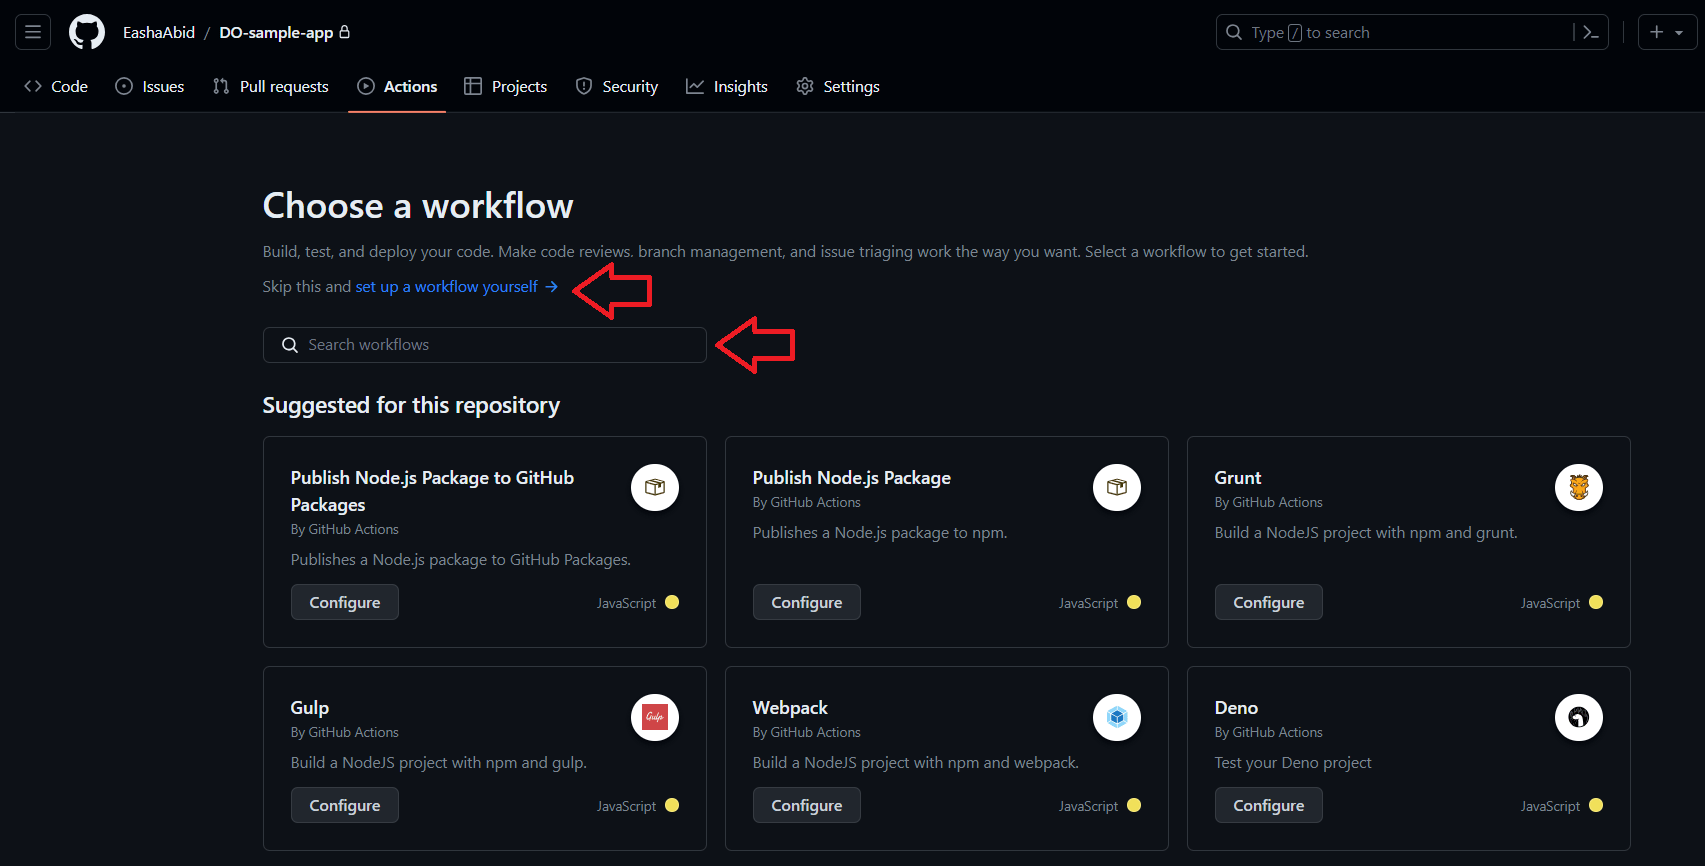
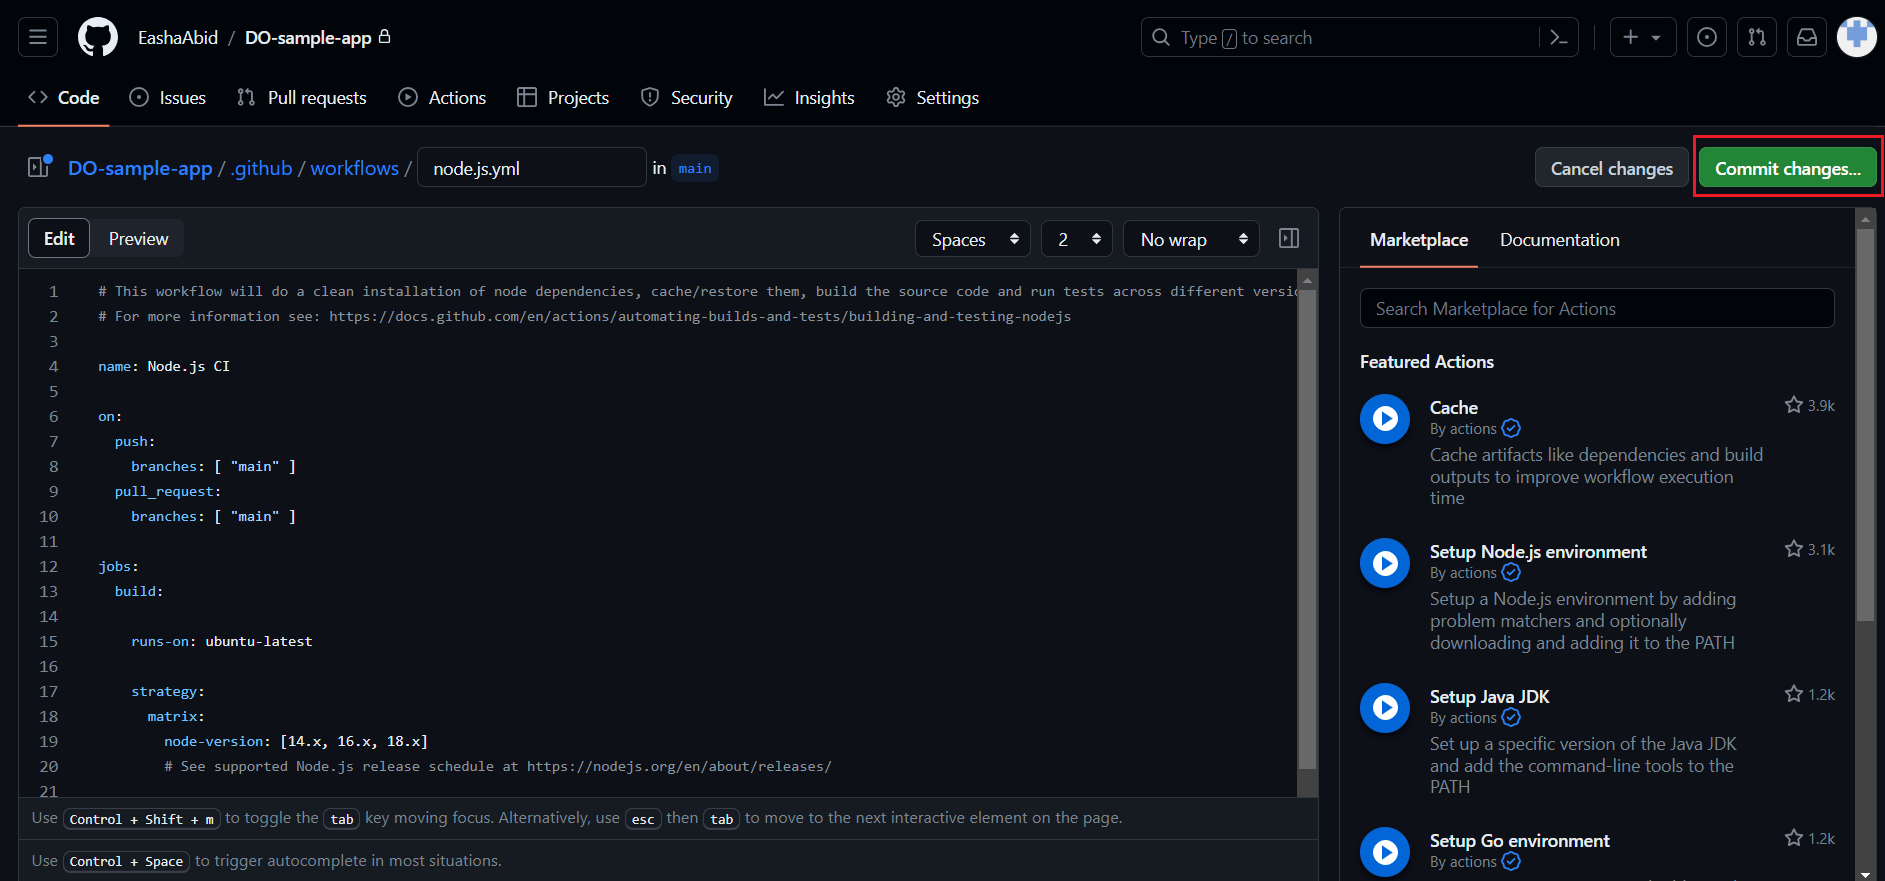
This tutorial demos a simple Node.js application so using GitHub’s prewritten Node.js workflow gets the job done. Minor edits in the YAML file may be needed to make sure it represents the code.
- Once you are okay with the workflow YAML, simply click on the Commit Changes button in the top right corner.
GitHub will run a few checks to see if your code works with the assigned workflow.
While this configuration takes care of swift development and error-free deployment, GitHub Actions can be leveraged to enhance the security of the deployment pipeline as well.
Step 4: Integrate Security Checks on Development Pipeline
Building security checks into your automation workflows is a great way to identify and address vulnerabilities in your codebase before they make their way into production. GitHub Actions provides a range of pre-built security-related workflows that can be readily integrated into development pipeline.
One of these workflows is Snyk GitHub Actions integration that automatically detects and fixes any codebase vulnerabilities.
Here’s how you can configure this on top of your application:
-
Login/sign up to Snyk account.
-
Connect your application’s repository with Snyk.
-
Add Snyk dependencies to your application by running the following command:
npm install snyk -
Commit these changes.
Before you set up the workflow, you’ll need to link Snyk’s API token with GitHub actions so that Snyk security workflow can automatically authenticate your account every time the workflow is run.
- Go to Snyk’s dashboard and copy your API token.
- Go to your GitHub repository.
- Click on Settings > Secrets > New repository secret and paste the token here. Save this change with a meaningful name like “SNYK_AUTH_TOKEN”.
To set up Snyk’s GitHub workflow:
-
Go to your GitHub repository that contains your application.
-
Navigate to the Actions tab and click on New workflow.

-
Click on setup a workflow yourself to manually create a YAML file or you can skip these steps by configuring Snyk’s GitHub Action available on GitHub’s marketplace.
If you choose to set up the workflow yourself, then you can use the following YAML file as a reference.
name: Snyk Security Check

on: push
jobs:
snyk-security-check:
    name: Snyk Security Check
    runs-on: windows-latest

    steps:
    - name: Checkout Repository
        uses: actions/checkout@master

    - name: Set Up Node.js
        uses: actions/setup-node@master
        with:
        node-version: '18'

    - name: Install Dependencies
        run: npm install

    - name: Snyk Auth
        run: npx snyk auth ${{ secrets.SNYK_AUTH_TOKEN }}

    - name: Run Snyk Security Check
        run: npx snyk test
This workflow triggers a security check through Snyk every time changes are made to the project.
- Commit these changes to your repository.
To verify the Snyk workflow, make changes in any of the registered files e.g. let’s edit app.js and commit the change. The Snyk vulnerability workflow will run automatically and update the status of the project’s security.
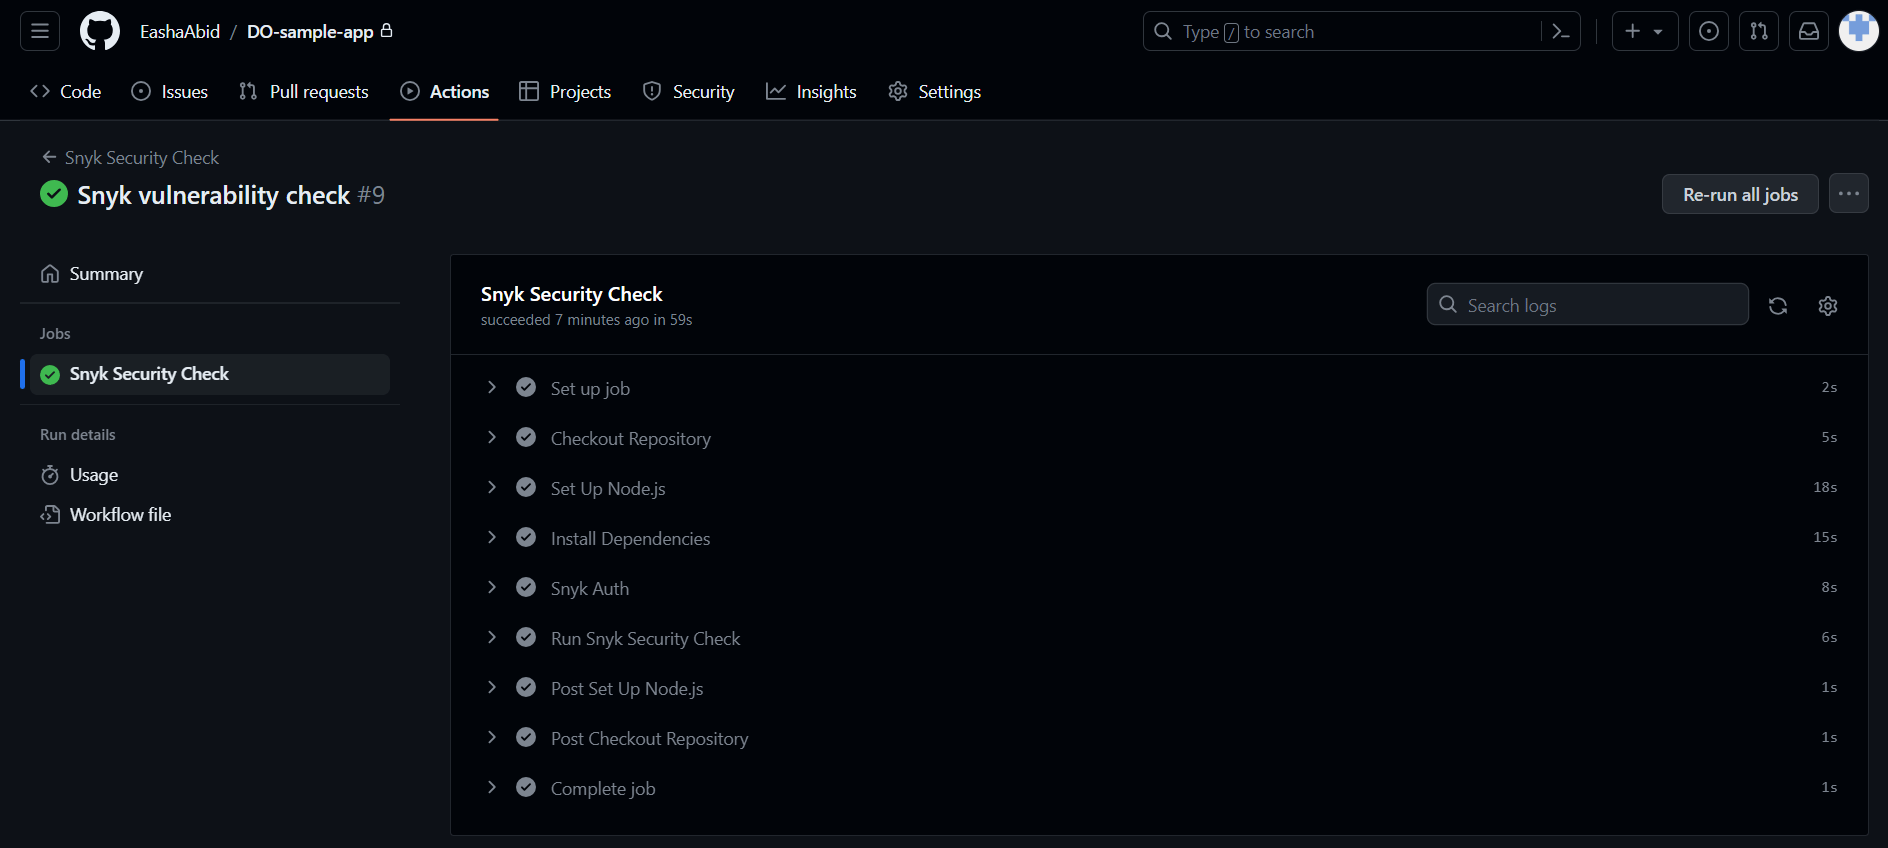
By following these steps, you’ll have set up Snyk GitHub Actions to automatically check for vulnerabilities in your application whenever changes are made to the specified files. This approach can help you maintain the security of your project and ensure that vulnerabilities are addressed promptly.
Step 5: Create Application in App Platform
To deploy this application on App Platform, follow these steps:
-
From DigitalOcean’s Control Panel, go to Create and select Apps.

-
Under Create Resources from Source Code, select the source to pull your application’s code from.
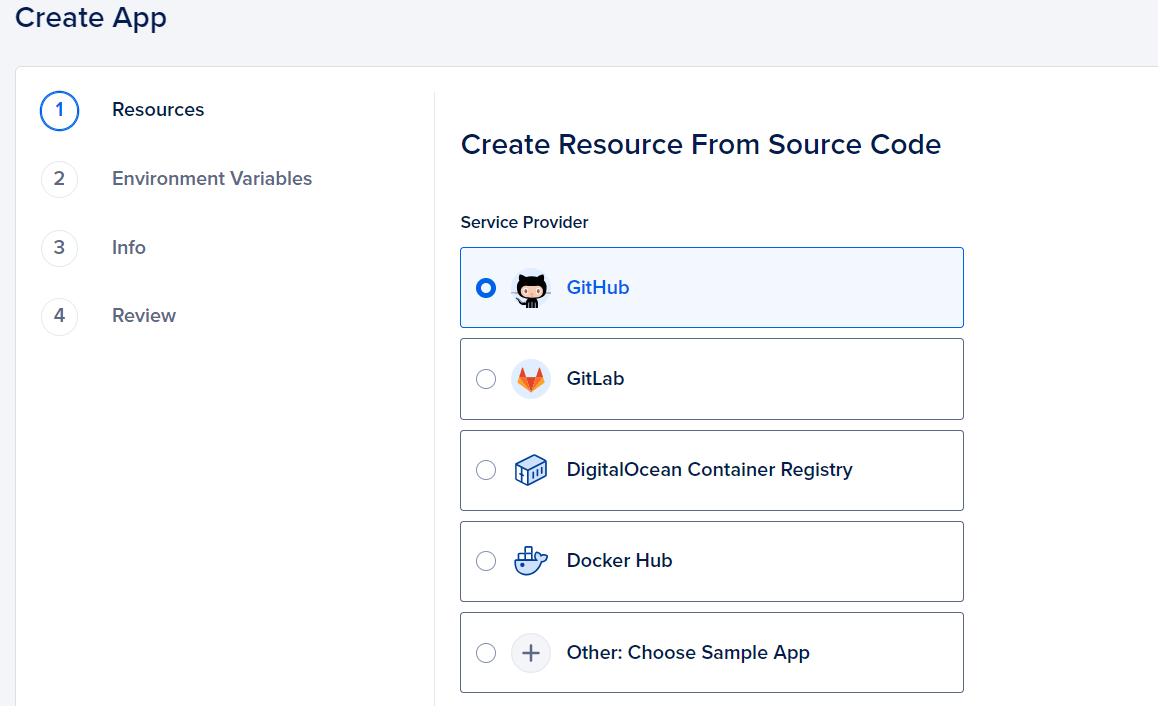
If you do not have a code in place, you can select Other: Choose Sample App option to use one of DigitalOcean’s sample apps.
- Enter the path to your source code and click on the Next button. Here, you can enter additional resources, edit the selected plan, manage databases, etc. For more detailed steps, refer to Create Apps documentation. Once you are satisfied with the app’s configuration, click on the Create Resources button on the Review page. This will deploy your source code on App Platform.
Step 6: Verify CI/CD Pipeline
It’s time to verify whether any changes to our repository get reflected in the app deployed on App Platform.
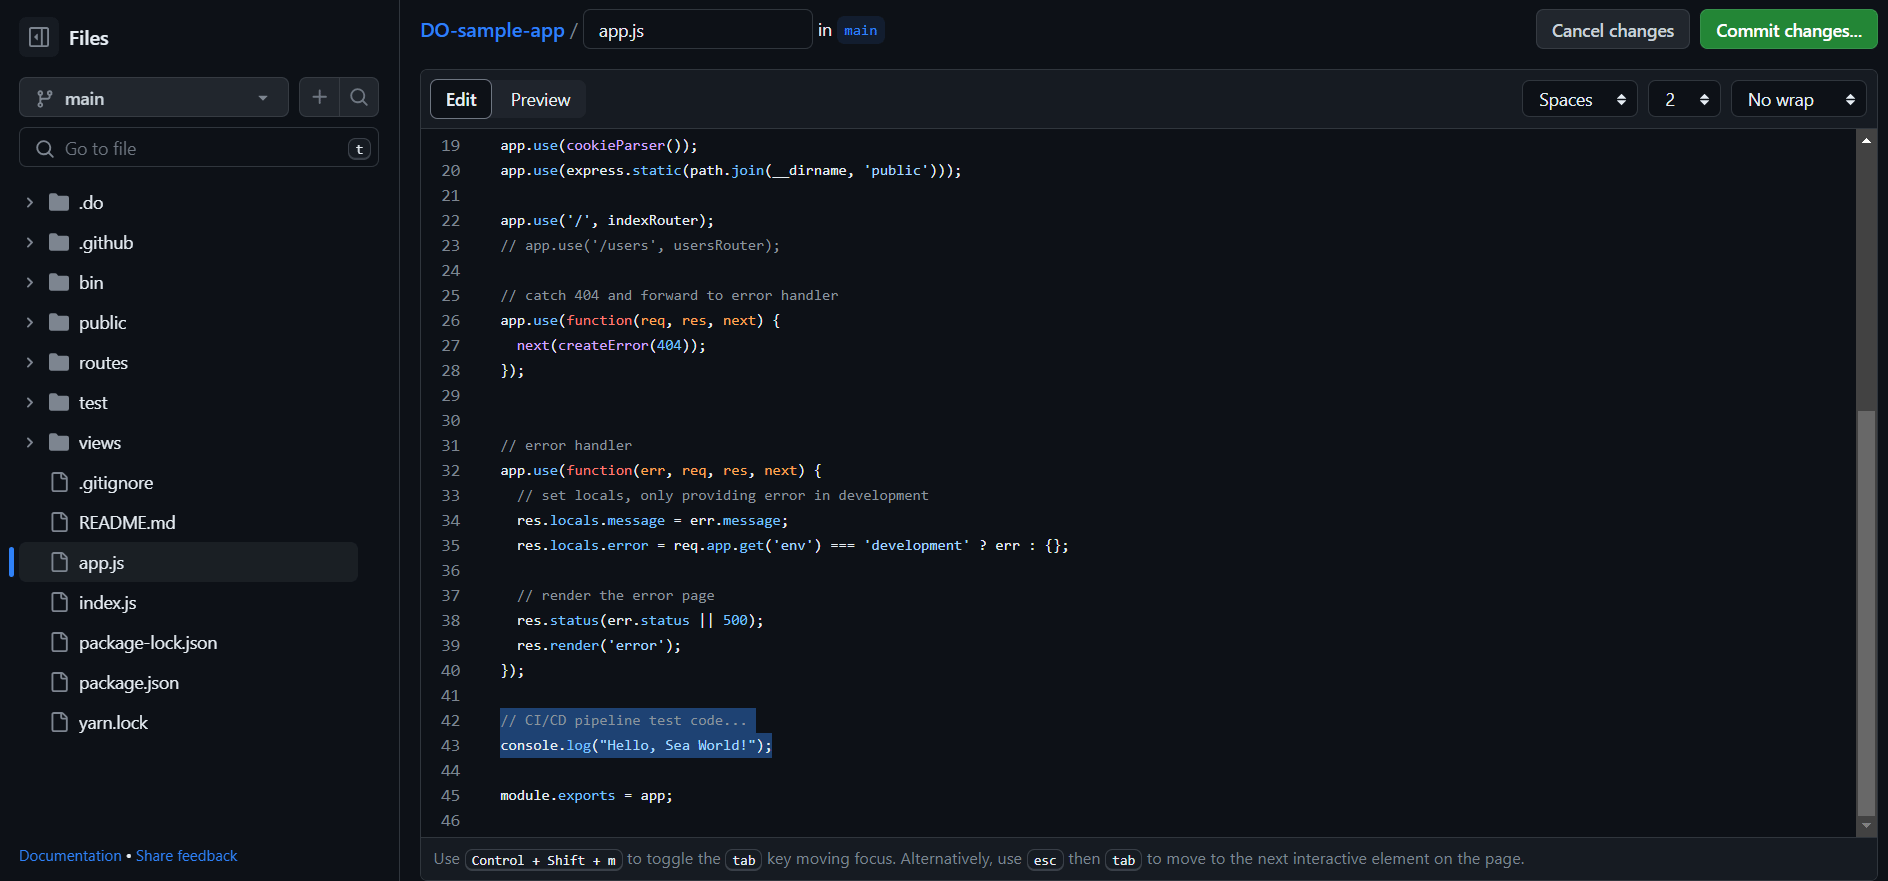
Let’s make a minor change in the app.js file directly and commit it to the repository.
{{< image “/developer-center/cicd-on-app-platform/test-code-in-appjs.png” >}}
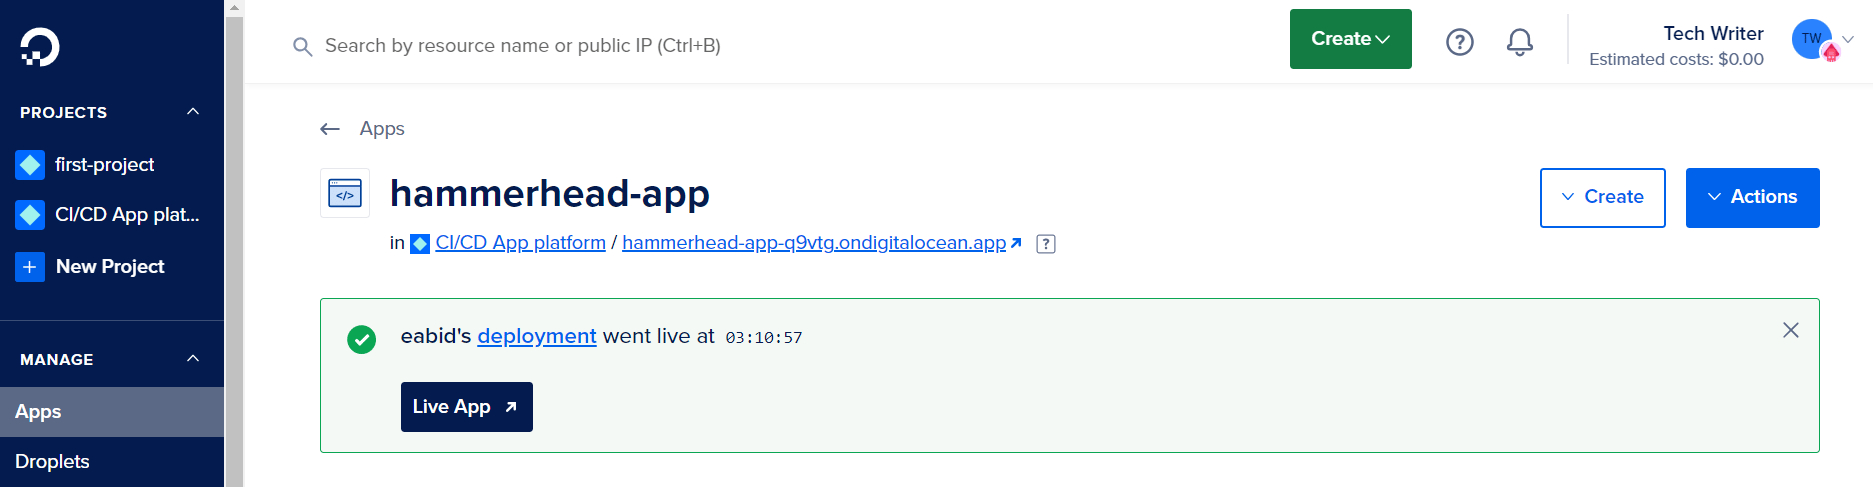
Now, go to the app in DigitalOcean Control Panel. Go to Console and start the app to see if we can see “Hello, Sea World!” being printed on the screen.
This is how easy it is to configure a CI/CD pipeline for the application you want to deploy on DigitalOcean cloud.
You can review all the files for this tutorial in the DigitalOcean Community repository.
Conclusion
CI/CD paves the way to a streamlined development and deployment. Combining this powerful concept with the ease provided by DigitalOcean cloud is a journey that celebrates agility and efficiency - a requirement any good cloud-based deployment should have. With the times to come, this fusion is going to get better and better. Stay tuned!
For more tutorials centered around App Platform, see DigitalOcean’s Dev Center. For a quick overview of how to use App Platform, see this tech talk.
Thanks for learning with the DigitalOcean Community. Check out our offerings for compute, storage, networking, and managed databases.
About the author
Still looking for an answer?
This textbox defaults to using Markdown to format your answer.
You can type !ref in this text area to quickly search our full set of tutorials, documentation & marketplace offerings and insert the link!
 This work is licensed under a Creative Commons Attribution-NonCommercial- ShareAlike 4.0 International License.
Become a contributor for community
Get paid to write technical tutorials and select a tech-focused charity to receive a matching donation.

DigitalOcean Documentation
Full documentation for every DigitalOcean product.

Resources for startups and AI-native businesses
The Wave has everything you need to know about building a business, from raising funding to marketing your product.
The developer cloud
Scale up as you grow — whether you're running one virtual machine or ten thousand.

Start building today
From GPU-powered inference and Kubernetes to managed databases and storage, get everything you need to build, scale, and deploy intelligent applications.
