
Companies that provide web services for the outside world in their own infrastructure are exposed to a variety of threats. The developers of the open source Mitmproxy tool describe it as the Swiss army knife for debugging, testing, data protection analysis, and penetration testing HTTP(S) connections. I show you how mitmproxy can be a useful addition to your security toolbox.
Key Takeaways
- Man-in-the-Middle Capability: Mitmproxy acts as an intermediary between clients and servers, intercepting and decrypting both HTTP and HTTPS traffic for analysis and manipulation
- Certificate Management: The tool generates its own CA certificates on-the-fly and provides easy installation methods across different platforms (Windows, Linux, macOS, mobile devices)
- Multiple Interface Options: Offers three interfaces - command-line (
mitmproxy), web GUI (mitmweb), and scriptable (mitmdump) - catering to different user preferences and automation needs - Advanced Traffic Manipulation: Supports real-time request/response editing, traffic replay, filtering, and selective interception using regex patterns and flow filters
- Extensible Architecture: Features a modular design with Python scripting support and a library of community-developed extensions for custom functionality
- Cross-Platform Support: Available for Linux, macOS, Windows, and mobile platforms with Docker containerization options for easy deployment
- Security Testing Focus: Specifically designed for penetration testing, debugging, data protection analysis, and web application security assessment
Man in the Middle
When most people hear the term ``proxy,‘’ they probably think of legacy proxy servers that act as gateways connecting local networks to the global network or as go-betweens protecting local clients against external access (e.g., NGINX, Squid, and WinGate come to mind). Given the name, mitmproxy could be assumed to be in the same category. However, the tool takes a different approach by specializing in HTTP(S) traffic analysis. Like Wireshark, the software is more of a sniffer that records the data traffic between the HTTP client and server and enables analysis by doing so.
The mitm part of the name hints at its functionality: mitmproxy acts as a man-in-the-middle (MITM) proxy that intercepts and modifies HTTP and HTTPS data traffic. You can record the HTTP conversation for later analysis, although the tool is limited to the protocol-specific data exchange. Unlike Wireshark and other sniffers, no other data is logged.
Mitmproxy can also act as a reverse proxy and forward data traffic to a specific server. Script-based manipulation of HTTP traffic is also an option, for which you can use simple Python scripts. Interaction with third-party applications for automatic manipulation or visualization is also possible with the Python API. Mitmproxy can generate SSL/TLS certificates for interception, as well.
Basic Principles
A basic understanding of how mitmproxy works is useful if you want to work effectively in the environment. For example, take a look at HTTPS-protected access by a client to a web server. The client uses the HTTP command:
CONNECT server.en:443 HTTP/1.1
A legacy proxy server cannot manipulate SSL-/TLS-encrypted data traffic but simply forwards the request to the target system; it thus lives up to its name as an authorized agent. When you use mitmproxy, the HTTPS proxy sits between the client and server with the classic man-in-the-middle approach. For the client, mitmproxy looks like a server, while pretending to be the client for the server, which allows mitmproxy to decrypt the data traffic from both sides.
The challenge for mitmproxy is that the certification authority’s system is designed to prevent precisely this type of attack by allowing a trusted third party to sign a server’s certificates cryptographically to verify its legitimacy. If any discrepancies are noted, the connection is interrupted, which is why it is often difficult to analyze secure connections.
The mitmproxy developers used a trick to solve this problem. The software itself acts as a trustworthy certificate authority (CA). To do so, mitmproxy comes with a complete CA implementation that generates all the required certificates on the fly. For the client to trust these certificates, you need to register mitmproxy manually as a trusted CA.
Mitmproxy then needs to overcome further challenges to inject the environment between the client and server without being noticed. For example, the domain name of the remote party must be determined so that it can be used in the intercept certificate. To do so, mitmproxy uses upstream certificate sniffing. The tool also extracts the common name (CN) from the upstream certificate and the subject alternative names (SANs). It also cleverly works around the server name indication (SNI) handover.
The following processes take place for HTTPS connections with an intermediate mitmproxy:
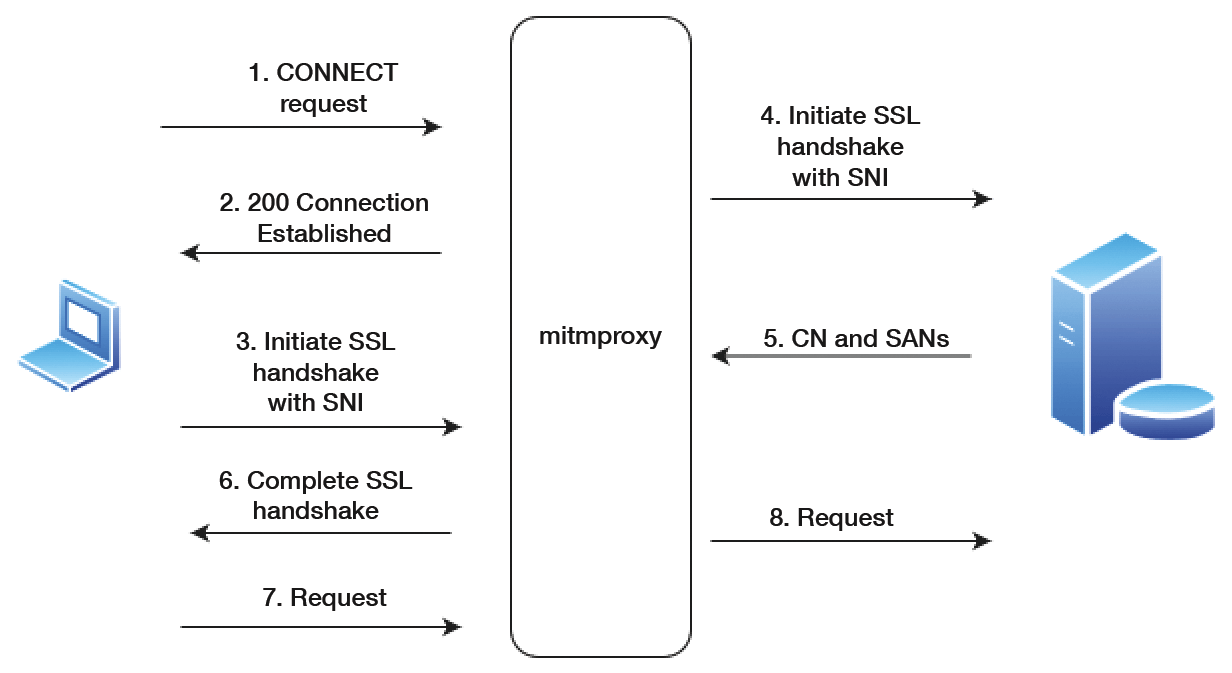
- The client establishes a connection to mitmproxy and generates an HTTP CONNECT request.
- Mitmproxy responds with a 200 Connection Established message, simulating a CONNECT pipe being opened.
- The client opens an SSL/TLS connection on the assumption that it is talking to the desired server. On doing so, it states the SNI for the hostname.
- Mitmproxy opens the connection to the server and sets up a secure connection with the SNI hostname specified by the client.
- The target system responds with a certificate containing the CN and SAN values required to create the interception certificate.
- Mitmproxy generates the interception certificate and continues the client SSL/TLS handshake interrupted in step 3.
- The client sends the request through the open connection.
- Mitmproxy forwards the request to the server through the connection initiated in step 4.
This simplified process sequence shows the sophistication of the actions performed by mitmproxy just to slip into position between the client and the server.
Getting Started
Mitmproxy is available for Linux, macOS, and Windows. Standalone binaries are available for Windows and Linux, with distribution-specific packages for various Linux distributions (e.g., Arch, Debian, Ubuntu, and Kali). After installing on Windows, mitmproxy, mitmdump, and mitmweb are added to PATH and can be called from the command line. In principle, the Linux packages will also run on Windows Subsystem for Linux (WSL).
If you prefer to use a Docker container, use the following command to launch the mitmproxy terminal interface:
docker run --rm -it -v ~/.mitmproxy:/home/mitmproxy/.mitmproxy -p 8080:8080 mitmproxy/mitmproxy
To make sure the client’s web traffic is routed through mitmproxy, you need to adjust the global settings when installing the software locally and enter a proxy address of 127.0.0.1:8080. You could also use a proxy auto-configuration (PAC) file to simplify the global network configuration; the required files are available online.
If you try to access the Internet with your web browser after configuring the proxy, the attempt will fail. Your browser displays a Your connection is not private error message. The reason is simple: The browser does not consider the intermediary proxy to be trustworthy because it considers the mitmproxy certificate invalid. Once the proxy server is activated, you can pick up the required certificate from the mitm.it website. Valid certificates for all supported platforms are available there. On Windows, use the import wizard to deploy the certificate. On Linux, the easiest way to import the certificate is with the command:
sudo security add-trusted-cert -d -p ssl -p basic -k /Library/Keychains/System.keychain mitmproxy-ca-cert.pem
Installation instructions are available onlinefor all other platforms. You can then view and, if needed, edit the details in the certificate manager belonging to your choice of operating system.
Web GUI
You can now track the exact HTTP commands in the mitmproxy console, but analyzing these commands is not particularly user friendly. The mitmproxy web interface can help, which is accessed at http://127.0.0.1:8081 by default. In the web GUI, mitmproxy shows the HTTP command exchange history. To install the required certificate on the client system, go to File | Install Certificates.
The Options tab offers various customization options for the web interface that mainly relate to the display, but you can also work with block lists and add an empty response for specific requests. Mitmproxy supports the following modes in addition to the Regular default mode:
- Transparent
- WireGuard
- Reverse Proxy
- Upstream Proxy
- SOCKS Proxy
- DNS Server
The choice of mode depends on whether you want to monitor the traffic from a client or a single server. If you want to examine the traffic reaching your own web server from the Internet, you need to enable the Reverse Proxy variant. In this case, mitmproxy acts like a ``normal’’ server that fields the requests from the Internet or from an analysis client and passes them on to the target system.
To make it easier to find the goodies, switch to the Start tab and enter a search term, which is a good way of restricting the view to specific sources, services, or file types. The good thing about this is that if the web GUI is open and you access the server in a second browser window, you can trace the commands in mitmproxy in real time.
The individual requests and responses can be examined both at the console level and in the web interface, but the web interface is far more convenient. You can play back the logged exchanges or select Edit to edit requests and forward them to the target server after doing so. It is easy to apply filters at the console level, intercept the traffic, and save the markup locally.
In view of the huge volumes of data that mitmproxy delivers, it is not always easy to keep track of the content in which you are interested, which is where the Highlight function comes in handy. Clicking on the Highlight button opens a selection menu where you can highlight specific content. You can limit the selection to methods or content types or even use a regular expression.
Advanced Analysis Techniques
One of mitmproxy’s special features is the Interception function, which lets you intercept and manipulate requests. Intercepting is not normally desirable because it impairs the browsing experience. To keep you from taking down the entire data exchange, mitmproxy uses a different approach and intercepts requests selectively. You can set this up in the web GUI or at the console with the ~u <regex> flow filter, and you can use the ~q option to avoid intercepting the responses. An ampersand (&) lets you combine multiple filter options.
Once you have interrupted a request, the next step is to modify it to suit your needs. If you are working with the web GUI, first enable Edit mode and select the entry with the request that you want to edit (e.g., you could manipulate the Path or user-agent option).
If you want to make the changes at the console level, press E to enable Edit mode; in the web GUI, open the Request tab and navigate to the entry in which you are interested. Make your changes and exit Edit mode. To resume the interrupted data flow, press the A button at the console or click Resume in the GUI.
Another special feature of mitmproxy is that you can replay previous data flows repeatedly. The tool supports two types of replay requests:
- Client-side replay retransmits previous client requests to the server.
- Server-side replay replays the server’s responses to previously recorded requests.
You can use both variants at the console and in the web GUI. To begin, select the desired requests with filter expressions. To repeat these, press the r key at the console or click Replay in the GUI. You can modify the request here, too.
Thanks to its modular architecture, you can extend mitmproxy’s functionality and draw on the development work of an active community. Table 1 summarizes the most interesting extensions. For example, the log-events.py script runs at console level and generates warnings.
| Script | Description |
|---|---|
| log-events.py | Write messages to the mitmproxy event log. |
| http-add-header.py | Add an HTTP header to each response. |
| internet-in-mirror.py | Mirror all websites. |
| commands-simple.py | Add a user-defined command to the command line. |
| shutdown.py | Shut down and terminate a mitmproxy instance. |
| duplicate-modifyreplay.py | Accept incoming HTTP requests and replay them with modified parameters. |
| tcp-simple.py | Process individual messages from a TCP connection. |
| websocket-injectmessage.py | Inject a WebSocket message into an open connection. |
Excluding Domains
When analyzing traffic, it might make sense to ignore certain domains – for two main reasons. First, some of the traffic might be protected by certificate pinning, and second, some of the traffic might simply be beyond your scope of interest.
In the first case, for example, Windows updates or access to Apple’s App Store will not work if you have set up mitmproxy in the middle. If some of the content is not relevant to you, simply hide it with the view_filter option.
To exclude hosts from monitoring, use the ignore_hosts option and specify this with a regular expression in the host:port string format. The command line alias is --ignore-hosts regex, and the complete command is:
mitmproxy -ignore-hosts '^example\.de:443$'
If you want to restrict recording to specific domains, use the --allow-hosts option.
Another great feature of mitmproxy is that the environment has a modular architecture, and you extend the feature set with the help of Python scripts. A major share of the existing feature set is already based on integrated add-ons. The structure and design of these scripts are kept so simple that it is easy to adapt them or develop your own scripts. Almost 30 scripts are currently available for download from the GitHub project site.
Frequently Asked Questions
1. How do I fix SSL/TLS certificate errors with mitmproxy?
Certificate errors typically occur when the client doesn’t trust mitmproxy’s generated certificate. To resolve this:
- Install the CA certificate: Visit
http://mitm.itin your browser after starting mitmproxy to download the appropriate certificate for your platform - For Windows: Use the certificate import wizard or run
certmgr.mscto install the certificate in the “Trusted Root Certification Authorities” store - For Linux/macOS: Use the command
sudo security add-trusted-cert -d -p ssl -p basic -k /Library/Keychains/System.keychain mitmproxy-ca-cert.pem - For mobile devices: Install the certificate through the device’s settings and enable “Full Trust” for root certificates
- Browser configuration: Ensure your browser is configured to use the proxy at
127.0.0.1:8080
You can read more about SSL/TLS certificate errors and SSL/TLS certificate verification in our tutorial.
2. What’s the difference between mitmproxy, Burp Suite, and Charles Proxy?
Here’s a comparison of mitmproxy, Burp Suite, and Charles Proxy to help you choose the right tool for your needs:
| Feature/Tool | Mitmproxy | Burp Suite | Charles Proxy |
|---|---|---|---|
| Type | Open-source, command-line focused | Commercial, GUI-focused | Commercial, user-friendly GUI |
| Pricing | Free and open-source | Free Community Edition, Professional ($399/year) | Free trial, $50-99/year |
| Interface | Command-line (mitmproxy), Web GUI (mitmweb), Scriptable (mitmdump) |
Desktop GUI with extensive features | Desktop GUI with intuitive design |
| HTTPS/SSL Support | Full SSL/TLS interception with auto-generated certificates | Advanced SSL/TLS handling with certificate management | Excellent SSL/TLS support with easy certificate installation |
| Mobile Testing | Good support with manual configuration | Excellent mobile app testing capabilities | Outstanding mobile testing with easy device setup |
| Traffic Replay | Advanced replay with filtering and modification | Comprehensive replay with automated testing | Basic replay functionality |
| Scripting | Python scripting with extensive API | Java/Python extensions and macros | Limited scripting capabilities |
| Vulnerability Scanning | No built-in scanning | Advanced automated vulnerability scanning | No built-in scanning |
| API Testing | Excellent for API debugging and testing | Comprehensive API security testing | Good for API debugging and monitoring |
| Learning Curve | Moderate (command-line experience helpful) | Steep (many advanced features) | Easy (intuitive GUI) |
| Best For | Developers, automation, command-line enthusiasts | Security professionals, penetration testers | QA teams, developers, mobile app testers |
3. How do I intercept HTTPS traffic with mitmproxy?
To intercept HTTPS traffic:
- Start mitmproxy: Run
mitmproxyormitmwebon your system - Configure proxy settings: Set your browser or application to use
127.0.0.1:8080as the HTTP/HTTPS proxy - Install certificates: Download and install the mitmproxy CA certificate from
http://mitm.it - Trust the certificate: Ensure the certificate is trusted by your system and browser
- Browse securely: All HTTPS traffic will now be intercepted and displayed in mitmproxy
The tool automatically handles SSL/TLS decryption and re-encryption, allowing you to view encrypted traffic in plain text.
4. Can I use mitmproxy for mobile app testing?
Yes, mitmproxy is excellent for mobile app testing:
- Connect devices: Ensure your mobile device and computer are on the same network
- Configure mobile proxy: Set the device’s proxy to your computer’s IP address and port 8080
- Install mobile certificate: Download the certificate from
http://mitm.iton your mobile device - Trust the certificate: Install and trust the certificate in your device’s security settings
- Test applications: Launch your mobile apps and monitor their HTTP/HTTPS traffic in mitmproxy
This is particularly useful for debugging API calls, analyzing app behavior, and testing security features.
5. How do I filter and search traffic in mitmproxy?
Mitmproxy offers powerful filtering capabilities:
Command-line filtering:
~u regex- Filter by URL~q- Show only requests (not responses)~s- Show only responses (not requests)~m GET- Filter by HTTP method~d domain.com- Filter by domain
Complete filtering commands:
# Start mitmproxy with specific filters
mitmproxy --set view_filter="~u example.com"
mitmproxy --set view_filter="~m POST"
mitmproxy --set view_filter="~d api.github.com"

# Filter by status codes
mitmproxy --set view_filter="~s 404"
mitmproxy --set view_filter="~s 200"

# Filter by content type
mitmproxy --set view_filter="~t application/json"
mitmproxy --set view_filter="~t text/html"

# Filter by request body content
mitmproxy --set view_filter="~b login"
mitmproxy --set view_filter="~b password"

# Filter by response body content
mitmproxy --set view_filter="~B error"
mitmproxy --set view_filter="~B success"

# Filter by header content
mitmproxy --set view_filter="~h User-Agent"
mitmproxy --set view_filter="~h Authorization"

# Filter by HTTP version
mitmproxy --set view_filter="~v HTTP/2"
mitmproxy --set view_filter="~v HTTP/1.1"
Interactive filtering (within mitmproxy console):
# Start mitmproxy
mitmproxy

# Then use these commands in the console:
~u example.com          # Show only URLs containing "example.com"
~m POST                 # Show only POST requests
~d api.github.com       # Show only requests to api.github.com
~s 200                  # Show only responses with status 200
~t application/json     # Show only JSON responses
~b login                # Show requests with "login" in body
~B error                # Show responses with "error" in body
~h Authorization        # Show requests with Authorization header
~v HTTP/2               # Show only HTTP/2 requests
Web interface filtering:
- Use the search box in the web GUI to filter by URL, method, or content
- Click “Highlight” to highlight specific content types or use regex patterns
- Use the “Start” tab to enter search terms and restrict the view
Combining filters:
# Multiple conditions with AND (&)
mitmproxy --set view_filter="~u example.com & ~m POST"
mitmproxy --set view_filter="~d api.github.com & ~s 200"
mitmproxy --set view_filter="~t application/json & ~B success"

# OR operations (|)
mitmproxy --set view_filter="~u api & ~m POST | ~m PUT"
mitmproxy --set view_filter="~s 200 | ~s 201 | ~s 204"

# Complex combinations
mitmproxy --set view_filter="(~u login | ~u auth) & ~m POST"
mitmproxy --set view_filter="~d example.com & (~s 200 | ~s 404)"
Advanced filtering examples:
# Filter for specific API endpoints
mitmproxy --set view_filter="~u /api/v1/ & ~m POST"

# Filter for error responses
mitmproxy --set view_filter="~s 4.. | ~s 5.."

# Filter for specific user agents
mitmproxy --set view_filter="~h 'Mozilla/5.0'"

# Filter for requests with specific headers
mitmproxy --set view_filter="~h 'Content-Type: application/json'"

# Filter for large responses
mitmproxy --set view_filter="~B .{1000,}"

# Filter for specific file types
mitmproxy --set view_filter="~u \\.(js|css|png|jpg)$"
Conclusion
Mitmproxy is an exciting tool for recording, analyzing, and manipulating HTTP traffic. Thanks to its specific focus, the HTTP proxy is great for checking web requests and responses, which makes it a valuable tool, not only for administrators, but also for developers and penetration testers.
This content is based on an article from ADMIN and is available to you through a collaboration with DigitalOcean.
Thanks for learning with the DigitalOcean Community. Check out our offerings for compute, storage, networking, and managed databases.
About the author
Still looking for an answer?
This textbox defaults to using Markdown to format your answer.
You can type !ref in this text area to quickly search our full set of tutorials, documentation & marketplace offerings and insert the link!
 This work is licensed under a Creative Commons Attribution-NonCommercial- ShareAlike 4.0 International License.
Become a contributor for community
Get paid to write technical tutorials and select a tech-focused charity to receive a matching donation.

DigitalOcean Documentation
Full documentation for every DigitalOcean product.

Resources for startups and AI-native businesses
The Wave has everything you need to know about building a business, from raising funding to marketing your product.
The developer cloud
Scale up as you grow — whether you're running one virtual machine or ten thousand.

Start building today
From GPU-powered inference and Kubernetes to managed databases and storage, get everything you need to build, scale, and deploy intelligent applications.
