By Joshua Bemenderfer

Linting has always been a bit of a pain point for Vue. Because of the single-file-component model, a linter trying to lint the script portion has to first be able to get through the HTML syntax around it. Linting the HTML structure and styles was largely ignored, as well, until now. Enter eslint-plugin-vue, the official linting plugin for Vue components. Previously, it was possible to lint scripts with Eslint by using eslint-plugin-html and a number of dirty hacks, but now it’s possible to lint Vue files properly. Structure and all. Let’s take a look at how to get that done.
Installation
First off, install eslint and of eslint-plugin-vue.
# Yarn
$ yarn add eslint eslint-plugin-vue --save-dev
# NPM
$ npm install eslint eslint-plugin-vue --save-dev
Usage
Now, update (or create) your .eslintrc.json file. Make sure you extend one of the available linting levels for eslint-plugin-vue.
The available levels are:
plugin:vue/base- Just the basic rules to make the parsing work. Doesn’t lint anything yet.plugin:vue/essential- The above, plus rules that exist solely to prevent errors or unexpected behavior in Vue.plugin:vue/strongly-recommended- The above, plus rules that are generally considered best practice.plugin:vue/recommended- The above, plus a few often-suggested style rules.
{
  "extends": [
    "eslint:recommended",
    "plugin:vue/recommended"
  ],
}
Many of the issues detected by those rules can be automatically fixed with eslint’s --fix option.
Editor Configuration
Now, if you open up a Vue file in your editor with some sort of eslint integration you might see… nothing. That’s because you need to associate the vue file type with the linter. This wasn’t previously a problem when using Vue files like HTML, as most integrations already supported HTML files.
Here’s how you’d fix the issue with Atom and VSCode. We’re still waiting on support in Sublime Text 3. Track this PR: https://github.com/roadhump/SublimeLinter-eslint/pull/169
For Atom + linter-eslint:
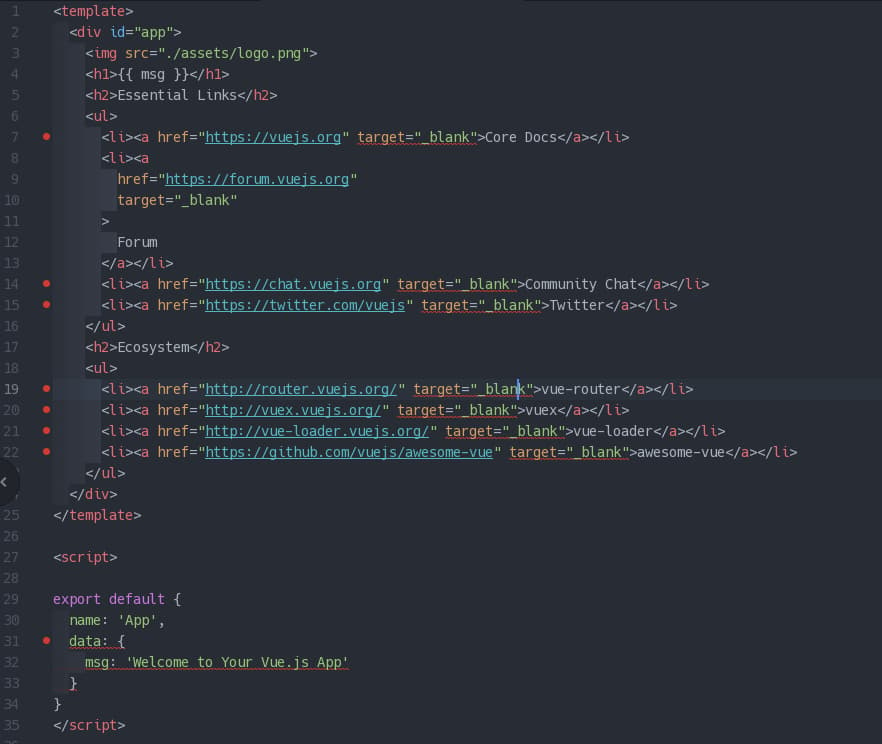
Go into Settings -> Packages -> linter-eslint and add text.html.vue to the “List of scopes to run eslint on” option. You may need to restart Atom.

Result:
For VSCode + Eslint:
Open your User Settings file and add
"eslint.validate": [
    "javascript",
    "javascriptreact",
    {
        "language": "vue",
        "autoFix": true
    }
],
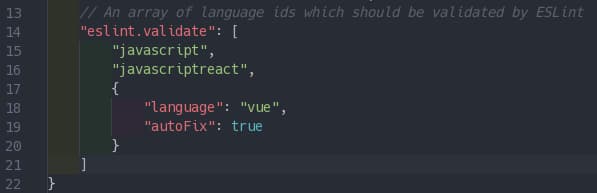
If you’ve already modified the eslint.validate property, just add the last item of the list above to it.
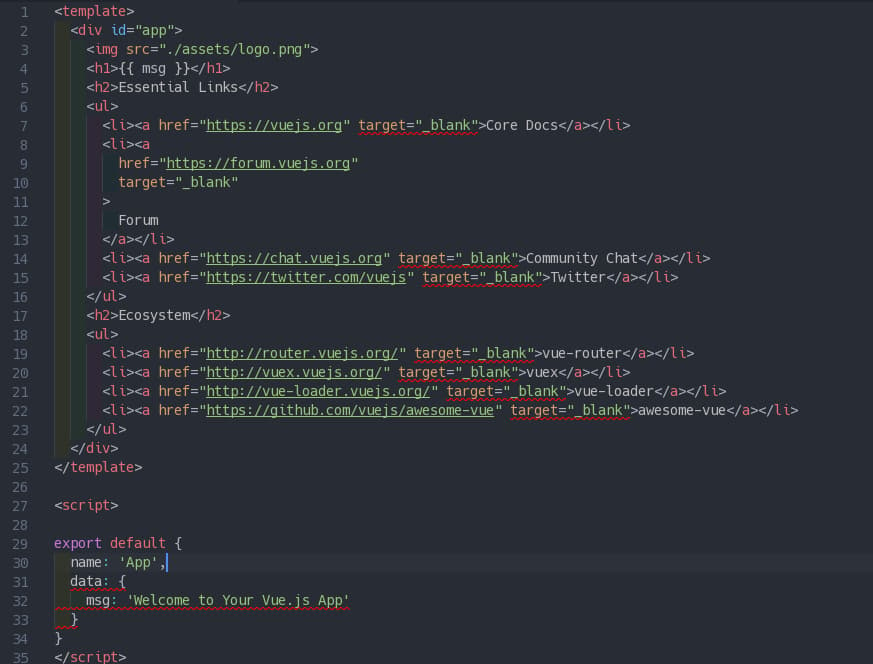
Result:
Now eslint should now run as expected and produce nice little warnings and errors to all of your Vue components. Hooray!
Thanks for learning with the DigitalOcean Community. Check out our offerings for compute, storage, networking, and managed databases.
About the author
Still looking for an answer?
This textbox defaults to using Markdown to format your answer.
You can type !ref in this text area to quickly search our full set of tutorials, documentation & marketplace offerings and insert the link!
 This work is licensed under a Creative Commons Attribution-NonCommercial- ShareAlike 4.0 International License.
Become a contributor for community
Get paid to write technical tutorials and select a tech-focused charity to receive a matching donation.

DigitalOcean Documentation
Full documentation for every DigitalOcean product.

Resources for startups and AI-native businesses
The Wave has everything you need to know about building a business, from raising funding to marketing your product.
The developer cloud
Scale up as you grow — whether you're running one virtual machine or ten thousand.

Start building today
From GPU-powered inference and Kubernetes to managed databases and storage, get everything you need to build, scale, and deploy intelligent applications.
