By Janakiram MSV and Brian Hogan

This article supplements a webinar series on deploying and managing containerized workloads in the cloud. The series covers the essentials of containers, including managing container lifecycles, deploying multi-container applications, scaling workloads, and working with Kubernetes. It also highlights best practices for running stateful applications.
This tutorial includes the concepts and commands in the fifth session of the series, Deploying Stateful Services in Kubernetes.
###Introduction
Kubernetes is an open-source container orchestration tool for managing containerized applications. In the previous parts of this series, you learned the building blocks of Kubernetes and packaged containers as Kubernetes ReplicaSets. While ReplicaSets ensure the availability of stateless Pods, they cannot be used with stateful workloads such as database clusters.
While it may be easy to package, deploy, manage, and scale contemporary cloud-native applications in Kubernetes, deploying and managing traditional workloads such as databases and content management systems in a containerized environment calls for a different approach. StatefulSets bring the flexibility of Kubernetes ReplicaSet to stateful workloads.
In the final installment of this tutorial series, you will deploy a highly available MongoDB ReplicaSet in Kubernetes as a StatefulSet using Helm, a popular open source package manager for Kubernetes.
Prerequisites
To complete this tutorial, you will need:
- An active Kubernetes cluster running on DigitalOcean, installed through StackPointCloud, which you can do by following the tutorial Getting Started with Kubernetes.
- The sample web application introduced in the tutorial Deploying and Scaling Microservices in Kubernetes, which is based on Node.js and MongoDB is extended to bring high availability to the database. For details on the application design, refer to the Building Containerized Applications tutorial.
- An active Docker Hub account to store the Docker image for the application.
- A local machine with Git installed
- If you’re using macOS, ensure you have Homebrew installed.
Step 1 – Installing the Helm Client on the Development Machine
With Helm, administrators can deploy complex Kubernetes applications with a single command. Applications are packaged as Charts that define, install, and upgrade Kubernetes applications. Charts provide an abstraction over Kubernetes objects such as Pods, Deployments, and Services.
Helm has two components–the server and the client. The server-side of Helm runs in Kubernetes as a Service called Tiller. The client is a command line tool that interacts with Tiller.
Since you are going to deploy a MongoDB ReplicaSet Helm Chart, you need the CLI that talks to Tiller, the server-side component of Helm. StackPointCloud, which you have used to set up Kubernetes on DigitalOcean, comes with Tiller preinstalled.
Note: These instructions are for macOS. If you are using other operating systems, please refer to the Helm installation guide.
Assuming you have Homebrew installed and configured on your Mac, run the following command to install Helm:
- brew install kubernetes-helm
Output==> Downloading https://homebrew.bintray.com/bottles/kubernetes-helm-2.8.2.high_sierra.bottle.tar.gz
...
==> Summary
🍺  /usr/local/Cellar/kubernetes-helm/2.8.2: 50 files, 121.7MB
Once Helm is installed, verify that you can run it by checking its current version.
- helm version
OutputClient: &version.Version{SemVer:"v2.7.2", GitCommit:"8478fb4fc723885b155c924d1c8c410b7a9444e6", GitTreeState:"clean"}
Server: &version.Version{SemVer:"v2.8.2", GitCommit:"a80231648a1473929271764b920a8e346f6de844", GitTreeState:"clean"}
This confirms that the client is installed properly and is able to talk to Tiller.
In the next step, we will use Helm to deploy the MongoDB ReplicaSet in Kubernetes.
Step 2 – Deploying the MongoDB ReplicaSet in Kubernetes
A StorageClass in Kubernetes provides a way for administrators to describe the “classes” of storage they offer. For example, when users request a storage volume, the StorageClass will determine what class of storage backend is provisioned from them. The classes may include standard HDD and a faster SSD. Behind the scenes, the StorageClass interacts with the underlying infrastructure such as a cloud provider’s API, to provision storage.
Since you need persistent storage to store MongoDB data, you may want to attach a DigitalOcean Block Storage volume to a worker node, and point the MongoDB Pod to use the storage volume for persistence.
In this case, the StorageClass acts as the interface between the Pod and the DigitalOcean block storage service. When you request a volume of block storage, the StorageClass talks to the preconfigured driver that knows how to allocate a block storage volume.
StackPointCloud installs the DigitalOcean storage driver and registers the StorageClass with Kubernetes during the setup. This saves us from the steps involved in installing and configuring the driver and the StorageClass.
Before we deploy the MongoDB cluster, let’s ensure that the StorageClass for DigitalOcean volumes is configured:
- kubectl get storageclass
The output confirms that StorageClass is configured and ready.
[secondary_label Output
NAME                     PROVISIONER                            AGE
digitalocean (default)   digitalocean/flex-volume-provisioner   1d
Next, you will configure and deploy the MongoDB ReplicaSet based on the DigitalOcean StorageClass.
Create a new directory for your project and switch to the new directory:
- mkdir ~/mongo-rs
- cd ~/mongo-rs
Clone the Helm Chart repository from GitHub:
- git clone https://github.com/kubernetes/charts.git
Navigate to the MongoDB ReplicaSet directory (charts/stable/mongodb-replicaset/) and verify that the file values.yaml exists.
- cd charts/stable/mongodb-replicaset/
- ls values.yaml
Outputvalues.yaml
This file contains the parameters and configuration for the chart. You need to modify this file to configure the MongoDB ReplicaSet to use the DigitalOcean StorageClass.
Edit values.yaml:
- nano values.yaml
Find and uncomment the following section:
...
# storageClass: "-"
...
Replace "-" with "digitalocean", like this:
...
storageClass: "digitalocean"
...
Save the file and exit your editor.
Now navigate to the ~/mongo-rs folder.
- cd ~/mongo-rs
You’re now ready to deploy the MongoDB ReplicaSet to your Kubernetes cluster, powered by DigitalOcean’s block storage. Run the following command to launch the database cluster.
- helm install --name=todo -f charts/stable/mongodb-replicaset/values.yaml stable/mongodb-replicaset
In the preceding command, --name refers to the name of the Helm chart. The switch -f points to the configuration settings stored in values.yaml.
You will immediately see the output confirming that the chart creation has started.
OutputNAME:   todo
LAST DEPLOYED: Sat Mar 31 10:37:06 2018
NAMESPACE: default
STATUS: DEPLOYED

RESOURCES:
==> v1/Service
NAME                     TYPE       CLUSTER-IP  EXTERNAL-IP  PORT(S)    AGE
todo-mongodb-replicaset  ClusterIP  None        <none>       27017/TCP  1s

==> v1beta1/StatefulSet
NAME                     DESIRED  CURRENT  AGE
todo-mongodb-replicaset  3        1        0s

==> v1/Pod(related)
NAME                       READY  STATUS    RESTARTS  AGE
todo-mongodb-replicaset-0  0/1    Init:0/2  0         0s

==> v1/ConfigMap
NAME                           DATA  AGE
todo-mongodb-replicaset        1     1s
todo-mongodb-replicaset-tests  1     1s


NOTES:
1. After the statefulset is created completely, one can check which instance is primary by running:

    $ for ((i = 0; i < 3; ++i)); do kubectl exec --namespace default todo-mongodb-replicaset-$i -- sh -c 'mongo --eval="printjson(rs.isMaster())"'; done

2. One can insert a key into the primary instance of the mongodb replica set by running the following:
    MASTER_POD_NAME must be replaced with the name of the master found from the previous step.

    $ kubectl exec --namespace default MASTER_POD_NAME -- mongo --eval="printjson(db.test.insert({key1: 'value1'}))"

3. One can fetch the keys stored in the primary or any of the slave nodes in the following manner.
    POD_NAME must be replaced by the name of the pod being queried.

    $ kubectl exec --namespace default POD_NAME -- mongo --eval="rs.slaveOk(); db.test.find().forEach(printjson)"
Let’s now run a series of commands to track the status of the cluster.
First, look at the StatefulSet:
- kubectl get statefulset
This command confirms that the MongoDB ReplicaSet was created as a Kubernetes StatefulSet.
OutputNAME                      DESIRED   CURRENT   AGE
todo-mongodb-replicaset   3         2         2m
Now explore the Pods:
- kubectl get pods
The number of Pods and their naming convention indicates that the MongoDB ReplicaSet is successfully configured:
OutputNAME                        READY     STATUS        RESTARTS   AGE
todo-mongodb-replicaset-0   1/1       Running       0          3m
todo-mongodb-replicaset-1   1/1       Running       0          1m
todo-mongodb-replicaset-2   1/1       Running       0          54s
Notice that each Pod has a suffix that ends with a sequential number, which is a distinctive feature of a StatefulSet.
Let’s now check if the MongoDB instances are communicating with each other. We will do this by running a command in the MongoDB shell within one of the Pods.
Use kubectl to launch the mongo console on one of the hosts:
- kubectl exec -it todo-mongodb-replicaset-0 mongo
After connecting, you’ll find yourself in the MongoDB shell:
OutputMongoDB shell version v3.6.3
connecting to: mongodb://127.0.0.1:27017
MongoDB server version: 3.6.3
Welcome to the MongoDB shell.
For interactive help, type "help".
...

2018-03-31T05:08:20.239+0000 I CONTROL  [initandlisten]
Check the ReplicaSet’s configuration with the following command:
- rs.conf()
The output confirms that there are three instances of MongoDB running as a ReplicaSet.
Output{
	"_id" : "rs0",
	"version" : 3,
	"protocolVersion" : NumberLong(1),
	"members" : [
		{
			"_id" : 0,
			"host" : "todo-mongodb-replicaset-0.todo-mongodb-replicaset.default.svc.cluster.local:27017",
			"arbiterOnly" : false,
			"buildIndexes" : true,
			"hidden" : false,
			"priority" : 1,
			"tags" : {

			},
			"slaveDelay" : NumberLong(0),
			"votes" : 1
		},
		{
			"_id" : 1,
			"host" : "todo-mongodb-replicaset-1.todo-mongodb-replicaset.default.svc.cluster.local:27017",
			"arbiterOnly" : false,
			"buildIndexes" : true,
			"hidden" : false,
			"priority" : 1,
			"tags" : {

			},
			"slaveDelay" : NumberLong(0),
			"votes" : 1
		},
		{
			"_id" : 2,
			"host" : "todo-mongodb-replicaset-2.todo-mongodb-replicaset.default.svc.cluster.local:27017",
			"arbiterOnly" : false,
			"buildIndexes" : true,
			"hidden" : false,
			"priority" : 1,
			"tags" : {

			},
			"slaveDelay" : NumberLong(0),
			"votes" : 1
		}
	],
	"settings" : {
		"chainingAllowed" : true,
		"heartbeatIntervalMillis" : 2000,
		"heartbeatTimeoutSecs" : 10,
		"electionTimeoutMillis" : 10000,
		"catchUpTimeoutMillis" : -1,
		"catchUpTakeoverDelayMillis" : 30000,
		"getLastErrorModes" : {

		},
		"getLastErrorDefaults" : {
			"w" : 1,
			"wtimeout" : 0
		},
		"replicaSetId" : ObjectId("5abdb4f61d952afc4b0b8218")
	}
}
Exit the MongoDB console:
- exit
This will disconnect you from your remote host as well.
Let’s switch gears and check the DigitalOcean control panel for the block storage volumes associated with the cluster. Log in to your DigitalOcean account and select the Volumes tab:
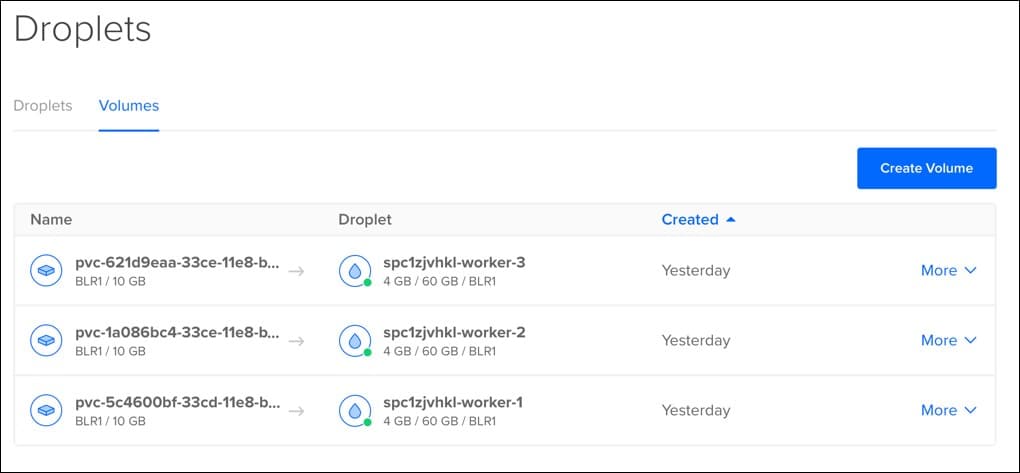
You can see that three volumes of 10GB each are attached to Kubernetes worker nodes. Each Pod of the MongoDB StatefulSet is storing the data in one of the block storage volumes. The size of 10GB is defined in values.yaml under the persistentVolume section.
persistentVolume:
  enabled: true
  ## mongodb-replicaset data Persistent Volume Storage Class
  ## If defined, storageClassName: <storageClass>
  ## If set to "-", storageClassName: "", which disables dynamic provisioning
  ## If undefined (the default) or set to null, no storageClassName spec is
  ##   set, choosing the default provisioner.  (gp2 on AWS, standard on
  ##   GKE, AWS & OpenStack)
  ##
  storageClass: digitalocean
  accessModes:
    - ReadWriteOnce
  size: 10Gi
  annotations: {}
You have successfully configured a highly available MongoDB ReplicaSet running in Kubernetes.
Now let’s deploy the web application that talks to the MongoDB cluster.
Step 3 – Deploying and Scaling the Web Application in Kubernetes
Let’s extend the ToDo Node.js application we used in previous parts of this tutorial series to take advantage of the MongoDB cluster.
Note: You can also build the container image from the source code or use the YAML files in the Kubernetes files directly. Refer to the tutorial Deploying and Scaling Microservices in Kubernetes for steps on building the image and deploying the application to Kubernetes.
Start by creating a new working directory:
- mkdir ~/web-app
- cd ~/web-app
Then clone the ToDo application’s repository that contains the code and Kubernetes artifacts.
- git clone https://github.com/janakiramm/todo.git
Switch to the todo-app/kubernetes directory which contains the Kubernetes configuration files.
- cd todo-app/kubernetes
Open the file web-rs-ss.yaml in your editor.
- nano web-rs-ss.yaml
Notice the env section on the YAML file.
      containers:
      - name: web
        image: janakiramm/todo
        env:
          - name: "DBHOST"
            value: "mongodb://todo-mongodb-replicaset-0.todo-mongodb-replicaset,todo-mongodb-replicaset-1.todo-mongodb-replicaset,todo-mongodb-replicaset-2.todo-mongodb-replicaset:27017"
        ports:
        - containerPort: 3000
This passes the database connection string to the application at runtime as an environment variable. Instead of pointing the application to a simple MongoDB Pod, this version of the app uses the StatefulSet you created. Each entry in the value section refers to one of the Pods of the MongoDB StatefulSet.
Use kubectl to deploy the web ReplicaSet along with the web Service
- kubectl create -f web-rs-ss.yaml -f web-service.yaml
You’ll see that both are created:
Outputreplicaset "web" created
service "web" created
List the pods again:
- kubectl get pods
You now see all the Pods belonging to MongoDB and the web app.
OutputNAME READY STATUS RESTARTS AGE
todo-mongodb-replicaset-0 1/1 Running 0 26m
todo-mongodb-replicaset-1 1/1 Running 0 24m
todo-mongodb-replicaset-2 1/1 Running 0 23m
web-t5zzk 1/1 Running 0 17s
web-x6dh8 1/1 Running 0 17s
Let’s check out the Kubernetes services
```command
kubectl get svc
OutputNAME                      TYPE        CLUSTER-IP   EXTERNAL-IP   PORT(S)          AGE
kubernetes                ClusterIP   10.3.0.1     <none>        443/TCP          1d
todo-mongodb-replicaset   ClusterIP   None         <none>        27017/TCP        27m
web                       NodePort    10.3.0.167   <none>        3000:31201/TCP   14s
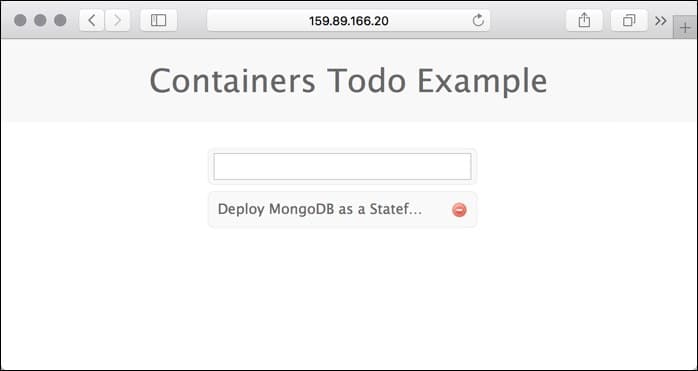
The web Pods talk to the MongoDB cluster through the todo-mongodb-replicaset Service. The web application is available through the web Service on NodePort 31201.
Accessing this port on any of the worker nodes shows the web application.
You can scale the web application by increasing the number of Pods in the ReplicaSet.
- kubectl scale rs/web --replicas=10
Outputreplicaset "web" scaled
You can then scale the application back to two Pods.
- kubectl scale rs/web --replicas=2
Outputreplicaset "web" scaled
Now let’s run some tests for availability.
Step 4 – Testing the MongoDB ReplicaSet for High Availability
One of the advantages of running a StatefulSet is the high availability of workloads. Let’s test this by deleting one of the Pods in the MongoDB StatefulSet.
- kubectl delete pod todo-mongodb-replicaset-2
Outputpod "todo-mongodb-replicaset-2" deleted
Check the number of Pods:
- kubectl get pods
You’ll see that todo-mongodb-replicaset-2 is terminating:
OutputNAME                        READY     STATUS        RESTARTS   AGE
todo-mongodb-replicaset-0   1/1       Running       0          33m
todo-mongodb-replicaset-1   1/1       Running       0          32m
todo-mongodb-replicaset-2   0/1       Terminating   0          31m
web-t5zzk                   1/1       Running       0          8m
web-x6dh8                   1/1       Running       0          8m
Within a few minutes, you will see that Kubernetes initializes another Pod to replace the deleted one.
- kubectl get pods
You’ll see todo-mongodb-replicaset-2 is initializing:
NAME                        READY     STATUS     RESTARTS   AGE
todo-mongodb-replicaset-0   1/1       Running    0          34m
todo-mongodb-replicaset-1   1/1       Running    0          33m
todo-mongodb-replicaset-2   0/1       Init:0/2   0          29s
web-t5zzk                   1/1       Running    0          8m
web-x6dh8                   1/1       Running    0          8m
Now that you know everything works, you can clean things up.
Delete all the objects created during this tutorial with the following commands:
- helm delete --purge todo
- kubectl delete -f web-rs-ss.yaml -f web-service.yaml
Outputreplicaset "web" deleted
service "web" deleted
To delete the Kubernetes cluster itself, visit StackPointCloud and do so through their control panel.
Conclusion
In this tutorial, you deployed a durable, persistent, highly available, MonogDB ReplicaSet as a Kubernetes StatefulSet. You also learned how to access the StatefulSet from other applications deployed in the same Kubernetes cluster.
Thanks for learning with the DigitalOcean Community. Check out our offerings for compute, storage, networking, and managed databases.
Tutorial Series: Webinar Series: Deploying & Managing Containerized Workloads in the Cloud
This series covers the essentials of containers, including container lifecycle management, deploying multi-container applications, scaling workloads, and understanding Kubernetes, along with highlighting best practices for running stateful applications. These tutorials supplement the by the same name.
Browse Series: 6 tutorials
About the author(s)
Cloud Computing Enthusiast
Managed the Write for DOnations program, wrote and edited community articles, and makes things on the Internet. Expertise in DevOps areas including Linux, Ubuntu, Debian, and more.
Still looking for an answer?
This textbox defaults to using Markdown to format your answer.
You can type !ref in this text area to quickly search our full set of tutorials, documentation & marketplace offerings and insert the link!
i recommend using containership.io instead of stackpoint, since stackpoint is paid and containership is always free and comes already with DO storage class for block storage.
Instead of
digitalocean (default) digitalocean/flex-volume-provisioner
I have
do-block-storage (default) com.digitalocean.csi.dobs
This prevents the application to deploy. I get a warning that says:
Warning FailedScheduling 2m (x37 over 12m) default-scheduler pod has unbound PersistentVolumeClaims (repeated 2 times)
How to fix this?
 This work is licensed under a Creative Commons Attribution-NonCommercial- ShareAlike 4.0 International License.
Become a contributor for community
Get paid to write technical tutorials and select a tech-focused charity to receive a matching donation.

DigitalOcean Documentation
Full documentation for every DigitalOcean product.

Resources for startups and AI-native businesses
The Wave has everything you need to know about building a business, from raising funding to marketing your product.
The developer cloud
Scale up as you grow — whether you're running one virtual machine or ten thousand.

Start building today
From GPU-powered inference and Kubernetes to managed databases and storage, get everything you need to build, scale, and deploy intelligent applications.
