
Status: Deprecated
This article covers a version of Ubuntu that is no longer supported. If you are currently operate a server running Ubuntu 12.04, we highly recommend upgrading or migrating to a supported version of Ubuntu:
- Upgrade to Ubuntu 14.04.
- Upgrade from Ubuntu 14.04 to Ubuntu 16.04
- Migrate the server data to a supported version
Reason: Ubuntu 12.04 reached end of life (EOL) on April 28, 2017 and no longer receives security patches or updates. This guide is no longer maintained.
See Instead: This guide might still be useful as a reference, but may not work on other Ubuntu releases. If available, we strongly recommend using a guide written for the version of Ubuntu you are using. You can use the search functionality at the top of the page to find a more recent version.
Introduction
FTP, or file transfer protocol, is a popular way to transfer files between local and remote servers. While FTP was a preferred method of transfer in the past, it authenticates in plain text, making it insecure.
ProFTPd is a popular FTP server that can be configured to use the SFTP protocol, a secure FTP alternative, instead of FTP. This article will show you how to configure ProFTPd to use this protocol to avoid the insecurity of FTP.
We will show you how to configure this on an Ubuntu 12.04 VPS, but most distributions should operate in a similar way.
Install ProFTPd
The ProFTPd software is in Ubuntu’s default repositories. We can install it by typing:
sudo apt-get update && sudo apt-get install proftpd
Choose “stand alone” when prompted during installation.
After it has been installed, we need to edit some basic configuration variables. Open the ProFTPd configuration file with root privileges with your text editor:
sudo nano /etc/proftpd/proftpd.conf
Change the ServerName parameter to match your domain name or IP address.
ServerName "yourDomainOrIPAddress"
Remove the # from in front of the DefaultRoot parameter to uncomment it:
DefaultRoot ~
Save and close the file.
Configure SFTP Access with ProFTPd
Now, we need to configure the service to use SFTP.
The default file looks in the conf.d subdirectory for additional configuration. We will create a file there to enable the use of SFTP:
sudo nano /etc/proftpd/conf.d/sftp.conf
ProFTPd can take configuration with the same formatting as Apache. If you are familiar with Apache, this should look familiar. If you are not familiar, it’s easy to figure out.
Copy and paste the following into the file:
<IfModule mod_sftp.c>

        SFTPEngine on
        Port 2222
        SFTPLog /var/log/proftpd/sftp.log

        # Configure both the RSA and DSA host keys, using the same host key
        # files that OpenSSH uses.
        SFTPHostKey /etc/ssh/ssh_host_rsa_key
        SFTPHostKey /etc/ssh/ssh_host_dsa_key

        SFTPAuthMethods publickey

        SFTPAuthorizedUserKeys file:/etc/proftpd/authorized_keys/%u

        # Enable compression
        SFTPCompression delayed

</IfModule>
Deconstructing the SFTP Configuration
Let’s break the file down into its component pieces so that we can understand it better.
The entire section is wrapped in IfModule tags to make sure that the configuration options are only applied if the SFTP module is available (which it is).
-
SFTPEngine on: Enables the SFTP ability for the server
-
Port 2222: Specifies the port where the SFTP connections will be accepted. Since SSH already is looking for connections on port 22, we want a different port.
-
SFTPLog: Configures the location of the log file that will be created.
-
SFTPHostKey: These two lines point to the SSH host keys. This is how the server identifies itself to clients. For the most part, the lines we used should be correct.
-
SFTPAuthMethods: This line configures the server to only accept connections with SSH keys.
-
SFTPAuthorizedUserKeys: This parameter names the location of the SFTP keys that can be used to authenticate someone. The
%uportion will substitute the authenticating user’s name. -
SFTPCompression delayed: This sets the compression mechanism that will be utilized during file transfers.
Configure Key Based Authentication
The ProFTPd can use SSH keys to authenticate users, but the keys must be converted to use the RFC4716 format. Luckily, the SSH suite has the ability to convert these files natively.
Begin by creating a directory to house these files:
sudo mkdir /etc/proftpd/authorized_keys
Now, we need to convert the public keys that are currently used to log into the server. If you only have one user, you can use this command:
<pre> sudo ssh-keygen -e -f ~<span class=“highlight”>username</span>/.ssh/authorized_keys | sudo tee /etc/proftpd/authorized_keys/<span class=“highlight”>username</span> </pre>
If you have multiple users and you need to separate their log in credentials, you will have to use the actual public key instead of the authorized_keys file, like this:
<pre> sudo ssh-keygen -e -f <span class=“highlight”>/path/to/id_rsa.pub</span> | sudo tee /etc/proftpd/authorized_keys/<span class=“highlight”>username_who_owns_key</span> </pre>
You can add as many keys as you would like.
When you are finished, restart the ProFTPd server:
sudo service proftpd restart
Disable SFTP Access on the SSH Port
Now that we have enabled SFTP through ProFTPd, we can disable it on the normal SSH port. This will allow us to configure user access and lock down what each user can see and manipulate through ProFTPd, without worrying about people being able to leave their home directories.
Open the SSHD configuration file:
sudo nano /etc/ssh/sshd_config
Towards the bottom of the file, you should see a line that looks like this:
Subsystem sftp /usr/lib/openssh/sftp-server
Put a hash (#) in front of it to comment out the line:
# Subsystem sftp /usr/lib/openssh/sftp-server
Save and close the file.
Now, restart the SSH server so to enable your changes:
sudo service ssh restart
Connecting with a Client
There are plenty of FTP clients that we can use to connect with our server. The good ones implement SFTP capabilities as well. We will demonstrate how to connect through FileZilla, which is available on all major platforms.
Open FileZilla’s preferences. Find the "SFTP section in the left-hand menu.
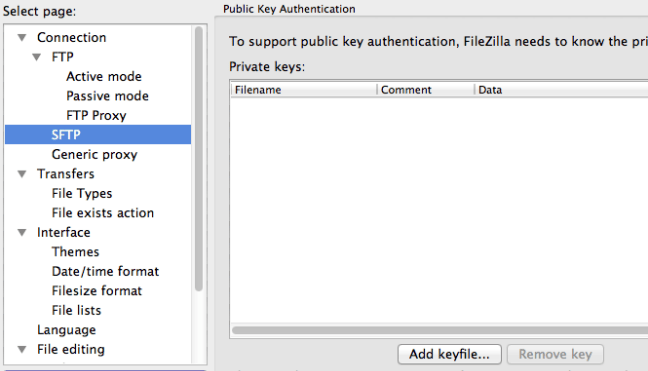
Click on “Add keyfile”, and navigate to the location of your private key. Usually, this will be in ~/.ssh/id_rsa. You will probably get a message saying that FileZilla will convert it to a supported format.
Press “Okay” to exit the preferences.
In the main interface, type sftp:// followed by the domain name or IP address of your server in the “Host” field. Place your username in the “Username” field and fill in the port you chose for the “Port” field:

Click “Quickconnect” and FileZilla should connect automatically using your SSH keys.
Conclusion
Your server should now be configured to accept SFTP connections managed by ProFTPd. You can configure the software to manage users and what areas are restricted. In general, FTP should be avoided at all costs due to its lack of proper security.
<div class=“author”>By Justin Ellingwood</div>
Thanks for learning with the DigitalOcean Community. Check out our offerings for compute, storage, networking, and managed databases.
About the author
Former Senior Technical Writer at DigitalOcean, specializing in DevOps topics across multiple Linux distributions, including Ubuntu 18.04, 20.04, 22.04, as well as Debian 10 and 11.
Still looking for an answer?
This textbox defaults to using Markdown to format your answer.
You can type !ref in this text area to quickly search our full set of tutorials, documentation & marketplace offerings and insert the link!
Did all the steps as mentioned, but I get this message on Fillezila (mac):
Error: Disconnected: No supported authentication methods available (server sent: publickey) Error: Could not connect to server
Any idea on how I can debug this?
when i try to convert the keys via
"Now, we need to convert the public keys that are currently used to log into the server. If you only have one user, you can use this command:
sudo ssh-keygen -e -f ~username/.ssh/authorized_keys | sudo tee /etc/proftpd/authorized_keys/username"
i get “ssh-keygen: /home/main/.ssh/authorized_keys: No such file or directory”
I have followed all the steps mentioned but get this error. what am i doing wrong ?
@karambahosting: Add the SSH key you want to use to ~username/.ssh/authorized_keys (each one on its own line, usually starting with “ssh-rsa”) and then run that command.
Somewhat new to this but have implemented the above. What I need is to be able to create accounts that are upload only with each account pointing to one file directory only (unique). This while still having admin access through the root account to all folders. How would I go about doing this? Any direction would help me out a lot. Thanks
@Josh: <blockquote>This while still having admin access through the root account to all folders.</blockquote> root has access to everything all the time, no matter what. <blockquote>What I need is to be able to create accounts that are upload only with each account pointing to one file directory only (unique).</blockquote> Check out <a href=“https://www.digitalocean.com/community/articles/how-to-add-and-delete-users-on-ubuntu-12-04-and-centos-6”>https://www.digitalocean.com/community/articles/how-to-add-and-delete-users-on-ubuntu-12-04-and-centos-6</a>.
Hello, while filezilla is trying to connect it gives me an error: Disconnected: No supported authentication methods available (server sent: public key) why it can be? thanks
@foykes: You need to configure filezilla to use your SSH key that you configured PuTTy to use.
After this step: sudo ssh-keygen -e -f ~username/.ssh/authorized_keys | sudo tee /etc/proftpd/authorized_keys/username
I get prompted for my passphrase. Once I enter the password, I get this response: load failed
This is on a brand-new vanilla installation of ubuntu+LAMP
@magness.richard: Try the following command instead: <pre>sudo ssh-keygen -e -f /home/username/.ssh/authorized_keys | sudo tee /etc/proftpd/authorized_keys/username </pre>
 This work is licensed under a Creative Commons Attribution-NonCommercial- ShareAlike 4.0 International License.
Become a contributor for community
Get paid to write technical tutorials and select a tech-focused charity to receive a matching donation.

DigitalOcean Documentation
Full documentation for every DigitalOcean product.

Resources for startups and AI-native businesses
The Wave has everything you need to know about building a business, from raising funding to marketing your product.
The developer cloud
Scale up as you grow — whether you're running one virtual machine or ten thousand.

Start building today
From GPU-powered inference and Kubernetes to managed databases and storage, get everything you need to build, scale, and deploy intelligent applications.
