
Introduction
Gathering information about your systems and applications can give you the information you need to make informed decisions about your infrastructure, servers, and software.
There are many different ways to acquire this kind of information, and display it in a way that allows for easy comprehension. One of these applications is called Graphite.
Graphite is an excellent tool for organizing and rendering visual representations of data gathered from your system. It is highly flexible and can be configured so that you can gain the benefits of both detailed representation and broad overviews of the performance and health of the metrics you are tracking.
In a previous guide, we looked at an overview of graphing and stats gathering applications that you can string together to create a robust system to display stats. In this guide, we’ll show you how to get set up with Graphite on your Ubuntu 14.04 server. In a future guide, we’ll talk about how to feed Graphite stats from collectd and Statsd.
Install Graphite
To get started, we need to download and install the Graphite components. If you looked at our introduction to graphing software, you will have noticed that Graphite is made of several components: the web application, a storage backend called Carbon, and the database library called whisper.
Graphite used to be fairly difficult to install. Luckily, in Ubuntu 14.04, all of the components that we need can be found in the default repositories.
Let’s update our local package index and then install the necessary packages:
sudo apt-get update
sudo apt-get install graphite-web graphite-carbon
During the installation, you will be asked whether you want Carbon to remove the database files if you ever decide to purge the installation. Choose “No” here so that you will not destroy your stats. If you need to start fresh, you can always manually remove the files (kept in var/lib/graphite/whisper).
When the installation is complete, Graphite will be installed. We need to do some additional configuration though to get everything off the ground and running.
Configure a Database for Django
Although the Graphite data itself is handled by Carbon and the whisper database library, the web application is a Django Python application, and needs to store its data somewhere.
By default, this is configured to use SQLite3 database files. However, these aren’t as robust as a full-fledged relational database management system, so we will be configuring our app to use PostgreSQL instead. PostgreSQL is much stricter with data typing and will catch exceptions that might lead to problems down the road.
Install PostgreSQL Components
We can install the database software and the helper packages we need by typing:
sudo apt-get install postgresql libpq-dev python-psycopg2
This will install the database software, as well as the Python libraries that Graphite will use to connect to and communicate with the database.
Create a Database User and a Database
After our database software is installed, we’ll need to create a PostgreSQL user and database for Graphite to use.
We can sign into an interactive PostgreSQL prompt by using the psql command as the postgres system user:
sudo -u postgres psql
Now, we need to create a database user account that Django will use to operate on our database. We will call the user graphite. Select a secure password for this user:
<pre> CREATE USER graphite WITH PASSWORD ‘<span class=“highlight”>password</span>’; </pre>
Now, we can create a database and give our new user ownership of it. We are going to call the database graphite as well to make it easy to recognize their association:
CREATE DATABASE graphite WITH OWNER graphite;
When you are finished, we can exit out of the PostgreSQL session:
\q
You may see a message that says that Postgres could not save the file history. This is not a problem for us, so we can continue.
Configure the Graphite Web Application
Now, we have our database and user ready to go. However, we still need to modify Graphite’s settings to use the components we just configured. There are also some other settings that we should take a look at.
Open the Graphite web app configuration file:
sudo nano /etc/graphite/local_settings.py
First, we should set the secret key that will be used as a salt when creating hashes. Uncomment the SECRET_KEY parameter and change the value to something long and unique.
<pre> SECRET_KEY = ‘<span class=“highlight”>a_salty_string</span>’ </pre>
Next, we should specify the timezone. This will affect the time displayed on our graphs, so it is important to set. Set it to your time zone as specified by the “TZ” column in this list.
<pre> TIME_ZONE = ‘<span class=“highlight”>America/New_York</span>’ </pre>
We also want to configure authentication for saving graph data. When we sync the database, we’ll be able to create a user account, but we need to enable authentication by uncommenting this line:
USE_REMOTE_USER_AUTHENTICATION = True
Next, look for the DATABASES dictionary definition. We want to change the values to reflect our Postgres information. You should change the NAME, ENGINE, USER, PASSWORD, and HOST keys.
When you are finished, it should look something like this:
<pre> DATABASES = { ‘default’: { ‘NAME’: ‘<span class=“highlight”>graphite</span>’, ‘ENGINE’: ‘django.db.backends.<span class=“highlight”>postgresql_psycopg2</span>’, ‘USER’: ‘<span class=“highlight”>graphite</span>’, ‘PASSWORD’: ‘<span class=“highlight”>password</span>’, ‘HOST’: ‘<span class=“highlight”>127.0.0.1</span>’, ‘PORT’: ‘’ } } </pre>
The areas in red are values you need to change. Make sure that you modify the password to the one you selected for the graphite user in Postgres.
Also, make sure that you set the HOST parameter. If you leave this blank, Postgres will think you are trying to connect using peer authentication, which will not authenticate correctly in our case.
Save and close the file when you are finished.
Sync the Database
Now that we have our database section filled out, we can sync the database to create the correct structure.
You can do this by typing:
sudo graphite-manage syncdb
You will be asked to create a superuser account for the database. Create a new user so that you can sign into the interface. You can call this whatever you want. This will allow you to save your graphs and modify the interface.
Configure Carbon
Now that we have a database, we can start to configure Carbon, the Graphite storage backend.
First, let’s enable the carbon service to start at boot. We can do this by opening the service configuration file:
sudo nano /etc/default/graphite-carbon
This only has one parameter, which dictates whether the service will start on boot. Change the value to “true”:
CARBON_CACHE_ENABLED=true
Save and close the file.
Next, open the Carbon configuration file:
sudo nano /etc/carbon/carbon.conf
Most of this file is already configured correctly for our purposes. However, we will make a small change.
Turn on log rotation by adjusting setting this directive to true:
ENABLE_LOGROTATION = True
Save and close the file.
Configuring Storage Schemas
Now, open the storage schema file. This tells Carbon how long to store values and how detailed these values should be:
sudo nano /etc/carbon/storage-schemas.conf
Inside, you will find entries that look like this:
<pre> [carbon] pattern = ^carbon. retentions = 60:90d
[default_1min_for_1day] pattern = .* retentions = 60s:1d </pre>
The file currently has two sections defined. The first one is for deciding what to do with data coming from Carbon itself. Carbon is actually configured to store some metrics of its own performance. The bottom definition is a catch-all that is designed to apply to any data that hasn’t been matched by another section. It defines a default policy.
The words in the brackets are the section headers that are used to define a new definition. Under each section, there is a pattern definition and a retentions policy.
The pattern definition is a regular expression that is used to match any information sent to Carbon. Information sent to Carbon includes a metric name, which is what this checks. In the first example, the pattern checks whether the metric in question starts with the string “carbon.”.
The retention policy is defined by sets of numbers. Each set consists of a metric interval (how often a metric is recorded), followed by a colon and then the length of time to store those values. You can define multiple sets of numbers separated by commas.
To demonstrate, we will define a new schema that will match a test value that we’ll use later on.
Before the default section, add another section for our test values. Make it look like this:
<pre> [test] pattern = ^test. retentions = 10s:10m,1m:1h,10m:1d </pre>
This will match any metrics beginning with “test.”. It will store the data it collects three times, in varying detail. The first archive definition (10s:10m) will create a data point every ten seconds. It will store the values for only ten minutes.
The second archive (1m:1h) will create a data point every minute. It will gather all of the data from the past minute (six points, since the previous archive creates a point every ten seconds) and aggregate it to create the point. By default, it does this by averaging the points, but we can adjust this later. It stores the data at this level of detail for one hour.
The last archive that will be created (10m:1d) will make a data point every 10 minutes, aggregating the data in the same way as the second archive. It will store the data for one day.
When we request information from Graphite, it will return information from the most detailed archive that measures the time frame we’re asking for. So if we ask for metrics from the past five minutes, information from the first archive will be returned. If we ask for a graph of the past 50 minutes, the data will be taken from the second archive.
Save and close the file when you are finished.
About Storage Aggregation Methods
The way that Carbon decides to aggregate data when crunching more detailed information into a generalized number is very important to understand if you want accurate metrics. This applies every time that Graphite makes a less detailed version of a metric, like in the second and third archives in the test schema we created above.
As we mentioned above, the default behavior is to take the average when aggregating. This means that, other than the most detailed archive, Carbon will average the data points it received to create the number.
This is not always desirable though. For instance, if we want the total number of times that an event occurred over various time periods, we would want to add up the data points to create our generalized data point instead of averaging them.
We can define the way we want aggregation to occur in a file called storage-aggregation.conf. Copy the file from the Carbon examples directory into our Carbon configuration directory:
sudo cp /usr/share/doc/graphite-carbon/examples/storage-aggregation.conf.example /etc/carbon/storage-aggregation.conf
Open the file in your text editor:
sudo nano /etc/carbon/storage-aggregation.conf
This looks a bit similar to the last file. You will find entries that look like this:
<pre> [min] pattern = .min$ xFilesFactor = 0.1 aggregationMethod = min </pre>
The section name and pattern are exactly the same as the storage-schemas file. It is just an arbitrary name and a pattern to match the metrics you are defining.
The XFilesFactor is an interesting parameter in that it allows you to specify the minimum percentage of values that Carbon should have to do the aggregation. By default, all values are set to 0.5, meaning that 50% of the more detailed data points must be available if an aggregated point is to be created.
This can be used to ensure that you’re not creating data points that might misrepresent the actual situation. For instance, if 70% of your data is being dropped because of network problems, you might not want to create a point that only truthfully represents 30% of the data.
The aggregation method is defined next. Possible values are average, sum, last, max and min. They are fairly self explanatory, but very important. Choosing the wrong value will cause your data to be recorded in an incorrect way. The correct selection depends entirely on what the metric is that you’re actually tracking.
Note: It is important to realize that if you send Graphite data points more frequently than the shortest archive interval length, some of your data will be lost!
This is because Graphite only applies aggregation when going from detailed archives to generalized archives. When creating the detailed data point, it only writes the most recent data sent to it when the interval has passed. We will discuss StatsD in another guide, which can help alleviate this problem by caching and aggregating data that comes in at a more frequent interval.
Save and close the file.
When you are finished, you can start Carbon by typing:
sudo service carbon-cache start
Install and Configure Apache
In order to use the web interface, we are going to install and configure the Apache web server. Graphite includes configuration files for Apache, so the choice is pretty easy.
Install the components by typing:
sudo apt-get install apache2 libapache2-mod-wsgi
When the installation is complete, we should disable the default virtual host file, since it conflicts with our new file:
sudo a2dissite 000-default
Next, copy the Graphite Apache virtual host file into the available sites directory:
sudo cp /usr/share/graphite-web/apache2-graphite.conf /etc/apache2/sites-available
We can then enable the virtual host file by typing:
sudo a2ensite apache2-graphite
Reload the service to implement the changes:
sudo service apache2 reload
Checking out the Web Interface
Now that we have everything configured, we can check out the web interface.
In your web browser, visit your server’s domain name or IP address:
<pre> http://<span class=“highlight”>server_domain_name_or_IP</span> </pre>
You should see a screen that looks like this:

Before you go any further, you should log in so that you can save any graph settings you might make. Click on the “Login” button on the top menu bar and enter the username and password you configured when syncing the Django database.
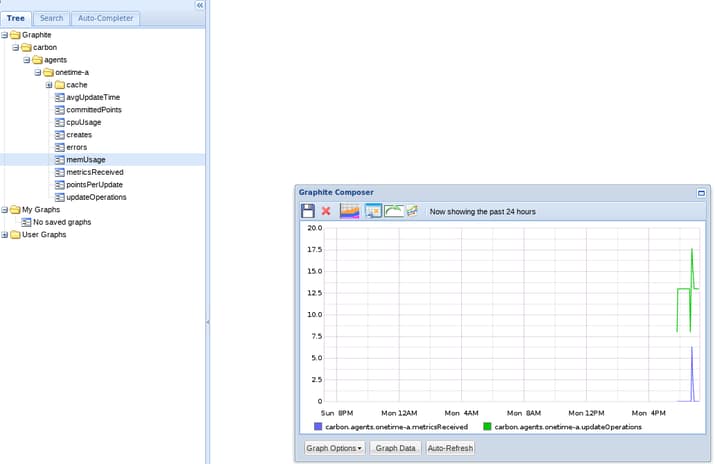
Next, If you open the tree for Graphite in the left-pane, you should see an entry for Carbon. This is where you can find graphs of data that Carbon recorded about itself. Click on a few of the options. Here, I’m graphing the metrics received and update operations metrics:
Now, let’s try to send some data to Graphite. As you go through these steps, be aware that you almost never send stats to Graphite like this. There are much better ways of doing this, but this will help to demonstrate what is going on in the background and will also help you understand the limitations of the way that Graphite handles data. We will talk about how to get around these with companion services later.
Metric messages need to contain a metric name, a value, and a timestamp. We can do this in our terminal. Let’s create a value that will match our test storage schema that we created. We will also match one of the definitions that will add up the values when it aggregates. We’ll use the date command to make our timestamp. Type:
echo "test.count 4 `date +%s`" | nc -q0 127.0.0.1 2003
If you refresh the page and then look in the Graphite tree on the left, you will see our new test metric. Send the above command a few times, waiting at least 10 seconds in between. Remember, Graphite throws all but the last value when more than one value is sent in its smallest interval.
Now, in the web interface, tell Graphite to show you the past 8 minutes. On the graph of the test metric, click on the icon that is a white rectangle with a green arrow. It will say “Select Recent Data” when you mouse over it:
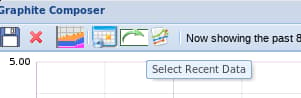
Select 8 minutes from the pop up window. Click on the icon that says “Update Graph” to get the most recent data. You should see a graph with barely any information. This is because you have only sent it a few values, each of which are “4”, so it has no variation.
However, if you view the graph of the past 15 minutes (assuming that you sent the command a few different times, spaced out larger than 10 seconds but less than one minute), you should see something different:
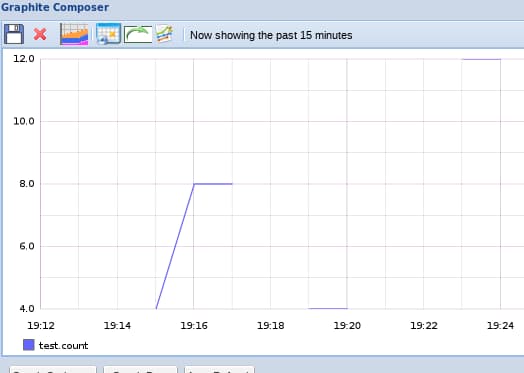
This is because our first archive does not save data for fifteen minutes, so Graphite looks to our second archive for the rendering data. It looks different because we sent Graphite a “count” metric, which matches one of our aggregation definitions.
The count aggregation tells Graphite to add up the values that it received over the course of its larger intervals instead of averaging. As you can see, the aggregation method we choose is very important because it defines how a generalize data point is created from the more detailed points.
Conclusion
You now have Graphite installed and set up, but it is still fairly limited in what it can do. We don’t want to have to manually feed it data all of the time and we want it to not throw away data if we have more than one metric within the smallest interval. We need companion tools that to help us work around these problems.
In the next guide, we’ll discuss how to set up collectd a system statistics gathering daemon that can be used to feed Graphite data and work around these limitations. In future guides, we’ll also cover how to configure StatsD with Graphite and how to use the Graphite interface more in-depth.
<div class=“author”>By Justin Ellingwood</div>
Thanks for learning with the DigitalOcean Community. Check out our offerings for compute, storage, networking, and managed databases.
Tutorial Series: Introduction to Tracking Statistics on Servers
Collecting and analyzing statistics on your servers and infrastructure becomes increasingly valuable as the complexity of your systems increase. In this series, we will introduce you to some battle-tested statistics gathering and rendering tools. We will go over some basic concepts and then show you how to install and set up each component to effectively monitor your servers and processes.
About the author
Former Senior Technical Writer at DigitalOcean, specializing in DevOps topics across multiple Linux distributions, including Ubuntu 18.04, 20.04, 22.04, as well as Debian 10 and 11.
Still looking for an answer?
This textbox defaults to using Markdown to format your answer.
You can type !ref in this text area to quickly search our full set of tutorials, documentation & marketplace offerings and insert the link!
I have a problem! When i run the ‘sudo graphite-manage syncdb’ i found this:
rhuan@graphite2:~$ sudo graphite-manage syncdb Traceback (most recent call last): File “/usr/bin/graphite-manage”, line 15, in <module> execute_from_command_line(sys.argv) File “/usr/lib/python2.7/dist-packages/django/core/management/init.py”, line 399, in execute_from_command_line utility.execute() File “/usr/lib/python2.7/dist-packages/django/core/management/init.py”, line 392, in execute self.fetch_command(subcommand).run_from_argv(self.argv) File “/usr/lib/python2.7/dist-packages/django/core/management/base.py”, line 242, in run_from_argv self.execute(*args, **options.dict) File “/usr/lib/python2.7/dist-packages/django/core/management/base.py”, line 280, in execute translation.activate(‘en-us’) File “/usr/lib/python2.7/dist-packages/django/utils/translation/init.py”, line 130, in activate return _trans.activate(language) File “/usr/lib/python2.7/dist-packages/django/utils/translation/trans_real.py”, line 188, in activate _active.value = translation(language) File “/usr/lib/python2.7/dist-packages/django/utils/translation/trans_real.py”, line 177, in translation default_translation = _fetch(settings.LANGUAGE_CODE) File “/usr/lib/python2.7/dist-packages/django/utils/translation/trans_real.py”, line 159, in _fetch app = import_module(appname) File “/usr/lib/python2.7/dist-packages/django/utils/importlib.py”, line 40, in import_module import(name) File “/usr/lib/python2.7/dist-packages/django/contrib/admin/init.py”, line 6, in <module> from django.contrib.admin.sites import AdminSite, site File “/usr/lib/python2.7/dist-packages/django/contrib/admin/sites.py”, line 4, in <module> from django.contrib.admin.forms import AdminAuthenticationForm File “/usr/lib/python2.7/dist-packages/django/contrib/admin/forms.py”, line 6, in <module> from django.contrib.auth.forms import AuthenticationForm File “/usr/lib/python2.7/dist-packages/django/contrib/auth/forms.py”, line 17, in <module> from django.contrib.auth.models import User File “/usr/lib/python2.7/dist-packages/django/contrib/auth/models.py”, line 48, in <module> class Permission(models.Model): File “/usr/lib/python2.7/dist-packages/django/db/models/base.py”, line 96, in new new_class.add_to_class(‘_meta’, Options(meta, **kwargs)) File “/usr/lib/python2.7/dist-packages/django/db/models/base.py”, line 264, in add_to_class value.contribute_to_class(cls, name) File “/usr/lib/python2.7/dist-packages/django/db/models/options.py”, line 124, in contribute_to_class self.db_table = truncate_name(self.db_table, connection.ops.max_name_length()) File “/usr/lib/python2.7/dist-packages/django/db/init.py”, line 34, in getattr return getattr(connections[DEFAULT_DB_ALIAS], item) File “/usr/lib/python2.7/dist-packages/django/db/utils.py”, line 198, in getitem backend = load_backend(db[‘ENGINE’]) File “/usr/lib/python2.7/dist-packages/django/db/utils.py”, line 131, in load_backend raise ImproperlyConfigured(error_msg) django.core.exceptions.ImproperlyConfigured: ‘jango.db.backends.postgresql_psycopg2’ isn’t an available database backend. Try using ‘django.db.backends.XXX’, where XXX is one of: u’mysql’, u’oracle’, u’postgresql_psycopg2’, u’sqlite3’ Error was: No module named jango.db.backends.postgresql_psycopg2.base
Can someone help me?? Thanks,
Oh, i’m sorry, i’ve entered “jango.db.backends.postgresql_psycopg2.base” but is “django”…
@rhuankarlus: There are a number of ports being used by carbon. By default they are 2003, 2004, and 7002. These can be configured in <code>/etc/carbon/carbon.conf</code>
Working fine, but I’ve very basic question. According to Graphite documentation, it can only store and render graphs of data on demand. It cannot collect data, it relies on data providers such as collectD or statsD . But without installing any of the data providers , We are able to see the graphs for cpuUsage, memUsage, errors, cache in carbon section. Who are providing Graphite these data?
@AndreSB, when carbon receive data, it stores the data on the database. Is this right? And if so, which table is used to store my data?
@rhuankarlus: The postgres database is just for the Django powered Graphite web front end. The actual databases that store the statistical information are powered by Whisper, and are store in /var/lib/graphite/whisper/
Thanks for the help @AndrewSB. But let me ask something. When I send data to myhost.graphite.com:2003 (the carbon’s port), why this data (in the right format) doesn’t appear in the graphite web interface? Can this be a carbon-cache’s problem or bad configuration?
P.S.: I’m sure that the data was right and be sending.
 This work is licensed under a Creative Commons Attribution-NonCommercial- ShareAlike 4.0 International License.
Become a contributor for community
Get paid to write technical tutorials and select a tech-focused charity to receive a matching donation.

DigitalOcean Documentation
Full documentation for every DigitalOcean product.

Resources for startups and AI-native businesses
The Wave has everything you need to know about building a business, from raising funding to marketing your product.
The developer cloud
Scale up as you grow — whether you're running one virtual machine or ten thousand.

Start building today
From GPU-powered inference and Kubernetes to managed databases and storage, get everything you need to build, scale, and deploy intelligent applications.
