
Introduction
Linux is, by definition, a multi-user OS that is based on the Unix concepts of file ownership and permissions to provide security at the file system level. To reliably administer a cloud server, it is essential that you have a decent understanding of how ownership and permissions work. There are many intricacies of dealing with file ownership and permissions, but this tutorial will provide a good introduction.
This tutorial will cover how to view and understand Linux ownership and permissions. If you are looking for a tutorial on how to modify permissions, you can read Linux Permissions Basics and How to Use Umask on a VPS.
Prerequisites
Make sure you understand the concepts covered in the prior tutorials in this series:
To follow this tutorial, you will need access to a cloud server. You can follow this guide to creating a DigitalOcean droplet.
About Users
As mentioned in the introduction, Linux is a multi-user system. You should understand the fundamentals of Linux users and groups before ownership and permissions, because they are the entities that the ownership and permissions apply to. Let’s get started with what users are.
In Linux, there are two types of users: system users and regular users. Traditionally, system users are used to run non-interactive or background processes on a system, while regular users are used for logging in and running processes interactively. When you first initialize and log in to a Linux system, you may notice that it starts out with many system users already created to run the services that the OS depends on. This is normal.
You can view all of the users on a system by looking at the contents of the /etc/passwd file. Each line in this file contains information about a single user, starting with its username (the name before the first :). You can print the contents of the passwd file with cat:
- cat /etc/passwd
Output…
sshd:x:109:65534::/run/sshd:/usr/sbin/nologin
landscape:x:110:115::/var/lib/landscape:/usr/sbin/nologin
pollinate:x:111:1::/var/cache/pollinate:/bin/false
systemd-coredump:x:999:999:systemd Core Dumper:/:/usr/sbin/nologin
lxd:x:998:100::/var/snap/lxd/common/lxd:/bin/false
vault:x:997:997::/home/vault:/bin/bash
stunnel4:x:112:119::/var/run/stunnel4:/usr/sbin/nologin
sammy:x:1001:1002::/home/sammy:/bin/sh
Superuser
In addition to the two user types, there is the superuser, or root user, that has the ability to override any file ownership and permission restrictions. In practice, this means that the superuser has the rights to access anything on its own server. This user is used to make system-wide changes.
It is also possible to configure other user accounts with the ability to assume “superuser rights”. This is often referred to as having sudo, because users who have permissions to temporarily gain superuser rights do so by preceding admin-level commands with sudo. In fact, creating a normal user that has sudo privileges for system administration tasks is considered to be best practice. This way, you can be more conservative in your use of the root user account.
About Groups
Groups are collections of zero or more users. A user belongs to a default group, and can also be a member of any of the other groups on a server.
You can view all the groups on the system and their members by looking in the /etc/group file, as you would with /etc/passwd for users. This article does not cover group management.
Now that you know what users and groups are, let’s talk about file ownership and permissions!
Viewing Ownership and Permissions
In Linux, every file is owned by a single user and a single group, and has its own access permissions. Let’s look at how to view the ownership and permissions of a file.
The most common way to view the permissions of a file is to use ls with the long listing option -l, e.g. ls -l myfile. If you want to view the permissions of all of the files in your current directory, run the command without the myfile argument, like this:
- ls -l
Note: If you are in an empty home directory, and you haven’t created any files to view yet, you can follow along by listing the contents of the /etc directory by running this command: ls -l /etc
Here is an example screenshot of ls -l output, with labels of each column of output:
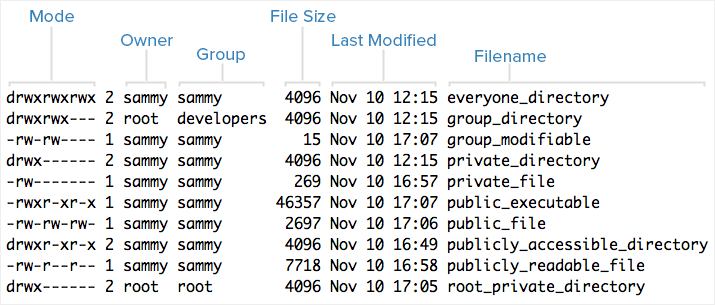
Each file lists its mode (which contains permissions), owner, group, and name are listed. To help explain what all of those letters and hyphens mean, let’s break down the mode column into its components.
Understanding Mode
To help explain what all the groupings and letters mean, here is a breakdown of the mode metadata of the first file in the above example:
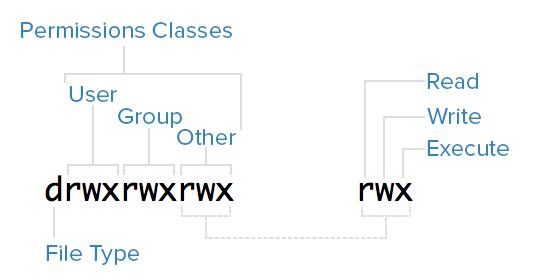
File Type
In Linux, there are two types of files: normal and special. The file type is indicated by the first character of the mode of a file — in this guide, this will be referred to as the “file type field”.
Normal files can be identified by a hyphen (-) in their file type fields. Normal files can contain data or anything else. They are called normal, or regular, files to distinguish them from special files.
Special files can be identified by a non-hyphen character, such as a letter, in their file type fields, and are handled by the OS differently than normal files. The character that appears in the file type field indicates the kind of special file a particular file is. For example, a directory, which is the most common kind of special file, is identified by the d character that appears in its file type field (like in the previous screenshot). There are several other kinds of special files.
Permissions Classes
From the diagram, you can see that the mode column indicates the file type, followed by three triads, or classes, of permissions: user (owner), group, and other. The order of the classes is consistent across all Linux systems.
The three permissions classes work as follows:
- User: The owner of a file belongs to this class.
- Group: The members of the file’s group belong to this class. Group permissions are a useful way of assigning permissions on a given file to multiple users.
- Other: Any users that are not part of the user or group classes for this file belong to this class.
Reading Symbolic Permissions
The next thing to pay attention to are those sets of three characters. They denote the permissions, in symbolic form, that each class has for a given file.
In each triad, read, write, and execute permissions are represented in the following way:
- Read: Indicated by an
rin the first position - Write: Indicated by a
win the second position - Execute: Indicated by an
xin the third position. In some special cases, there may be a different character here
A hyphen (-) in the place of one of these characters indicates that the respective permission is not available for the respective class. For example, if the group (second) triad for a file is r--, the file is “read-only” to the group that is associated with the file.
Understanding Read, Write, Execute
Now that you know how to read the permissions of a file, you should know what each of the permissions actually allow users to do. This tutorial will cover each permission individually, but keep in mind that they are often used in combination with each other to allow for useful access to files and directories.
Here is a breakdown of the access that the three permission types grant to user:
Read
For a normal file, read permission allows a user to view the contents of the file.
For a directory, read permission allows a user to view the names of the file in the directory.
Write
For a normal file, write permission allows a user to modify and delete the file.
For a directory, write permission allows a user to delete the directory, modify its contents (create, delete, and rename files in it), and modify the contents of files that the user has write permissions to.
Execute
For a normal file, execute permission allows a user to execute (run) a file — the user must also have read permission. Execute permissions must be set for executable programs and shell scripts before a user can run them.
For a directory, execute permission allows a user to access, or traverse into (i.e. cd) and access metadata about files in the directory (the information that is listed in an ls -l).
Examples of Modes (and Permissions)
Now that know how to read the mode of a file, and understand the meaning of each permission, you will see a few examples of common modes, with brief explanations, to bring the concepts together.
-rw-------: A file that is only accessible by its owner-rwxr-xr-x: A file that is executable by every user on the system. A “world-executable” file-rw-rw-rw-: A file that is open to modification by every user on the system. A “world-writable” filedrwxr-xr-x: A directory that every user on the system can read and accessdrwxrwx---: A directory that is modifiable (including its contents) by its owner and groupdrwxr-x---: A directory that is accessible by its group
The owner of a file usually enjoys the most permissions, when compared to the other two classes. Typically, you will see that the group and other classes only have a subset of the owner’s permissions (equivalent or less). This makes sense because files should only be accessible to users who need them for a particular reason.
Another thing to note is that even though many permission combinations are possible, only certain ones make sense in most situations. For example, write or execute access is almost always accompanied by read access, since it’s hard to modify, and impossible to execute, something you can’t read.
Conclusion
You should now have a good understanding of how ownership and permissions work in Linux. To learn how to modify these permissions using chown, chgrp, and chmod, refer to Linux Permissions Basics and How to Use Umask on a VPS.
If you would like to learn more about Linux fundamentals, read the next tutorial in this series, An Introduction to Linux I/O Redirection.
Thanks for learning with the DigitalOcean Community. Check out our offerings for compute, storage, networking, and managed databases.
Tutorial Series: Getting Started with Linux
If you are new to Linux and its command line interface, it may seem like a daunting task to get started with it. This series will bring you up to speed with essential Linux basics, and provide a solid foundation for working with Linux servers. If you have little to no knowledge about using Linux, this is where you will want to start.
Browse Series: 4 tutorials
About the author
Software Engineer @ DigitalOcean. Former Señor Technical Writer (I no longer update articles or respond to comments). Expertise in areas including Ubuntu, PostgreSQL, MySQL, and more.
Still looking for an answer?
This textbox defaults to using Markdown to format your answer.
You can type !ref in this text area to quickly search our full set of tutorials, documentation & marketplace offerings and insert the link!
This comment has been deleted
Whenever you are dealing with permissions, you should also note Attributes. I’ve written a small tutorial on the matter:
https://www.digitalocean.com/community/questions/what-are-file-directory-attributes
 This work is licensed under a Creative Commons Attribution-NonCommercial- ShareAlike 4.0 International License.
Become a contributor for community
Get paid to write technical tutorials and select a tech-focused charity to receive a matching donation.

DigitalOcean Documentation
Full documentation for every DigitalOcean product.

Resources for startups and AI-native businesses
The Wave has everything you need to know about building a business, from raising funding to marketing your product.
The developer cloud
Scale up as you grow — whether you're running one virtual machine or ten thousand.

Start building today
From GPU-powered inference and Kubernetes to managed databases and storage, get everything you need to build, scale, and deploy intelligent applications.
