
Introduction
If you’ve ever felt that your Python scripts are running a bit too slow—especially when dealing with heavy computations or large datasets—you’re not alone. Python is a great language for writing clear, readable code, but sometimes it could use a little speed boost. That’s where Cython comes in.
In this article, we’ll explore how you can use Cython to supercharge your Python code by converting it into fast, compiled C code—without leaving the comfort of Python syntax. Whether you’re new to performance tuning or just curious about making your scripts faster, this guide will walk you through the basics in a simple, beginner-friendly way.
Cython is an easy way to significantly lessen the computation time of Python scripts without sacrificing the functionality that is easily achieved using Python.
This tutorial will introduce you to using Cython to speed up Python scripts. We’ll look at a simple yet computationally expensive task: creating a for loop that iterates through a Python list of 1 billion numbers and sums them. Since time is particularly important when running code on resource-limited devices, we’ll put this issue into context by considering how to implement Python code in Cython on Raspberry Pi (RPi). Cython makes a significant change in the speed of calculation. Think of it like a sloth compared to a cheetah.
Prerequisites for Boosting Python Scripts with Cython
- Basic Knowledge of Python: Familiarity with Python syntax, functions, data types, and modules.
- Understanding of C/C++ Basics: Basic understanding of C or C++ concepts such as pointers, data types, and control structures.
- Python Development Environment: Python installed (preferably Python 3.x) with a package manager like pip.
- Cython Installation: Install Cython using pip install cython.
- Familiarity with Terminal/Command Line: Basic ability to navigate and run commands in the terminal or command prompt.
These prerequisites will help us be ready to start optimizing Python code using Cython.
The sections covered in this tutorial are as follows:
- Python, CPython, and Cython
- Cythonizing Simple Python Code
- Cythonizing a for Loop
- Assigning C Data Types to the Variables
- Using Cython on Raspberry Pi
Let’s get started.
Python and CPython
Many people are unaware of the fact that languages like Python are implemented in other languages. For example, the C implementation of Python is called CPython. Note that it is not Cython.
The default and most popular implementation of Python is CPython. There is an important advantage to using it. C is a compiled language, and its code is converted into machine code, which is executed directly by the central processing unit (CPU). Now, you may wonder, if C is a compiled language, does that mean Python is, too?
Python implementation in C (CPython) is not 100% compiled and also not 100% interpreted. There is both compilation and interpretation in the process of running a Python script. To make this clear, let’s see the steps of running a Python script:
- Compiling source code using CPython to generate bytecode
- Interpreting the bytecode in a CPython interpreter
- Running the output of the CPython interpreter in a CPython virtual machine
Compilation occurs when CPython compiles the source code (.py file) to generate the CPython bytecode (.pyc file). The CPython bytecode (.pyc file) is then interpreted using a CPython interpreter, and the output runs in a CPython virtual machine. According to the above steps, running a Python script involves both compilation and interpretation.
The CPython compiler generates the bytecode just once, but the interpreter is called each time the code runs. Usually, the interpretation of the bytecode takes a lot of time. If using an interpreter slows down the execution, why use it at all? The big reason is that it helps make Python cross-platform. Since the bytecode runs in a CPython virtual machine on top of the CPU, it is independent of the machine it’s running on. As a result, the bytecode can run on different machines unchanged.
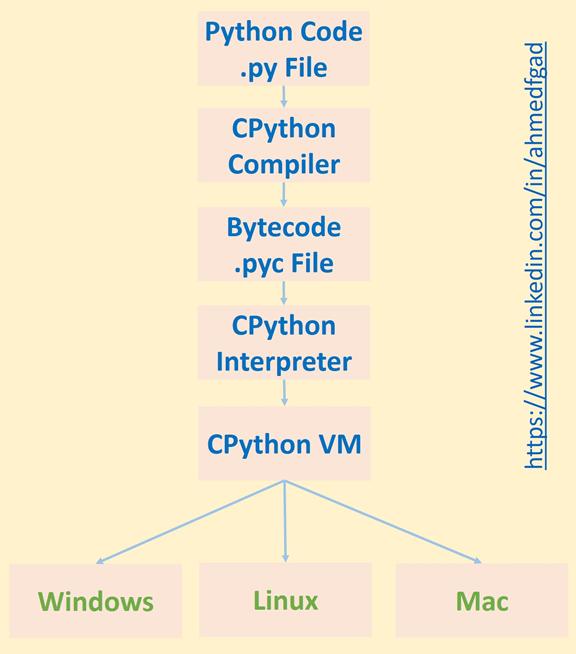
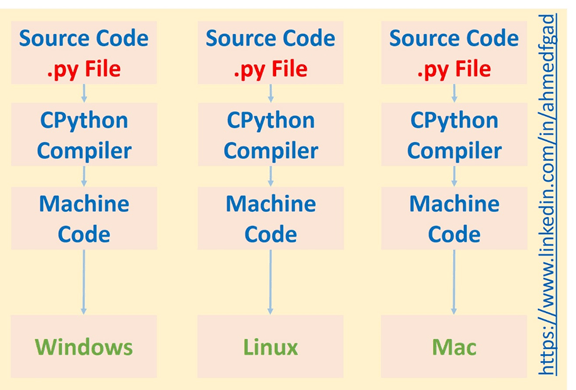
If no interpreter is used, the CPython compiler generates machine code that directly runs on the CPU. Because different platforms have different instructions, the code is not cross-platform.
In summary, using a compiler speeds up the process, but an interpreter makes the code cross-platform. So, a reason why Python is slower than C is that an interpreter is used. Remember that the compiler just runs once, but the interpreter runs each time the code is executed.
Python is much slower than C, but many programmers still prefer it since it’s so much easier to use. Python hides many details from the programmer, which can help prevent frustrating debugging. For instance, since Python is a dynamically-typed language, you do not have to explicitly specify the type of each variable in your code – Python will deduce it automatically. In contrast, with statically-typed languages (like C, C++, or Java), you must specify the types of the variables, as seen below.
int x = 10
string s = "Hello"
Compare this to the implementation below in Python. Dynamic typing makes it easier to code, but it puts a much greater burden on the machine to find a suitable datatype, making the process slower.
x = 10
s = "Hello"
Generally speaking, “higher level” languages like Python are much easier to use for developers. However, when the code is run, it will need to be converted into low-level instructions. This conversion takes more time, which is sacrificed for ease-of-use.
If time is an important factor, then you need to use the lower-level instructions. So, rather than typing the code using Python, which is the interface, you can write it using CPython, which is the backend of Python implemented in C. However, if you do so, you will feel that you are programming in C, not Python.
CPython is much more complex. In CPython, everything is implemented in C. There is no way to escape the C complexity in coding. This is why many developers opt for Cython instead. But how is Cython different from CPython?
How Cython Is Different
According to the official Cython documentation, Cython is essentially Python with added C data types. A 2009 tutorial paper further explains that Cython is a Python-based programming language that includes extra syntax for adding static type declarations. This allows developers to keep the simplicity of Python while gaining the performance benefits of C.
Based on the definitions above, Cython gives you the best of both worlds—Python’s simplicity and C’s performance. You can continue writing standard Python code, but when needed, you can speed things up by replacing certain parts with C-like syntax using Cython. This results in a mix of Python and C code within the same file. While most Python code works in Cython, there are some limitations. To understand these in detail, visit the Cython limitations guide.
The regular Python file has a .py extension, but the Cython file has the .pyx extension instead. The same Python code can be written inside the .pyx files, but these also allow you to use Cython code. Note that just placing the Python code into a .pyx file may speed up the process compared to running the Python code directly, but not as much as when also declaring the variable types. Thus, the focus of this tutorial is not only on writing the Python code within the .pyx file but also on making edits that will make it run faster. By doing so, we add a bit of difficulty to the programming, but much time is saved from doing so. If you have any experience with C programming, then it will be even easier for you.
Cythonizing Simple Python Code
To convert your Python code into Cython, start by creating a file with a .pyx extension instead of the usual .py. You can begin writing standard Python code in this file, but keep in mind that not all Python features are fully supported. For a detailed list of these restrictions, refer to the Cython limitations guide.
Before going forward, make sure Cython is installed. You can do so with the following command.
pip install cython
To generate the .pyd (on Windows) or .so (on Linux/macOS) file, which is the compiled module you’ll later import, you first need to build your Cython file. This is done using a setup.py script. Create a setup.py file and add the following code to it. In this script, we use the distutils.core.setup() function along with Cython.Build.cythonize() to compile the .pyx file. The cythonize() function takes the path to the .pyx file you want to compile. For this example, we’re assuming that setup.py is located in the same directory as your test_cython.pyx file.
import distutils.core
import Cython.Build
distutils.core.setup(
    ext_modules = Cython.Build.cythonize("test_cython.pyx"))
In order to build the Cython file, issue the command below in the command prompt; the current directory of the command prompt is expected to be the same as the directory of the setup.py file.
python setup.py build_ext --inplace
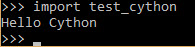
After this command is complete, two files will be placed beside the .pyx file. The first one has the .c extension, and the other file will have the extension .pyd (or similar, based on the operating system used). To use the generated file, just import the test_cython module, and the “Hello Cython” message will appear directly, as you see below.
We have now successfully cythonized the Python code. The next section discusses cythonizing a .pyx file in which a loop is created.
Cythonizing a “for” Loop
Now, let’s optimize our aforementioned task: a for loop that iterates through 1 million numbers and sums them. Let’s start by looking at the efficiency of just the iterations of the loop. The time module is imported to estimate how long it takes to execute.
import time
t1 = time.time()

for k in range(1000000):
    pass

t2 = time.time()
t = t2-t1
print("%.20f" % t)
In a .pyx file, the mean time for 3 runs is 0.0281 seconds. The code is running on a machine with Core i7-6500U CPU @ 2.5 GHz and 16 GB DDR3 RAM.
Compare this with the time it takes to run in a normal Python file, the mean of which is 0.0411 seconds. This means Cython is 1.46 times faster than Python for the iterations alone, even though we don’t need to modify the for loop to get it to execute at C speed.
Now, let’s add the summing task. We’ll use the range() function for this.
import time
t1 = time.time()

total = 0
for k in range(1000000):
    total = total + k
print "Total =", total

t2 = time.time()
t = t2-t1
print("%.100f" % t)
Note that both of the scripts return the same value, which is 499999500000. In Python, this takes an average of 0.1183 seconds to run (between three trials). In Cython, it is 1.35 times faster, at an average of 0.0875 seconds.
Let’s see another example in which the loop iterates through 1 billion numbers starting from 0.
import time
t1 = time.time()

total = 0
for k in range(1000000000):
    total = total + k
print "Total =", total

t2 = time.time()
t = t2-t1
print("%.20f" % t)
The Cython script completed in nearly 85 seconds (1.4 minutes), while the Python script completed in nearly 115 seconds (1.9 minutes). In both cases, it’s simply too much time. What is the benefit of using Cython if it lasts for more than a minute on such a trivial task? Note that this is our fault, not Cython’s.
As discussed previously, writing the Python code within the Cython .pyx script is an improvement, but it does not cut the execution time very much. We have to make edits to the Python code within the Cython script. The first thing to focus on is to explicitly define the data types of the variables used.
Assigning C Data Types to Variables
According to the previous code, there are 5 variables used: total, k, t1, t2, and t. All of these variables have their data types deduced implicitly by the code, thus taking more time. To save the time used to deduce their data types, let’s assign them data types from the C language instead.
The type defined for the variable k is int, and the float type is assigned for the remaining three variables t1, t2, and t.
import time

cdef unsigned long long int total
cdef int k
cdef float t1, t2, t

t1 = time.time()

for k in range(1000000000):
    total = total + k
print "Total =", total

t2 = time.time()
t = t2-t1
print("%.100f" % t)
Note that the precision defined in the last print statement is set to 100, and all of these numbers are zeros (see the next figure). This is what we can expect from using Cython. While Python takes more than 1.9 minutes, Cython takes no time at all. I cannot even say that the speed is 1000 or 100000 times faster than Python; I tried different precisions for the printed time, and still no number appears.

Note that you can also create an integer variable to hold the value passed to the range() function. This will boost performance even more. The new code is listed below, where the value is stored in the maxval integer variable.
import time

cdef unsigned long long int maxval
cdef unsigned long long int total
cdef int k
cdef float t1, t2, t

maxval=1000000000

t1=time.time()

for k in range(maxval):
    total = total + k
print "Total =", total

t2=time.time()
t = t2-t1
print("%.100f" % t)
Now that we’ve seen how to speed up the performance of the Python scripts by using Cython, let’s apply this to the Raspberry Pi (RPi).
Accessing Raspberry Pi from a PC
If this is the first time you’re using your Raspberry Pi, then both your PC and the Raspberry Pi need to get connected over a network. You can do this by connecting both of them to a switch on which the DHCP (Dynamic Host Configuration Protocol) is active to assign them IP addresses automatically. After successful network creation, you can access the RPi based on the IPv4 address assigned to it. How do you know what the IPv4 address assigned to your RPi is? Don’t worry, you can simply use an IP scanner tool.
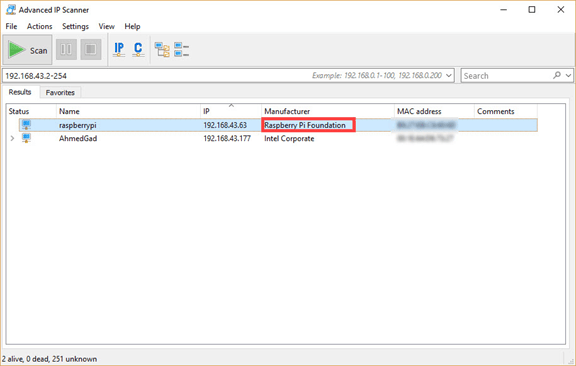
The interface of the application is as seen below. It accepts a range of IPv4 addresses to search for and returns the information for active devices.

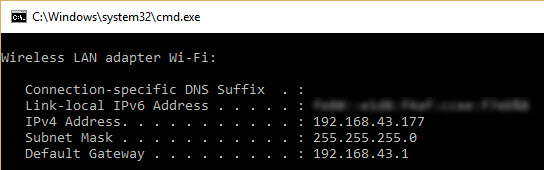
You need to enter the range of IPv4 addresses in your local network. If you do not know the range, just issue the ipconfig command in Windows (or ifconfig in Linux) to know your PC IPv4 address (as shown in the figure below). In my case, the IPv4 address assigned to the Wi-Fi adapter of my PC is 192.168.43.177, and the subnet mask is 255.255.255.0. This means that the range of IPv4 addresses in the network is from 192.168.43.1 to 192.168.43.255. According to the figure, the IPv4 address 192.168.43.1 is assigned to the gateway. Note that the last IPv4 address in the range, 192.168.43.255, is reserved for broadcast messages. Thus, the range to search should start from 192.168.43.2 and end at 192.168.43.254.
The scan result shown in the next figure shows that the IPv4 address assigned to the RPi is 192.168.43.63. This IPv4 address can be used to create a secure shell (SSH) session.
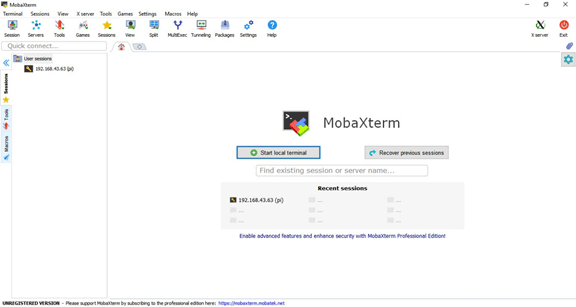
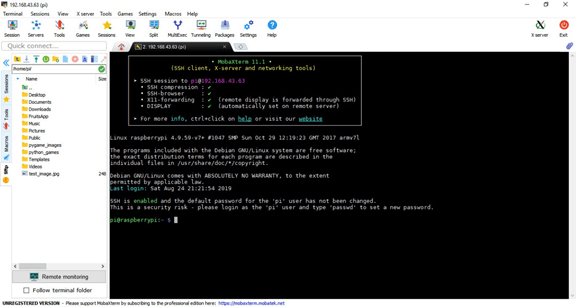
To establish the SSH session, I will utilize the free software MobaXterm. The application’s interface is shown below.
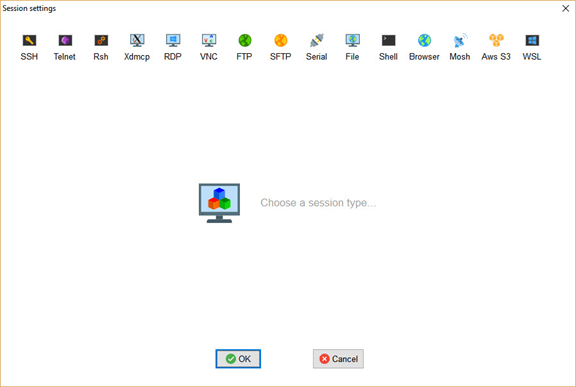
To create an SSH session, click the Session button in the top-left corner. A new window will appear, as shown below.
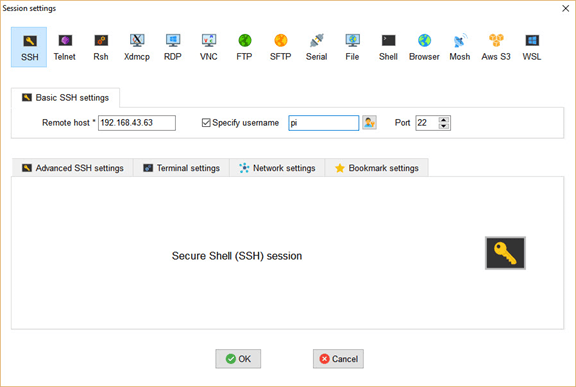
From this window, click on the SSH button at the top-left corner to open the window shown below. Just enter the IPv4 address of the RPi and the username (which is by default pi), then click OK to start the session.
After clicking the OK button, a new window will appear asking for the password. The default password is raspberrypi. After logging in, the next window appears. The pane to the left helps to navigate the directories of the RPi easily. There is also a command line for entering commands.
Using Cython with Raspberry Pi
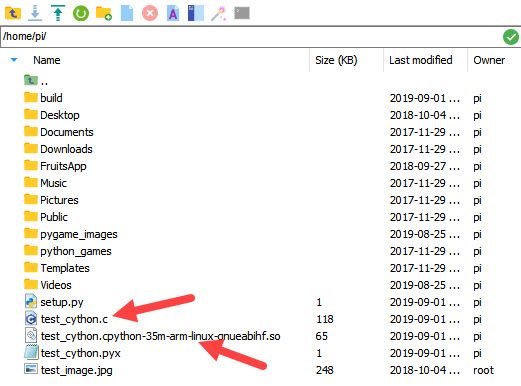
Create a new file and set its extension to .pyx to write the code for the last example. There are options in the bar on the left pane for creating new files and directories. You can use the new file icon to make things even simpler, as shown in the following figure. I created a file named test_cython.pyx in the root directory of the RPi.

Double-click the file to open it, paste the code, and save it. After that, we can create the setup.py file, which is exactly the same as we discussed previously. Next, we must issue the following command to build the Cython script.
python3 setup.py build_ext --inplace
After this command completes successfully, you can find the output files listed in the left pane according to the next figure. Note that the extension of the module to be imported is now .so, as we are no longer using Windows.
Now, let’s activate Python and import the module, as shown below. The same results achieved on the PC are also achieved here; the consumed time is essentially zero.

Conclusion
In this tutorial, we demonstrated how Cython can significantly accelerate Python code by compiling it to C and adding static type declarations. Through the example of summing elements in a list of 1 billion numbers, we saw how a task that takes nearly two minutes in pure Python can be reduced to milliseconds with Cython optimizations.
For developers looking to scale compute-heavy Python applications efficiently, Cython offers a simple yet powerful solution. To further enhance performance and scalability, consider running your optimized Python workloads on DigitalOcean Droplets—a reliable and developer-friendly cloud platform built to support high-performance computing tasks with ease.
Thanks for learning with the DigitalOcean Community. Check out our offerings for compute, storage, networking, and managed databases.
About the author
Still looking for an answer?
This textbox defaults to using Markdown to format your answer.
You can type !ref in this text area to quickly search our full set of tutorials, documentation & marketplace offerings and insert the link!
 This work is licensed under a Creative Commons Attribution-NonCommercial- ShareAlike 4.0 International License.
Become a contributor for community
Get paid to write technical tutorials and select a tech-focused charity to receive a matching donation.

DigitalOcean Documentation
Full documentation for every DigitalOcean product.

Resources for startups and AI-native businesses
The Wave has everything you need to know about building a business, from raising funding to marketing your product.
The developer cloud
Scale up as you grow — whether you're running one virtual machine or ten thousand.

Start building today
From GPU-powered inference and Kubernetes to managed databases and storage, get everything you need to build, scale, and deploy intelligent applications.
