By erm and Hazel Virdó

Introduction
Having access to the Twitter API using Python can be extremely useful for promoting your brand (if you represent a business or organization), as well as incredibly enjoyable and entertaining (if you are an individual user or hobbyist programmer).
In this article, we will outline the steps necessary for you to create a Twitter application and access your account using Python.
Prerequisites
Before you begin, ensure you have completed the following prerequisites:
- A Ubuntu 14.04 Droplet
- A sudo non-root user, which you can set up by following steps 1-4 in this tutorial.
- A Twitter account with a valid phone number
You will also require Python 2.7, which comes preinstalled on Ubuntu 14.04. To ensure you have the correct version (2.7.x), you can type the following command at your terminal:
python --version
This article will use Ubuntu 14.04 LTS as the Linux server distribution, but the steps should be identical on Ubuntu 12.04, Ubuntu 12.10, and Ubuntu 14.10.
Step 1 — Install pip and Tweepy
In this step, we will install pip and Tweepy.
The Python library Tweepy provides easy access to the Twitter API. The simplest means of acquiring Tweepy is using pip, a Python package management system.
First, we will install pip.
sudo apt-get update && sudo apt-get install python-pip
This will set up python-pip on your system and allow you to install numerous other Python libraries using the pip command.
Next, we will install Tweepy using pip.
sudo pip install tweepy
Note: Using sudo to install a Python library with pip will install it system-wide and make it available to all users.
Step 2 — Create Your Twitter Application
We will now explain the process of creating a Twitter application and retrieving your API access keys and tokens. These tokens are what will allow you to authenticate your Python client application with Twitter. As mentioned in the prerequisites, you will require a valid phone number in order to create applications using Twitter.
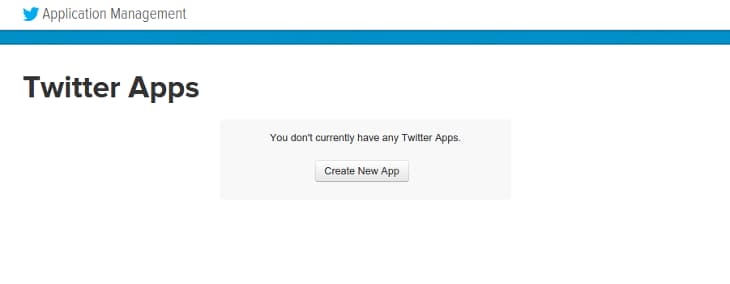
Open up your browser and visit https://apps.twitter.com/ then log in using your Twitter account credentials. Once logged in, click the button labeled Create New App.
You will now be redirected to the application creation page. Fill out the required form information and accept the Developer Agreement at the bottom of the page, then click the button labeled Create your Twitter application.

On this page, you’ll fill out the following fields.
- Name: my-example-app
- Description: My example application.
- Website: https://my.example.placeholder
You will also have to click the checkbox that says Yes, I agree underneath the Developer Agreement.
Step 3 — Modify Your Application’s Permission Level and Generate Your Access Tokens
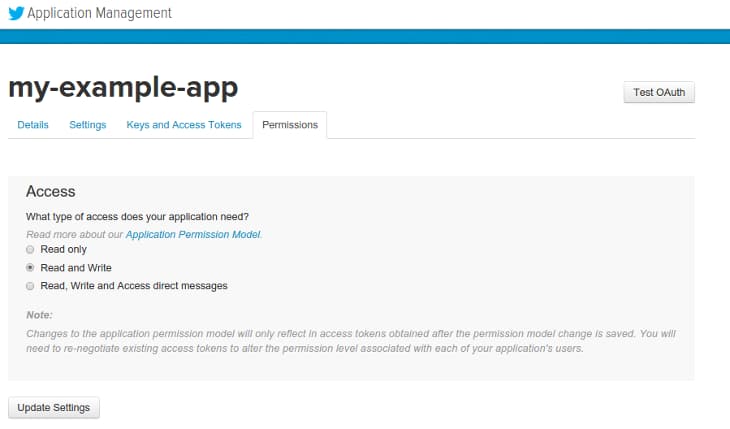
After successfully creating your application, you will be redirected to your application’s settings page. Before you create your application keys, you will need to first modify the access level permissions in order to allow your application to post on your behalf.

Click on the link labeled modify app permissions. You will then be able to choose which permissions to allow. Select Read and Write to allow your application to post on your account’s timeline. If you want to allow the API access to direct messages, select Read, Write and Access direct messages instead.
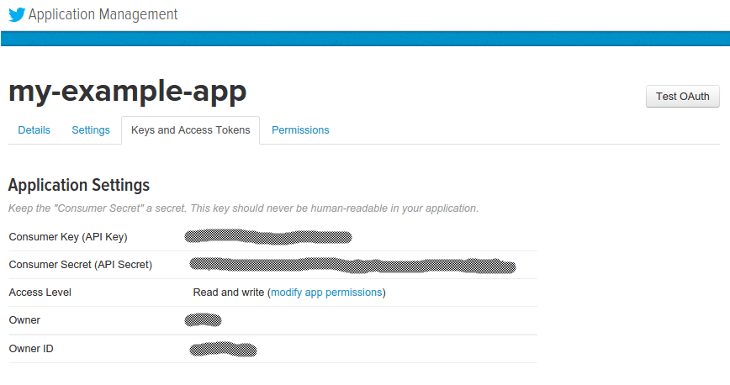
After updating your application’s permissions to allow posting, click the tab labeled Keys and Access Tokens. This will take you to a page that lists your Consumer Key and Consumer Secret, and also will allow you to generate your Access Token and Access Token Secret. These keys and secrets are necessary to authenticate our client application with Twitter.
Click the button labeled Create my access token under the Access Token heading to generate your Access Token and Access Token Secret.
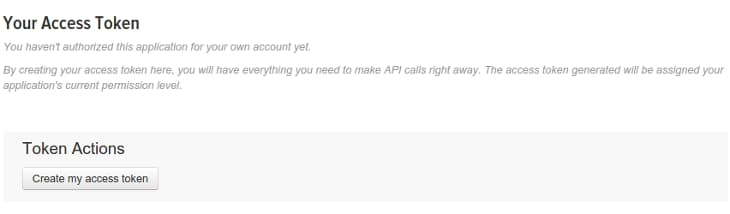
Now you will now have an Access Token and an Access Token Secret. You’ll also see the Access Level you chose before, your username as the Owner, and your Owner ID.
Step 4 — Create a Python application to authenticate with Twitter
After successfully creating your Twitter application and generating the necessary keys and tokens, you are now ready to create your client application for posting to your timeline. In this step, we provide you a simple “Hello World!” Python script to test your application.
Create a new file called helloworld.py.
nano helloworld.py
Paste the following script into the editor. Replace the keys and secrets with your unique credentials from the Twitter apps website. You can also replace the “Testing!” status with whatever you’d like the test tweet to say.
import tweepy

CONSUMER_KEY = 'your_consumer_key'
CONSUMER_SECRET = 'your_consumer_secret'
ACCESS_TOKEN = 'your_access_token'
ACCESS_TOKEN_SECRET = 'your_access_token_secret'

auth = tweepy.OAuthHandler(CONSUMER_KEY, CONSUMER_SECRET)
auth.set_access_token(ACCESS_TOKEN, ACCESS_TOKEN_SECRET)
api = tweepy.API(auth)

status = "Testing!"
api.update_status(status=status)
Save the file, then run the script.
python helloworld.py
Check your Twitter account. If the status posts to your account’s timeline, then you have successfully configured your Twitter application and authenticated using Tweepy!
Thanks for learning with the DigitalOcean Community. Check out our offerings for compute, storage, networking, and managed databases.
About the author(s)
former DO tech editor publishing articles here with the community, then founded the DO product docs team (https://do.co/docs). to all of my authors: you are incredible. working with you was a gift. love is what makes us great.
Still looking for an answer?
This textbox defaults to using Markdown to format your answer.
You can type !ref in this text area to quickly search our full set of tutorials, documentation & marketplace offerings and insert the link!
This is great!!!
I had my first tweet up within minutes and I’ve already written this into my IRC bot.
it’s saying invalid syntax because my access token has a ‘-’ in between the keys
 This work is licensed under a Creative Commons Attribution-NonCommercial- ShareAlike 4.0 International License.
Become a contributor for community
Get paid to write technical tutorials and select a tech-focused charity to receive a matching donation.

DigitalOcean Documentation
Full documentation for every DigitalOcean product.

Resources for startups and AI-native businesses
The Wave has everything you need to know about building a business, from raising funding to marketing your product.
The developer cloud
Scale up as you grow — whether you're running one virtual machine or ten thousand.

Start building today
From GPU-powered inference and Kubernetes to managed databases and storage, get everything you need to build, scale, and deploy intelligent applications.
