By Jonathan Cardoso and Timothy Nolan

The author selected the Tech Education Fund to receive a donation as part of the Write for DOnations program.
Introduction
Having an automated deployment process is a requirement for a scalable and resilient application, and GitOps, or Git-based DevOps, has rapidly become a popular method of organizing CI/CD with a Git repository as a “single source of truth.” Tools like CircleCI integrate with your GitHub repository, allowing you to test and deploy your code automatically every time you make a change to your repository. When this kind of CI/CD is combined with the flexibility of Kubernetes infrastructure, you can build an application that scales easily with changing demand.
In this article you will use CircleCI to deploy a sample application to a DigitalOcean Kubernetes (DOKS) cluster. After reading this tutorial, you’ll be able to apply these same techniques to deploy other CI/CD tools that are buildable as Docker images.
Prerequisites
To follow this tutorial, you’ll need to have:
-
A DigitalOcean account, which you can set up by following the Sign up for a DigitalOcean Account documentation.
-
Docker installed on your workstation, and knowledge of how to build, remove, and run Docker images. You can install Docker on Ubuntu 20.04 by following the tutorial on How To Install and Use Docker on Ubuntu 20.04.
-
Knowledge of how Kubernetes works and how to create deployments and services on it. It’s highly recommended to read the Introduction to Kubernetes article.
-
The
kubectlcommand line interface tool installed on the computer from which you will control your cluster. -
An account on Docker Hub to be used to store your sample application image.
-
A GitHub account and knowledge of Git basics. You can follow the tutorial series Introduction to Git: Installation, Usage, and Branches and How To Create a Pull Request on GitHub to build this knowledge.
For this tutorial, you will use Kubernetes version 1.22.7 and kubectl version 1.23.5.
Step 1 — Creating Your DigitalOcean Kubernetes Cluster
Note: You can skip this section if you already have a running DigitalOcean Kubernetes cluster.
In this first step, you will create the DigitalOcean Kubernetes (DOKS) cluster from which you will deploy your sample application. The kubectl commands executed from your local machine will change or retrieve information directly from the Kubernetes cluster.
Go to the Kubernetes page on your DigitalOcean account.
Click Create a Kubernetes cluster, or click the green Create button at the top right of the page and select Kubernetes from the dropdown menu.

The next page is where you are going to specify the details of your cluster. On Select a Kubernetes version pick version 1.22.7-do.0. If this one is not available, choose the latest recommended version.
For Choose a datacenter region, choose the region closest to you. This tutorial will use San Francisco.
You then have the option to build your Node pool(s). On Kubernetes, a node is a worker machine, which contains the services necessary to run pods. On DigitalOcean, each node is a Droplet. Your node pool will consist of a single Basic node. Select the 1GB/1vCPU configuration and change to 1 Node on the number of nodes.
You can add extra tags if you want; this can be useful if you plan to use the DigitalOcean API or just to better organize your node pools.
On Choose a name, for this tutorial, use kubernetes-deployment-tutorial. This will make it easier to follow throughout while reading the next sections. Finally, click the green Create Cluster button to create your cluster. Wait until the cluster creation has completed.
After cluster creation, there will be instructions to connect to your cluster. Follow the instructions on the Automated (recommended) tab or download the kubeconfig file under the Manual tab. This is the file you will be using to authenticate the kubectl commands you are going to run against your cluster. Download it to your kubectl machine.
The default way to use that file is to always pass the --kubeconfig flag and the path to it on all commands you run with kubectl. For example, if you downloaded the config file to Desktop, you would run the kubectl get pods command like this:
- kubectl --kubeconfig ~/Desktop/kubernetes-deployment-tutorial-kubeconfig.yaml get pods
This would yield the following output:
OutputNo resources found.
This means you accessed your cluster. The No resources found. message is correct, since you don’t have any pods on your cluster.
If you are not maintaining any other Kubernetes clusters you can copy the kubeconfig file to a folder on your home directory called .kube. Create that directory in case it does not exist:
- mkdir -p ~/.kube
Then copy the config file into the newly created .kube directory and rename it config:
- cp current_kubernetes-deployment-tutorial-kubeconfig.yaml_file_path ~/.kube/config
The config file should now have the path ~/.kube/config. This is the file that kubectl reads by default when running any command, so there is no need to pass --kubeconfig anymore. Run the following:
- kubectl get pods
You will receive the following output:
OutputNo resources found in default namespace.
Now access the cluster with the following:
- kubectl get nodes
You will receive the list of nodes on your cluster. The output will be similar to this:
OutputNAME                   STATUS   ROLES    AGE   VERSION
pool-upkissrv3-uzm8z   Ready    <none>   12m   v1.22.7
In this tutorial you are going to use the default namespace for all kubectl commands and manifest files, which are files that define the workload and operating parameters of work in Kubernetes. Namespaces are like virtual clusters inside your single physical cluster. You can change to any other namespace you want; just make sure to always pass it using the --namespace flag to kubectl, and/or specifying it on the Kubernetes manifests metadata field. They are a great way to organize the deployments of your team and their running environments; read more about them in the official Kubernetes overview on Namespaces.
By finishing this step you are now able to run kubectl against your cluster. In the next step, you will create the local Git repository you are going to use to house your sample application.
Step 2 — Creating the Local Git Repository
You are now going to structure your sample deployment in a local Git repository. You will also create some Kubernetes manifests that will be global to all deployments you are going to do on your cluster.
Note: This tutorial has been tested on Ubuntu 20.04, and the individual commands are styled to match this OS. However, most of the commands here can be applied to other Linux distributions with little to no change needed, and commands like kubectl are platform-agnostic.
First, create a new Git repository locally that you will push to GitHub later on. Create an empty folder called do-sample-app in your home directory and cd into it:
- mkdir ~/do-sample-app
- cd ~/do-sample-app
Now create a new Git repository in this folder with the following command:
- git init .
Inside this repository, create an empty folder called kube:
- mkdir ~/do-sample-app/kube/
This will be the location where you are going to store the Kubernetes resources manifests related to the sample application that you will deploy to your cluster.
Now, create another folder called kube-general, but this time outside of the Git repository you just created. Make it inside your home directory:
- mkdir ~/kube-general/
This folder is outside of your Git repository because it will be used to store manifests that are not specific to a single deployment on your cluster, but common to multiple ones. This will allow you to reuse these general manifests for different deployments.
With your folders created and the Git repository of your sample application in place, it’s time to arrange the authentication and authorization of your DOKS cluster.
Step 3 — Creating a Service Account
It’s generally not recommended to use the default admin user to authenticate from other Services into your Kubernetes cluster. If your keys on the external provider got compromised, your whole cluster would become compromised.
Instead you are going to use a single Service Account with a specific Role, which is all part of the RBAC Kubernetes authorization model.
This authorization model is based on Roles and Resources. You start by creating a Service Account, which is basically a user on your cluster, then you create a Role, in which you specify what resources it has access to on your cluster. Finally, you create a Role Binding, which is used to make the connection between the Role and the Service Account previously created, granting to the Service Account access to all resources the Role has access to.
The first Kubernetes resource you are going to create is the Service Account for your CI/CD user, which this tutorial will name cicd.
Create the file cicd-service-account.yml inside the ~/kube-general folder, and open it with your favorite text editor:
- nano ~/kube-general/cicd-service-account.yml
Write the following content on it:
apiVersion: v1
kind: ServiceAccount
metadata:
  name: cicd
  namespace: default
This is a YAML file; all Kubernetes resources are represented using one. In this case you are saying this resource is from Kubernetes API version v1 (internally kubectl creates resources by calling Kubernetes HTTP APIs), and it is a ServiceAccount.
The metadata field is used to add more information about this resource. In this case, you are giving this ServiceAccount the name cicd, and creating it on the default namespace.
You can now create this Service Account on your cluster by running kubectl apply, like the following:
- kubectl apply -f ~/kube-general/
You will receive output similar to the following:
Outputserviceaccount/cicd created
To make sure your Service Account is working, try to log in to your cluster using it. To do that you first need to obtain their respective access token and store it in an environment variable. Every Service Account has an access token which Kubernetes stores as a Secret.
You can retrieve this secret using the following command:
- TOKEN=$(kubectl get secret $(kubectl get secret | grep cicd-token | awk '{print $1}') -o jsonpath='{.data.token}' | base64 --decode)
Some explanation on what this command is doing:
$(kubectl get secret | grep cicd-token | awk '{print $1}')
This is used to retrieve the name of the secret related to our cicd Service Account. kubectl get secret returns the list of secrets on the default namespace, then you use grep to search for the lines related to your cicd Service Account. Then you return the name, since it is the first thing on the single line returned from the grep.
kubectl get secret preceding-command -o jsonpath='{.data.token}' | base64 --decode
This will retrieve only the secret for your Service Account token. You then access the token field using jsonpath, and pass the result to base64 --decode. This is necessary because the token is stored as a Base64 string. The token itself is a JSON Web Token.
You can now try to retrieve your pods with the cicd Service Account. Run the following command, replacing server-from-kubeconfig-file with the server URL that can be found after server: in ~/.kube/config (the config file you downloaded for the cluster). This command will give a specific error that you will learn about later in this tutorial:
- kubectl --insecure-skip-tls-verify --kubeconfig="/dev/null" --server=server-from-kubeconfig-file --token=$TOKEN get pods
--insecure-skip-tls-verify skips the step of verifying the certificate of the server, since you are just testing and do not need to verify this. --kubeconfig="/dev/null" is to make sure kubectl does not read your config file and credentials but instead uses the token provided.
The output should be similar to this:
OutputError from server (Forbidden): pods is forbidden: User "system:serviceaccount:default:cicd" cannot list resource "pods" in API group "" in the namespace "default"
This is an error, but it shows us that the token worked. The error you received is about your Service Account not having the neccessary authorization to list the resource secrets, but you were able to access the server itself. If your token had not worked, the error would have been the following one:
Outputerror: You must be logged in to the server (Unauthorized)
Now that the authentication was a success, the next step is to fix the authorization error for the Service Account. You will do this by creating a role with the necessary permissions and binding it to your Service Account.
Step 4 — Creating the Role and the Role Binding
Kubernetes has two ways to define roles: using a Role or a ClusterRole resource. The difference between the former and the latter is that the first one applies to a single namespace, while the other is valid for the whole cluster.
As you are using a single namespace on this tutorial, you will use a Role.
Create the file ~/kube-general/cicd-role.yml and open it with your favorite text editor:
- nano ~/kube-general/cicd-role.yml
The basic idea is to grant access to do everything related to most Kubernetes resources in the default namespace. Your Role would look like this:
kind: Role
apiVersion: rbac.authorization.k8s.io/v1
metadata:
  name: cicd
  namespace: default
rules:
  - apiGroups: ["", "apps", "batch", "extensions"]
    resources: ["deployments", "services", "replicasets", "pods", "jobs", "cronjobs"]
    verbs: ["*"]
This YAML has some similarities with the one you created previously, but here you are saying this resource is a Role, and it’s from the Kubernetes API rbac.authorization.k8s.io/v1. You are naming your role cicd, and creating it on the same namespace you created your ServiceAccount, the default one.
Then you have the rules field, which is a list of resources this role has access to. In Kubernetes resources are defined based on the API group they belong to, the resource kind itself, and what actions you can do on then, which is represented by a verb. Those verbs are similar to the HTTP ones.
In this case you are saying that your Role is allowed to do everything, *, on the following resources: deployments, services, replicasets, pods, jobs, and cronjobs. This also applies to those resources belonging to the following API groups: "" (empty string), apps, batch, and extensions. The empty string means the root API group. If you use apiVersion: v1 when creating a resource it means this resource is part of this API group.
A Role by itself does nothing; you must also create a RoleBinding, which binds a Role to something, in this case, a ServiceAccount.
Create the file ~/kube-general/cicd-role-binding.yml and open it:
- nano ~/kube-general/cicd-role-binding.yml
Add the following lines to the file:
kind: RoleBinding
apiVersion: rbac.authorization.k8s.io/v1
metadata:
  name: cicd
  namespace: default
subjects:
  - kind: ServiceAccount
    name: cicd
    namespace: default
roleRef:
  kind: Role
  name: cicd
  apiGroup: rbac.authorization.k8s.io
Your RoleBinding has some specific fields that have not yet been covered in this tutorial. roleRef is the Role you want to bind to something; in this case it is the cicd role you created earlier. subjects is the list of resources you are binding your role to; in this case it’s a single ServiceAccount called cicd.
Note: If you had used a ClusterRole, you would have to create a ClusterRoleBinding instead of a RoleBinding. The file would be almost the same. The only difference would be that it would have no namespace field inside the metadata.
With those files created you will be able to use kubectl apply again. Create those new resources on your Kubernetes cluster by running the following command:
- kubectl apply -f ~/kube-general/
You will receive output similar to the following:
Outputrolebinding.rbac.authorization.k8s.io/cicd created
role.rbac.authorization.k8s.io/cicd created
serviceaccount/cicd unchanged
Now, try the command you ran previously:
- kubectl --insecure-skip-tls-verify --kubeconfig="/dev/null" --server=server-from-kubeconfig-file --token=$TOKEN get pods
Since you have no pods, this will yield the following output:
OutputNo resources found in default namespace.
In this step, you gave the Service Account you are going to use on CircleCI the necessary authorization to do meaningful actions on your cluster like listing, creating, and updating resources. Now it’s time to create your sample application.
Step 5 — Creating Your Sample Application
Note: All commands and files created from now on will start from the folder ~/do-sample-app you created earlier. This is becase you are now creating files specific to the sample application that you are going to deploy to your cluster.
The Kubernetes Deployment you are going to create will use the Nginx image as a base, and your application will be a simple static HTML page. This is a great start because it allows you to test if your deployment works by serving HTML directly from Nginx. As you will see later on, you can redirect all traffic coming to a local address:port to your deployment on your cluster to test if it’s working.
Inside the repository you set up earlier, create a new Dockerfile file and open it with your text editor of choice:
- nano ~/do-sample-app/Dockerfile
Write the following on it:
FROM nginx:1.21

COPY index.html /usr/share/nginx/html/index.html
This will tell Docker to build the application container from an nginx image.
Now create a new index.html file and open it:
- nano ~/do-sample-app/index.html
Write the following HTML content:
<!DOCTYPE html>
<title>DigitalOcean</title>
<body>
  Kubernetes Sample Application
</body>
This HTML will display a simple message that will let you know if your application is working.
You can test if the image is correct by building and then running it.
First, build the image with the following command, replacing dockerhub-username with your own Docker Hub username. You must specify your username here so when you push it later on to Docker Hub it will work:
- docker build ~/do-sample-app/ -t dockerhub-username/do-kubernetes-sample-app
Now run the image. Use the following command, which starts your image and forwards any local traffic on port 8080 to the port 80 inside the image, the port Nginx listens to by default:
- docker run --rm -it -p 8080:80 dockerhub-username/do-kubernetes-sample-app
The command prompt will stop being interactive while the command is running. Instead you will see the Nginx access logs. If you open localhost:8080 on any browser it should show an HTML page with the content of ~/do-sample-app/index.html. In case you don’t have a browser available, you can open a new terminal window and use the following curl command to fetch the HTML from the webpage:
- curl localhost:8080
You will receive the following output:
Output<!DOCTYPE html>
<title>DigitalOcean</title>
<body>
  Kubernetes Sample Application
</body>
Stop the container (CTRL + C on the terminal where it’s running), and submit this image to your Docker Hub account. To do this, first log in to Docker Hub:
- docker login
Fill in the required information about your Docker Hub account, then push the image with the following command (don’t forget to replace the dockerhub-username with your own):
- docker push dockerhub-username/do-kubernetes-sample-app
You have now pushed your sample application image to your Docker Hub account. In the next step, you will create a Deployment on your DOKS cluster from this image.
Step 6 — Creating the Kubernetes Deployment and Service
With your Docker image created and working, you will now create a manifest telling Kubernetes how to create a Deployment from it on your cluster.
Create the YAML deployment file ~/do-sample-app/kube/do-sample-deployment.yml and open it with your text editor:
- nano ~/do-sample-app/kube/do-sample-deployment.yml
Write the following content on the file, making sure to replace dockerhub-username with your Docker Hub username:
apiVersion: apps/v1
kind: Deployment
metadata:
  name: do-kubernetes-sample-app
  namespace: default
  labels:
    app: do-kubernetes-sample-app
spec:
  replicas: 1
  selector:
    matchLabels:
      app: do-kubernetes-sample-app
  template:
    metadata:
      labels:
        app: do-kubernetes-sample-app
    spec:
      containers:
        - name: do-kubernetes-sample-app
          image: dockerhub-username/do-kubernetes-sample-app:latest
          ports:
            - containerPort: 80
              name: http
Kubernetes deployments are from the API group apps, so the apiVersion of your manifest is set to apps/v1. On metadata you added a new field you have not used previously, called metadata.labels. This is useful to organize your deployments. The field spec represents the behavior specification of your deployment. A deployment is responsible for managing one or more pods; in this case it’s going to have a single replica by the spec.replicas field. That is, it’s going to create and manage a single pod.
To manage pods, your deployment must know which pods it’s responsible for. The spec.selector field is the one that gives it that information. In this case the deployment will be responsible for all pods with tags app=do-kubernetes-sample-app. The spec.template field contains the details of the Pod this deployment will create. Inside the template you also have a spec.template.metadata field. The labels inside this field must match the ones used on spec.selector. spec.template.spec is the specification of the pod itself. In this case it contains a single container, called do-kubernetes-sample-app. The image of that container is the image you built previously and pushed to Docker Hub.
This YAML file also tells Kubernetes that this container exposes the port 80, and gives this port the name http.
To access the port exposed by your Deployment, create a Service. Make a file named ~/do-sample-app/kube/do-sample-service.yml and open it with your favorite editor:
- nano ~/do-sample-app/kube/do-sample-service.yml
Next, add the following lines to the file:
apiVersion: v1
kind: Service
metadata:
  name: do-kubernetes-sample-app
  namespace: default
  labels:
    app: do-kubernetes-sample-app
spec:
  type: ClusterIP
  ports:
    - port: 80
      targetPort: http
      name: http
  selector:
    app: do-kubernetes-sample-app
This file gives your Service the same labels used on your deployment. This is not required, but it helps to organize your applications on Kubernetes.
The service resource also has a spec field. The spec.type field is responsible for the behavior of the service. In this case it’s a ClusterIP, which means the service is exposed on a cluster-internal IP, and is only reachable from within your cluster. This is the default spec.type for services. spec.selector is the label selector criteria that should be used when picking the pods to be exposed by this service. Since your pod has the tag app: do-kubernetes-sample-app, you used it here. spec.ports are the ports exposed by the pod’s containers that you want to expose from this service. Your pod has a single container which exposes port 80, named http, so you are using it here as targetPort. The service exposes that port on port 80 too, with the same name, but you could have used a different port/name combination than the one from the container.
With your Service and Deployment manifest files created, you can now create those resources on your Kubernetes cluster using kubectl:
- kubectl apply -f ~/do-sample-app/kube/
You will receive the following output:
Outputdeployment.apps/do-kubernetes-sample-app created
service/do-kubernetes-sample-app created
Test if this is working by forwarding one port on your machine to the port that the service is exposing inside your Kubernetes cluster. You can do that using kubectl port-forward:
- kubectl port-forward $(kubectl get pod --selector="app=do-kubernetes-sample-app" --output jsonpath='{.items[0].metadata.name}') 8080:80
The subshell command $(kubectl get pod --selector="app=do-kubernetes-sample-app" --output jsonpath='{.items[0].metadata.name}') retrieves the name of the pod matching the app tag you used. Otherwise you could have retrieved it from the list of pods by using kubectl get pods.
After you run port-forward, the shell will stop being interactive, and will instead output the requests redirected to your cluster:
OutputForwarding from 127.0.0.1:8080 -> 80
Forwarding from [::1]:8080 -> 80
Opening localhost:8080 on any browser should render the same page you saw when you ran the container locally, but it’s now coming from your Kubernetes cluster. As before, you can also use curl in a new terminal window to check if it’s working:
- curl localhost:8080
You will receive the following output:
Output<!DOCTYPE html>
<title>DigitalOcean</title>
<body>
  Kubernetes Sample Application
</body>
Next, it’s time to push all the files you created to your GitHub repository. To do this you must first create a repository on GitHub called digital-ocean-kubernetes-deploy.
In order to keep this repository simple for demonstration purposes, do not initialize the new repository with a README, license, or .gitignore file when asked on the GitHub UI. You can add these files later on.
With the repository created, point your local repository to the one on GitHub. To do this, press CTRL + C to stop kubectl port-forward and get the command line back, then run the following commands to add a new remote called origin:
- cd ~/do-sample-app/
- git remote add origin https://github.com/your-github-account-username/digital-ocean-kubernetes-deploy.git
There should be no output from the preceding command.
Next, commit all the files you created up to now to the GitHub repository. First, add the files:
- git add --all
Next, commit the files to your repository, with a commit message in quotation marks:
- git commit -m "initial commit"
This will yield output similar to the following:
Output[master (root-commit) db321ad] initial commit
 4 files changed, 47 insertions(+)
 create mode 100644 Dockerfile
 create mode 100644 index.html
 create mode 100644 kube/do-sample-deployment.yml
 create mode 100644 kube/do-sample-service.yml
Finally, push the files to GitHub:
- git push -u origin master
You will be prompted for your username and password. Once you have entered this, you will see output like this:
OutputCounting objects: 7, done.
Delta compression using up to 8 threads.
Compressing objects: 100% (7/7), done.
Writing objects: 100% (7/7), 907 bytes | 0 bytes/s, done.
Total 7 (delta 0), reused 0 (delta 0)
To github.com:your-github-account-username/digital-ocean-kubernetes-deploy.git
 * [new branch]      master -> master
Branch master set up to track remote branch master from origin.
If you go to your GitHub repository page you will now see all the files there. With your project up on GitHub, you can now set up CircleCI as your CI/CD tool.
Step 7 — Configuring CircleCI
For this tutorial, you will use CircleCI to automate deployments of your application whenever the code is updated, so you will need to log in to CircleCI using your GitHub account and set up your repository.
First, go to their homepage https://circleci.com, and press Sign Up.
You are using GitHub, so click the green Sign Up with GitHub button.
CircleCI will redirect to an authorization page on GitHub. CircleCI needs some permissions on your account to be able to start building your projects. This allows CircleCI to obtain your email, deploy keys and permission to create hooks on your repositories, and add SSH keys to your account. If you need more information on what CircleCI is going to do with your data, check their documentation about GitHub integration.
After authorizing CircleCI you will be redirected to the Projects page. Here you can set up your GitHub repository in CircleCI. Select Set Up Project in the entry for your digital-ocean-kubernetes-deploy repo. Then select the Faster: Commit a starter CI pipeline to a new branch option. This will create a new circleci-project-setup branch for your project.
Next, specify some environment variables in the CircleCI settings. You can find the settings of the project by selecting the Project Settings button in the top right section of the page then selecting Environment Variables. Press Add Environment Variable to create new environment variables.
First, add two environment variables called DOCKERHUB_USERNAME and DOCKERHUB_PASS, which will be needed later on to push the image to Docker Hub. Set the values to your Docker Hub username and password, respectively.
Then add three more: KUBERNETES_TOKEN, KUBERNETES_SERVER, and KUBERNETES_CLUSTER_CERTIFICATE.
The value of KUBERNETES_TOKEN will be the value of the local environment variable you used earlier to authenticate on your Kubernetes cluster using your Service Account user. If you have closed the terminal, you can always run the following command to retrieve it again:
- kubectl get secret $(kubectl get secret | grep cicd-token | awk '{print $1}') -o jsonpath='{.data.token}' | base64 --decode
KUBERNETES_SERVER will be the string you passed as the --server flag to kubectl when you logged in with your cicd Service Account. You can find this after server: in the ~/.kube/config file, or in the file kubernetes-deployment-tutorial-kubeconfig.yaml downloaded from the DigitalOcean dashboard when you made the initial setup of your Kubernetes cluster.
KUBERNETES_CLUSTER_CERTIFICATE should also be available on your ~/.kube/config file. It’s the certificate-authority-data field on the clusters item related to your cluster. It should be a long string; make sure to copy all of it.
Those environment variables must be defined here because most of them contain sensitive information, and it is not secure to place them directly on the CircleCI YAML config file.
With CircleCI listening for changes on your repository and the environment variables configured, it’s time to create the configuration file.
Make a directory called .circleci inside your sample application repository:
- mkdir ~/do-sample-app/.circleci/
Inside this directory, create a file named config.yml and open it with your favorite editor:
- nano ~/do-sample-app/.circleci/config.yml
Add the following content to the file, making sure to replace dockerhub-username with your Docker Hub username:
version: 2.1
jobs:
  build:
    docker:
      - image: circleci/buildpack-deps:bullseye
    environment:
      IMAGE_NAME: dockerhub-username/do-kubernetes-sample-app
    working_directory: ~/app
    steps:
      - checkout
      - setup_remote_docker
      - run:
          name: Build Docker image
          command: |
            docker build -t $IMAGE_NAME:latest .
      - run:
          name: Push Docker Image
          command: |
            echo "$DOCKERHUB_PASS" | docker login -u "$DOCKERHUB_USERNAME" --password-stdin
            docker push $IMAGE_NAME:latest
workflows:
  version: 2
  build-deploy-master:
    jobs:
      - build:
          filters:
            branches:
              only: master
This sets up the workflow build-deploy-master, which right now has a single job called build. This job will run for every commit to the master branch.
The build job is using the image circleci/buildpack-deps:bullseye to run its steps, which is an image from CircleCI based on the official buildpack-deps Docker image, but with some extra tools installed, like the Docker binaries themselves.
The workflow has four steps:
checkoutretrieves the code from GitHub.setup_remote_dockersets up a remote, isolated environment for each build. This is required before you use anydockercommand inside a job step. This is necessary because as the steps are running inside a docker image,setup_remote_dockerallocates another machine to run the commands there.- The first
runstep builds the image, as you did previously in your local environment. For that you are using the environment variable you declared inenvironment:,IMAGE_NAME. - The last
runstep pushes the image to Docker Hub, using the environment variables you configured on the project settings to authenticate.
There are other registries besides Docker Hub that you can use to store container images and collaborate on them with others. For instance, DigitalOcean has its own container registry to which you can push container images.
To push an image to the DigitalOcean Container Registry, you could replace the second run step with one like the following:
. . .
      - run: |
          docker login -u $DOCKER_USERNAME -p $DOCKER_PASSWORD registry.digitalocean.com/your_registry
          docker push registry.digitalocean.com/your_registry/do-kubernetes-sample-app
. . .
This assumes you’ve securely set $DOCKER_USERNAME and $DOCKER_PASSWORD as environment variables previously in the file, as this will avoid exposing them in the CircleCI job output. Also, note that both of these values should be set to the same DigitalOcean API token.
To learn more about the DigitalOcean container registry, check out our product documentation.
Commit the new file to your repository and push the changes upstream:
- cd ~/do-sample-app/
- git add .circleci/
- git commit -m "add CircleCI config"
- git push
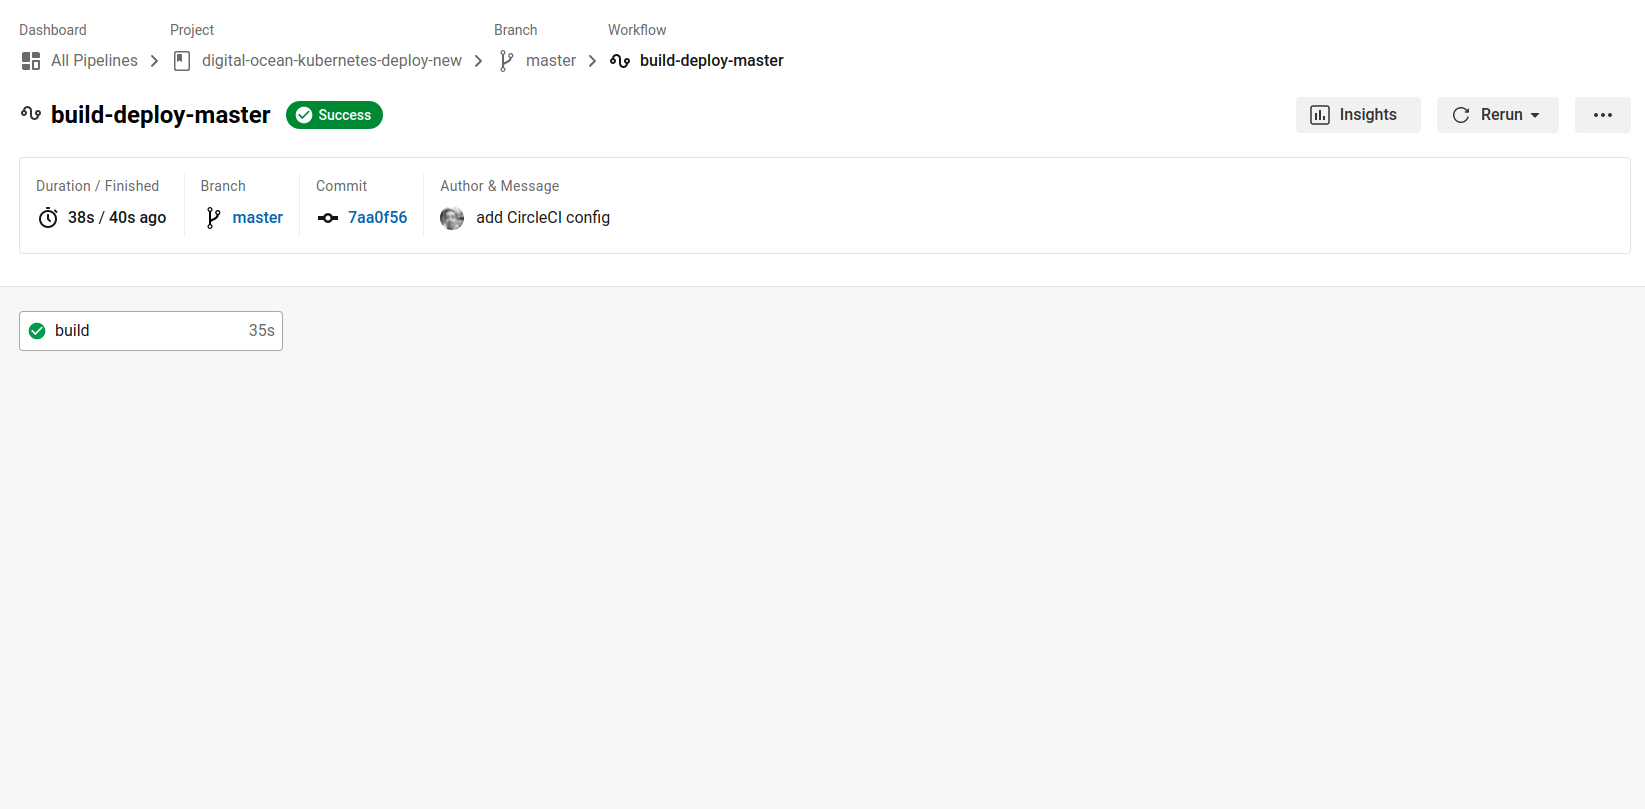
This will trigger a new build on CircleCI. The CircleCI workflow is going to correctly build and push your image to Docker Hub.
Now that you have created and tested your CircleCI workflow, you can set your DOKS cluster to retrieve the up-to-date image from Docker Hub and deploy it automatically when changes are made.
Step 8 — Updating the Deployment on the Kubernetes Cluster
Now that your application image is being built and sent to Docker Hub every time you push changes to the master branch on GitHub, it’s time to update your deployment on your Kubernetes cluster so that it retrieves the new image and uses it as a base for deployment.
To do that, first fix one issue with your deployment: it’s currently depending on an image with the latest tag. This tag does not tell us which version of the image you are using. You cannot easily lock your deployment to that tag because it’s overwritten everytime you push a new image to Docker Hub, and by using it like that you lose the reproducibility of containerized applications.
You can read more about that on Vladislav Supalov’s article about why depending on the latest tag is an anti-pattern.
To correct this, you first must make some changes to your Push Docker Image build step in the ~/do-sample-app/.circleci/config.yml file. Open up the file:
- nano ~/do-sample-app/.circleci/config.yml
Then add the highlighted lines to your Push Docker Image step:
...
      - run:
          name: Push Docker Image
          command: |
            echo "$DOCKERHUB_PASS" | docker login -u "$DOCKERHUB_USERNAME" --password-stdin
            docker tag $IMAGE_NAME:latest $IMAGE_NAME:$CIRCLE_SHA1
            docker push $IMAGE_NAME:latest
            docker push $IMAGE_NAME:$CIRCLE_SHA1
...
CircleCI has some special environment variables set by default. One of them is CIRCLE_SHA1, which contains the hash of the commit it’s building. The changes you made to ~/do-sample-app/.circleci/config.yml will use this environment variable to tag your image with the commit it was built from, always tagging the most recent build with the latest tag. That way, you always have specific images available, without overwriting them when you push something new to your repository.
Save and exit the file.
Next, change your deployment manifest file to point to that file. This would be a small change if inside ~/do-sample-app/kube/do-sample-deployment.yml you could set your image as dockerhub-username/do-kubernetes-sample-app:$COMMIT_SHA1, but kubectl doesn’t do variable substitution inside the manifests when you use kubectl apply. To account for this, you can use envsubst. envsubst is a CLI tool that is part of the GNU gettext project. It allows you to pass some text to it, and if it finds any variable inside the text that has a matching environment variable, it replaces the variable with the respective value. The resulting text is then returned as output.
To use this, you will create a bash script that will be responsible for your deployment. Make a new folder called scripts inside ~/do-sample-app/:
- mkdir ~/do-sample-app/scripts/
Inside that folder create a new bash script called ci-deploy.sh and open it with your favorite text editor:
- nano ~/do-sample-app/scripts/ci-deploy.sh
Inside it write the following bash script:
#! /bin/bash
# exit script when any command ran here returns with non-zero exit code
set -e

COMMIT_SHA1=$CIRCLE_SHA1

# Export it so it's available for envsubst
export COMMIT_SHA1=$COMMIT_SHA1

#  Since the only way for envsubst to work on files is using input/output redirection,
#  it's not possible to do in-place substitution, so you will save the output to another file
#  and overwrite the original with that one.
envsubst <./kube/do-sample-deployment.yml >./kube/do-sample-deployment.yml.out
mv ./kube/do-sample-deployment.yml.out ./kube/do-sample-deployment.yml

echo "$KUBERNETES_CLUSTER_CERTIFICATE" | base64 --decode > cert.crt

./kubectl \
  --kubeconfig=/dev/null \
  --server=$KUBERNETES_SERVER \
  --certificate-authority=cert.crt \
  --token=$KUBERNETES_TOKEN \
  apply -f ./kube/
Let’s go through this script, using the comments in the file. First, there is the following:
set -e
This line makes sure any failed command stops the execution of the bash script. That way if one command fails, the next ones are not executed.
COMMIT_SHA1=$CIRCLE_SHA1
export COMMIT_SHA1=$COMMIT_SHA1
These lines export the CircleCI $CIRCLE_SHA1 environment variable with a new name. If you had just declared the variable without exporting it using export, it would not be visible for the envsubst command.
envsubst <./kube/do-sample-deployment.yml >./kube/do-sample-deployment.yml.out
mv ./kube/do-sample-deployment.yml.out ./kube/do-sample-deployment.yml
envsubst cannot do in-place substitution. That is, it cannot read the content of a file, replace the variables with their respective values, and write the output back to the same file. Therefore, you will redirect the output to another file and then overwrite the original file with the new one.
echo "$KUBERNETES_CLUSTER_CERTIFICATE" | base64 --decode > cert.crt
The environment variable $KUBERNETES_CLUSTER_CERTIFICATE you created earlier on CircleCI’s project settings is in reality a Base64 encoded string. To use it with kubectl you must decode its contents and save it to a file. In this case you are saving it to a file named cert.crt inside the current working directory.
./kubectl \
  --kubeconfig=/dev/null \
  --server=$KUBERNETES_SERVER \
  --certificate-authority=cert.crt \
  --token=$KUBERNETES_TOKEN \
  apply -f ./kube/
Finally, you are running kubectl. The command has similar arguments to the one you ran when you were testing your Service Account. You are calling apply -f ./kube/, since on CircleCI the current working directory is the root folder of your project. ./kube/ here is your ~/do-sample-app/kube folder.
Save the file and make sure it’s executable:
- chmod +x ~/do-sample-app/scripts/ci-deploy.sh
Now, edit ~/do-sample-app/kube/do-sample-deployment.yml:
- nano ~/do-sample-app/kube/do-sample-deployment.yml
Change the tag of the container image value to look like the following one:
...
      containers:
        - name: do-kubernetes-sample-app
          image: dockerhub-username/do-kubernetes-sample-app:$COMMIT_SHA1
          ports:
            - containerPort: 80
              name: http
Save and close the file. You must now add some new steps to your CI configuration file to update the deployment on Kubernetes.
Open ~/do-sample-app/.circleci/config.yml in your favorite text editor:
- nano ~/do-sample-app/.circleci/config.yml
Write the following new job, right below the build job you created previously:
...
          command: |
            echo "$DOCKERHUB_PASS" | docker login -u "$DOCKERHUB_USERNAME" --password-stdin
            docker tag $IMAGE_NAME:latest $IMAGE_NAME:$CIRCLE_SHA1
            docker push $IMAGE_NAME:latest
            docker push $IMAGE_NAME:$CIRCLE_SHA1
  deploy:
    docker:
      - image: circleci/buildpack-deps:bullseye
    working_directory: ~/app
    steps:
      - checkout
      - run:
          name: Install envsubst
          command: |
            sudo apt-get update && sudo apt-get -y install gettext-base
      - run:
          name: Install kubectl
          command: |
            curl -LO https://storage.googleapis.com/kubernetes-release/release/$(curl -s https://storage.googleapis.com/kubernetes-release/release/stable.txt)/bin/linux/amd64/kubectl
            chmod u+x ./kubectl
      - run:
          name: Deploy Code
          command: ./scripts/ci-deploy.sh
...
The first two steps of your new deploy job are installing some dependencies, first envsubst and then kubectl. The Deploy Code step is responsible for running our deploy script.
Now you will add this job to the build-deploy-master workflow you created previously. Inside the build-deploy-master workflow configuration, write the following new entry right after the existing entry for the build job:
...
workflows:
  version: 2
  build-deploy-master:
    jobs:
      - build:
          filters:
            branches:
              only: master
      - deploy:
          requires:
            - build
          filters:
            branches:
              only: master
This adds the deploy job to the build-deploy-master workflow. The deploy job will only run for commits to master, and only after the build job is completed.
The contents of ~/do-sample-app/.circleci/config.yml will now be like this:
version: 2.1
jobs:
  build:
    docker:
      - image: circleci/buildpack-deps:bullseye
    environment:
      IMAGE_NAME: dockerhub-username/do-kubernetes-sample-app
    working_directory: ~/app
    steps:
      - checkout
      - setup_remote_docker
      - run:
          name: Build Docker image
          command: |
            docker build -t $IMAGE_NAME:latest .
      - run:
          name: Push Docker Image
          command: |
            echo "$DOCKERHUB_PASS" | docker login -u "$DOCKERHUB_USERNAME" --password-stdin
            docker tag $IMAGE_NAME:latest $IMAGE_NAME:$CIRCLE_SHA1
            docker push $IMAGE_NAME:latest
            docker push $IMAGE_NAME:$CIRCLE_SHA1
  deploy:
    docker:
      - image: circleci/buildpack-deps:bullseye
    working_directory: ~/app
    steps:
      - checkout
      - run:
          name: Install envsubst
          command: |
            sudo apt-get update && sudo apt-get -y install gettext-base
      - run:
          name: Install kubectl
          command: |
            curl -LO https://storage.googleapis.com/kubernetes-release/release/$(curl -s https://storage.googleapis.com/kubernetes-release/release/stable.txt)/bin/linux/amd64/kubectl
            chmod u+x ./kubectl
      - run:
          name: Deploy Code
          command: ./scripts/ci-deploy.sh
workflows:
  version: 2
  build-deploy-master:
    jobs:
      - build:
          filters:
            branches:
              only: master
      - deploy:
          requires:
            - build
          filters:
            branches:
              only: master
You can now save and exit the file.
To make sure the changes are really going to be reflected on your Kubernetes deployment, edit your index.html. Change the HTML to something else, like:
<!DOCTYPE html>
<title>DigitalOcean</title>
<body>
  Automatic Deployment is Working!
</body>
Once you have saved the above change, commit all the modified files to the repository, and push the changes upstream:
- cd ~/do-sample-app/
- git add --all
- git commit -m "add deploy script and add new steps to circleci config"
- git push
You will see the new build running on CircleCI, and successfully deploying the changes to your Kubernetes cluster.
Wait for the build to finish, then run the same command you ran previously:
- kubectl port-forward $(kubectl get pod --selector="app=do-kubernetes-sample-app" --output jsonpath='{.items[0].metadata.name}') 8080:80
Make sure everything is working by opening your browser on the URL localhost:8080 or by making a curl request to it. It should show the updated HTML:
- curl localhost:8080
You will receive the following output:
Output<!DOCTYPE html>
<title>DigitalOcean</title>
<body>
  Automatic Deployment is Working!
</body>
This means that you have successfully set up automated deployment with CircleCI.
Conclusion
This was a basic tutorial on how to do deployments to DigitalOcean Kubernetes using CircleCI. From here, you can improve your pipeline in many ways. The first thing you can do is create a single build job for multiple deployments, each one deploying to different Kubernetes clusters or different namespaces. This can be useful when you have different Git branches for development/staging/production environments, ensuring that the deployments are always separated.
You could also build your own image to be used on CircleCI, instead of using buildpack-deps. This image could be based on it, but could already have kubectl and envsubst dependencies installed.
If you would like to learn more about CI/CD on Kubernetes, check out the tutorials for our CI/CD on Kubernetes Webinar Series, or for more information about apps on Kubernetes, see Modernizing Applications for Kubernetes.
Thanks for learning with the DigitalOcean Community. Check out our offerings for compute, storage, networking, and managed databases.
About the author(s)
Former Senior Technical Editor at DigitalOcean, fiction writer and podcaster elsewhere, always searching for the next good nautical pun! Areas of expertise include Node.js, PostgreSQL, CSS, JavaScript.
Still looking for an answer?
This textbox defaults to using Markdown to format your answer.
You can type !ref in this text area to quickly search our full set of tutorials, documentation & marketplace offerings and insert the link!
This comment has been deleted
This process is not working for me at the last step:
- run: name: Deploy Code command: ./scripts/ci-deploy.sh
I got file not found all the time. So i tried the following trying to find the file:
sudo find / -type f -name “ci-deploy.sh” -exec ‘{}’ ‘;’
And the file doesn’t exist but I can see it in my github repo, folder scripts. Please help me with this issue.
This process works perfectly on my system, and is actually a solution I am looking for my CI/CD setup on DO kubernetes cluster. But I have read in DO k8s known- issues that the DigitalOcean cluster’s certificate-authority-data, client-certificate and client-key, all of which present in kubeconfig as you mentioned, are auto-rotated every 7 days.
Sources:
(1.)https://www.digitalocean.com/docs/kubernetes/overview/#known-issues (2.) https://www.digitalocean.com/community/questions/can-i-stop-my-kubeconfig-file-from-expiring-every-7-days
If this is the scenario, then we also need to automate downloading new kubeconfig every 6 days, and modify the certificate-authority-data that will be used in kubectl to deploy/upgrade.
Am I correct with this conclusion ? I basically don’t want to use doctl along with kubectl to allow kubectl to connect without having the headache of certificate management. Is there any other solution for certificate-management with kubectl and DO clusters?
Thanks for this. Works perfectly well - was actually using this on a different cloud provider ;-)
Thx Jonathan!
I have an issue though. All the steps worked like a charm for me, except for the last one “updating index.html”. For some reason, the index.html has the initial state and is not being updated, even though I see on docker.hub the updated image.
Do you have any clue why this is the case?
Cheers, Taras
Great article! Very helpful indeed!
Small question:
Why are you using kubectl port-forward $(kubectl get pod --selector="app=do-kubernetes-sample-app" --output jsonpath='{.items[0].metadata.name}') 8080:80 instead of just kubectl port-forward svc/do-kubernetes-sample-app 8080:80?
If like me you want to use a ClusterRole and ClusterRoleBinding, you need to make a few more changes then what is mentioned.
To be specific, in my case I use an ingress and in specific an nginx ingress controller.
The changes are as follows:
- in the ClusterRole definition add “networking.k8s.io” to the apiGroups array
- in the ClusterRole definition add “ingresses” to the resources array
- in the ClusterRoleBinding change the roleRef kind to ClusterRole (from Role)
This allowed the service account actually able to manage the ingress resources
clap! clap! clap! clap! clap! clap! clap! clap! clap! clap! clap! clap!
 This work is licensed under a Creative Commons Attribution-NonCommercial- ShareAlike 4.0 International License.
Become a contributor for community
Get paid to write technical tutorials and select a tech-focused charity to receive a matching donation.

DigitalOcean Documentation
Full documentation for every DigitalOcean product.

Resources for startups and AI-native businesses
The Wave has everything you need to know about building a business, from raising funding to marketing your product.
The developer cloud
Scale up as you grow — whether you're running one virtual machine or ten thousand.

Start building today
From GPU-powered inference and Kubernetes to managed databases and storage, get everything you need to build, scale, and deploy intelligent applications.
