Not using Ubuntu 16.04?
Choose a different version or distribution.
Introduction
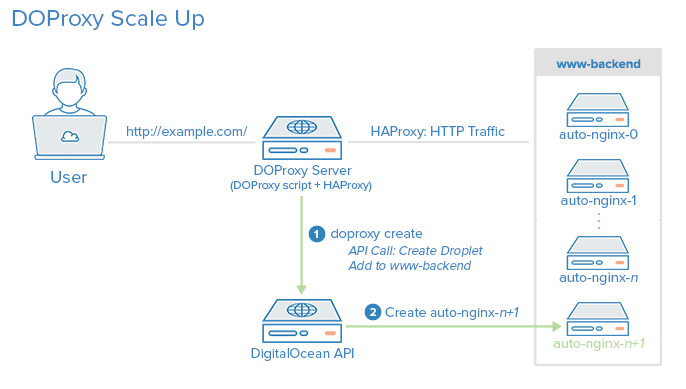
In this tutorial we will demonstrate how to use the DigitalOcean API to horizontally scale your server setup using DOProxy, a Ruby script that, once configured, provides a command line interface to scale your HTTP application server tier up or down.
DOProxy was written specifically for this tutorial to provide a simple way for creating and deleting application server Droplets by using the DigitalOcean API as well as managing their membership to an HAProxy load balancer. This basic scaling model allows users to access your application through the HAProxy server which will, in turn, forward them to the back-end application servers in a load balanced fashion.
DOProxy performs three primary functions:
- Creates Droplets and adds them to the load balancer
- Deletes Droplets and removes them from the load balancer
- Maintains an inventory of the Droplets that it has created until they are deleted
Note: The primary purpose of this tutorial is to teach the minimum required concepts that are necessary to programmatically scale your DigitalOcean server architecture through the API. You should not run DOProxy in a production environment since it was not designed with resiliency in mind and it performs only very basic error checking. With that being said, getting familiar with this script is a great way to get you started with learning about horizontal scaling through the DigitalOcean API.
Prerequisites
This tutorial uses the following technologies that you may want to read about before proceeding:
- Reverse proxy load balancers, such as HAProxy
- DigitalOcean API v2
- Cloudinit and User-data
- DigitalOcean Droplet Metadata
Because DOProxy is written in Ruby, knowledge of Ruby can be beneficial. To gain more of a familiarity with Ruby, you can read our series on How To Code in Ruby. If you’re less familiar with Ruby, we provide some pseudocode to explain the gist of the DOProxy code. In order to simplify our calls to the API, we are using DropletKit which is the official DigitalOcean Ruby wrapper.
Before we get into the details of how DOProxy works we will install and use it on a server.
Let’s install DOProxy on an Ubuntu 16.04 Droplet now.
Install DOProxy
First, create an Ubuntu 16.04 Droplet in the NYC3 region, the region DOProxy uses by default. If you wish to use another region, you will need to configure the region variable in the doproxy.yml file after installing DOProxy. This Droplet will run the HAProxy load balancer and the DOProxy scaling script, so choose a size that you think will be adequate for your desired scale potential. Because this tutorial is a basic demonstration of scaling with no real traffic expected, the 512MB size is probably adequate.
For the length of this document, we will refer to this Droplet as the DOProxy server.
Next, log into the server and follow the Installation and Configuration (including doproxy config and Userdata) sections in the DOProxy GitHub repository README to install DOProxy on this server. Be sure to replace the YOUR_DO_API_TOKEN and YOUR_SSH_KEY_FINGERPRINT values in the DOproxy configuration file or the script will not work.
Now that you have DOProxy and HAProxy installed on your server, let’s try and scale the environment.
Run DOProxy
Log into your DOProxy server as root and get to the directory where you cloned DOProxy.
Run DOProxy without any arguments:
- ruby doproxy.rb
This should print out the available commands:
OutputCommands:
doproxy.rb print                   # Print backend Droplets in inventory file
doproxy.rb create                  # Create a new backend Droplet and reload
doproxy.rb delete <LINE_NUMBER>    # Delete a Droplet and reload
doproxy.rb reload                  # Generate HAProxy config and reload HAProxy
doproxy.rb generate                # Generate HAProxy config based on inventory
At this point, DOProxy hasn’t yet created any Droplets. Let’s create some to get our HTTP service online, and scale up.
Scale Up (Create)
Run the create command to create the first Droplet that is managed by DOProxy:
- ruby doproxy.rb create
This will take some time before returning to the prompt (because the script creates a new Droplet via the API and waits for it to boot up). We’ll talk about how the API call is made when we go through the pseudocode.
Once the script is done, you should see a success message that contains the Droplet ID:
OutputSuccess: 4202645 created and added to backend.
It is suggested that you wait a couple minutes after the prompt has returned before proceeding with the next steps since it is possible that the userdata script may not have yet run and hence, the HAProxy may not have started passing traffic.
Once you are ready to continue, visit your DOProxy server’s public IP address in a web browser. You should see a page that lists your new Droplet’s hostname, id, and public IP address.
We’ll use DOProxy to create two more Droplets, for a total of three. Feel free to create more if you want:
- ruby doproxy.rb create
- ruby doproxy.rb create
Now visit your DOProxy server’s public IP address in a web browser again. If you refresh the page, you will notice that the information on the page will change while cycling through the Droplets that you’ve created. This is because they are all being load balanced by HAProxy which added each Droplet to its configuration when created with DOProxy.
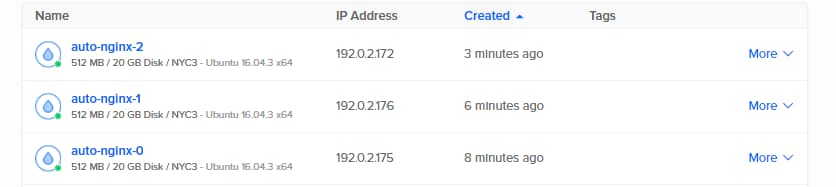
If you happen to look in the DigitalOcean Control Panel, you will notice that these new Droplets will be listed there (along with the rest of your Droplets):
Let’s take a closer look at the Droplets that were created by looking at DOProxy’s inventory.
Print Inventory
DOProxy provides a print command that will print out all of the Droplets that are part of its inventory:
- ruby doproxy.rb print
You should see output that looks something like this:
Output0) auto-nginx-0  (pvt ip: 192.0.2.175, status: active, id: 4202645)
1) auto-nginx-1  (pvt ip: 192.0.2.176, status: active, id: 4205587)
2) auto-nginx-2  (pvt ip: 192.0.2.172, status: active, id: 4205675)
In the example output, we see information about the three Droplets that we created, including their hostnames, status, and Droplet IDs. The hostnames and IDs should match what you saw in your web browser when you accessed the HAProxy load balancer (via DOProxy’s public IP address).
As you may have noticed, DOProxy only printed information about Droplets that it created. This is because it maintains an inventory of the Droplets it creates.
Check out the contents of the inventory file now:
- cat inventory
You should see the ID of each Droplet, one per line. Each time a Droplet is created, its ID is stored in this inventory file.
As you may have guessed, DOProxy’s print command iterates through the Droplet IDs in the inventory file and performs an API call to retrieve information about each of them.
It should be noted that storing your server inventory in a single file is not the best solution — it can easily be corrupted or deleted — but it demonstrates a simple implementation that works. A distributed key value store, such as etcd, would be a better solution. You would also want to save more than just the Droplet ID in the inventory (so you don’t have to make API calls every time you want to look at certain Droplet information).
Scale Down (Delete)
DOProxy also has a delete command that lets you delete Droplets in your inventory. The delete command requires that you provide the line number of the Droplet to delete (as displayed by the print command).
Before running this command you will probably want to print your inventory:
- ruby doproxy.rb print
So, for example, if you want to delete the third Droplet, you would supply 2 as the line number:
- ruby doprorxy.rb delete 2
After a moment, you’ll see the confirmation message:
OutputSuccess: 4205675 deleted and removed from backend.
The delete command deletes the Droplet via the API, removes it from the HAProxy configuration and deletes it from the inventory. Feel free to verify that the Droplet was deleted by using the DOProxy print command or by checking the DigitalOcean control panel. You will also notice that it is no longer part of the load balancer.
HAProxy Configuration
The last piece of DOProxy that we haven’t discussed yet is how HAProxy is configured.
When you run the create or delete DOProxy command, the information for each Droplet in the inventory is retrieved and some of the information is used to modify an HAProxy configuration file. In particular, the Droplet ID and private IP address are used to add each Droplet as a backend server.
Look at the last few lines of the generated haproxy.cfg file like this:
- tail haproxy.cfg
You should see something like this:
	frontend www-http
	   bind 203.0.113.43:80
	   reqadd X-Forwarded-Proto:\ http
	   default_backend www-backend

	backend www-backend

	   server www-4202645 192.0.2.175:80 check # id:4202645, hostname:auto-nginx-0
	   server www-4205587 192.0.2.176:80 check # id:4205587, hostname:auto-nginx-1
The frontend section should contain the public IP address of your DOProxy server, and the backend section should contain lines that refer to each of the Droplets that were created.
Note: At this point, you may want to delete the rest of the Droplets that were created with DOProxy (ruby doproxy.rb delete 0 until all of the servers are gone).
Now that you’ve seen DOProxy’s scaling in action, let’s take a closer look at the code.
DOProxy Code
In this section, we will look at the pertinent files and lines of code that make DOProxy work. Seeing how DOProxy was implemented should give you some ideas of how you can use the API to manage and automate your own server infrastructure.
Since you cloned the repository to your server, you can look at the files there or you can look at the files at the DOProxy repository (https://github.com/scanevari/doproxy).
Important files:
doproxy.rb: DOProxy Ruby script. Provides the command line interface and logic behind DOProxydoproxy.yml: DOProxy configuration file. Contains the API token and specifies Droplet create optionshaproxy.cfg.erb: HAProxy configuration template. Used to generate load balancer configuration with proper backend server informationinventory: Droplet inventory file. Stores IDs of created Dropletsuser-data.yml: Userdata file. A cloud-config file that will run on a new Droplet when it is created
Let’s dive into the configuration files first.
doproxy.yml
These are the important lines in doproxy.yml:
token: YOUR_DO_API_TOKEN
ssh_key_ids:
  - YOUR_SSH_KEY_FINGERPRINT
...
droplet_options:
  hostname_prefix: auto-nginx
  region: nyc3
  size: 1gb
  image: ubuntu-16-04-x64
The token property is the one that must hold your read and write API token.
The other lines specify the options that will be used when DOProxy creates a new Droplet. For example, installing of the specified SSH key (by ID or fingerprint) and prefixing the hostnames with “auto-nginx”.
More information about valid Droplet options can be found in the DigitalOcean API documentation.
user-data.yml
This is the file that will be executed by cloud-init when each new Droplet is created. This means that you can supply a cloud-config file or a script to install your application software on each new Droplet.
The sample userdata file contains a simple bash script that installs Nginx on an Ubuntu server and replaces its default configuration file with the Droplet’s hostname, ID, and public IP address:
#!/bin/bash

apt-get -y update
apt-get -y install nginx
export DROPLET_ID=$(curl http://169.254.169.254/metadata/v1/id)
export HOSTNAME=$(curl -s http://169.254.169.254/metadata/v1/hostname)
export PUBLIC_IPV4=$(curl -s http://169.254.169.254/metadata/v1/interfaces/public/0/ipv4/address)
echo Droplet: $HOSTNAME, ID: $DROPLET_ID, IP Address: $PUBLIC_IPV4 > /var/www/html/index.html
Those curl commands are retrieving the information about the Droplet (hostname, ID, and IP address) using the DigitalOcean Metadata service.
In a production implementation, this file would contain the commands to, for instance, install and configure your application. You can also use this to automate the integration of your Droplets into your overall infrastructure by doing things like automatically installing SSH keys and connecting to your configuration management or monitoring tools.
To read more about userdata, cloud-config, and metadata, check out these links:
haproxy.cfg.erb
The HAProxy configuration template contains most of the load balancer configuration, with some Ruby code that will be replaced with backend Droplet information.
We’ll just look at the Ruby section that generates the backend configuration:
backend www-backend
   <% @Droplets.each_with_index do |droplet, index| %>
   server www-<%= droplet.id %> <%= droplet.private_ip %>:80 check # id:<%= droplet.id %>, hostname:<%= droplet.name -%>
   <% end %>
This code iterates through each of the Droplets in the inventory and adds a new HAProxy backend entry for each one of them (based on the private IP address).
For example, a line like this will be produced for each Droplet:
server www-4202645 192.0.2.175:80 check # id:4202645, hostname:auto-nginx-0
Whenever a Droplet is created or deleted, DOProxy generates a new HAProxy configuration file containing the changes.
doproxy.rb
This Ruby script consists mainly of a DOProxy class that contains the methods that perform the Droplet creation and deletion, inventory management and HAProxy configuration generation.
If you understand Ruby, check out the file on GitHub: https://github.com/scanevari/doproxy/blob/master/doproxy.rb.
If you don’t understand Ruby, here is some simplified pseudocode that explains each method. It may be useful to compare this against the actual Ruby code to help you understand what is happening.
def initialize
Executed every time DOProxy runs with any valid arguments:
- Read
doproxy.ymlconfiguration file and get API token and Droplet options.
def get\_inventory
Retrieves information for each Droplet in the inventory file. It must be executed before any of the other methods are executed.
- Read inventory file (which contains Droplet IDs)
- For each Droplet ID, use the API to retrieve Droplet information
def print\_inventory
This method prints Droplet information for each of the Droplet IDs in the inventory file. It is invoked with the doproxy.rb print command.
- For each Droplet in the inventory print the hostname, private IP address, status, and ID
def create\_server
When invoked through the doproxy.rb create command, this method creates a new Droplet and adds it to the inventory file. Then, it calls reload_haproxy to re-generate the HAProxy configuration file and reload the load balancer.
- Read the userdata file
- Use the API to create a Droplet based on supplied userdata and options
- Wait for Droplet status to become “active” — use API to retrieve Droplet information every 15 seconds until status changes
- When status is “active”, add the Droplet ID to the inventory file
- Call
reload_haproxyto regenerate the HAProxy configuration file and reload the load balancer
def delete\_server(line\_number)
When the doproxy.rb delete command is used, this method deletes the specified Droplet and deletes its ID from the inventory file. It then calls reload_haproxy to re-generate the HAProxy configuration file and reload the load balancer.
- Remove the specified line from the inventory file (delete Droplet ID)
- Use API to delete Droplet by its ID
- Call
reload_haproxyto re-generate the HAProxy configuration file and reload the load balancer
def generate\_haproxy\_cfg
This is a supporting method that creates new HAProxy configuration files based on the Droplets in the inventory.
- Open the HAProxy configuration template (
haproxy.cfg.erb) - For each Droplet in inventory, add a corresponding backend server entry
- Write resulting
haproxy.cfgfile to disk
def reload\_haproxy
This is another supporting method that copies the HAProxy configuration file into the proper location and reloads HAProxy. This relies on generate_haproxy_cfg.
- Copy HAProxy configuration file
haproxy.cfgto the location where HAProxy will look for it on reload - Reload HAProxy
That’s all of the important code that makes DOProxy work. The last thing we will discuss is DropletKit, the API wrapper that we used in DOProxy.
DropletKit Gem
DOProxy uses the DropletKit gem which is the official DigitalOcean API v2 Ruby wrapper that facilitates calls made to the DigitalOcean API. DropletKit allows us to easily write Ruby programs that do things like:
- Create new Droplets
- Delete existing Droplets
- Get information about existing Droplets such as status, IP address, Droplet ID, region, etc
This tutorial focused on these particular API endpoints, but keep in mind that there are many other endpoints that can help facilitate programmatic management of your DigitalOcean server infrastructure.
Conclusion
Now that you’ve seen how a simple script can help scale a server environment by leveraging the DigitalOcean API, cloud-config, and metadata, you can apply all these concepts to scale your own server setup. Although DOProxy isn’t intended for production use, it should give you a good set of ideas for implementing your own scaling solution.
Remember that the scaling setup described here with DOProxy is informational, but it could be greatly improved by using it in conjunction with our monitoring system. This would allow you to automatically scale your application server tier up and down depending on certain conditions such as server resource utilization.
Thanks for learning with the DigitalOcean Community. Check out our offerings for compute, storage, networking, and managed databases.
About the author
Still looking for an answer?
This textbox defaults to using Markdown to format your answer.
You can type !ref in this text area to quickly search our full set of tutorials, documentation & marketplace offerings and insert the link!
 This work is licensed under a Creative Commons Attribution-NonCommercial- ShareAlike 4.0 International License.
Become a contributor for community
Get paid to write technical tutorials and select a tech-focused charity to receive a matching donation.

DigitalOcean Documentation
Full documentation for every DigitalOcean product.

Resources for startups and AI-native businesses
The Wave has everything you need to know about building a business, from raising funding to marketing your product.
The developer cloud
Scale up as you grow — whether you're running one virtual machine or ten thousand.

Start building today
From GPU-powered inference and Kubernetes to managed databases and storage, get everything you need to build, scale, and deploy intelligent applications.
