By Hanif Jetha and Lisa Tagliaferri

Introduction
Regular database backups are a crucial step in guarding against unintended data loss events. In general, there are two broad categories of backups: filesystem-level (“physical”) backups and logical backups. Filesystem-level backups involve snapshotting the underlying data files at a point in time, and allowing the database to cleanly restore itself using the state captured in the snapshotted files. Logical backups involve using a tool (e.g. mongodump or pg_dump) to export data from the database into backup files, which are then restored using a corresponding restore tool (e.g. mongorestore or psql <).
In this guide, we’ll demonstrate how to perform a filesystem-level backup of a running MongoDB installation using Droplet Snapshots. In addition, we’ll cover how to perform a restore from the snapshot image.
Note: As detailed in the DigitalOcean backups guide, there is some performance impact when using Droplet snapshots, especially on highly loaded databases. You should test this procedure first using a non-production database with simulated load to verify that this method will work in your production deployment.
Prerequisites
Before you get started with this guide, make sure you’ve completed the following prerequisite steps:
- An Ubuntu 16.04 Droplet with a non-root user that has sudo privileges, as detailed in Initial Server Setup with Ubuntu 16.04
- MongoDB installed and configured, as detailed in How to Install MongoDB on Ubuntu 16.04
This guide will assume you have MongoDB 3.2+ installed, using the default WiredTiger storage engine with journaling enabled. In addition, to use this guide, it’s important that the dbpath directory (the directory containing the data files, by default /var/lib/mongodb) is mapped to a single volume. If you haven’t attached additional block storage volumes to your Droplet, you can follow this guide.
Once you’re logged in to your Droplet and have MongoDB up and running, you’re ready to get started.
Step 1 — Verify your MongoDB Setup
We’re first going to check that journaling has been enabled.
Journaling is a MongoDB feature that provides durability in the event of a database failure by writing operations to journal files. To learn more about MongoDB journaling, consult the MongoDB Manual.
If you followed the above guide, journaling will be enabled by default. To confirm that this is the case, we can inspect the MongoDB configuration file.
Open up /etc/mongod.conf using your favorite text editor, such as nano for instance:
- nano /etc/mongod.conf
You should see the following block:
- # Where and how to store data.
- storage:
- dbPath: /var/lib/mongodb
- journal:
- enabled: true
- # engine:
- # mmapv1:
- # wiredTiger:
This indicates that journaling has been enabled. If you’re on MongoDB 3.2+, the default storage engine is WiredTiger (MMAPv1 was MongoDB’s original storage engine).
We’ll now insert some dummy data to test the backup and restore procedure.
Step 2 — Insert Test Data
If you have started with a clean server and don’t have any data yet, we can insert some sample data into a dummy restaurants collection for demonstration purposes. If you already have some collections and documents stored in your database, feel free to skip this step.
First, connect to the running database using the MongoDB shell:
mongo
You should see the following Mongo shell prompt:
MongoDB shell version: 3.2.19
connecting to: test
Server has startup warnings:
2018-02-16T02:40:13.071+0000 I CONTROL  [initandlisten]
2018-02-16T02:40:13.071+0000 I CONTROL  [initandlisten] ** WARNING: /sys/kernel/mm/transparent_hugepage/enabled is 'always'.
2018-02-16T02:40:13.071+0000 I CONTROL  [initandlisten] **        We suggest setting it to 'never'
2018-02-16T02:40:13.071+0000 I CONTROL  [initandlisten]
2018-02-16T02:40:13.071+0000 I CONTROL  [initandlisten] ** WARNING: /sys/kernel/mm/transparent_hugepage/defrag is 'always'.
2018-02-16T02:40:13.071+0000 I CONTROL  [initandlisten] **        We suggest setting it to 'never'
2018-02-16T02:40:13.071+0000 I CONTROL  [initandlisten]
>
The default database the shell uses is the test database.
Let’s list the collections present in the test database:
- show collections
Since we haven’t inserted anything into the database yet, there are no collections, and we’re brought back to the prompt with no output.
Let’s insert a document into a dummy restaurants collection, which we’ll create at the same time:
- db.restaurants.insert({'name': 'Sammy's Pizzeria'})
You should see the following output:
- WriteResult({ "nInserted" : 1 })
This indicates that the insert operation was successful. Since the restaurants collection didn’t previously exist, it was created at the same time.
Let’s list collections once again:
show collections
We now see our newly created restaurants collection:
restaurants
Now that we’ve stored some sample data in the database, we’re ready to back it up.
##Step 3 — Snapshot the MongoDB Droplet
To perform the backup, we’re going to take advantage of DigitalOcean Droplet Snapshots. Droplet Snapshots allow us to create an image of the Droplet at the point in time the snapshot was initiated. This image can then be restored to a new Droplet, where further recovery operations can take place.
Given that we’re using MongoDB 3.2+ (with WiredTiger and journaling enabled), we don’t need to suspend writes to the filesystem while the snapshot occurs. Once we restore the image and start up the database, MongoDB will restore itself from a checkpoint, and then replay operations from the journal files until it reaches the point in time that the snapshot occurred. If you’re interested in exploring journaling further, consult the MongoDB Manual),
To begin the snapshot process, log in to your DigitalOcean account, navigate to your MongoDB Droplet, and click the Snapshots link in the sidebar.
You should see the following prompt:
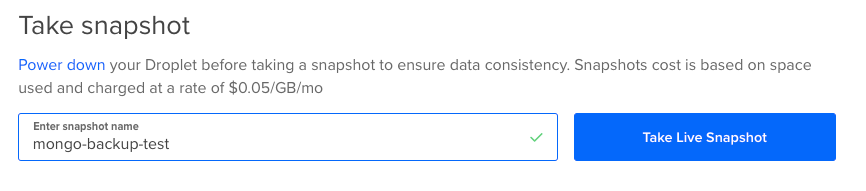
Note: Although it’s recommended to power down your Droplet before taking a snapshot, in production deployments this may not always be possible. MongoDB’s journaling feature enables consistent and valid snapshots, even while the database and Droplet are running.
Give your snapshot a descriptive name and click the Take Live Snapshot button to begin the snapshot process.
You should see the following snapshot progress indicator:
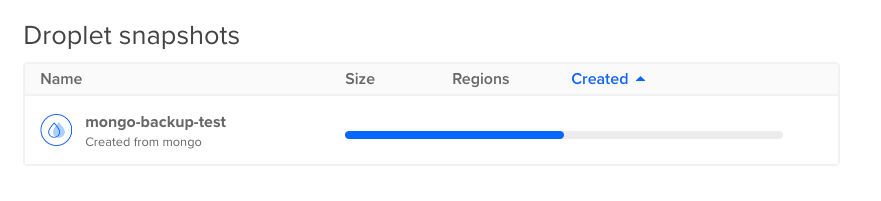
Once the snapshot completes, you’ll be able to create a new Droplet from the image, or restore the running Droplet to the state captured in your snapshot image.
We’re now ready to perform a restore and validation of the backup procedure.
Step 4 — Restore the MongoDB Droplet
We’ll now create a new Droplet that will be restored from the image we just created. The data available in our MongoDB database will be the same data available at the time the snapshot was taken.
Navigate back to Snapshots using the sidebar, and locate your completed Droplet snapshot.

Click into More and select Create Droplet.
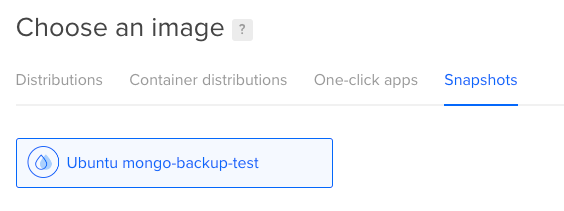
You’ll be taken to the Create Droplet menu, where you’ll be able to spin up a new Droplet from your snapshot.
Choose the image corresponding to the snapshot you took earlier. In this case, we’ll use the mongo-backup-test image.
Finish configuring your restore Droplet and click Create. Once your restore Droplet is up and running, log into it.
If you configured MongoDB to start upon Droplet boot, it should now be running. You can check this using systemctl:
- sudo systemctl status mongod
You should see the following output:
Output● mongod.service - High-performance, schema-free document-oriented database
   Loaded: loaded (/lib/systemd/system/mongod.service; enabled; vendor preset: enabled)
   Active: active (running) since Wed 2018-02-14 21:14:40 UTC; 4min 53s ago
     Docs: https://docs.mongodb.org/manual
 Main PID: 1302 (mongod)
    Tasks: 19
   Memory: 87.2M
      CPU: 1.802s
   CGroup: /system.slice/mongod.service
           └─1302 /usr/bin/mongod --quiet --config /etc/mongod.conf
Indicating that all is well and MongoDB started up correctly.
If MongoDB is not running, we’ll first need to delete the lock file, and then start the service:
- rm /var/lib/mongodb/mongod.lock
- sudo systemctl start mongod
Verify that MongoDB started up correctly using systemctl status.
Once MongoDB is up and running, it will begin to clean itself up and restore its state to the point in time when the snapshot occurred. This can take several minutes and the mongo shell may not be available until this completes.
Once the server becomes available, we can log in using the mongo command:
- mongo
You’ll now be given the mongo shell prompt:
OutputMongoDB shell version: 3.2.19
connecting to: test
Server has startup warnings:
2018-02-14T21:14:41.923+0000 I CONTROL  [initandlisten]
2018-02-14T21:14:41.923+0000 I CONTROL  [initandlisten] ** WARNING: /sys/kernel/mm/transparent_hugepage/enabled is 'always'.
2018-02-14T21:14:41.923+0000 I CONTROL  [initandlisten] **        We suggest setting it to 'never'
2018-02-14T21:14:41.923+0000 I CONTROL  [initandlisten]
2018-02-14T21:14:41.923+0000 I CONTROL  [initandlisten] ** WARNING: /sys/kernel/mm/transparent_hugepage/defrag is 'always'.
2018-02-14T21:14:41.923+0000 I CONTROL  [initandlisten] **        We suggest setting it to 'never'
2018-02-14T21:14:41.923+0000 I CONTROL  [initandlisten]
>
If you’ve made it to this point, congratulations! You’ve successfully performed a backup and restore of your MongoDB database.
As an additional precautionary measure, we can check the integrity of our collections.
Step 5 — Check Data Integrity
Before production use of this backup data, it’s useful to check restored collections for invalid BSON objects.
Note: The validate command can be slow on very large collections. In addition, all reads and writes will be blocked on the collection until the validate command returns.
In this example, we have a collection called restaurants on which we want to run the validate command.
From the mongo shell, run the validate command:
- db.restaurants.validate({full:true})
You should see similar output to the following:
- {
- "ns" : "test.restaurants",
- "nrecords" : 1,
- "nIndexes" : 1,
- "keysPerIndex" : {
- "test.restaurants.$_id_" : 1
- },
- "indexDetails" : {
- "test.restaurants.$_id_" : {
- "valid" : true
- }
- },
- "valid" : true,
- "errors" : [ ],
- "ok" : 1
- }
If you see valid: true, all aspects of your collection are valid and you can safely use data from this collection in production.
Conclusion
In this tutorial we’ve learned how to complete a physical filesystem-level backup of a running MongoDB database server.
To learn more about various methods of backing up a MongoDB database, consult the MongoDB manual.
This particular backup technique was made possible due to DigitalOcean’s convenient Droplet Snapshots feature. To learn more about Droplet Snapshots, consult the Snapshot docs.
In addition, you can schedule these snapshots to occur automatically using the Backups feature. To learn more about Droplet Backups, consult the Backups Introduction.
Thanks for learning with the DigitalOcean Community. Check out our offerings for compute, storage, networking, and managed databases.
About the author(s)
DevOps Engineer, Former Technical Writer and Editor at DigitalOcean. Expertise in topics including Ubuntu, Kubernetes, Docker, CentOS.
Community and Developer Education expert. Former Senior Manager, Community at DigitalOcean. Focused on topics including Ubuntu 22.04, Ubuntu 20.04, Python, Django, and more.
Still looking for an answer?
This textbox defaults to using Markdown to format your answer.
You can type !ref in this text area to quickly search our full set of tutorials, documentation & marketplace offerings and insert the link!
Great guide Hanif,
Nice to see guides on snapshots and backups.
Would you mind if we use this guide on Snapshooter to help our customers who run mongodb?
If you want more frequent backups check us out too, free for one droplet.
Regards
Simon
 This work is licensed under a Creative Commons Attribution-NonCommercial- ShareAlike 4.0 International License.
Become a contributor for community
Get paid to write technical tutorials and select a tech-focused charity to receive a matching donation.

DigitalOcean Documentation
Full documentation for every DigitalOcean product.

Resources for startups and AI-native businesses
The Wave has everything you need to know about building a business, from raising funding to marketing your product.
The developer cloud
Scale up as you grow — whether you're running one virtual machine or ten thousand.

Start building today
From GPU-powered inference and Kubernetes to managed databases and storage, get everything you need to build, scale, and deploy intelligent applications.
