Not using Ubuntu 18.04?
Choose a different version or distribution.
Introduction
Rails is a web application framework written in Ruby. It takes an opinionated approach to application development, assuming that set conventions best serve developers where there is a common goal. Rails therefore offers conventions for handling routing, stateful data, asset management, and more to provide the baseline functionality that most web applications need.
Rails follows the model-view-controller (MCV) architectural pattern, which separates an application’s logic, located in models, from the routing and presentation of application information. This organizational structure — along with other conventions that allow developers to extract code into helpers and partials — ensures that application code isn’t repeated unnecessarily.
In this tutorial, you will build a Rails application that will enable users to post information about sharks and their behavior. It will be a good starting point for future application development.
Prerequisites
To follow this tutorial, you will need:
- A local machine or development server running Ubuntu 18.04. Your development machine should have a non-root user with administrative privileges and a firewall configured with
ufw. For instructions on how to set this up, see our Initial Server Setup with Ubuntu 18.04 tutorial. - Node.js and npm installed on your local machine or development server. This tutorial uses Node.js version 10.16.3 and npm version 6.9.0. For guidance on installing Node.js and npm on Ubuntu 18.04, follow the instructions in the “Installing Using a PPA” section of How To Install Node.js on Ubuntu 18.04.
- Ruby, rbenv, and Rails installed on your local machine or development server, following Steps 1-4 in How To Install Ruby on Rails with rbenv on Ubuntu 18.04. This tutorial uses Ruby 2.5.1, rbenv 1.1.2, and Rails 5.2.0.
Step 1 — Installing SQLite3
Before creating our Rails shark application, we will need to ensure that we have a database to store user data. Rails is configured to use SQLite by default, and this is often a good choice in development. Since our application data doesn’t require a high level programmatic extensibility, SQLite will meet our needs.
First, update your package index:
- sudo apt update
Next, install the sqlite3 and libsqlite3-dev packages:
sudo apt install sqlite3 libsqlite3-dev
This will install both SQLite and its required development files.
Check your version to confirm that the installation was successful:
- sqlite3 --version
Output3.22.0 2018-01-22 18:45:57 0c55d179733b46d8d0ba4d88e01a25e10677046ee3da1d5b1581e86726f2alt1
With SQLite installed, you are ready to begin developing your application.
Step 2 — Creating a New Rails Project
With our database installed, we can create a new Rails project and look at some of the default boilerplate code that Rails gives us with the rails new command.
Create a project called sharkapp with the following command:
- rails new sharkapp
You will see a good deal of output telling you what Rails is creating for your new project. The output below highlights some significant files, directories, and commands:
Output     create
     . . .
     create  Gemfile
     . . .
      create  app
      . . .
      create  app/controllers/application_controller.rb
      . . .
      create  app/models/application_record.rb
      . . .
      create  app/views/layouts/application.html.erb
      . . .
      create  config
      create  config/routes.rb
      create  config/application.rb
      . . .
      create  config/environments
      create  config/environments/development.rb
      create  config/environments/production.rb
      create  config/environments/test.rb
      . . .
      create  config/database.yml
      create  db
      create  db/seeds.rb
      . . .
         run  bundle install
      . . .
Bundle complete! 18 Gemfile dependencies, 78 gems now installed.
Use `bundle info [gemname]` to see where a bundled gem is installed.
      . . .
* bin/rake: Spring inserted
* bin/rails: Spring inserted
The output highlighted here tells you that Rails has created the following:
Gemfile: This file lists the gem dependencies for your application. A gem is a Ruby software package, and a Gemfile allows you to manage your project’s software needs.app: Theappdirectory is where your main application code lives. This includes the models, controllers, views, assets, helpers, and mailers that make up the application itself. Rails gives you some application-level boilerplate for the MCV model to start out in files likeapp/models/application_record.rb,app/controllers/application_controller.rb, andapp/views/layouts/application.html.erb.config: This directory contains your application’s configuration settings:config/routes.rb: Your application’s route declarations live in this file.config/application.rb: General settings for your application components are located in this file.
config/environments: This directory is where configuration settings for your environments live. Rails includes three environments by default:development,production, andtest.config/database.yml: Database configuration settings live in this file, which is broken into four sections:default,development,production, andtest. Thanks to the Gemfile that came with therails newcommand, which included thesqlite3gem, ourconfig/database.ymlfile has itsadapterparameter set tosqlite3already, specifying that we will use an SQLite database with this application.db: This folder includes a directory for database migrations calledmigrate, along with theschema.rbandseeds.rbfiles.schema.dbcontains information about your database, whileseeds.rbis where you can place seed data for the database.
Finally, Rails runs the bundle install command to install the dependencies listed in your Gemfile.
Once everything is set up, navigate to the sharkapp directory:
- cd sharkapp
You can now start the Rails server to ensure that your application is working, using the rails server command. If you are working on your local machine, type:
- rails server
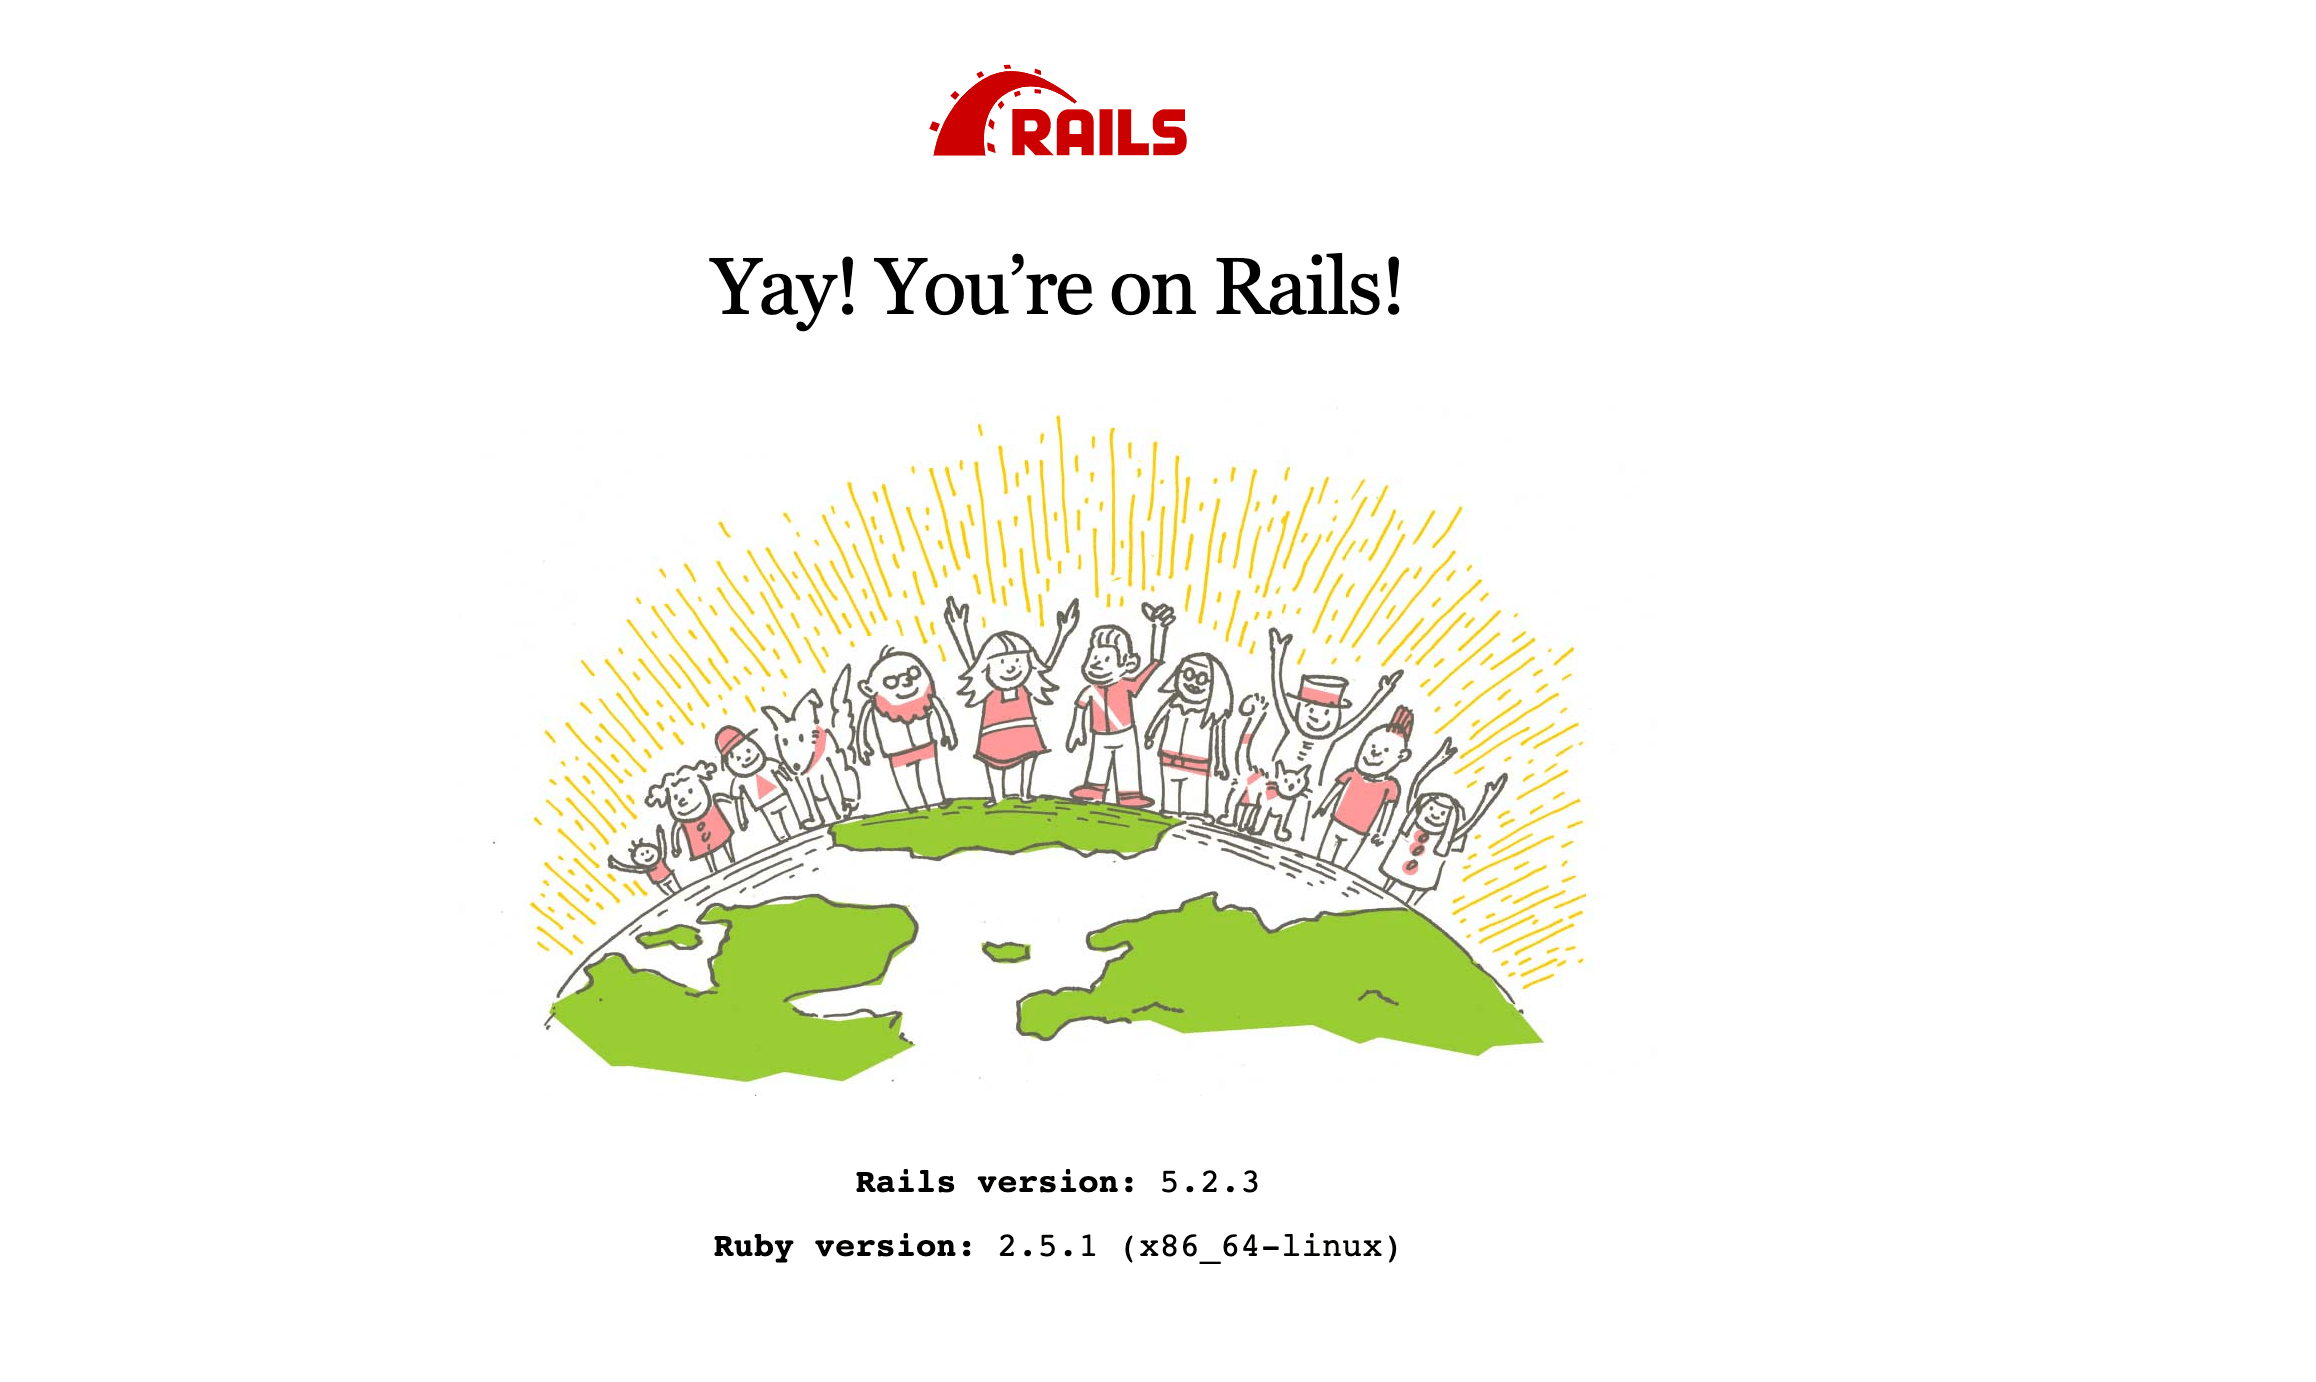
Rails binds to localhost by default, so you can now access your application by navigating your browser to locahost:3000, where you will see the following image:
If you are working on a development server, first ensure that connections are allowed on port 3000:
- sudo ufw allow 3000
Then start the server with the --binding flag, to bind to your server IP:
- rails server --binding=your_server_ip
Navigate to http://your_server_ip:3000 in your browser, where you will see the Rails welcome message.
Once you have looked around, you can stop the server with CTRL+C.
With your application created and in place, you are ready to start building from the Rails boilerplate to create a unique application.
Step 3 — Scaffolding the Application
To create our shark information application, we will need to create a model to manage our application data, views to enable user interaction with that data, and a controller to manage communication between the model and the views. To build these things we will use the rails generate scaffold command, which will give us a model, a database migration to alter the database schema, a controller, a full set of views to manage Create, Read, Update, and Delete (CRUD) operations for the application, and templates for partials, helpers, and tests.
Because the generate scaffold command does so much work for us, we’ll take a closer look at the resources it creates to understand the work that Rails is doing under the hood.
Our generate scaffold command will include the name of our model and the fields we want in our database table. Rails uses Active Record to manage relationships between application data, constructed as objects with models, and the application database. Each of our models is a Ruby class, while also inheriting from the ActiveRecord::Base class. This means that we can work with our model class in the same way that we would work with a Ruby class, while also pulling in methods from Active Record. Active Record will then ensure that each class is mapped to a table in our database, and each instance of that class to a row in that table.
Type the following command to generate a Shark model, controller, and associated views:
- rails generate scaffold Shark name:string facts:text
With name:string and facts:text we are giving Rails information about the fields we would like in our database table and the type of data they should accept. Both will give us room to input what we would like, though text will allow more characters for shark facts.
When you type this command, you will again see a long list of output that explains everything Rails is generating for you. The output below highlights some of the more significant things for our setup:
Output      invoke  active_record
      create    db/migrate/20190804181822_create_sharks.rb
      create    app/models/shark.rb
      . . .
      invoke  resource_route
       route    resources :sharks
      invoke  scaffold_controller
      create    app/controllers/sharks_controller.rb
      invoke    erb
      create      app/views/sharks
      create      app/views/sharks/index.html.erb
      create      app/views/sharks/edit.html.erb
      create      app/views/sharks/show.html.erb
      create      app/views/sharks/new.html.erb
      create      app/views/sharks/_form.html.erb
      . . .
Rails has created the model at app/models/shark.rb and a database migration to go with it: db/migrate/20190804181822_create_sharks.rb. The timestamp on your migration file will differ from what you see here.
It has also created a controller, app/controllers/sharks_controller.rb, as well as the views associated with our application’s CRUD operations, collected under app/views/sharks. Among these views is a partial, _form.html.erb, that contains code used across views.
Finally, Rails added a new resourceful route, resources :sharks, to config/routes.rb. This enables the Rails router to match incoming HTTP requests with the sharks controller and its associated views.
Though Rails has done much of the work of building out our application code for us, it is worth taking a look at some files to understand what is happening.
First, let’s look at the controller file with the following command:
- cat app/controllers/sharks_controller.rb
Outputclass SharksController < ApplicationController
  before_action :set_shark, only: [:show, :edit, :update, :destroy]

  # GET /sharks
  # GET /sharks.json
  def index
    @sharks = Shark.all
  end

  # GET /sharks/1
  # GET /sharks/1.json
  def show
  end

  # GET /sharks/new
  def new
    @shark = Shark.new
  end

  # GET /sharks/1/edit
  def edit
  end

  # POST /sharks
  # POST /sharks.json
  def create
    @shark = Shark.new(shark_params)

    respond_to do |format|
      if @shark.save
        format.html { redirect_to @shark, notice: 'Shark was successfully created.' }
        format.json { render :show, status: :created, location: @shark }
      else
        format.html { render :new }
        format.json { render json: @shark.errors, status: :unprocessable_entity }
      end
    end
  end

  # PATCH/PUT /sharks/1
  # PATCH/PUT /sharks/1.json
  def update
    respond_to do |format|
      if @shark.update(shark_params)
        format.html { redirect_to @shark, notice: 'Shark was successfully updated.' }
        format.json { render :show, status: :ok, location: @shark }
      else
        format.html { render :edit }
        format.json { render json: @shark.errors, status: :unprocessable_entity }
      end
    end
  end

  # DELETE /sharks/1
  # DELETE /sharks/1.json
  def destroy
    @shark.destroy
    respond_to do |format|
      format.html { redirect_to sharks_url, notice: 'Shark was successfully destroyed.' }
      format.json { head :no_content }
    end
  end

  private
    # Use callbacks to share common setup or constraints between actions.
    def set_shark
      @shark = Shark.find(params[:id])
    end

    # Never trust parameters from the scary internet, only allow the white list through.
    def shark_params
      params.require(:shark).permit(:name, :facts)
    end
end
The controller is responsible for managing how information gets fetched and passed to its associated model, and how it gets associated with particular views. As you can see, our sharks controller includes a series of methods that map roughly to standard CRUD operations. However, there are more methods than CRUD functions, to enable efficiency in the case of errors.
For example, consider the create method:
. . .
  def create
    @shark = Shark.new(shark_params)

    respond_to do |format|
      if @shark.save
        format.html { redirect_to @shark, notice: 'Shark was successfully created.' }
        format.json { render :show, status: :created, location: @shark }
      else
        format.html { render :new }
        format.json { render json: @shark.errors, status: :unprocessable_entity }
      end
    end
  end
. . .
If a new instance of the Shark class is successfully saved, redirect_to will spawn a new request that is then directed to the controller. This will be a GET request, and it will be handled by the show method, which will show the user the shark they’ve just added.
If there is a failure, then Rails will render the app/views/sharks/new.html.erb template again rather than making another request to the router, giving users another chance to submit their data.
In addition to the sharks controller, Rails has given us a template for an index view, which maps to the index method in our controller. We will use this as the root view for our application, so it’s worth taking a look at it.
Type the following to output the file:
- cat app/views/sharks/index.html.erb
Output<p id="notice"><%= notice %></p>

<h1>Sharks</h1>

<table>
  <thead>
    <tr>
      <th>Name</th>
      <th>Facts</th>
      <th colspan="3"></th>
    </tr>
  </thead>

  <tbody>
    <% @sharks.each do |shark| %>
      <tr>
        <td><%= shark.name %></td>
        <td><%= shark.facts %></td>
        <td><%= link_to 'Show', shark %></td>
        <td><%= link_to 'Edit', edit_shark_path(shark) %></td>
        <td><%= link_to 'Destroy', shark, method: :delete, data: { confirm: 'Are you sure?' } %></td>
      </tr>
    <% end %>
  </tbody>
</table>

<br>

<%= link_to 'New Shark', new_shark_path %>
The index view iterates through the instances of our Shark class, which have been mapped to the sharks table in our database. Using ERB templating, the view outputs each field from the table that is associated with an individual shark instance: name and facts.
The view then uses the link_to helper to create a hyperlink, with the provided string as the text for the link and the provided path as the destination. The paths themselves are made possible through the helpers that became available to us when we defined the sharks resourceful route with the rails generate scaffold command.
In addition to looking at our index view, we can also take a look at the new view to see how Rails uses partials in views. Type the following to output the app/views/sharks/new.html.erb template:
- cat app/views/sharks/new.html.erb
Output<h1>New Shark</h1>

<%= render 'form', shark: @shark %>

<%= link_to 'Back', sharks_path %>
Though this template may look like it lacks input fields for a new shark entry, the reference to render 'form' tells us that the template is pulling in the _form.html.erb partial, which extracts code that is repeated across views.
Looking at that file will give us a full sense of how a new shark instance gets created:
- cat app/views/sharks/_form.html.erb
Output<%= form_with(model: shark, local: true) do |form| %>
  <% if shark.errors.any? %>
    <div id="error_explanation">
      <h2><%= pluralize(shark.errors.count, "error") %> prohibited this shark from being saved:</h2>

      <ul>
      <% shark.errors.full_messages.each do |message| %>
        <li><%= message %></li>
      <% end %>
      </ul>
    </div>
  <% end %>

  <div class="field">
    <%= form.label :name %>
    <%= form.text_field :name %>
  </div>

  <div class="field">
    <%= form.label :facts %>
    <%= form.text_area :facts %>
  </div>

  <div class="actions">
    <%= form.submit %>
  </div>
<% end %>
This template makes use of the form_with form helper. Form helpers are designed to facilitate the creation of new objects from user input using the fields and scope of particular models. Here, form_with takes model: shark as an argument, and the new form builder object that it creates has field inputs that correspond to the fields in the sharks table. Thus users have form fields to enter both a shark name and shark facts.
Submitting this form will create a JSON response with user data that the rest of your application can access by way of the params method, which creates a ActionController::Parameters object with that data.
Now that you know what rails generate scaffold has produced for you, you can move on to setting the root view for your application.
Step 4 — Creating the Application Root View and Testing Functionality
Ideally, you want the landing page of your application to map to the application’s root, so users can immediately get a sense of the application’s purpose.
There are a number of ways you could handle this: for example, you could create a Welcome controller and an associated index view, which would give users a generic landing page that could also link out to different parts of the application. In our case, however, having users land on our index sharks view will be enough of an introduction to the application’s purpose for now.
To set this up, you will need to modify the routing settings in config/routes.rb to specify the root of the application.
Open config/routes.rb for editing, using nano or your favorite editor:
- nano config/routes.rb
The file will look like this:
Rails.application.routes.draw do
  resources :sharks
  # For details on the DSL available within this file, see http://guides.rubyonrails.org/routing.html
end
Without setting something more specific, the default view at http://localhost:3000 or http://your_server_ip:3000 will be the default Rails welcome page.
In order to map the root view of the application to the index view of the sharks controller, you will need to add the following line to the file:
Rails.application.routes.draw do
  resources :sharks

  root 'sharks#index'
  # For details on the DSL available within this file, see http://guides.rubyonrails.org/routing.html
end
Now, when users navigate to your application root, they will see a full listing of sharks, and have the opportunity to create a new shark entry, look at existing entries, and edit or delete given entries.
Save the file and exit your editor when you are finished editing. If you used nano to edit the file, you can do so by pressing CTRL+X, Y, then ENTER
You can now run your migrations with the following command:
- rails db:migrate
You will see output confirming the migration.
Start your Rails server once again. If you are working locally, type:
- rails s
On a development server, type:
- rails s --binding=your_server_ip
Navigate to localhost:3000 if you are working locally, or http://your_server_ip:3000 if you are working on a development server.
Your application landing page will look like this:
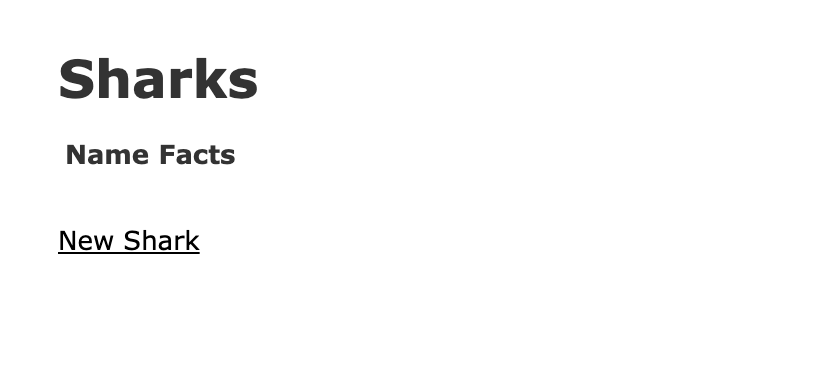
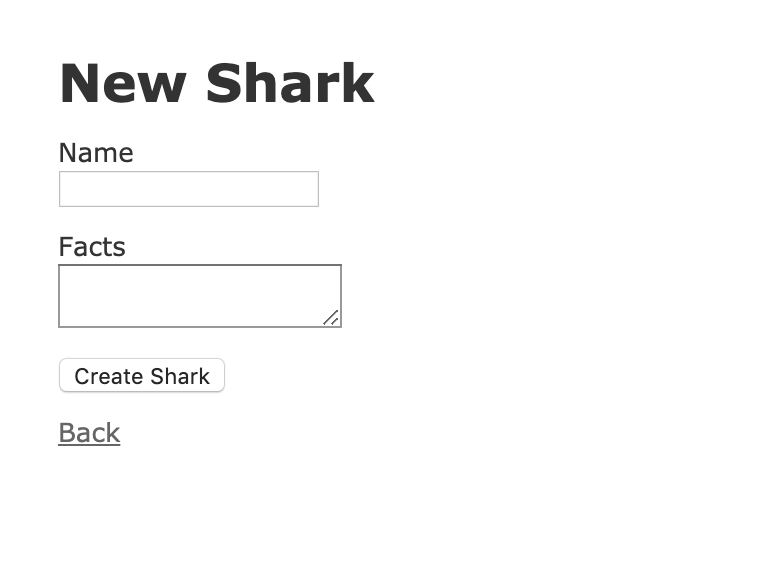
To create a new shark, click on the New Shark link at the bottom of the page, which will take you to the sharks/new route:
Let’s add some demo information to test our application. Input “Great White” into the Name field and “Scary” into the Facts field:
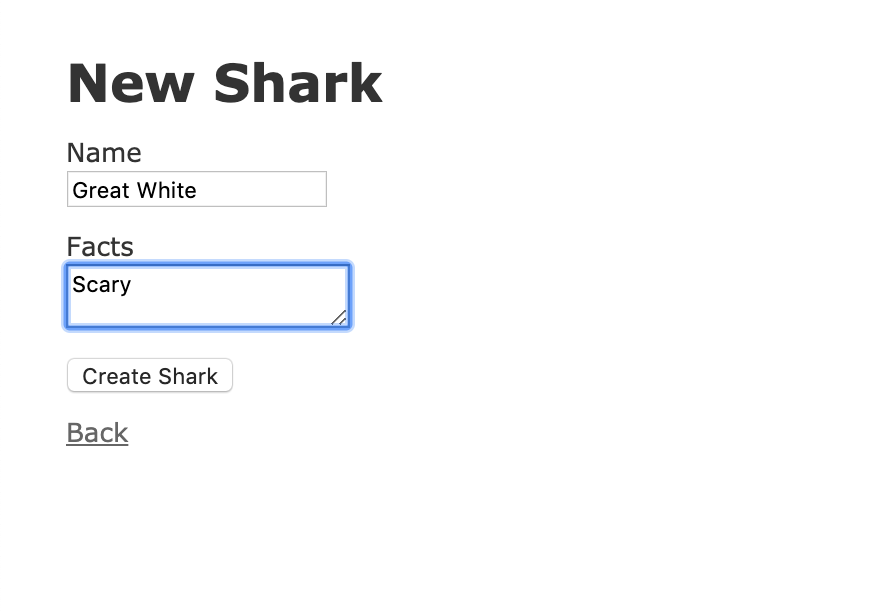
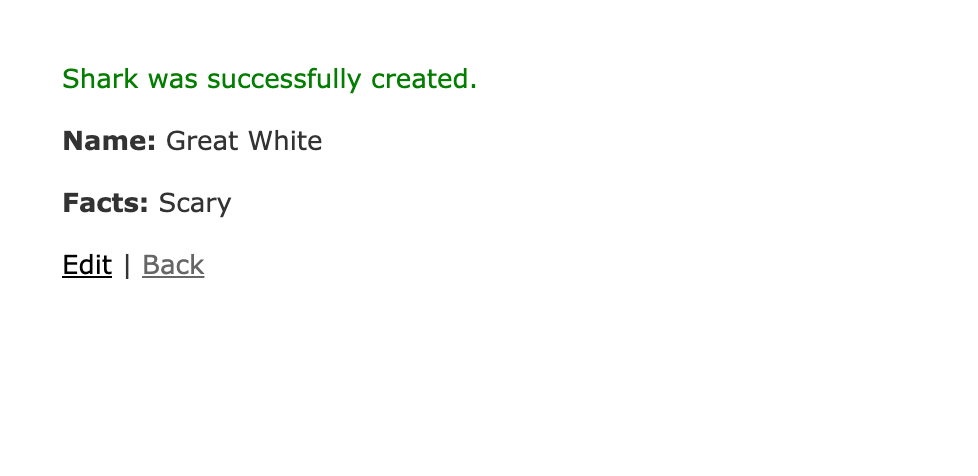
Click on the Create button to create the shark.
This will direct you to the show route, which, thanks to the before_action filter, is set with the set_shark method, which grabs the id of the shark we’ve just created:
class SharksController < ApplicationController
  before_action :set_shark, only: [:show, :edit, :update, :destroy]

  . . .

  def show
  end

  . . .

  private
    # Use callbacks to share common setup or constraints between actions.
    def set_shark
      @shark = Shark.find(params[:id])
    end
  . . .
You can test the edit function now by clicking Edit on your shark entry. This will take you to the edit route for that shark:
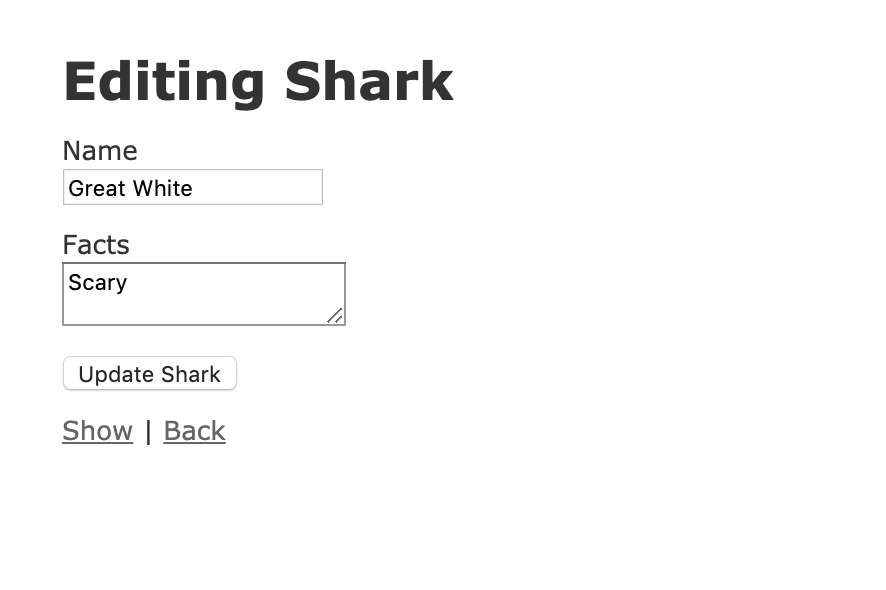
Change the facts about the Great White to read “Large” instead of “Scary” and click Update Shark. This will take you back to the show route:
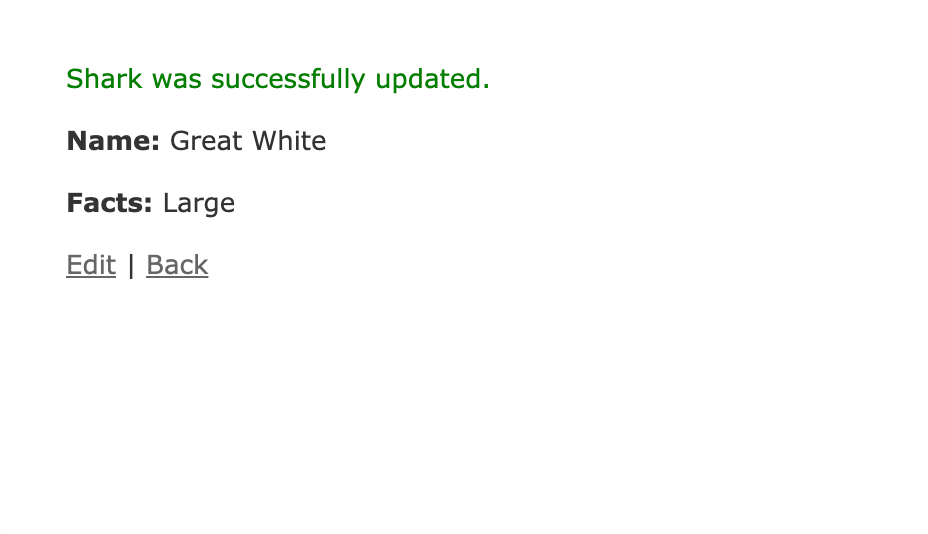
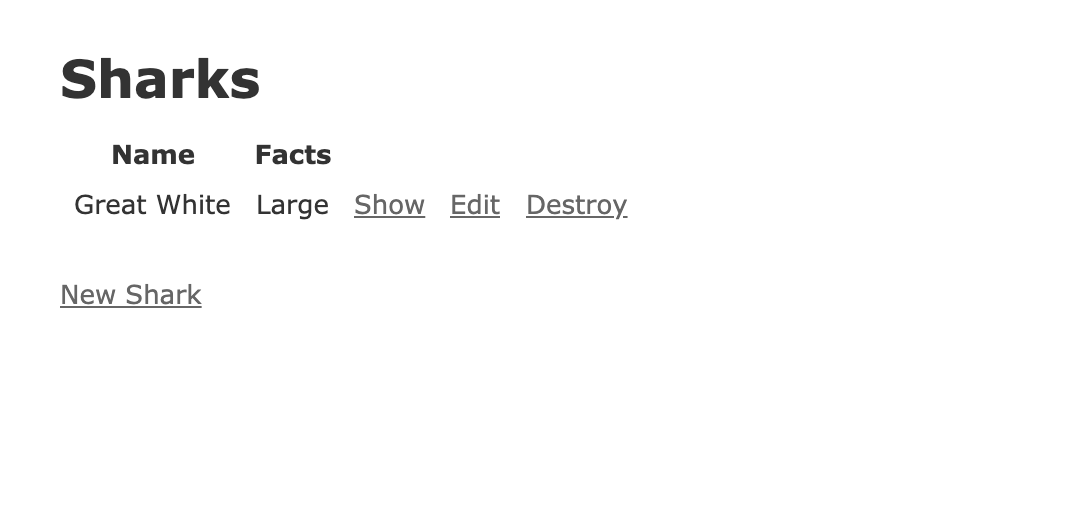
Finally, clicking Back will take you to your updated index view:
Now that you have tested your application’s basic functionality, you can add some validations and security checks to make everything more secure.
Step 5 — Adding Validations
Your shark application can accept input from users, but imagine a case where a user attempts to create a shark without adding facts to it, or creates an entry for a shark that’s already in the database. You can create mechanisms to check data before it gets entered into the database by adding validations to your models. Since your application’s logic is located in its models, validating data input here makes more sense than doing so elsewhere in the application.
Note that we will not cover writing validation tests in this tutorial, but you can find out more about testing by consulting the Rails documentation.
If you haven’t stopped the server yet, go ahead and do that by typing CTRL+C.
Open your shark.rb model file:
- nano app/models/shark.rb
Currently, the file tells us that the Shark class inherits from ApplicationRecord, which in turn inherits from ActiveRecord::Base:
class Shark < ApplicationRecord
end
Let’s first add some validations to our name field to confirm that the field is filled out and that the entry is unique, preventing duplicate entries:
class Shark < ApplicationRecord
  validates :name, presence: true, uniqueness: true
end
Next, add a validation for the facts field to ensure that it, too, is filled out:
class Shark < ApplicationRecord
  validates :name, presence: true, uniqueness: true
  validates :facts, presence: true
end
We are less concerned here with the uniqueness of the facts, as long as they are associated with unique shark entries.
Save and close the file when you are finished.
Start up your server once again with either rails s or rails s --binding=your_server_ip, depending on whether you are working locally or with a development server.
Navigate to your application’s root at http://localhost:3000 or http://your_server_ip:3000.
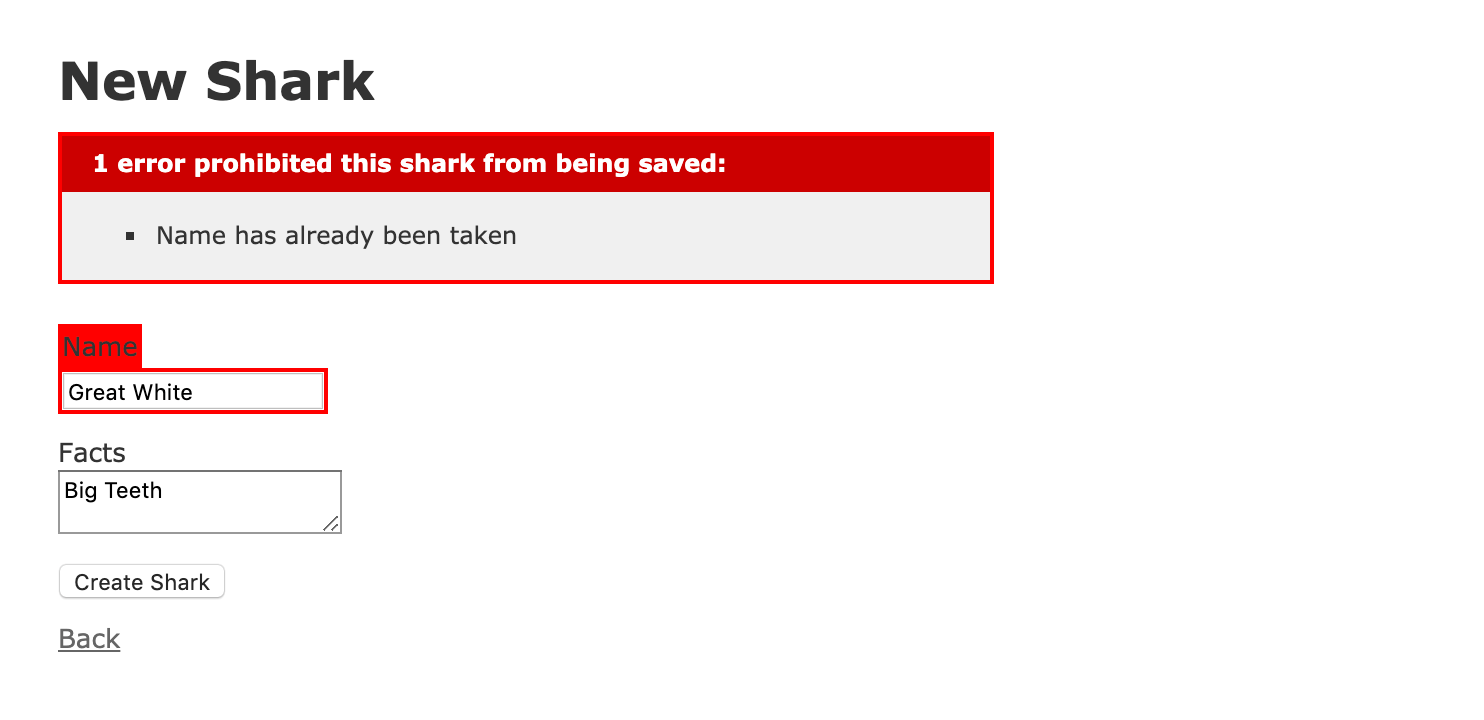
Click on New Shark. In the form, add “Great White” to the Name field and “Big Teeth” to the Facts field, and then click on Create Shark. You should see the following warning:
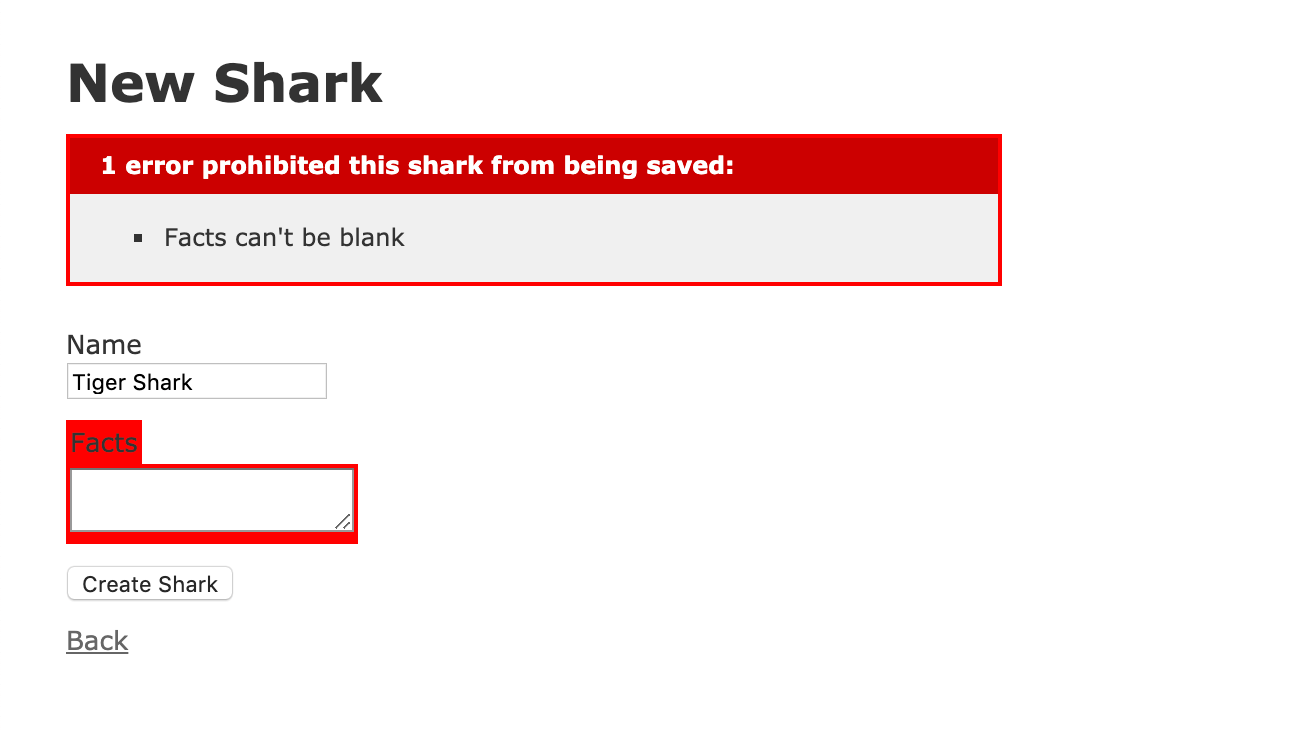
Now, let’s see if we can check our other validation. Click Back to return to the homepage, and then New Shark once again. In the new form, enter “Tiger Shark” in the Name field, and leave Facts blank. Clicking Create Shark will trigger the following warning:
With these changes, your application has some validations in place to ensure consistency in the data that’s saved to the database. Now you can turn your attention to your application’s users and defining who can modify application data.
Step 6 — Adding Authentication
With validations in place, we have some guarantees about the data that’s being saved to the database. But what about users? If we don’t want any and all users adding to the database, then we should add some authentication measures to ensure that only permitted users can add sharks. In order to do this, we’ll use the http_basic_authenticate_with method, which will allow us to create a username and password combination to authenticate users.
There are a number of ways to authenticate users with Rails, including working with the bcrypt or devise gems. For now, however, we will add a method to our application controller that will apply to actions across our application. This will be useful if we add more controllers to the application in the future.
Stop your server again with CTRL+C.
Open the file that defines your ApplicationController:
- nano app/controllers/application_controller.rb
Inside, you will see the definition for the ApplicationController class, which the other controllers in your application inherit from:
class ApplicationController < ActionController::Base
end
To authenticate users, we’ll use a hardcoded username and password with the http_basic_authenticate_with method. Add the following code to the file:
class ApplicationController < ActionController::Base
  http_basic_authenticate_with name: 'sammy', password: 'shark', except: [:index, :show]
end
In addition to supplying the username and password here, we’ve also restricted authentication by specifying the routes where it should not be required: index and show. Another way of accomplishing this would have been to write only: [:create, :update, :destroy]. This way, all users will be able to look at all of the sharks and read facts about particular sharks. When it comes to modifying site content, however, users will need to prove that they have access.
In a more robust setup, you would not want to hardcode values in this way, but for the purposes of demonstration, this will allow you to see how you can include authentication for your application’s routes. It also lets you see how Rails stores session data by default in cookies: once you authenticate on a specified action, you will not be required to authenticate again in the same session.
Save and close app/controllers/application_controller.rb when you are finished editing. You can now test authentication in action.
Start the server with either rails s or rails s --binding=your_server_ip and navigate to your application at either http://localhost:3000 or http://your_server_ip:3000.
On the landing page, click on the New Shark button. This will trigger the following authentication window:
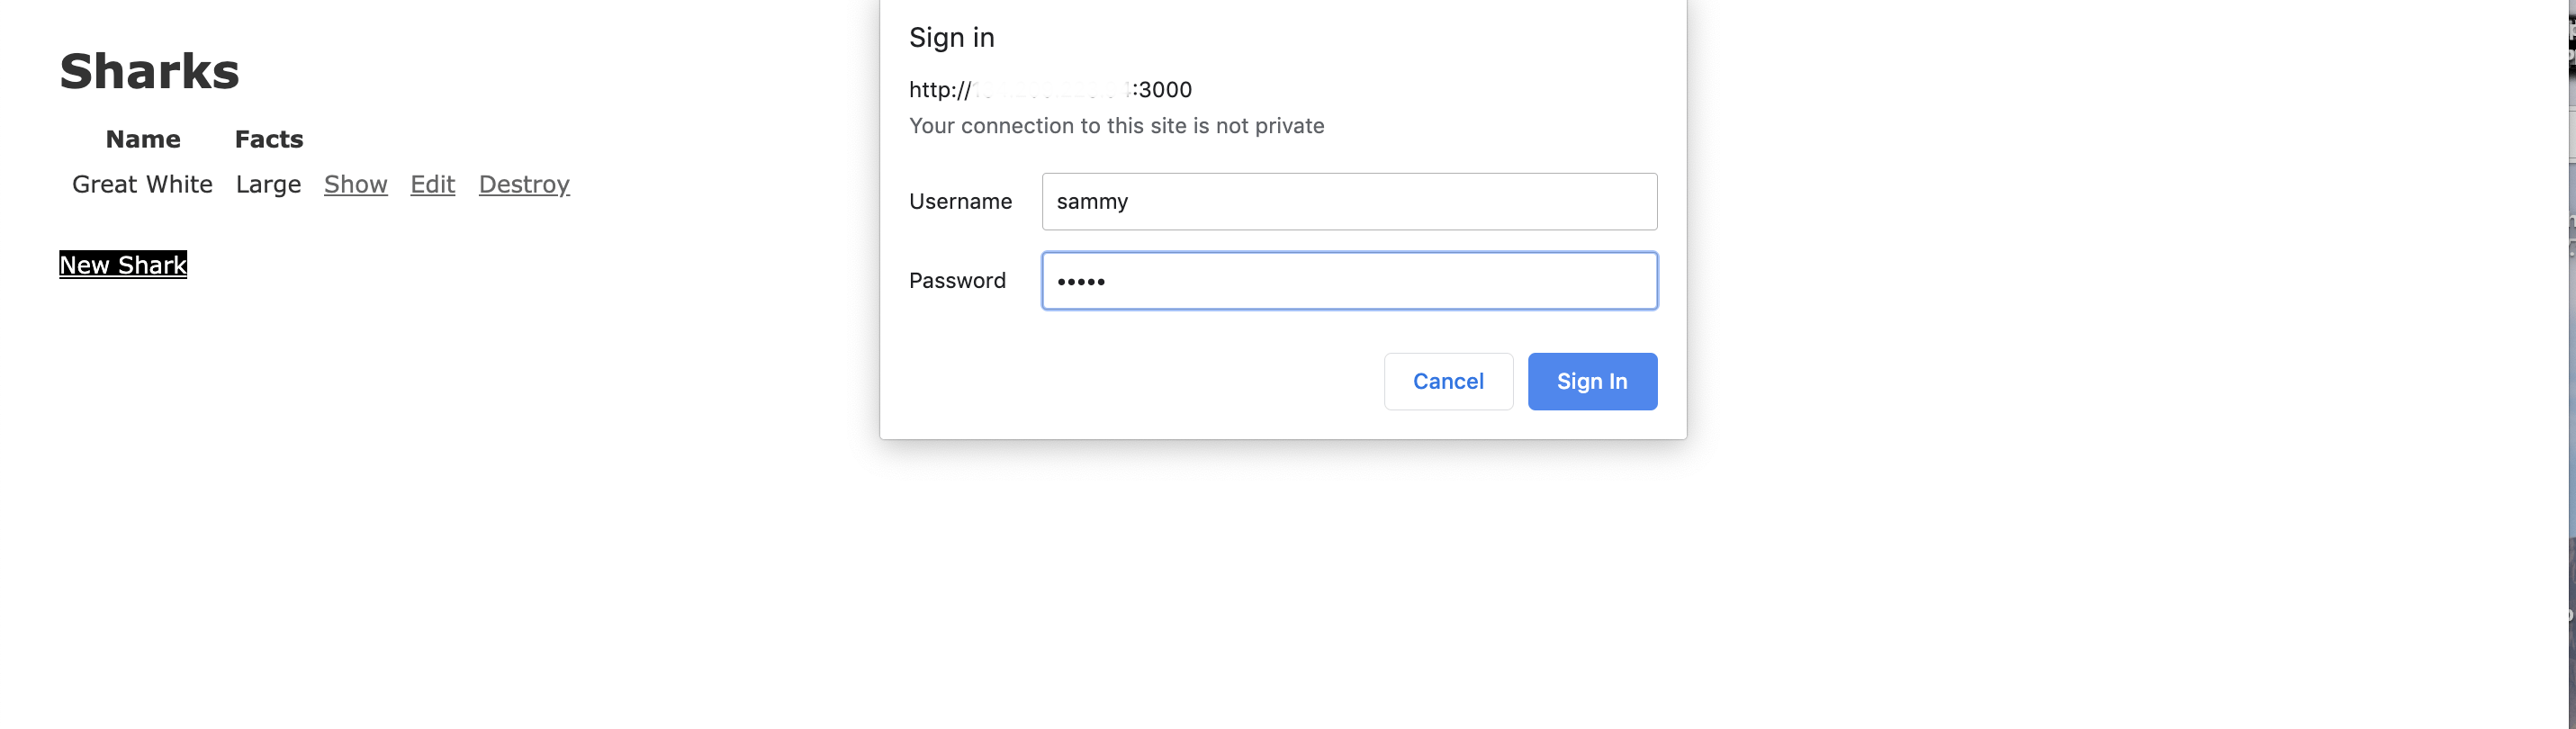
If you enter the username and password combination you added to app/controllers/application_controller.rb, you will be able to securely create a new shark.
You now have a working shark application, complete with data validations and a basic authentication scheme.
Conclusion
The Rails application you created in this tutorial is a jumping off point that you can use for further development. If you are interested in exploring the Rails ecosystem, the project documentation is a great place to start.
You can also learn more about adding nested resources to your project by reading How To Create Nested Resources for a Ruby on Rails Application, which will show you how to build out your application’s models and routes.
Additionally, you might want to explore how to set up a more robust frontend for your project with a framework such as React. How To Set Up a Ruby on Rails Project with a React Frontend offers guidance on how to do this.
If you would like to explore different database options, you can also check out How To Use PostgreSQL with Your Ruby on Rails Application on Ubuntu 18.04, which walks through how to work with PostgreSQL instead of SQLite. You can also consult our library of PostgreSQL tutorials to learn more about working with this database.
Thanks for learning with the DigitalOcean Community. Check out our offerings for compute, storage, networking, and managed databases.
Tutorial Series: Rails on Containers
This series covers how to build and containerize a Ruby on Rails application. It walks through common development tasks – adding nested resources, a JavaScript framework (Stimulus.js), Bootstrap stylings, and Sidekiq and Redis to handle background jobs – before moving on to showing you how to containerize a Rails application for development.
Browse Series: 7 tutorials
About the author
Former Developer at DigitalOcean community. Expertise in areas including Ubuntu, Docker, Ruby on Rails, Debian, and more.
Still looking for an answer?
This textbox defaults to using Markdown to format your answer.
You can type !ref in this text area to quickly search our full set of tutorials, documentation & marketplace offerings and insert the link!
 This work is licensed under a Creative Commons Attribution-NonCommercial- ShareAlike 4.0 International License.
Become a contributor for community
Get paid to write technical tutorials and select a tech-focused charity to receive a matching donation.

DigitalOcean Documentation
Full documentation for every DigitalOcean product.

Resources for startups and AI-native businesses
The Wave has everything you need to know about building a business, from raising funding to marketing your product.
The developer cloud
Scale up as you grow — whether you're running one virtual machine or ten thousand.

Start building today
From GPU-powered inference and Kubernetes to managed databases and storage, get everything you need to build, scale, and deploy intelligent applications.
