By Tomas Fernandez and Brian Hogan

The author selected the Open Internet / Free Speech fund to receive a donation as part of the Write for DOnations program.
Introduction
Kubernetes allows users to create resilient and scalable services with a single command. Like anything that sounds too good to be true, it has a catch: you must first prepare a suitable Docker image and thoroughly test it.
Continuous Integration (CI) is the practice of testing the application on each update. Doing this manually is tedious and error-prone, but a CI platform runs the tests for you, catches errors early, and locates the point at which the errors were introduced. Release and deployment procedures are often complicated, time-consuming, and require a reliable build environment. With Continuous Delivery (CD) you can build and deploy your application on each update without human intervention.
To automate the whole process, you’ll use Semaphore, a Continuous Integration and Delivery (CI/CD) platform.
In this tutorial, you’ll build an address book API service with Node.js. The API exposes a simple RESTful API interface to create, delete, and find people in the database. You’ll use Git to push the code to GitHub. Then you’ll use Semaphore to test the application, build a Docker image, and deploy it to a DigitalOcean Kubernetes cluster. For the database, you’ll create a PostgreSQL cluster using DigitalOcean Managed Databases.
Prerequisites
Before reading on, ensure you have the following:
- A DigitalOcean account and a Personal Access Token. Follow Create a Personal Access Token to set one up for your account.
- A Docker Hub account.
- A GitHub account.
- A Semaphore account; you can sign up with your GitHub account.
- A new GitHub repository called
addressbookfor the project. When creating the repository, select the Initialize this repository with a README checkbox and select Node in the Add .gitignore menu. Follow GitHub’s Create a Repo help page for more details. - Git installed on your local machine and set up to work with your GitHub account. If you are unfamiliar or need a refresher, consider reading the How to use Git reference guide.
- curl installed on your local machine.
- Node.js installed on your local machine. In this tutorial, you’ll use Node.js version
10.16.0.
Step 1 — Creating the Database and the Kubernetes Cluster
Start by provisioning the services that will power the application: the DigitalOcean Database Cluster and the DigitalOcean Kubernetes Cluster.
Log in to your DigitalOcean account and create a project. A project lets you organize all the resources that make up the application. Call the project addressbook.
Next, create a PostgreSQL cluster. The PostgreSQL database service will hold the application’s data. You can pick the latest version available. It should take a few minutes before the service is ready.
Once the PostgreSQL service is ready, create a database and a user. Set the database name to addessbook_db and set the username to addressbook_user. Take note of the password that’s generated for your new user. Databases are PostgreSQL’s way of organizing data. Usually, each application has its own database, although there are no hard rules about this. The application will use the username and password to get access to the database so it can save and retrieve its data.
Finally, create a Kubernetes Cluster. Choose the same region in which the database is running. Name the cluser addressbook-server and set the number of nodes to 3.
While the nodes are provisioning, you can start building your application.
Step 2 — Writing the Application
Let’s build the address book application you’re going to deploy. To start, clone the GitHub repository you created in the prerequisites so you have a local copy of the .gitignore file GitHub created for you, and you’ll be able to commit your application code quickly without having to manually create a repository. Open your browser and go to your new GitHub repository. Click on the Clone or download button and copy the provided URL. Use Git to clone the empty repository to your machine:
- git clone https://github.com/your_github_username/addressbook
Enter the project directory:
- cd addressbook
With the repository cloned, you can start writing the app. You’ll build two components: a module that interacts with the database, and a module that provides the HTTP service. The database module will know how to save and retrieve persons from the address book database, and the HTTP module will receive requests and respond accordingly.
While not strictly mandatory, it’s good practice to test your code while you write it, so you’ll also create a testing module. This is the planned layout for the application:
database.js: database module. It handles database operations.app.js: the end user module and the main application. It provides an HTTP service for the users to connect to.database.test.js: tests for the database module.
In addition, you’ll want a package.json file for your project, which describes the project and its required dependencies. You can either create it manually with your editor, or interactively using npm. Run the npm init command to create the file interactively:
- npm init
The command will ask for some information to get started. Fill in the values as shown in the example. If you don’t see an answer listed, leave the answer blank, which uses the default value in parentheses:
npm outputpackage name: (addressbook) addressbook
version: (1.0.0) 1.0.0
description: Addressbook API and database
entry point: (index.js) app.js
test command:
git repository: URL for your GitHub repository
keywords:
author: Sammy the Shark <sammy@example.com>"
license: (ISC)
About to write to package.json:

{
  "name": "addressbook",
  "version": "1.0.0",
  "description": "Addressbook API and database",
  "main": "app.js",
  "scripts": {
    "test": "echo \"Error: no test specified\" && exit 1"
  },
  "author": "",
  "license": "ISC"
}


Is this OK? (yes) yes
Now you can start writing the code. The database is at the core of the service you’re developing. It’s essential to have a well-designed database model before writing any other components. Consequently, it makes sense to start with the database code.
You don’t have to code all the bits of the application; Node.js has a large library of reusable modules. For instance, you don’t have to write any SQL queries if you have the Sequelize ORM module in the project. This module provides an interface that handles databases as JavaScript objects and methods. It can also create tables in your database. Sequelize needs the pg module to work with PostgreSQL.
Install modules using the npm install command with the --save option, which tells npm to save the module in package.json. Execute this command to install both sequelize and pg:
- npm install --save sequelize pg
Create a new JavaScript file to hold the database code:
- nano database.js
Import the sequelize module by adding this line to the file:
const Sequelize = require('sequelize');

. . .
Then, below that line, initialize a sequelize object with the database connection parameters, which you’ll retrieve from the system environment. This keeps the credentials out of your code so you don’t accidentally share your credentials when you push your code to GitHub. You can use process.env to access environment variables, and JavaScripts’s || operator to set defaults for undefined variables:
. . .

const sequelize = new Sequelize(process.env.DB_SCHEMA || 'postgres',
                                process.env.DB_USER || 'postgres',
                                process.env.DB_PASSWORD || '',
                                {
                                    host: process.env.DB_HOST || 'localhost',
                                    port: process.env.DB_PORT || 5432,
                                    dialect: 'postgres',
                                    dialectOptions: {
                                        ssl: process.env.DB_SSL == "true"
                                    }
                                });

. . .
Now define the Person model. To keep the example from getting too complex, you’ll only create two fields: firstName and lastName, both storing string values. Add the following code to define the model:
. . .

const Person = sequelize.define('Person', {
    firstName: {
        type: Sequelize.STRING,
        allowNull: false
    },
    lastName: {
        type: Sequelize.STRING,
        allowNull: true
    },
});

. . .
This defines the two fields, making firstName mandatory with allowNull: false. Sequelize’s model definition documentation shows the available data types and options.
Finally, export the sequelize object and the Person model so other modules can use them:
. . .

module.exports = {
    sequelize: sequelize,
    Person: Person
};
It’s handy to have a table-creation script in a separate file that you can call at any time during development. These types of files are called migrations. Create a new file to hold this code:
- nano migrate.js
Add these lines to the file to import the database model you defined, and call the sync() function to initialize the database, which creates the table for your model:
var db = require('./database.js');
db.sequelize.sync();
The application is looking for database connection information in system environment variables. Create a file called .env to hold those values, which you will load into the environment during development:
- nano .env
Add the following variable declarations to the file. Ensure that you set DB_HOST, DB_PORT, and DB_PASSWORD to those associated with your DigitalOcean PostgreSQL cluster:
export DB_SCHEMA=addressbook_db
export DB_USER=addressbook_user
export DB_PASSWORD=your_db_user_password
export DB_HOST=your_db_cluster_host
export DB_PORT=your_db_cluster_port
export DB_SSL=true
export PORT=3000
Save the file.
Warning: never check environment files into source control. They usually have sensitive information.
Since you defined a default .gitignore file when you created the repository, this file is already ignored.
You are ready to initialize the database. Import the environment file and run migrate.js:
- source ./.env
- node migrate.js
This creates the database table:
Output
Executing (default): CREATE TABLE IF NOT EXISTS "People" ("id"   SERIAL , "firstName" VARCHAR(255) NOT NULL, "lastName" VARCHAR(255), "createdAt" TIMESTAMP WITH TIME ZONE NOT NULL, "updatedAt" TIMESTAMP WITH TIME ZONE NOT NULL, PRIMARY KEY ("id"));
Executing (default): SELECT i.relname AS name, ix.indisprimary AS primary, ix.indisunique AS unique, ix.indkey AS indkey, array_agg(a.attnum) as column_indexes, array_agg(a.attname) AS column_names, pg_get_indexdef(ix.indexrelid) AS definition FROM pg_class t, pg_class i, pg_index ix, pg_attribute a WHERE t.oid = ix.indrelid AND i.oid = ix.indexrelid AND a.attrelid = t.oid AND t.relkind = 'r' and t.relname = 'People' GROUP BY i.relname, ix.indexrelid, ix.indisprimary, ix.indisunique, ix.indkey ORDER BY i.relname;
The output shows two commands. The first one creates the People table as per your definition. The second command checks that the table was indeed created by looking it up in the PostgreSQL catalog.
It’s good practice to create tests for your code. With tests, you can validate the code’s behavior. You can write a check for each function, method, or any other part of your system and verify that it works the way you’d expect, without having to test things manually.
The jest testing framework is a great fit for writing tests against Node.js applications. Jest scans the files in the project for test files and executes them one a time. Install Jest with the --save-dev option, which tells npm that the module is not required to run the program, but it is a dependency for developing the application:
- npm install --save-dev jest
You’ll write tests to verify that you can insert, read, and delete records from your database. These tests will verify that your database connection and permissions are configured properly, and will also provide some tests you can use in your CI/CD pipeline later.
Create the database.test.js file:
- nano database.test.js
Add the following content. Start by importing the database code:
const db = require('./database');

. . .
To ensure the database is ready to use, call sync() inside the beforeAll function:
. . .

beforeAll(async () => {
    await db.sequelize.sync();
});

. . .
The first test creates a person record in the database. The sequelize library executes all queries asynchronously, which means it doesn’t wait for the results of the query. To make the test wait for results so you can verify them, you must use the async and await keywords. This test calls the create() method to insert a new row in the database. Use expect to compare the person.id column with 1. The test will fail if you get a different value:
. . .

test('create person', async () => {
    expect.assertions(1);
    const person = await db.Person.create({
        id: 1,
        firstName: 'Sammy',
        lastName: 'Davis Jr.',
        email: 'sammy@example.com'
    });
    expect(person.id).toEqual(1);
});

. . .
In the next test, use the findByPk() method to retrieve the row with id=1. Then, validate the firstName and lastName values. Once again, use async and await:
. . .

test('get person', async () => {
    expect.assertions(2);
    const person = await db.Person.findByPk(1);
    expect(person.firstName).toEqual('Sammy');
    expect(person.lastName).toEqual('Davis Jr.');
});

. . .
Finally, test removing a person from the database. The destroy() method deletes the person with id=1. To ensure that it worked, try retrieving the person a second time and checking that the returned value is null:
. . .

test('delete person', async () => {
    expect.assertions(1);
    await db.Person.destroy({
        where: {
            id: 1
        }
    });
    const person = await db.Person.findByPk(1);
    expect(person).toBeNull();
});

. . .
Finally, add this code to close the connection to the database with close() once all tests have finished:
. . .

afterAll(async () => {
    await db.sequelize.close();
});
Save the file.
The jest command runs the test suite for your program, but you can also store commands in package.json. Open this file in your editor:
- nano package.json
Locate the scripts keyword and replace the existing test line (which was just a placeholder). The test command is jest:
. . .

  "scripts": {
    "test": "jest"
  },

. . .
Now you can call npm run test to invoke the test suite. This may be a longer command, but if you need to modify the jest command later, external services won’t have to change; they can continue calling npm run test.
Run the tests:
- npm run test
Then, check the results:
Output  console.log node_modules/sequelize/lib/sequelize.js:1176
    Executing (default): CREATE TABLE IF NOT EXISTS "People" ("id"   SERIAL , "firstName" VARCHAR(255) NOT NULL, "lastName" VARCHAR(255), "createdAt" TIMESTAMP WITH TIME ZONE NOT NULL, "updatedAt" TIMESTAMP WITH TIME ZONE NOT NULL, PRIMARY KEY ("id"));

  console.log node_modules/sequelize/lib/sequelize.js:1176
    Executing (default): SELECT i.relname AS name, ix.indisprimary AS primary, ix.indisunique AS unique, ix.indkey AS indkey, array_agg(a.attnum) as column_indexes, array_agg(a.attname) AS column_names, pg_get_indexdef(ix.indexrelid) AS definition FROM pg_class t, pg_class i, pg_index ix, pg_attribute a WHERE t.oid = ix.indrelid AND i.oid = ix.indexrelid AND a.attrelid = t.oid AND t.relkind = 'r' and t.relname = 'People' GROUP BY i.relname, ix.indexrelid, ix.indisprimary, ix.indisunique, ix.indkey ORDER BY i.relname;

  console.log node_modules/sequelize/lib/sequelize.js:1176
    Executing (default): INSERT INTO "People" ("id","firstName","lastName","createdAt","updatedAt") VALUES ($1,$2,$3,$4,$5) RETURNING *;

  console.log node_modules/sequelize/lib/sequelize.js:1176
    Executing (default): SELECT "id", "firstName", "lastName", "createdAt", "updatedAt" FROM "People" AS "Person" WHERE "Person"."id" = 1;

  console.log node_modules/sequelize/lib/sequelize.js:1176
    Executing (default): DELETE FROM "People" WHERE "id" = 1

  console.log node_modules/sequelize/lib/sequelize.js:1176
    Executing (default): SELECT "id", "firstName", "lastName", "createdAt", "updatedAt" FROM "People" AS "Person" WHERE "Person"."id" = 1;

 PASS  ./database.test.js
  ✓ create person (344ms)
  ✓ get person (173ms)
  ✓ delete person (323ms)

Test Suites: 1 passed, 1 total
Tests:       3 passed, 3 total
Snapshots:   0 total
Time:        5.315s
Ran all test suites.
With the database code tested, you can build the API service to manage the people in the address book.
To serve HTTP requests, you’ll use the Express web framework. Install Express and save it as a dependency using npm install:
- npm install --save express
You’ll also need the body-parser module, which you’ll use to access the HTTP request body. Install this as a dependency as well:
- npm install --save body-parser
Create the main application file app.js:
- nano app.js
Import the express, body-parser, and database modules. Then create an instance of the express module called app to control and configure the service. You use app.use() to add features such as middleware. Use this to add the body-parser module so the application can read url-encoded strings:
var express = require('express');
var bodyParser = require('body-parser');
var db = require('./database');
var app = express();
app.use(bodyParser.urlencoded({ extended: true }));

. . .
Next, add routes to the application. Routes are similar to buttons in an app or website; they trigger some action in your application. Routes link unique URLs to actions in the application. Each route will serve a specific path and support a different operation.
The first route you’ll define handles GET requests for the /person/$ID path, which will display the database record for the person with the specified ID. Express automatically sets the value of the requested $ID in the req.params.id variable.
The application must reply with the person data encoded as a JSON string. As you did in the database tests, use the findByPk() method to retrieve the person by id and reply to the request with HTTP status 200 (OK) and send the person record as JSON. Add the following code:
. . .

app.get("/person/:id", function(req, res) {
    db.Person.findByPk(req.params.id)
        .then( person => {
            res.status(200).send(JSON.stringify(person));
        })
        .catch( err => {
            res.status(500).send(JSON.stringify(err));
        });
});

. . .
Errors cause the code in catch() to be executed. For instance, if the database is down, the connection will fail, and this will execute instead. In case of trouble, set the HTTP status to 500 (Internal Server Error) and send the error message back to the user:
Add another route to create a person in the database. This route will handle PUT requests and access the person’s data from the req.body. Use the create() method to insert a row in the database:
. . .

app.put("/person", function(req, res) {
    db.Person.create({
        firstName: req.body.firstName,
        lastName: req.body.lastName,
        id: req.body.id
    })
        .then( person => {
            res.status(200).send(JSON.stringify(person));
        })
        .catch( err => {
            res.status(500).send(JSON.stringify(err));
        });
});

. . .
Add another route to handle DELETE requests, which will remove records from the address book. First, use the ID to locate the record and then use the destroy method to remove it:
. . .

app.delete("/person/:id", function(req, res) {
    db.Person.destroy({
        where: {
            id: req.params.id
        }
    })
        .then( () => {
            res.status(200).send();
        })
        .catch( err => {
            res.status(500).send(JSON.stringify(err));
        });
});

. . .
And for convenience, add a route that retrieves all people in the database using the /all path:
. . .

app.get("/all", function(req, res) {
    db.Person.findAll()
        .then( persons => {
            res.status(200).send(JSON.stringify(persons));
        })
        .catch( err => {
            res.status(500).send(JSON.stringify(err));
        });
});

. . .
One last route left. If the request did not match any of the previous routes, send status code 404 (Not Found):
. . .

app.use(function(req, res) {
    res.status(404).send("404 - Not Found");
});

. . .
Finally, add the listen() method, which starts up the service. If the environment variable PORT is defined, then the service listens in that port; otherwise, it defaults to port 3000:
. . .

var server = app.listen(process.env.PORT || 3000, function() {
    console.log("app is running on port", server.address().port);
});
As you’ve learned, the package.json file lets you define various commands to run tests, start your apps, and other tasks, which often lets you run common commands with much less typing. Add a new command on package.json to start the application. Edit the file:
- nano package.json
Add the start command, so it looks like this:
. . .

  "scripts": {
    "test": "jest",
    "start": "node app.js"
  },

. . .
Don’t forget to add a comma to the previous line, as the scripts section needs its entries separated by commas.
Save the file and start the application for the first time. First, load the environment file with source; this imports the variables into the session and makes them available to the application. Then, start the application with npm run start:
- source ./.env
- npm run start
The app starts on port 3000:
Outputapp is running on port 3000
Open a browser and navigate to http://localhost:3000/all. You’ll see a page showing [].
Switch back to your terminal and press CTRL-C to stop the application.
Now is an excellent time to add code quality tests. Code quality tools, also known as linters, scan the project for issues in the code. Bad coding practices like leaving unused variables, not ending statements with a semicolon, or missing curly braces can cause bugs that are difficult to find.
Install jshint tool, a JavaScript linter, as a development dependency:
- npm install --save-dev jshint
Over the years, JavaScript has received of updates, features, and syntax changes. The language has been standardized by ECMA International under the name of “ECMAScript”. About once a year, ECMA releases a new version of ECMAScript with new features.
By default, jshint assumes that your code is compatible with ES6 (ECMAScript Version 6), and will throw an error if it finds any keywords not supported in that version. You’ll want to find the version that is compatible with your code. If you look at the feature table for all the recent versions, you’ll find that the async/await keywords were not introduced until ES8. You used both keywords in the database test code, so that sets the minimum compatible version to ES8.
To tell jshint the version you’re using, create a file called .jshintrc:
- nano .jshintrc
In the file, specify esversion. The jshintrc file uses JSON, so create a new JSON object in the file:
{ "esversion": 8 }
Save the file and exit the editor.
Add a command to run jshint. Edit package.json:
- nano package.json
Add a lint command to your project in the scripts section of package.json. The command calls the lint tool against all the JavaScript files you created so far:
. . .

  "scripts": {
    "test": "jest",
    "start": "node app.js",
    "lint": "jshint app.js database*.js migrate.js"
  },

. . .
Now you can run the linter to find any issues:
- npm run lint
There should not be any error messages:
Output> jshint app.js database*.js migrate.js
If there are any errors, jshint will show the line that has the problem.
You’ve completed the project and ensured it works. Add the files to the repository, commit, and push the changes:
- git add *.js
- git add package*.json
- git add .jshintrc
- git commit -m 'initial commit'
- git push origin master
Now you can configure Semaphore to test, build, and deploy the application, starting by configuring Semaphore with your DigitalOcean Personal Access Token and database credentials.
Step 3 — Creating Secrets in Semaphore
There is some information that doesn’t belong in a GitHub repository. Passwords and API Tokens are good examples of this. You’ve stored this sensitive data in a separate file and loaded it into your environment, When using Semaphore, you can use Secrets to store sensitive data.
There are three kinds of secrets in the project:
- Docker Hub: the username and password of your Docker Hub account.
- DigitalOcean Personal Access Token: to deploy the application to your Kubernetes cluster.
- Environment Variables: for database username and password connection parameters.
To create the first secret, open your browser and log in to the Semaphore website. On the left navigation menu, click Secrets under the CONFIGURATION heading. Click the Create New Secret button.
For Name of the Secret, enter dockerhub. Then under Environment Variables, create two environment variables:
DOCKER_USERNAME: your DockerHub username.DOCKER_PASSWORD: your DockerHub password.
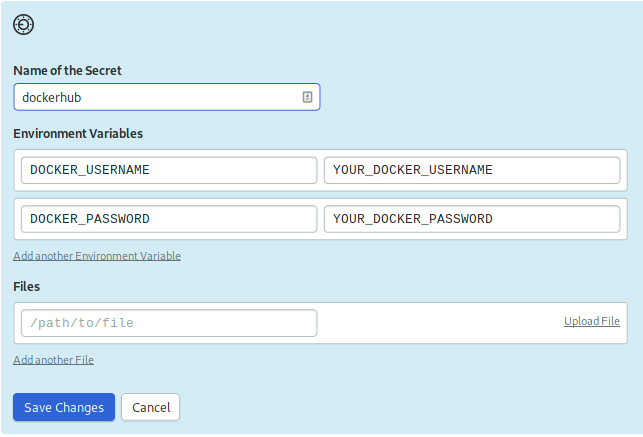
Click Save Changes.
Create a second secret for your DigitalOcean Personal Access Token. Once again, click on Secrets on the left navigation menu, then on Create New Secret. Call this secret do-access-token and create an environment value called DO_ACCESS_TOKEN with the value set to your Personal Access Token:
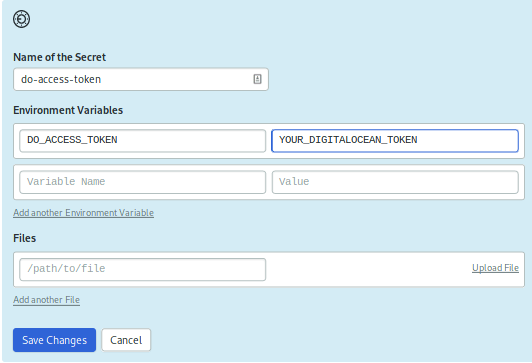
Save the secret.
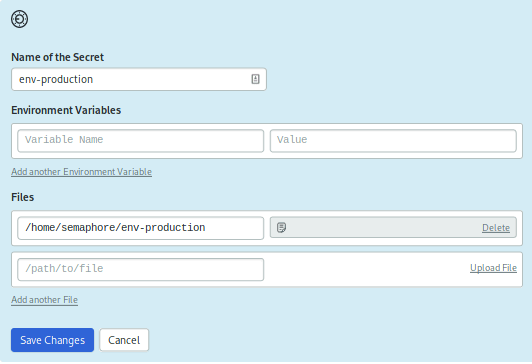
For the next secret, instead of setting environment variables directly, you’ll upload the .env file from the project’s root.
Create a new secret called env-production. Under the Files section, press the Upload file link to locate and upload your .env file, and tell Semaphore to place it at /home/semaphore/env-production.
Note: Because the file is hidden, you may have trouble finding it on your computer. There is usually a menu item or a key combination to view hidden files, such as CTRL+H. If all else fails, you can try copying the file with a non-hidden name:
- cp .env env
Then upload the file and rename it back:
- cp env .env
The environment variables are all configured. Now you can begin the Continuous Integration setup.
Step 4 — Adding your Project to Semaphore
In this step you will add your project to Semaphore and start the Continuous Integration (CI) pipeline.
First, link your GitHub repository with Semaphore:
- Log in to your Semaphore account.
- Click the + icon next to PROJECTS.
- Click the Add Repository button next to your repository.

Now that Semaphore is connected, it will pick up any changes in the repository automatically.
You are now ready to create the Continuous Integration pipeline for the application. A pipeline defines the path your code must travel to get built, tested, and deployed. The pipeline is automatically run each time there is a change in the GitHub repository.
First, you should ensure that Semaphore uses the same version of Node you’ve been using during development. You can check which version is running on your machine:
- node -v
Outputv10.16.0
You can tell Semaphore which version of Node.js to use by creating a file called .nvmrc in your repository. Internally, Semaphore uses node version manager to switch between Node.js versions. Create the .nvmrc file and set the version to 10.16.0:
- echo '10.16.0' > .nvmrc
Semaphore pipelines go in the .semaphore directory. Create the directory:
- mkdir .semaphore
Create a new pipeline file. The initial pipeline is always called semaphore.yml. In this file, you’ll define all the steps required to build and test the application.
- nano .semaphore/semaphore.yml
Note: You are creating a file in the YAML format. You must preserve the leading spaces as shown in the tutorial.
The first line must set the Semaphore file version; the current stable is v1.0. Also, the pipeline needs a name. Add these lines to your file:
version: v1.0
name: Addressbook

. . .
Semaphore automatically provisions virtual machines to run the tasks. There are various machines to choose from. For the integration jobs, use the e1-standard-2 (2 CPUs 4 GB RAM) along with an Ubuntu 18.04 OS. Add these lines to the file:
. . .

agent:
  machine:
    type: e1-standard-2
    os_image: ubuntu1804

. . .
Semaphore uses blocks to organize the tasks. Each block can have one or more jobs. All jobs in a block run in parallel, each one in an isolated machine. Semaphore waits for all jobs in a block to pass before starting the next one.
Start by defining the first block, which installs all the JavaScript dependencies to test and run the application:
. . .

blocks:
  - name: Install dependencies
    task:

. . .
You can define environment variables that are common for all jobs, like setting NODE_ENV to test, so Node.js knows this is a test environment. Add this code after task:
. . .
    task:
      env_vars:
        - name: NODE_ENV
          value: test

. . .
Commands in the prologue section are executed before each job in the block. It’s a convenient place to define setup tasks. You can use checkout to clone the GitHub repository. Then, nvm use activates the appropriate Node.js version you specified in .nvmrc. Add the prologue section:
    task:
. . .

      prologue:
        commands:
          - checkout
          - nvm use

. . .
Next add this code to install the project’s dependencies. To speed up jobs, Semaphore provides the cache tool. You can run cache store to save node_modules directory in Semaphore’s cache. cache automatically figures out which files and directories should be stored. The second time the job is executed, cache restore restores the directory.
. . .

      jobs:
        - name: npm install and cache
          commands:
            - cache restore
            - npm install
            - cache store

. . .
Add another block which will run two jobs. One to run the lint test, and another to run the application’s test suite.
. . .

  - name: Tests
    task:
      env_vars:
        - name: NODE_ENV
          value: test
      prologue:
        commands:
          - checkout
          - nvm use
          - cache restore

. . .
The prologue repeats the same commands as in the previous block and restores node_module from the cache. Since this block will run tests, you set the NODE_ENV environment variable to test.
Now add the jobs. The first job performs the code quality check with jshint:
. . .

      jobs:
        - name: Static test
          commands:
            - npm run lint

. . .
The next job executes the unit tests. You’ll need a database to run them, as you don’t want to use your production database. Semaphore’s sem-service can start a local PostgreSQL database in the test environment that is completely isolated. The database is destroyed when the job ends. Start this service and run the tests:
. . .

        - name: Unit test
          commands:
            - sem-service start postgres
            - npm run test
Save the .semaphore/semaphore.yml file.
Now add and commit the changes to the GitHub repository:
- git add .nvmrc
- git add .semaphore/semaphore.yml
- git commit -m "continuous integration pipeline"
- git push origin master
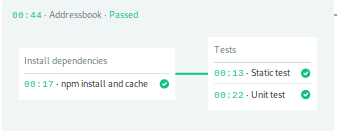
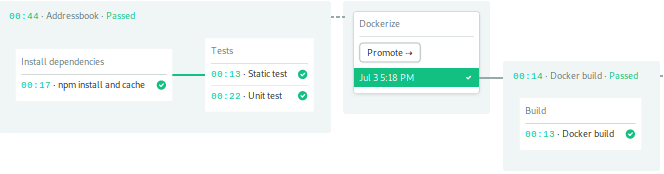
As soon as the code is pushed to GitHub, Semaphore starts the CI pipeline:

You can click on the pipeline to show the blocks and jobs, and their output.
Next you will create a new pipeline that builds a Docker image for the application.
Step 5 — Building Docker Images for the Application
A Docker image is the basic unit of a Kubernetes deployment. The image should have all the binaries, libraries, and code required to run the application. A Docker container is not a lightweight virtual machine, but it behaves like one. The Docker Hub registry contains hundreds of ready-to-use images, but we’re going to build our own.
In this step, you’ll add a new pipeline to build a custom Docker image for your app and push it to Docker Hub.
To build a custom image, create a Dockerfile:
- nano Dockerfile
The Dockerfile is a recipe to create the image. You can use the official Node.js distribution as a starting point instead of starting from scratch. Add this to your Dockerfile:
FROM node:10.16.0-alpine

. . .
Then add a command which copies package.json and package-lock.json, and then install the node modules inside the image:
. . .

COPY package*.json ./
RUN npm install

. . .
Installing the dependencies first will speed up subsequent builds, as Docker will cache this step.
Now add this command which copies all the application files in the project root into the image:
. . .

COPY *.js ./

. . .
Finally, EXPOSE specifies that the container listens for connections on port 3000, where the application is listening, and CMD sets the command that should run when the container starts. Add these lines to your file:
. . .

EXPOSE 3000
CMD [ "npm", "run", "start" ]
Save the file.
With the Dockerfile complete, you can create a new pipeline so Semaphore can build the image for you when you push your code to GitHub. Create a new file called docker-build.yml:
- nano .semaphore/docker-build.yml
Start the pipeline with the same boilerplate as the the CI pipline, but with the name Docker build:
version: v1.0
name: Docker build
agent:
  machine:
    type: e1-standard-2
    os_image: ubuntu1804

. . .
This pipeline will have only one block and one job. In Step 3, you created a secret named dockerhub with your Docker Hub username and password. Here, you’ll import these values using the secrets keyword. Add this code:
. . .

blocks:
  - name: Build
    task:
      secrets:
        - name: dockerhub

. . .
Docker images are stored in repositories. We’ll use the official Docker Hub which allows for an unlimited number of public images. Add these lines to check out the code from GitHub and use the docker login command to authenticate with Docker Hub.
    task:
. . .

      prologue:
        commands:
          - checkout
          - echo "${DOCKER_PASSWORD}" | docker login -u "${DOCKER_USERNAME}" --password-stdin

. . .
Each Docker image is fully identified by the combination of name and tag. The name usually corresponds to the product or software, and the tag corresponds to the particular version of the software. For example, node.10.16.0. When no tag is supplied, Docker defaults to the special latest tag. Hence, it’s considered good practice to use the latest tag to refer to the most current image.
Add the following code to build the image and push it to Docker Hub:
. . .

      jobs:
      - name: Docker build
        commands:
          - docker pull "${DOCKER_USERNAME}/addressbook:latest" || true
          - docker build --cache-from "${DOCKER_USERNAME}/addressbook:latest" -t "${DOCKER_USERNAME}/addressbook:$SEMAPHORE_WORKFLOW_ID" .
          - docker push "${DOCKER_USERNAME}/addressbook:$SEMAPHORE_WORKFLOW_ID"
When Docker builds the image, it reuses parts of existing images to speed up the process. The first command tries to pull the latest image from Docker Hub so it may be reused. Semaphore stops the pipeline if any of the commands return a status code different than zero. For example, if the repository doesn’t have any latest image, as it won’t on the first try, the pipeline will stop. You can force Semaphore to ignore failed commands by appending || true to the command.
The second command builds the image. To reference this particular image later, you can tag it with a unique string. Semaphore provides several environment variables for jobs. One of them, $SEMAPHORE_WORKFLOW_ID is unique and shared among all the pipelines in the workflow. It’s handy for referencing this image later in the deployment.
The third command pushes the image to Docker Hub.
The build pipeline is ready, but Semaphore will not start it unless you connect it to the main CI pipeline. You can chain multiple pipelines to create complex, multi-branch workflows using promotions.
Edit the main pipeline file .semaphore/semaphore.yml:
- nano .semaphore/semaphore.yml
Add the following lines at the end of the file:
. . .

promotions:
  - name: Dockerize
    pipeline_file: docker-build.yml
    auto_promote_on:
      - result: passed
auto_promote_on defines the condition to start the docker build pipeline. In this case, it runs when all jobs defined in the semaphore.yml file have passed.
To test the new pipeline, you need to add, commit, and push all the modified files to GitHub:
- git add Dockerfile
- git add .semaphore/docker-build.yml
- git add .semaphore/semaphore.yml
- git commit -m "docker build pipeline"
- git push origin master
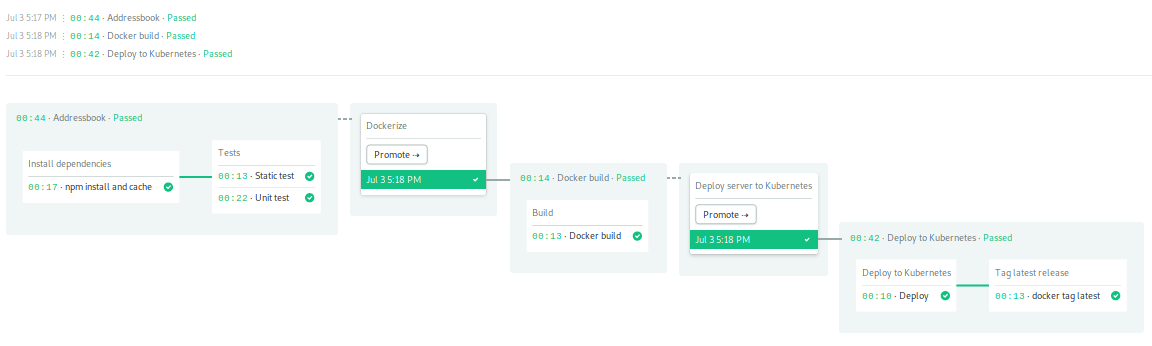
After the CI pipeline is complete, the Docker build pipeline starts.
When it finishes, you’ll see your new image in your Docker Hub repository.
You’ve got your build process testing and creating the image. Now you’ll create the final pipeline to deploy the application to your Kubernetes cluster.
Step 6 — Setting up Continuous Deployment to Kubernetes
The building block of a Kubernetes deployment is the pod. A pod is a group of containers that are managed as a single unit. The containers inside a pod start and stop in unison and always run on the same machine, sharing its resources. Each pod has an IP address. In this case, the pods will only have one container.
Pods are ephemeral; they are created and destroyed frequently. You can’t tell which IP address is going to be assigned to each pod until it’s started. To solve this, you’ll use services, which have fixed public IP addresses so incoming connections can be load-balanced and forwarded to the pods.
You could manage pods directly, but it’s better to let Kubernetes handle that by using a deployment. In this section, you will create a declarative manifest that describes the final desired state for your cluster. The manifest has two resources:
- Deployment: starts the pods in the cluster nodes as required and keeps track of their status. Since in this tutorial we’re using a 3-node cluster, we’ll deploy 3 pods.
- Service: acts as an entry point for our users. Listens to traffic on port
80(HTTP) and forwards the connection to the pods.
Create a manifest file called deployment.yml:
- nano deployment.yml
Start the manifest with the Deployment resource. Add the following contents to the new file to define the deployment:
apiVersion: apps/v1
kind: Deployment
metadata:
  name: addressbook
spec:
  replicas: 3
  selector:
    matchLabels:
      app: addressbook
  template:
    metadata:
      labels:
        app: addressbook
    spec:
      containers:
        - name: addressbook
          image: ${DOCKER_USERNAME}/addressbook:${SEMAPHORE_WORKFLOW_ID}
          env:
            - name: NODE_ENV
              value: "production"
            - name: PORT
              value: "$PORT"
            - name: DB_SCHEMA
              value: "$DB_SCHEMA"
            - name: DB_USER
              value: "$DB_USER"
            - name: DB_PASSWORD
              value: "$DB_PASSWORD"
            - name: DB_HOST
              value: "$DB_HOST"
            - name: DB_PORT
              value: "$DB_PORT"
            - name: DB_SSL
              value: "$DB_SSL"


. . .
For each resource in the manifest, you need to set an apiVersion. For deployments, use apiVersion: apps/v1, a stable version. Then, tell Kubernetes that this resource is a Deployment with kind: Deployment. Each definition should have a name defined in metadata.name.
In the spec section you tell Kubernetes what the desired final state is. This definition requests that Kubernetes should create 3 pods with replicas: 3.
Labels are key-value pairs used to organize and cross-reference Kubernetes resources. You define labels with metadata.labels, and you can look for matching labels with selector.matchLabels. This is how you connect elements togther.
The key spec.template defines a model that Kubernetes will use to create each pod. Inside spec.template.metadata.labels you set one label for the pods: app: addressbook.
With spec.selector.matchLabels you make the deployment manage any pods with the label app: addressbook. In this case you are making this deployment responsible for all the pods.
Finally, you define the image that runs in the pods. In spec.template.spec.containers you set the image name. Kubernetes will pull the image from the registry as needed. In this case, it will pull from Docker Hub). You can also set environment variables for the containers, which is fortunate because you need to supply several values for the database connection.
To keep the deployment manifest flexible, you’ll be relying on variables. The YAML format, however, doesn’t allow variables, so the file isn’t valid yet. You’ll solve that problem when you define the deployment pipeline for Semaphore.
That’s it for the deployment. But this only defines the pods. You still need a service that will allow traffic to flow to your pods. You can add another Kubernetes resource in the same file as long as you use three hyphens (---) as a separator.
Add the following code to define a load balancer service that connects to pods with the addressbook label:
. . .

---

apiVersion: v1
kind: Service
metadata:
  name: addressbook-lb
spec:
  selector:
    app: addressbook
  type: LoadBalancer
  ports:
    - port: 80
      targetPort: 3000
The load balancer will receive connections on port 80 and forward them to the pods’ port 3000 where the application is listening.
Save the file.
Now, create a deployment pipeline for Semaphore that will deploy the app using the manifest. Create a new file in the .semaphore directory:
- nano .semaphore/deploy-k8s.yml
Begin the pipeline as usual, specifying the version, name, and image:
version: v1.0
name: Deploy to Kubernetes
agent:
  machine:
    type: e1-standard-2
    os_image: ubuntu1804

. . .
This pipeline will have two blocks. The first block deploys the application to the Kubernetes cluster.
Define the block and import all the secrets:
. . .

blocks:
  - name: Deploy to Kubernetes
    task:
      secrets:
        - name: dockerhub
        - name: do-access-token
        - name: env-production

. . .
Store your DigitalOcean Kubernetes cluster name in an environment variable so you can reference it later:
. . .

      env_vars:
        - name: CLUSTER_NAME
          value: addressbook-server

. . .
DigitalOcean Kubernetes clusters are managed with a combination of two programs: kubectl and doctl. The former is already included in Semaphore’s image, but the latter isn’t, so you need to install it. You can use the prologue section to do it.
Add this prologue section:
. . .

      prologue:
        commands:
          - wget https://github.com/digitalocean/doctl/releases/download/v1.20.0/doctl-1.20.0-linux-amd64.tar.gz
          - tar xf doctl-1.20.0-linux-amd64.tar.gz
          - sudo cp doctl /usr/local/bin
          - doctl auth init --access-token $DO_ACCESS_TOKEN
          - doctl kubernetes cluster kubeconfig save "${CLUSTER_NAME}"
          - checkout

. . .
The first command downloads the doctl official release with wget. The second command decompresses it with tar and copies it into the local path. Once doctl is installed, it can be used to authenticate with the DigitalOcean API and request the Kubernetes config file for our cluster. After checking out our code, we are done with the prologue:
Next comes the final piece of our pipeline: deploying to the cluster.
Remember that there were some environment variables in deployment.yml, and YAML does not allow that. As a result, deployment.yml in its current state, won’t work. To get around that, source the environment file to load the variables, then use the envsubst command to expand the variables in-place with the actual values. The result, a file called deploy.yml, is entirely valid YAML with the values inserted. With the file in place, you can start the deployment with kubectl apply:
. . .

      jobs:
      - name: Deploy
        commands:
          - source $HOME/env-production
          - envsubst < deployment.yml | tee deploy.yml
          - kubectl apply -f deploy.yml

. . .
The second block adds the latest tag to the image on Docker Hub to denote that this is the most current version deployed. Repeat the Docker login steps, then pull, retag, and push to Docker Hub:
. . .

  - name: Tag latest release
    task:
      secrets:
        - name: dockerhub
      prologue:
        commands:
          - checkout
          - echo "${DOCKER_PASSWORD}" | docker login -u "${DOCKER_USERNAME}" --password-stdin
          - checkout
      jobs:
      - name: docker tag latest
        commands:
          - docker pull "${DOCKER_USERNAME}/addressbook:$SEMAPHORE_WORKFLOW_ID"
          - docker tag "${DOCKER_USERNAME}/addressbook:$SEMAPHORE_WORKFLOW_ID" "${DOCKER_USERNAME}/addressbook:latest"
          - docker push "${DOCKER_USERNAME}/addressbook:latest"
Save the file.
This pipeline performs the deployment, but it can only start if the Docker image was successfully generated and pushed to Docker Hub. As a result, you must connect the build and deployment pipelines with a promotion. Edit the Docker build pipeline to add it:
- nano .semaphore/docker-build.yml
Add the promotion to the end of the file:
. . .

promotions:
  - name: Deploy to Kubernetes
    pipeline_file: deploy-k8s.yml
    auto_promote_on:
      - result: passed
You are done setting up the CI/CD workflow.
All that remains is pushing the modified files and letting Semaphore do the work. Add, commit, and push your repository’s changes:
- git add .semaphore/deploy-k8s.yml
- git add .semaphore/docker-build.yml
- git add deployment.yml
- git commit -m "kubernetes deploy pipeline"
- git push origin master
It’ll take a few minutes for the deployment to complete.
Let’s test the application next.
Step 7 — Testing the Application
At this point, the application is up and running. In this step, you’ll use curl to test the API endpoint.
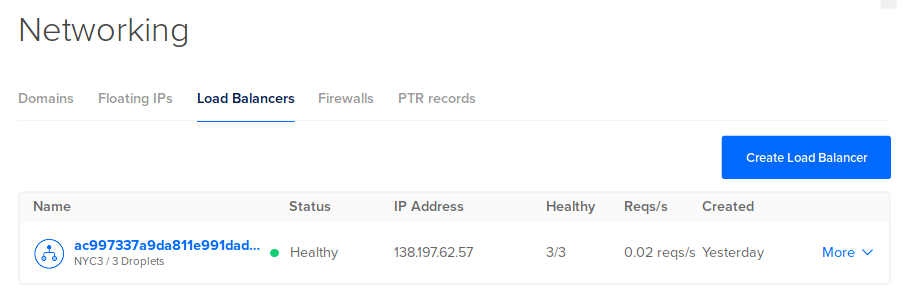
You’ll need to know the public IP that DigitalOcean has given to your cluster. Follow these steps to find it:
- Log in to your DigitalOcean account.
- Select the addressbook project
- Go to Networking.
- Click on Load Balancers.
- The IP Address is shown. Copy the IP address.
Let’s check the /all route using curl:
- curl -w "\n" YOUR_CLUSTER_IP/all
You can use the -w "\n" option to ensure curl prints all lines:
Since there are no records in the database yet, you get an empty JSON array as the result:
Output[]
Create a new person record by making a PUT request to the /person endpoint:
- curl -w "\n" -X PUT \
- -d "firstName=Sammy&lastName=the Shark" YOUR_CLUSTER_IP/person
The API returns the JSON object for the person:
Output{
    "id": 1,
    "firstName": "Sammy",
    "lastName": "the Shark",
    "updatedAt": "2019-07-04T23:51:00.548Z",
    "createdAt": "2019-07-04T23:51:00.548Z"
}
Create a second person:
- curl -w "\n" -X PUT \
- -d "firstName=Tommy&lastName=the Octopus" YOUR_CLUSTER_IP/person
The output indicates that a second person was created:
Output{
    "id": 2,
    "firstName": "Tommy",
    "lastName": "the Octopus",
    "updatedAt": "2019-07-04T23:52:08.724Z",
    "createdAt": "2019-07-04T23:52:08.724Z"
}
Now make a GET request to get the person with the id of 2:
- curl -w "\n" YOUR_CLUSTER_IP/person/2
The server replies with the data you requested:
Output{
    "id": 2,
    "firstName": "Tommy",
    "lastName": "the Octopus",
    "createdAt": "2019-07-04T23:52:08.724Z",
    "updatedAt": "2019-07-04T23:52:08.724Z"
}
To delete the person, send a DELETE request:
- curl -w "\n" -X DELETE YOUR_CLUSTER_IP/person/2
No output is returned by this command.
You should only have one person in your database, the one with the id of 1. Try getting /all again:
- curl -w "\n" YOUR_CLUSTER_IP/all
The server replies with an array of persons containing only one record:
Output[
    {
        "id": 1,
        "firstName": "Sammy",
        "lastName": "the Shark",
        "createdAt": "2019-07-04T23:51:00.548Z",
        "updatedAt": "2019-07-04T23:51:00.548Z"
    }
]
At this point, there’s only one person left in the database.
This completes the tests for all the endpoints in our application and marks the end of the tutorial.
Conclusion
In this tutorial, you wrote a complete Node.js application from scratch which used DigitalOcean’s managed PostgreSQL database service. You then used Semaphore’s CI/CD pipelines to fully automate a workflow that tested and built a container image, uploaded it to Docker Hub, and deployed it to DigitalOcean Kubernetes.
To learn more about Kubernetes, you can read An Introduction to Kubernetes and the rest of DigitalOcean’s Kubernetes tutorials.
Now that your application is deployed, you may consider adding a domain name, securing your database cluster, or setting up alerts for your database.
Thanks for learning with the DigitalOcean Community. Check out our offerings for compute, storage, networking, and managed databases.
About the author(s)
Developer & Writer
Managed the Write for DOnations program, wrote and edited community articles, and makes things on the Internet. Expertise in DevOps areas including Linux, Ubuntu, Debian, and more.
Still looking for an answer?
This textbox defaults to using Markdown to format your answer.
You can type !ref in this text area to quickly search our full set of tutorials, documentation & marketplace offerings and insert the link!
I followed the tutorial but my load balacner is down, including the droplets.
Don’t you have to remove export from the .env file? Never worked for me until I removed the export keyword
First got this error in Unit Test:
SequelizeConnectionError: The server does not support SSL connections
so I changed the DB_SSL value in the .env to false, next had this issue:
SequelizeConnectionError: role "semaphore" does not exist
any idea?
 This work is licensed under a Creative Commons Attribution-NonCommercial- ShareAlike 4.0 International License.
Become a contributor for community
Get paid to write technical tutorials and select a tech-focused charity to receive a matching donation.

DigitalOcean Documentation
Full documentation for every DigitalOcean product.

Resources for startups and AI-native businesses
The Wave has everything you need to know about building a business, from raising funding to marketing your product.
The developer cloud
Scale up as you grow — whether you're running one virtual machine or ten thousand.

Start building today
From GPU-powered inference and Kubernetes to managed databases and storage, get everything you need to build, scale, and deploy intelligent applications.
