
The author selected the Free and Open Source Fund to receive a donation as part of the Write for DOnations program.
Introduction
The FreeBSD ports and packages collection, hereafter called ports tree, is FreeBSD’s build system for external software. It offers a Makefile-based, consistent way of building packages. The port refers to the build recipe, that is the Makefile and related files; while package is the output of building one port into a binary (compressed) archive of the package files and its meta information.
Manually building and installing a subset or all of the over 30,000 ports is possible with make install. However, the builds would run on one of your servers—not a clean environment. For production use cases, manual builds would also mean that each host needs the same revision of the ports tree, and needs to compile all packages for itself. This means repeated, error-prone work by humans and the servers. It is preferable to retrieve and use identical, pre-built binary packages on each host and serve them from a central, secure package repository.
To achieve this, Poudriere is the standard tool on FreeBSD to build, test, and audit packages as well as maintain the package repositories. Each build is run isolated in a fresh jail, running the desired version of FreeBSD, and starting with no packages installed. Only the base system, plus any explicitly specified dependencies, are available to the clean build. Poudriere takes care of rebuilding packages when necessary as well as updating the package repository after a build has finished. The poudriere command line tool is central to administering different ports trees, FreeBSD versions, port build options, and lastly, running the builds.
In this tutorial you’ll configure Poudriere, build a set of desired packages, set up HTTP-based package hosting, and automate the build using Buildbot as a continuous integration platform. Finally, you will securely access the packages from a client machine.
Note: To cover production-like use cases, the tutorial examples use the quarterly stable branches of the ports tree. Staying on one such branch protects you from breaking changes and provides security and build fixes where necessary—if you regularly update the tree from upstream (Subversion, or its GitHub mirror). You can choose to stay on one branch for an extended period of time, depending on the pace at which your system updates can be handled by developer/infrastructure teams. The ports collection supports FreeBSD releases until they become end-of-life (EOL)—see Supported FreeBSD releases—so that OS and package updates can be handled independently. Alternatively, you could consider a local version control repository cloned from the upstream tree. That way, you can manage patches and only merge upstream changes at the time you desire.
Prerequisites
Note: As of July 1, 2022, DigitalOcean no longer supports the creation of new FreeBSD Droplets through the Control Panel or API. However, you can still spin up FreeBSD Droplets using a custom image. Learn how to import a custom image to DigitalOcean by following our product documentation.
Before you begin this guide, you will need:
- A server running FreeBSD 11.2. If you’re new to working with FreeBSD, you may find it helpful to customize this server by following our guide on How to Get Started with FreeBSD. Note: FreeBSD 12.0 currently has an issue with nested jails, which first needs to be fixed before 12.x can be used for this tutorial.
- 10 GB free disk space or more to have enough capacity to store packages and logs.
- A basic Buildbot setup by completing the How To Set Up Buildbot on FreeBSD tutorial.
- Another server running FreeBSD, the same version, which you are going to use as a client to fetch and install the packages that you’re going to automatically build and host in a HTTP/HTTPS-based package repository.
Step 1 — Installing Poudriere for Use in Buildbot Worker
After completing the prerequisite tutorial, you’ll have a working Buildbot master and worker jail plus Nginx setup. You will build upon this existing setup in the following steps. In this first step, you’re going to install the build tool Poudriere inside the worker jail, since that is where the Buildbot worker process will trigger builds later on.
Connect to your server hosting Buildbot and open a root shell in the worker jail with the following command:
- sudo jexec buildbot-worker0 csh
Install Poudriere as a package:
- pkg install poudriere
Then confirm installation by pressing y and then ENTER.
Note: It is preferable to use the official FreeBSD package repository for installing Buildbot, Poudriere, and so on. If you build those tool packages yourself, you start off in a chicken-and-egg situation: wanting to install external software, but requiring Poudriere installed to get cleanly built packages. Since Poudriere is a very stable and backward-compatible tool, nothing speaks against updating it regularly and independently from your production packages.
If you followed the prerequisite tutorial, this is already the case and you can continue without following this note.
You’ve successfully installed the latest Poudriere tool and dependencies. In the next several steps, you will go through preparations to configure Poudriere.
Step 2 — Creating a Package Signing Key (Optional)
It’s recommended to set up digital signatures for built packages in order to provide more security. Skip this step if you want to secure your installation later, or in a different way. Otherwise, let’s go ahead and create a key pair used to sign packages (using the private key) and verify packages (using the public part).
Packages, by default, are built as .txz files, which are strongly compressed tarballs of the package contents. The compressed files’ checksums, together with serving the files via HTTP/HTTPS (TCP checksums), already provide some protection against corrupted data. Package contents typically comprise files and directories plus meta information such as the package name, version, and miscellaneous options. Files may even include setuid-able programs (as seen in the sudo package—though sudo is not built into FreeBSD), and the installation-time scripts run as root user. Installing from unverified sources therefore poses a security risk.
By serving the packages over HTTPS, you cannot detect whether someone tampered with the packages on-disk. Integrity and authenticity of your packages can be added by configuring Poudriere to sign the package repository with an RSA private key. Signed digests and the corresponding public key are thereby stored in the package repository’s digests.txz file. The required key pair (RSA private and public key) can be kept unchanged for a long time unless the private key was lost or compromised.
In this step you’ll create the key pair where the builds run (worker jail) and download the public part for later use on package clients (discussed in a later step).
Ensure you’re still in the worker jail root shell.
Create a new RSA private key:
- openssl genrsa -out /usr/local/etc/poudriere.key 4096
The private key file only needs to be accessible by root—the user that runs Poudriere. Protect its access permissions:
- chmod 0600 /usr/local/etc/poudriere.key
Later, you’ll need the public key part available on clients for verifying package signatures. Let’s extract the public key now:
- openssl rsa -in /usr/local/etc/poudriere.key -pubout -out /tmp/poudriere.pub
Lastly, download the public key file from your own computer:
- scp your-server:/usr/jails/buildbot-worker0/tmp/poudriere.pub /tmp/poudriere.pub
This concludes the optional creation of a key pair for package signing. You will later configure the actual signing with Poudriere and use the downloaded public key file on clients for the verification.
Another optional step follows: if you use the ZFS filesystem, Poudriere can make use of it to speed up builds. Otherwise, you can skip to Step 4 to configure Poudriere in order to get ready for running the first build.
Step 3 — Setting Up ZFS (Optional)
This step only applies if you run a FreeBSD system on top of the ZFS filesystem. In this step, you’re going to create the filesystems that Poudriere can use to create and manage jails faster, potentially speeding up your builds.
You can find out whether you’re using ZFS by listing pools. Make sure you’re on the server’s shell, not inside a jail.
- exit
Run the following command to list the zpools:
- sudo zpool list
If any pool is available, it will print information about it:
OutputNAME    SIZE  ALLOC   FREE  CKPOINT  EXPANDSZ   FRAG    CAP  DEDUP  HEALTH  ALTROOT
zroot   148G  94.4G  54.1G        -         -    66%    63%  1.00x  ONLINE  -
Otherwise if ZFS support is not available the tool will print no pools available, or failed to initialize ZFS library. This means that none of your system is using ZFS; in this case, skip to the next step. If you have decided to use another disk or storage type, such as the UFS filesystem, you can also move on to the next step.
If you plan to use ZFS, remember the printed pool name on which you want to store build-related data. You should plan for several gigabytes of storage.
ZFS is helpful to separate the various datasets of Poudriere, like build jails, ports trees, logs, packages, and other data. These are stored independently and as a result can be deleted quickly with the certainty of not leaving free space or traces behind.
For Poudriere to make use of ZFS, you need to do three things: create a parent ZFS dataset, allow for the creation and deletion of ZFS datasets (which the Buildbot worker jail, or any other jail, by default cannot do), and edit Poudriere’s configuration accordingly.
In the prerequisite tutorial, you configured the Buildbot worker jail in /etc/jail.buildbot-worker0.conf. Open this file with your preferred text editor and add the following highlighted lines to delegate a parent dataset to allow the jail to administer ZFS datasets beneath the parent. Remember to replace zroot with your desired pool name:
- sudo ee /etc/jail.buildbot-worker0.conf
buildbot-worker0 {
    host.hostname = buildbot-worker0.localdomain;
    ip4.addr = "lo1|10.0.0.3/24";
    path = "/usr/jails/buildbot-worker0";
    exec.start = "/bin/sh /etc/rc";
    exec.stop = "/bin/sh /etc/rc.shutdown";
    mount.devfs; # need /dev/*random for Python
    persist;

    exec.poststart = "/sbin/zfs jail buildbot-worker0 zroot/pdr/w0";
}
In this article we will store build-related data on the ZFS pool zroot—please adapt this ZFS-related configuration here and throughout the rest of the article if you chose a pool of a different name.
After adding this content, save and exit the editor. If you’re using ee, do this by pressing CTRL+C, typing exit, and pressing ENTER.
Create the parent ZFS dataset mentioned in the configuration file:
- sudo zfs create zroot/pdr
- sudo zfs create zroot/pdr/w0
This deliberately assumes that you may want to add more workers in the future and therefore creates a sub-dataset for your first worker. The dataset name is short on purpose, since older versions of FreeBSD (before 12.0) had a mount name limit of 88 characters.
In order for a jail to take control of a parent dataset and administer any children, the dataset must be marked with the following flag:
- sudo zfs set jailed=on zroot/pdr/w0
With the preconditions now met, the jail will start correctly with the new configuration:
- sudo service jail restart buildbot-worker0
With these instructions, you successfully created the required filesystems—ZFS datasets—and allowed the jail to manage the parent dataset. In the next step, you will configure Poudriere, which involves specifying the chosen zpool and dataset used to store build-related data.
Step 4 — Configuring Poudriere, the Build Jail, and the Ports Tree
Until this point, you’ve installed Poudriere and optionally covered requirements for package signing and ZFS. For Poudriere to be able to run in a “jailed” fashion—that is, functioning correctly from within the Buildbot worker jail—you need to provide certain permissions to the jail. For example, if you use ZFS, you have already delegated a parent dataset for use and administration by the jail.
Let’s first configure the loopback IP and all of the permissions, and then step through the respective meaning following the changes.
Poudriere wants to start two build jails per build: one with loopback-only networking and one with internet access. Only build stages that are supposed to reach the internet will use the latter. For example, the fetch may download source tarballs, but the build phase is not allowed internet access. The existing configuration of the worker jail has ip4.addr = "lo1|10.0.0.3/24" that allows internet access. In order to allow Poudriere to assign a loopback address to freshly started build jails, the IP must also be passed to its parent (the worker jail). For this to work, please ensure you have applied the latest version of the firewall configuration file /usr/local/etc/ipfw.rules from the prerequisite tutorial, which will block the loopback interface lo0 from opening outgoing connections through NAT.
Add the highlighted lines to your worker jail configuration:
- sudo ee /etc/jail.buildbot-worker0.conf
buildbot-worker0 {
    host.hostname = buildbot-worker0.localdomain;
    ip4.addr = "lo1|10.0.0.3/24";
    ip4.addr += "lo0|127.0.0.3";
    path = "/usr/jails/buildbot-worker0";
    exec.start = "/bin/sh /etc/rc";
    exec.stop = "/bin/sh /etc/rc.shutdown";
    mount.devfs; # need /dev/*random for Python
    persist;

    # If you followed the ZFS setup step, you have this line
    # already (keep it). For non-ZFS setup, this line must be absent.
    exec.poststart = "/sbin/zfs jail buildbot-worker0 zroot/pdr/w0";

    allow.chflags;
    allow.mount;
    allow.mount.devfs;
    allow.mount.nullfs;
    allow.mount.procfs;
    allow.mount.tmpfs;
    allow.mount.zfs; # only needed if you use ZFS
    allow.raw_sockets; # optional
    allow.socket_af; # optional
    allow.sysvipc; # optional
    children.max=16;
    enforce_statfs=1;
}
Here you’ve added the following (also see the jail(8) manpage):
ip4.addr += "lo0|127.0.0.3"adds another IPv4 address to the jail. You will later configure Poudriere’sLOIP4variable in order to assign this loopback address to build jails that are not supposed to talk to the internet or other machines in your network, such as during thebuildphase. If you ever have a build that requires internet access during build, Poudriere supports a variableALLOW_NETWORKING_PACKAGESas a workaround. However, it is preferable to follow best practice and perform downloads, and other internet-facing tasks earlier, in thefetchphase for which Poudriere permits internet access.allow.chflagsallows Poudriere to render certain system files like/bin/shimmutable in the build jail.allow.mountand the otherallow.mount.*options enable Poudriere to mount certain required filesystems into the build jails.allow.raw_socketswhich permits use of raw sockets, andallow.socket_afwhich permits use of any socket address family, are both applied to the internet-capable build jails. This is helpful so that you can run tools likepingin interactive mode, like when entering a build jail to debug problems.allow.sysvipcis deprecated in favor of three separate settingssysvmsg/sysvsem/sysvshmto restrict jails to only see their own shared memory objects (via “SYS V” IPC primitives). However, Poudriere can only pass onallow.sysvipcto build jails because it cannot read the relevant sysctl information for the three separate parameters (as of FreeBSD 11.2). With this deprecated configuration, the jail could read shared memory of processes outside the jail. This is only relevant for certain software that depends on IPC features, like PostgreSQL, so chances are small for this to affect security. You can remove this configuration unless you depend on a port that requires it during build.children.max=16allows 16 sub-jails below the worker jail. You can raise this number later if you have a lot of CPUs and Poudriere tries to create more build jails than permitted. Each Poudriere build will try to create a reference jail and two build jails per “job”, and its default is to use the number of CPUs (as output bysysctl -n hw.ncpu) as the job count.enforce_statfs=1is required together withallow.mountin order to mount certain filesystems.
Save and exit the configuration file.
Restart the jail for its configuration to take affect immediately:
- sudo service jail restart buildbot-worker0
The respective kernel modules must be loaded so that Poudriere can perform mounts. Run the following commands to load the modules at boot time and immediately:
- sudo sysrc -f /boot/loader.conf nullfs_load=YES
- sudo kldload -n nullfs
- sudo sysrc -f /boot/loader.conf tmpfs_load=YES
- sudo kldload -n tmpfs
You already installed the Poudriere package earlier, which has copied the sample file /usr/local/etc/poudriere.conf.sample to /usr/local/etc/poudriere.conf. Next, you will make edits to the configuration file. All possible configuration variables already exist in the sample, so uncomment or adapt the respective line in the file to set a variable to a certain value.
For the following commands, please ensure you are still in a root shell in the worker jail:
- sudo jexec buildbot-worker0 csh
Open the file with the following command:
- ee /usr/local/etc/poudriere.conf
If you have decided to use ZFS, please fill in your desired zpool and parent dataset:
. . .
# Poudriere can optionally use ZFS for its ports/jail storage. For
# ZFS define ZPOOL, otherwise set NO_ZFS=yes
#
#### ZFS
# The pool where poudriere will create all the filesystems it needs
# poudriere will use ${ZPOOL}/${ZROOTFS} as its root
#
# You need at least 7GB of free space in this pool to have a working
# poudriere.
#
ZPOOL=zroot

### NO ZFS
# To not use ZFS, define NO_ZFS=yes
#NO_ZFS=yes

# root of the poudriere zfs filesystem, by default /poudriere
ZROOTFS=/pdr/w0
. . .
Otherwise, if you decided against ZFS, please disable ZFS support:
. . .
# Poudriere can optionally use ZFS for its ports/jail storage. For
# ZFS define ZPOOL, otherwise set NO_ZFS=yes
#
#### ZFS
# The pool where poudriere will create all the filesystems it needs
# poudriere will use ${ZPOOL}/${ZROOTFS} as its root
#
# You need at least 7GB of free space in this pool to have a working
# poudriere.
#
#ZPOOL=zroot

### NO ZFS
# To not use ZFS, define NO_ZFS=yes
NO_ZFS=yes

# root of the poudriere zfs filesystem, by default /poudriere
# ZROOTFS=/poudriere
. . .
You will later instruct Poudriere to download a FreeBSD base system and thereby bootstrap the first build jail. This requires specifying a download host, add the following highlighted line:
. . .
# the host where to download sets for the jails setup
# You can specify here a host or an IP
# replace _PROTO_ by http or ftp
# replace _CHANGE_THIS_ by the hostname of the mirrors where you want to fetch
# by default: ftp://ftp.freebsd.org
#
# Also note that every protocols supported by fetch(1) are supported here, even
# file:///
# Suggested: https://download.FreeBSD.org
FREEBSD_HOST=https://download.FreeBSD.org
Since Poudriere will run jailed, the mount name limit of 88 characters of FreeBSD versions before 12.0 is especially harmful, as the full path of the jail /usr/jails/buildbot-worker0 is part of each mount path. Exceeding the limit would fatally break the builds, so let’s take good care to reduce path lengths. Instead of the typical directory /usr/local/poudriere, you can use /pdr like the following:
. . .
# The directory where poudriere will store jails and ports
BASEFS=/pdr
Now, create that directory:
- mkdir /pdr
Switch again to your editor of poudriere.conf:
- ee /usr/local/etc/poudriere.conf
Poudriere will mount a central directory for dist files (the source code tarballs for each port) while running builds so that all builders share the same cache. The default directory is:
. . .
# If set the given directory will be used for the distfiles
# This allows to share the distfiles between jails and ports tree
# If this is "no", poudriere must be supplied a ports tree that already has
# the required distfiles.
DISTFILES_CACHE=/usr/ports/distfiles
Now, create that directory:
- mkdir -p /usr/ports/distfiles
If you followed Step 2 and created a package repository signing key, please enter the editor again and specify it:
- ee /usr/local/etc/poudriere.conf
. . .
# Path to the RSA key to sign the PKG repo with. See pkg-repo(8)
PKG_REPO_SIGNING_KEY=/usr/local/etc/poudriere.key
Builds will run much faster if you cache C/C++ compiler and linker outputs for next time. The ports tree supports this directly by leveraging the tool ccache. Please enable it and create the respective cache directory if you can spare at least 5GB more space (the default cache size):
. . .
# ccache support. Supply the path to your ccache cache directory.
# It will be mounted into the jail and be shared among all jails.
# It is recommended that extra ccache configuration be done with
# ccache -o rather than from the environment.
CCACHE_DIR=/var/cache/ccache
- mkdir /var/cache/ccache
Building and running Linux software is uncommon, so disable it until needed:
- ee /usr/local/etc/poudriere.conf
. . .
# Disable linux support
NOLINUX=yes
The jails should get a loopback address assigned, or Poudriere will warn about it. We can inherit the jail’s IP because it is on a loopback-only network interface (lo1). For this, please add the following line to the end of the configuration file:
LOIP4=127.0.0.3
Save and exit the configuration file.
For working builds, we need two more resources: a FreeBSD base system to use as the build jail template and an up-to-date ports tree. Choose the FreeBSD version you are targeting. In this tutorial, we will tell Poudriere to download FreeBSD 11.2 for amd64 architecture. You can name the jail how you like, but a consistent naming scheme like 112amd64 is recommended. Also keep in mind the choice between quarterly, stable ports tree branches (here, we use 2019Q2) and the bleeding edge “head” branch that might lead to breaking builds after updates every now and then. FreeBSD versions newer than that on the server can’t be used in the build jail.
Download and create the build jail:
- poudriere jail -c -j 112amd64 -v 11.2-RELEASE -a amd64
Lastly, let’s download the ports tree. The default download method is portsnap, which uses compressed snapshots of the tree without history information. Either Subversion or Git are preferable to merge upstream changes or contribute back. This is also important if you want to use a custom, self-hosted tree in a version control system. In the following command, please fill in the current year and quarter.
If you want to start with the upstream, official ports tree:
- poudriere ports -c -p 2019Q2 -m svn+https -B branches/2019Q2
The method svn+https would sync from the FreeBSD Subversion host (viewable online here). If you plan to use an alternative source, read the following note, otherwise skip it.
Note: As an alternative, the method git clones the tree from the mirror on GitHub by default.
To use the “head” branch, replace the last parameter with -B head (for Subversion) or -B master (for Git).
If you prefer to use your own Git repository, you will have to explicitly specify your repository URL and branch name. Let’s assume you want to name your tree customtree and use the branch custom:
- poudriere ports -c -p customtree -m git -B custom -U https://github.com/AndiDog/freebsd-ports.git
The example URL points to a fork of freebsd-ports on GitHub, but could be any Git or other supported type of repository to which the CI server has access.
Available trees can be listed with poudriere ports -l, which outputs a listing like:
OutputPORTSTREE METHOD    TIMESTAMP           PATH
2019Q2    svn+https 2019-04-20 19:23:19 /pdr/ports/2019Q2
You’re now done setting up Poudriere’s configuration and resources. You’ve configured Poudriere with the required data to trigger the first builds and enabled the jail to create subjails. Next, you’re going to run the first build manually to verify that the setup is working.
Step 5 — Running a Manual Test Build
You can use the command poudriere bulk to build one or more packages and all its dependencies. After the first build of a package, Poudriere also automatically detects if a rebuild is necessary, or otherwise leaves the existing package file untouched. While the bulk subcommand only builds packages, running a build using poudriere testport would also test the specified ports using the definition of “testing” given in the port’s Makefile. For the scope of this article, we’re only interested in providing packages for installation on clients, so we are using bulk builds.
Ensure you’re still in a root shell of the worker jail where you have installed Poudriere. Later on, this will also be where the Buildbot worker process will run builds automatically.
Run the build, filling in the placeholders with the build jail name and ports tree name you chose earlier:
- poudriere bulk -j 112amd64 -p 2019Q2 ports-mgmt/pkg
This builds the port ports-mgmt/pkg. Ports in the official tree are stored in a <category>/<name> hierarchy, and those paths (called package origin) are used to tell Poudriere which packages should be built. For the start, we have chosen to only build the package manager pkg, which does not have any third-party dependencies and is therefore a good, quick check on the configuration. If everything runs fine, you’ll see output like this:
Output[00:00:00] Creating the reference jail... done
[00:00:06] Mounting system devices for 112amd64-2019Q2
[00:00:06] Mounting ports/packages/distfiles
[00:00:06] Using packages from previously failed build
[00:00:06] Mounting ccache from: /var/cache/ccache
[00:00:06] Mounting packages from: /pdr/data/packages/112amd64-2019Q2
/etc/resolv.conf -> /pdr/data/.m/112amd64-2019Q2/ref/etc/resolv.conf
[00:00:06] Starting jail 112amd64-2019Q2
[00:00:07] Logs: /pdr/data/logs/bulk/112amd64-2019Q2/2019-04-20_19h35m00s
[00:00:07] Loading MOVED for /pdr/data/.m/112amd64-2019Q2/ref/usr/ports
[00:00:08] Ports supports: FLAVORS SELECTED_OPTIONS
[00:00:08] Gathering ports metadata
[00:00:08] Calculating ports order and dependencies
[00:00:08] pkg package missing, skipping sanity
[00:00:08] Skipping incremental rebuild and repository sanity checks
[00:00:08] Cleaning the build queue
[00:00:08] Sanity checking build queue
[00:00:08] Processing PRIORITY_BOOST
[00:00:08] Balancing pool
[00:00:08] Recording filesystem state for prepkg... done
[00:00:08] Building 1 packages using 1 builders
[00:00:08] Starting/Cloning builders
[00:00:14] Hit CTRL+t at any time to see build progress and stats
[00:00:14] [01] [00:00:00] Building ports-mgmt/pkg | pkg-1.10.5_5
[00:03:24] [01] [00:03:10] Finished ports-mgmt/pkg | pkg-1.10.5_5: Success
[00:03:25] Stopping 1 builders
[00:03:25] Creating pkg repository
Creating repository in /tmp/packages: 100%
Packing files for repository: 100%
[00:03:25] Committing packages to repository
[00:03:25] Removing old packages
[00:03:25] Built ports: ports-mgmt/pkg
[112amd64-2019Q2] [2019-04-20_19h35m00s] [committing:] Queued: 1  Built: 1  Failed: 0  Skipped: 0  Ignored: 0  Tobuild: 0   Time: 00:03:18
[00:03:25] Logs: /pdr/data/logs/bulk/112amd64-2019Q2/2019-04-20_19h35m00s
[00:03:25] Cleaning up
[00:03:25] Unmounting file systems
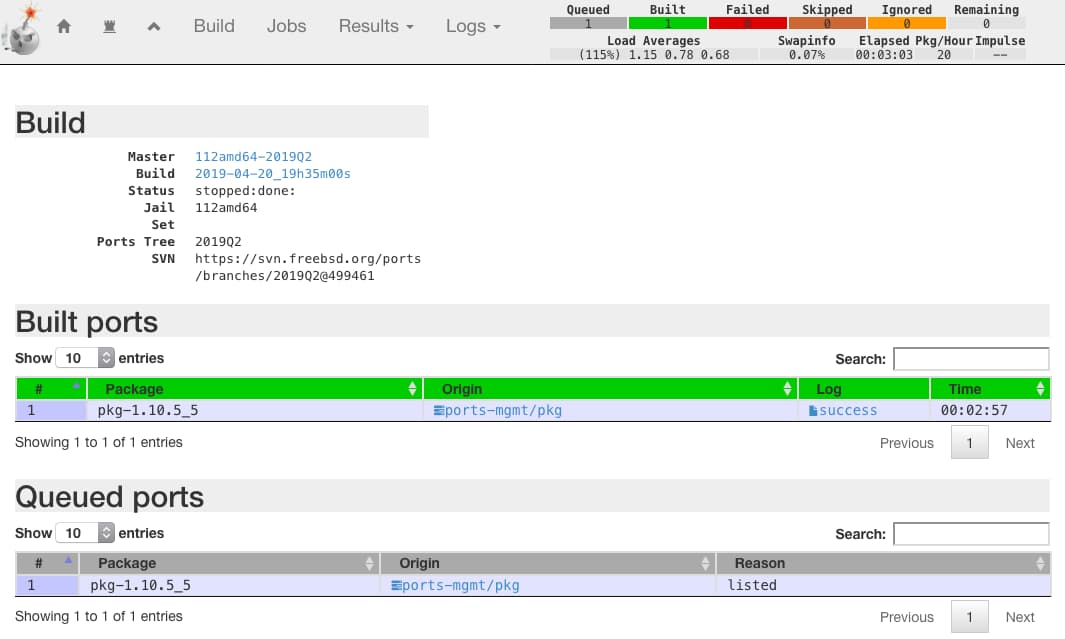
This output shows where packages will go after build, and from where existing packages are taken in case they don’t need rebuild (here: /pdr/data/packages/112amd64-2019Q2). Also, the output shows an overview of running builds while Poudriere runs (you can press CTRL+T in an interactive shell to print the progress). In the final summary you’ll see one package was built. You can view verbose build output in the log directory (/pdr/data/logs/bulk/112amd64-2019Q2/*).
This output confirms a successful build. If Poudriere has built at least one package successfully, it will automatically commit it to the package repository. This means that packages are only available after all builds have finished, even if other packages failed to build. You now have a working package repository at /pdr/data/packages/112amd64-2019Q2 within the Buildbot worker jail.
You’ve completed all the configuration needed to return working Poudriere builds, and you’ve successfully verified with a manual build. You’ll see this same output later in the tutorial once you’ve automated the bulk build in Buildbot. In addition, a link to view the detailed logs shall be accessible from the web interface. To achieve this, and to serve the package repository to clients, you’ll set up a web server next.
Step 6 — Configuring Nginx to Serve the Poudriere Web Interface and Package Repository
Poudriere provides several output artifacts that we want to host using a web server:
- Package repositories are made available to clients so they can access them with the regular
pkg updateandpkg installcommands, using HTTPS or HTTP as transport. - Detailed build logs are helpful for developers to debug problematic builds or to investigate build output. They are stored per package and per build—in the Poudriere output from the last step, you saw that logs are stored in one directory per build, labeled with date and time.
- Poudriere’s built-in web interface is a small, single HTML page per build that uses WebSockets to regularly update the status shown on the page. This is helpful to get a better overview of how far a build is, which dependencies triggered other package builds to fail, and lastly as a replacement for the command line output, which only shows a summary at the end unless you specifically make it print the current build progress.
The configuration change in Nginx is short, as only static files need to be served. Since you’ll serve them to the outside world, you’re now going to configure the existing Nginx instance on the server, outside the jails, to serve the mentioned files from paths within the worker jail.
Please exit the jail shell since you’re now going to work on the server:
- exit
Open an editor with the Nginx configuration /usr/local/etc/nginx/nginx.conf:
- sudo ee /usr/local/etc/nginx/nginx.conf
Add the following locations inside the server { block:
. . .
http {
    . . .
    server {
        . . .
        location / {
            root /usr/local/www/nginx;
            index index.html index.htm;
        }

        # poudriere logs
        location ~ ^/logs(/(.*))?$ {
            include mime.types;
            types {
                text/plain log;
            }

            alias /usr/jails/buildbot-worker0/pdr/data/logs/bulk$1;
            index index.html index.htm;
            autoindex on;
        }

        # poudriere packages
        location ~ ^/packages(/(.*))?$ {
            alias /usr/jails/buildbot-worker0/pdr/data/packages$1;
            index no-index-file-but-required-directive-to-list-dir-contents;
            autoindex on;
        }

        location /buildbot/ {
            proxy_pass http://10.0.0.2:8010/;
        }

        . . .
    }
}
. . .
Save and close the Nginx configuration file. Then, reload the Nginx service:
- sudo service nginx reload
Let’s now check out the artifacts created by the first manual build. Open up your preferred web browser on your local machine to access the resources.
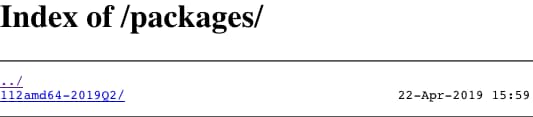
The package repository is below https://your-domain/packages/ (or http://your-server-ip/). You will find meta information in the root directory, e.g. 112amd64-2019Q2, and all built packages in the subdirectory All:

Detailed build logs and Poudriere’s built-in web interface can be found below https://your-domain/logs/. Click through the directory hierarchy to reach the data of your previous manual build. In this example, you might end up on a URL like https://your-domain/logs/112amd64-2019Q2/latest/build.html.
If you did not set up a domain name for your server, you will need to enter your server’s public IP address for these examples, e.g. http://your-server-ip/logs/.
This concludes all manual setup to get working builds and have visibility into the output (packages and logs). Going forward, you will automate builds to achieve continuous integration.
Step 7 — Setting Up a Buildbot Builder for Your Packages
Your goal in this step is to automate bulk-package builds by executing Poudriere in the same way you already have manually—by adding to the existing Buildbot sample configuration. By the end of this step, Buildbot will trigger the package build whenever the chosen branch of the ports tree changes. In this tutorial’s examples, that would be the quarterly branch 2019Q2.
All necessary changes are done in the Buildbot master configuration, so please open a root shell in the master jail:
- sudo jexec buildbot-master csh
First, a builder must be defined that describes the commands and actions performed to run a build. In the existing configuration /var/buildbot-master/master.cfg, you will find a section ####### BUILDERS—open an editor and replace the whole section until the next heading starting with ####### ..., with the following configuration:
- ee /var/buildbot-master/master.cfg
. . .
####### BUILDERS

c['builders'] = []

PORTS_TO_BUILD = {
    'security/sudo',
    'shells/bash',
    'sysutils/tmux',
}


# Custom classes
class PoudriereLogLineObserver(util.LogLineObserver):
    _logsRe = re.compile(r'Logs: /pdr/data/logs/bulk(/[-_/0-9A-Za-z]+)$')

    def __init__(self):
        super().__init__()
        self._hadUrls = False

    def outLineReceived(self, line):
        if not self._hadUrls:
            m = self._logsRe.search(line.strip())
            if m:
                poudriereUiUrl = f'''{re.sub('/buildbot/$', '', c['buildbotURL'])}/logs{m.group(1)}'''
                self.step.addURL('Poudriere build', poudriereUiUrl)
                self.step.addURL('Poudriere logs', poudriereUiUrl + '/logs/')
                self._hadUrls = True


class PoudriereCompileStep(steps.Compile):
    def __init__(self, *args, **kwargs):
        super().__init__(*args, **kwargs)
        self.addLogObserver('stdio', PoudriereLogLineObserver())


# Poudriere bulk build
bulkBuildFactory = util.BuildFactory()
bulkBuildFactory.addSteps([
    steps.ShellCommand(
        name='update ports tree',
        command=['sudo', 'poudriere', 'ports', '-u', '-p', '2019Q2', '-v'],
        haltOnFailure=True,
    ),
    PoudriereCompileStep(
        name='make bulk',
        command=['sudo', 'poudriere', 'bulk', '-j', '112amd64', '-p', '2019Q2'] + list(sorted(PORTS_TO_BUILD)),
        haltOnFailure=True,
    ),
])
c['builders'].append(util.BuilderConfig(name='bulk-112amd64-2019Q2',
                                        workernames=['worker0'],
                                        factory=bulkBuildFactory))
. . .
Note how this makes use of Buildbot’s extensibility: custom classes are used to observe and parse information from Poudriere’s log output. Namely, PoudriereLogLineObserver is added as “log observer”, i.e. gets called whenever a new log line is printed during the build. The class searches the logs for the log directory and converts that into hyperlinks. Those links will be displayed alongside the build step and take the user directly to Poudriere’s web interface and logs.
In the first build step “update ports tree”, we use Poudriere’s built-in update command (ports -u) to pull the latest version of the ports tree. This will use the previously configured method automatically (for example SVN/Git). This way, you can be sure the packages are always built against the latest committed tree, which is especially helpful if you have your own versioned repository where you maintain software versions and patches.
At the top, the list PORTS_TO_BUILD specifies which ports should be built. It is used in the steps of the build factory specified at the bottom of the block. The build factory is a template used to instantiate a build. Buildbot creates a unique build whenever one is triggered, and the build uses a copy of the steps that were defined for the build factory at the time. In this case, we configured exactly two steps:
- Update the ports tree. Since this example uses the quarterly branch
2019Q2, it will not receive changes very often (typically only security and build fixes). - Run the bulk build using the same tree.
To make the added code block work, please add a required import to the top of the file:
# -*- python -*-
# ex: set filetype=python:

import re

from buildbot.plugins import *
The re library in Python implements regular expressions, a feature to search or replace parts of a string—the PoudriereLogLineObserver class uses it to search for a line Logs: /pdr/data/logs/... that mentions the log directory.
The build commands use sudo to run certain commands. This is required because Poudriere needs superuser privileges when running a build—in order to create, manage, and destroy the build jails—and also the ports trees managed by Poudriere are created with the root user as owner. In the previous tutorial, we configured the user that runs the Buildbot worker process with sysrc buildbot_worker_uid=buildbot-worker. Hence, we want to allow the buildbot-worker user to run exactly the necessary commands as root, but not other commands (for security reasons). Let’s install the sudo program and configure it accordingly.
This needs to be done on the worker jail, not the master. Please exit the master jail shell and enter the worker jail:
- exit
- sudo jexec buildbot-worker0 csh
Install the sudo package:
- pkg install sudo
Confirm installation with y and ENTER.
On FreeBSD, the sudo package by default reads configuration files from /usr/local/etc/sudoers.d/. Open an editor to create a new configuration file:
- env EDITOR=ee visudo /usr/local/etc/sudoers.d/buildbot-worker
The use of visudo is intentional, since it will warn on syntax errors and allow fixing them instead of committing a bad configuration.
Specify which commands the buildbot-worker user can run as root without requiring any password:
buildbot-worker ALL=(ALL) NOPASSWD: /usr/local/bin/poudriere bulk *
buildbot-worker ALL=(ALL) NOPASSWD: /usr/local/bin/poudriere ports -u *
Save the file and switch back to the master jail for further required configuration of the Buildbot master:
- exit
- sudo jexec buildbot-master csh
You just fulfilled the requirements to get the bulk build to work. But as mentioned, each build must be triggered to run. Buildbot uses the term scheduler for an object that defines when a build is triggered, and with which extra information, such as which branch has been changed. Please remove the existing section SCHEDULERS from the configuration file, and place the following content after the BUILDERS section, so that the code can use all existing builder names:
- ee /var/buildbot-master/master.cfg
. . .
####### SCHEDULERS

c['schedulers'] = []

# Forceful scheduler allowed for all builders
c['schedulers'].append(schedulers.ForceScheduler(
    name='force',
    builderNames=[builder.name for builder in c['builders']]))

# Watch ports tree for changes on given branch
c['schedulers'].append(schedulers.SingleBranchScheduler(
    name='sched-bulk-112amd64-2019Q2',
    change_filter=util.ChangeFilter(project='freebsd-ports', branch='branches/2019Q2'),
    builderNames=['bulk-112amd64-2019Q2']))
. . .
This replaces the sample configuration so that a force button appears on every builder. And most importantly, it creates a scheduler that watches all changes pertaining to the given project/branch and triggers a build for each change. Yet, no such change events can occur—you first have to create a change source. Typically, those are version control systems like SVN or Git on which one can detect changes on a branch. Buildbot supports the most popular ones, so we can use its functionality to add our chosen upstream ports tree repository as source. Completely replace the section CHANGESOURCES with the following configuration:
. . .
####### CHANGESOURCES

c['change_source'] = []

c['change_source'].append(changes.SVNPoller(
    'svn://svn.freebsd.org/ports/',
    project='freebsd-ports',
    split_file=util.svn.split_file_branches,
    svnbin='svnlite',
    pollInterval=4 * 3600))

# Example for Git:
# c['change_source'].append(changes.GitPoller(
#     repourl='https://github.com/AndiDog/freebsd-ports.git',
#     project='freebsd-ports',
#     branches=['custom'],
#     pollInterval=4 * 3600))
. . .
This polls the SVN repository every four hours on the Buildbot master, and any new (not seen before) changes are forwarded to matching schedulers which in turn would trigger builds that are eventually dispatched to run on our single Buildbot worker. The ports tree is very large, and at first run these pollers will download the full history (for Git, only the specified branches), which can take a few minutes and require significant space (several gigabytes).
Apply the new configuration file by restarting Buildbot:
- service buildbot restart
In this example, you have used the upstream ports collection from svn://svn.freebsd.org/ports/ and builds are scheduled whenever the branch 2019Q2 changes. As noted before, quarterly branches are mostly stable and do not receive updates very often. Since you probably do not want to wait for such a change to come in before the build is triggered the first time, let’s run it once by hand.
Open your Buildbot web interface (https://your-domain/buildbot/), navigate to Builds > Builders > bulk-112amd64-2019Q2. It will not show any builds yet.
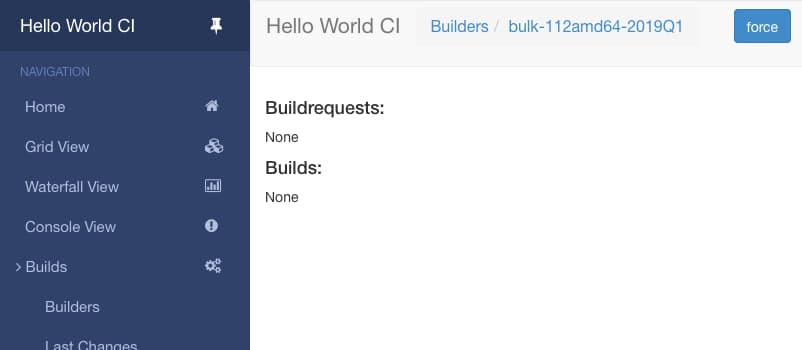
Click the force button at the top-right and then Start Build. That will trigger the build using its default settings, i.e. reason, branch, and other values are not overridden. The “update ports tree” step might take a minute to run, and eventually the Poudriere build should also run through successfully. The web interface will show the build as successful.
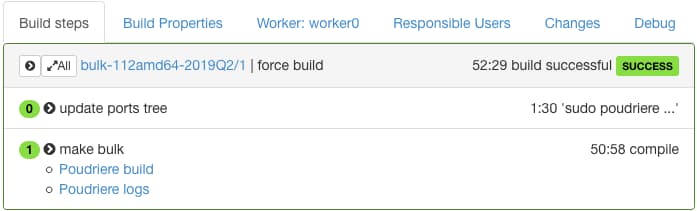
Clicking one of the links (Poudriere build and Poudriere logs) will take you to the Poudriere web interface and build logs for this specific build, respectively (as shown in Step 6). Expand by clicking the arrow next to make bulk and then stdio > view all … lines to show the full output of the poudriere bulk ... command.
Having completed the first build, the packages are now available, as configured in Nginx in Step 6. Head to https://your-domain/packages/ (or http://your-server-ip/packages/) in a browser and click through the package repository created by Poudriere. You can find the actual package files (*.txz) once you enter one of the repositories and navigate to the All/ subdirectory.
Now that packages are available over HTTPS (or HTTP if you decided so) and built automatically on ports tree changes, you can configure one or more hosts to use those packages.
Step 8 — Configuring Package Clients
In this step, you need a second FreeBSD server and will set it up such that it can fetch and install the packages built on the CI server. We will call this second server the package client.
SSH into the client host. Most remaining instructions in this section will be done on the client:
- ssh package-client
Create the directory for custom package repository configurations:
- sudo mkdir -p /usr/local/etc/pkg/repos
As root user, open an editor to create the file /usr/local/etc/pkg/repos/ci.conf, and specify how and from where to retrieve packages:
- sudo ee /usr/local/etc/pkg/repos/ci.conf
In case you chose package signing, use this content:
ci: {
    url: "https://your-domain/packages/112amd64-2019Q2",
    signature_type: "pubkey",
    pubkey: "/usr/local/etc/pkg/repos/ci.pub",
    enabled: yes
}
Alternatively, if you decided to go without package signing, disable signature checks as follows:
ci: {
    url: "https://your-domain/packages/112amd64-2019Q2",
    signature_type: "none",
    enabled: yes
}
Note: This note applies only if you followed Step 2 to create a package repository signing key. Please skip it otherwise.
From your local machine, upload the public key to the package client:
- scp /tmp/poudriere.pub package-client:/tmp/ci.pub
Using the client shell again, move the key into place so it can verify the authenticity of packages:
- sudo mv /tmp/ci.pub /usr/local/etc/pkg/repos/ci.pub
You completed configuring the package repository and enabled it, but on a regular FreeBSD installation, the official package repository “FreeBSD” would be enabled as well. Mixing installed packages from different sources is a foolproof way to have your production software crash at some point due to incompatible software versions or differing ABI, API, or build options. All packages on a host should stem from the same source.
The default configuration of the official repository is stored in /etc/pkg/FreeBSD.conf. This file belongs to the base system and should not be touched. However, you can override its settings—namely, we want to disable the repository altogether—by adding the respective flag in a configuration file under /usr/local/etc/pkg/repos, where also your own repository is configured. Please create a new file /usr/local/etc/pkg/repos/FreeBSD.conf with an editor, and use the following content to disable the FreeBSD repository:
- sudo ee /usr/local/etc/pkg/repos/FreeBSD.conf
FreeBSD: {
    enabled: no
}
If you are on a fully pristine package client host, no packages are installed yet and you can immediately begin using your own package repository. However, if even only one package was installed from another source, you are recommended to uninstall those packages and begin from scratch using your own source. The package manager pkg itself is installed as a package—to solve the chicken-and-egg problem, FreeBSD’s base system ships with a small executable /usr/sbin/pkg, which can bootstrap the package manager. That is, download the pkg package and install it as the very first package on the system. From that point on, the executable /usr/local/sbin/pkg of that package supports you as full-blown package manager.
Run the following command to bootstrap pkg:
- sudo pkg bootstrap
In the output of pkg bootstrap, you should see that packages are taken from your own package repository which we called ci in the configuration file. If you are using a package signing key, the output will also hint about the security verification.
OutputThe package management tool is not yet installed on your system.
Do you want to fetch and install it now? [y/N]: y
Bootstrapping pkg from https://your-domain/packages/112amd64-2019Q2, please wait...
Verifying signature with public key /usr/local/etc/pkg/repos/ci.pub... done
Installing pkg-1.10.5_5...
Extracting pkg-1.10.5_5: 100%
If you see this successful output, please skip to the next note block. However, if the package manager or other packages had already been installed from another source, and you get this error:
Outputpkg already bootstrapped at /usr/local/sbin/pkg
Then please follow the instructions in the note.
Note – only if package manager was bootstrapped already:
You can list installed packages with pkg info. In this case, you should uninstall all of them including pkg, and reinstall them later. To do that, please first list the manually installed packages with pkg query -e "%a==0" "%n". Remember which of them you want to install again later. If, for instance, you use a shell which is not part of the base system (e.g. bash is an external package), you will want to reinstall it later or you might not be able to log in again.
The following commands will remove all existing packages and the package manager, bootstrap the package manager again from your own package repository, and give an example of reinstalling your desired packages such as bash. Note though that you will only be able to install packages that you have built through the CI, i.e. listed in the Buildbot master configuration (variable PORTS_TO_BUILD).
First, open a root shell before uninstalling the sudo package, or else you may not be able to gain superuser privileges anymore. Keep it open until you have bootstrapped pkg through the course of the tutorial and successfully reinstalled sudo:
- sudo sh
Uninstall all packages, including pkg:
- pkg delete --all --force
Bootstrap the package manager:
- pkg bootstrap
Confirm to bootstrap the package manager by pressing y, followed by ENTER.
In the likely case that you set up your package host using a Let’s Encrypt certificate for HTTPS, you will run into the chicken-and-egg problem where your package host is not trusted but you would need to install the package ca_root_nss (containing trustworthy root certificate authorities) to trust the Let’s Encrypt CA and thereby also trust the server hosting your custom-built packages. The same problem would arise if you used an internal CA (self-signed by you or your company). Certificate verification errors would result in error output like this when bootstrapping the package manager:
OutputThe package management tool is not yet installed on your system.
Do you want to fetch and install it now? [y/N]: y
Bootstrapping pkg from https://example.com/packages/112amd64-2019Q2, please wait...
Certificate verification failed for /C=US/O=Let's Encrypt/CN=Let's Encrypt Authority X3
34389740104:error:14090086:SSL routines:ssl3_get_server_certificate:certificate verify failed:/usr/src/crypto/openssl/ssl/s3_clnt.c:1269:
[...]
If you see this error, please follow the instructions in the note below. Otherwise, you are all set and can skip this part and continue after the note.
Note – only if using HTTPS and certificate verification failed:
There is one straight workaround: trust the security of the package signing key, hence bootstrapping pkg and installing the ca_root_nss package via unencrypted HTTP. Since this is not always an option because of privacy concerns, blocked HTTP ports etc., we should prefer a more “best practice” way. The official FreeBSD repository is also signed by Let’s Encrypt, so we cannot simply install the ca_root_nss package from there. No matter which CA it is, you are recommended to set up your package clients with a fixed set of HTTPS CAs to trust. You can achieve exactly that within the next few instructions. We are going to assume this is for Let’s Encrypt, but the instructions will work the same way for your own, self-signed CA (you’ll need its certificate chain handy).
In your web browser, visit Let’s Encrypt’s certificate listing at https://letsencrypt.org/certificates/. Make sure the web site is trusted by the browser. Download the certificates under Root Certificates > Active > ISRG Root X1 (self-signed) and Intermediate Certificates > Active > Let’s Encrypt Authority X3 (Signed by ISRG Root X1) in PEM format to /tmp/root.pem and /tmp/intermediate.pem on your local computer, respectively.
After the download has succeeded, concatenate the files into a certificate chain:
- cat /tmp/intermediate.pem /tmp/root.pem >/tmp/letsencrypt-chain.pem
- scp /tmp/letsencrypt-chain.pem package-client:/tmp/.
Back in the shell of the package client, you now need to specify this chain of trust in the package manager configuration /usr/local/etc/pkg.conf so it gets used for TLS verification. Add these lines using an editor, and create the file if it does not exist yet:
- sudo ee /usr/local/etc/pkg.conf
pkg_env: {
    SSL_CA_CERT_FILE: "/usr/local/etc/pkg/repos/letsencrypt-chain.pem",
}
Move the CA chain into place:
- sudo mv /tmp/letsencrypt-chain.pem /usr/local/etc/pkg/repos/.
If you stayed in a root shell until now because the sudo package was removed, this command must be run without sudo. The same applies to the next command within this note.
With this setting, you can try bootstrapping once again and should not get any more TLS errors. There is one small twist: the FreeBSD built-in /usr/sbin/pkg, which bootstraps the full package manager, does not honor the configured pkg_env setting, so we have to override the respective environment variable for this one time only, using the same value as configured:
- sudo env SSL_CA_CERT_FILE=/usr/local/etc/pkg/repos/letsencrypt-chain.pem pkg bootstrap
If you previously deleted existing packages, it’s a good time to reinstall essential tools now (e.g. sudo), plus any other desired packages.
- pkg install bash sudo
And drop out of the root shell, if that is still the case:
- exit
In order to test whether everything works, install packages from the list specified in the Buildbot master config (variable PORTS_TO_BUILD). For example, the Bash shell and sudo:
- sudo pkg install bash sudo tmux
Again, confirm installation by pressing y and then ENTER. The package installation should run through without any issues.
You can use pkg info to list which packages are currently installed (including dependencies, if any). To verify that no packages from other sources are installed, possibly causing clashes or incompatibilities, you could list installed packages with these details using pkg query "%n: autoinstalled=%a from repo=%R". Mind that pkg will be shown as bootstrapped from unknown-repository—this is why previously, you verified the bootstrapping output to see that the package manager itself is also taken from your own package repository.
In this last step, you configured access to the CI’s package repository on a client, optionally enabled package signature verification for security purposes, ensured that packages only come from a single source to avoid compatibility issues, bootstrapped the package manager pkg, and installed your desired packages as built by the CI.
Conclusion
In this tutorial, you have installed and configured Poudriere, automated running package builds, and configured secure access to the package repository from a client host, ending up with the latest built packages installed from a single, central source. The setup puts you in an excellent position to keep your servers consistent and up-to-date, and manage version upgrades of external software packages.
To further enhance your current setup, you could consider select follow-up steps:
- Private access only: By default, Droplets have a public IP address on the internet. Also, Buildbot supports authentication but is by default unprotected.
- Alert on build problems: Check out how to set up Buildbot reporters to get started.
- Keep ports tree up to date: In the examples from the tutorial, the quarterly branch 2019Q2 was used, but you should switch to a newer tree eventually or use your own version-controlled repository to apply desired patches.
- Adding builds for own projects: The FreeBSD Porter’s Handbook explains how to write a build recipe (a port) if you want to build and install your internal software as FreeBSD packages.
- Monitor outdated packages on clients: You can compare installed packages on a client with the latest available packages on the CI using the output of
sudo pkg update -q && sudo pkg version -q --not-like "="which prints all packages whose version does not exactly match. See the manpage of pkg-version for more details. - Add cleanup job: Over time, the Buildbot worker jail will run full of old build log files, source tarballs, and possibly deprecated packages. Use the commands
poudriere {logclean,distclean,pkgclean}to clean up (see manpage of poudriere).
Thanks for learning with the DigitalOcean Community. Check out our offerings for compute, storage, networking, and managed databases.
About the author(s)
Former Senior Technical Editor at DigitalOcean, with a strong focus on DevOps and System Administration content. Areas of expertise include Terraform, PyTorch, Python, and Django.
Still looking for an answer?
This textbox defaults to using Markdown to format your answer.
You can type !ref in this text area to quickly search our full set of tutorials, documentation & marketplace offerings and insert the link!
 This work is licensed under a Creative Commons Attribution-NonCommercial- ShareAlike 4.0 International License.
Become a contributor for community
Get paid to write technical tutorials and select a tech-focused charity to receive a matching donation.

DigitalOcean Documentation
Full documentation for every DigitalOcean product.

Resources for startups and AI-native businesses
The Wave has everything you need to know about building a business, from raising funding to marketing your product.
The developer cloud
Scale up as you grow — whether you're running one virtual machine or ten thousand.

Start building today
From GPU-powered inference and Kubernetes to managed databases and storage, get everything you need to build, scale, and deploy intelligent applications.
