By Jon Schwenn and Tammy Fox

Introduction
PHP is a server side scripting language used by many popular CMS and blog platforms like WordPress and Drupal. It is also part of the popular LAMP and LEMP stacks. Updating the PHP configuration settings is a common task when setting up a PHP-based website. Locating the exact PHP configuration file may not be easy. There are multiple installations of PHP running normally on a server, and each one has its own configuration file. Knowing which file to edit and what the current settings are can be a bit of a mystery.
This guide will show how to view the current PHP configuration settings of your web server and how to make updates to the PHP settings.
Prerequisites
For this guide, you need the following:
- Ubuntu 14.04 Droplet
- A non-root user with sudo privileges (Initial Server Setup with Ubuntu 14.04 explains how to set this up).
- An understanding of editing files on a Linux system. The Basic Linux Navigation and File Management tutorial explains how to edit files.
- A web server with PHP installed.
There are many web server configurations with PHP, but here are two common methods:
- How To Install a LAMP stack on Ubuntu 14.04
- One-Click Install LAMP on Ubuntu 14.04 with DigitalOcean
This tutorial is applicable to these DigitalOcean One-click Apps as well:
Note: This tutorial assumes you are running Ubuntu 14.04. Editing the php.ini file should be the same on other systems, but the file locations might be different.
All the commands in this tutorial should be run as a non-root user. If root access is required for the command, it will be preceded by sudo.
Reviewing the PHP Configuration
You can review the live PHP configuration by placing a page with a phpinfo function along with your website files.
To create a file with this command, first change into the directory that contains your website files. For example, the default directory for webpage files for Apache on Ubuntu 14.04 is /var/www/html/:
- cd /var/www/html
Then, create the info.php file:
- sudo nano /var/www/html/info.php
Paste the following lines into this file and save it:
<?php
phpinfo();
?>
Note: Some DigitalOcean One-click Apps have an info.php file placed in the web root automatically.
When visiting the info.php file on your web server (http://www.example.com/info.php) you will see a page that displays details on the PHP environment, OS version, paths, and values of configuration settings. The file to the right of the Loaded Configuration File line shows the proper file to edit in order to update your PHP settings.
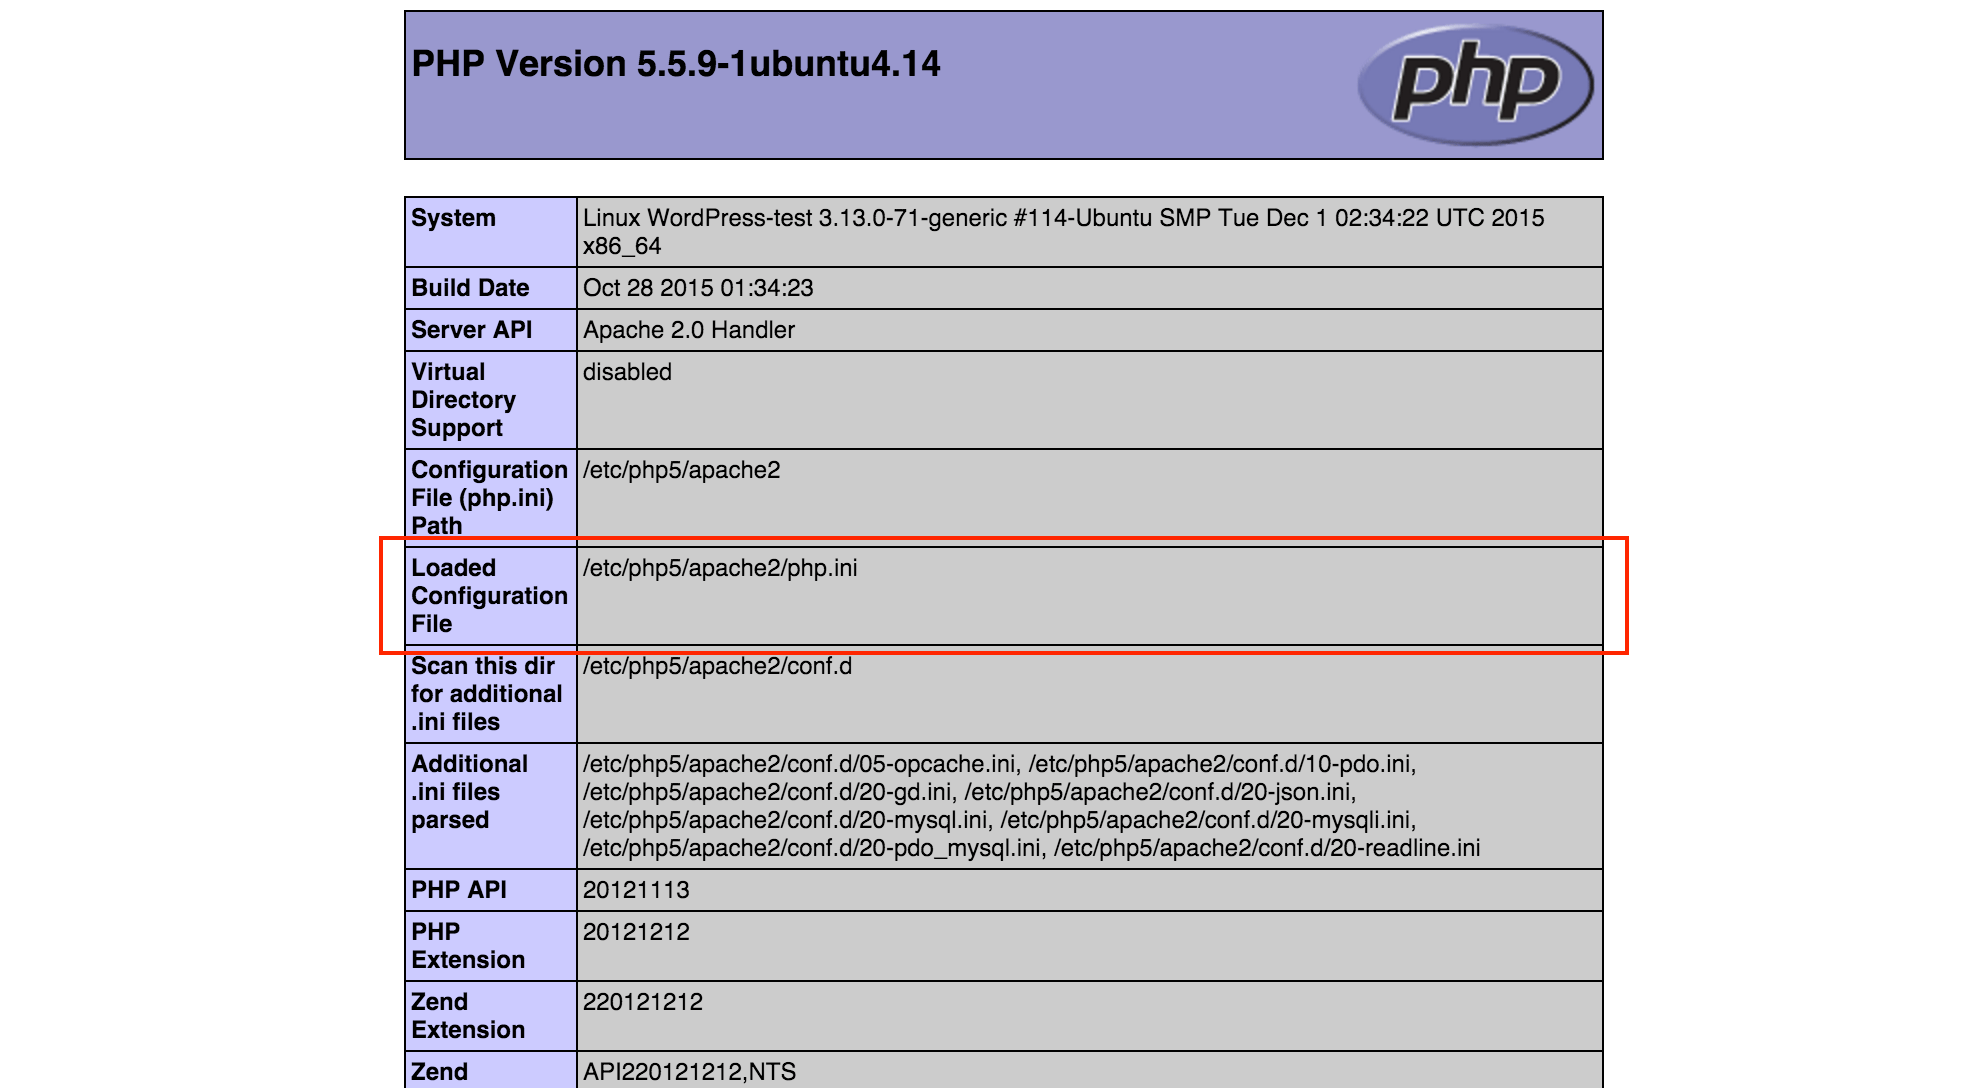
This page can be used to reveal the current settings your web server is using. For example, using the Find function of your web browser, you can search for the settings named post_max_size and upload_max_filesize to see the current settings that restrict file upload sizes.
Warning: Since the info.php file displays version details of the OS, Web Server, and PHP, this file should be removed when it is not needed to keep the server as secure as possible.
Modifying the PHP Configuration
The php.ini file can be edited to change the settings and configuration of how PHP functions. This section gives a few common examples.
Sometimes a PHP application might need to allow for larger upload files such as uploading themes and plugins on a WordPress site. To allow larger uploads for your PHP application, edit the php.ini file with the following command (Change the path and file to match your Loaded Configuration File. This example shows the path for Apache on Ubuntu 14.04.):
- sudo nano /etc/php5/apache2/php.ini
The default lines that control the file size upload are:
post_max_size = 8M
upload_max_filesize = 2M
Change these default values to your desired maximum file upload size. For example, if you needed to upload a 30MB file you would changes these lines to:
post_max_size = 30M
upload_max_filesize = 30M
Other common resource settings include the amount of memory PHP can use as set by memory_limit:
memory_limit = 128M
or max_execution_time, which defines how many seconds a PHP process can run for:
max_execution_time = 30
When you have the php.ini file configured for your needs, save the changes, and exit the text editor.
Restart the web server to enable the changes. For Apache on Ubuntu 14.04, this command will restart the web server:
- sudo service apache2 restart
Refreshing the info.php page should now show your updated settings. Remember to remove the info.php when you are done changing your PHP configuration.
Conclusion
Many PHP-based applications require slight changes to the PHP configuration. By using the phpinfo function, the exact PHP configuration file and settings are easy to find. Use the method described in this article to make these changes.
Thanks for learning with the DigitalOcean Community. Check out our offerings for compute, storage, networking, and managed databases.
About the author(s)
Red Hat Certified Architect
Technical Editor, DigitalOcean
Still looking for an answer?
This textbox defaults to using Markdown to format your answer.
You can type !ref in this text area to quickly search our full set of tutorials, documentation & marketplace offerings and insert the link!
Good article, but you can use for getting the ini path simple command like:
php --ini
Just for reference:
If you’re using PHP-FPM (e.g. with nginx) then the location of the config file on Ubuntu/Debian is
/etc/php5/fpm/php.ini
This comment has been deleted
PHP settings can be changed and configured using php.ini file. This blog will give you few common examples. In PHP applications there are some case in which we might need to allow for larger upload files. Such as videos, plugins or large database files. In order to upload large amount of data into your PHP application you need to edit the php.ini file with the following command (This example shows the path for Apache on Ubuntu 14.04.): sudo nano /etc/php5/apache2/php.ini The default lines that control the file size upload are: php.ini post_max_size = 8M upload_max_filesize = 2M You can change your desired maximum file upload size with these default values. For example, if you needed to upload a 60MB file you would changes these lines to: php.ini post_max_size = 60M upload_max_filesize = 60M If you want to increase the amount of memory limit PHP can use, you can set by memory_limit: php.ini memory_limit = 128M or max_execution_time, which defines how many seconds a PHP process can run for: php.ini max_execution_time = 30 When php.ini is configured then you can save the changes and exit php.ini file Now restart the web server to enable the changes that you have just made. For Apache on Ubuntu 14.04, this command will restart the web server: sudo service apache2 restart Now create file info.php and write the following lines: <?php phpinfo(); ?> Now refresh the page info.php and you will see the changes has been updated that you have made.
If you’re using PHP-FPM such as on servers managed by ServerPilot, you can also use “.user.ini” files to change PHP settings.
For people with nginx and php7.0 Type
sudo service php7.0-fpm restart
to see the changes
This was great. Thank you all so much for your input. I was finally able to adjust my settings and get my theme installed. I am grateful to this community.
Thanks for the useful article. You don’t need to restart Apache, you can reload the config:
sudo service apache2 reload
This is useful when amending a production server.
 This work is licensed under a Creative Commons Attribution-NonCommercial- ShareAlike 4.0 International License.
Become a contributor for community
Get paid to write technical tutorials and select a tech-focused charity to receive a matching donation.

DigitalOcean Documentation
Full documentation for every DigitalOcean product.

Resources for startups and AI-native businesses
The Wave has everything you need to know about building a business, from raising funding to marketing your product.
The developer cloud
Scale up as you grow — whether you're running one virtual machine or ten thousand.

Start building today
From GPU-powered inference and Kubernetes to managed databases and storage, get everything you need to build, scale, and deploy intelligent applications.
