
Introduction
Mesosphere is a system that combines a number of components to effectively manage server clustering and highly available deployments on top of an existing operating system layer. Unlike systems like CoreOS, Mesosphere is not a specialized operating system and is instead a set of packages.
In this guide, we will go over how to configure a highly available cluster in Mesosphere. This configuration will set us up with failover in case any of our master nodes go down as well as a pool of slave servers to handle the tasks that are scheduled.
We will be using Ubuntu 14.04 servers for this guide.
Prerequisites and Goals
Before you complete this guide, it is strongly recommended that you review our introduction to Mesosphere. This is a good way to get familiar with the components that the system is comprised of and assist you in identifying what each unit is responsible for.
During this tutorial, we will be using six Ubuntu servers. This fulfills the Apache Mesos recommendation of having at least three masters for a production environment. It also provides a pool of three worker or slave servers, which will be assigned work when tasks are sent to the cluster.
The six servers we will be using will use zookeeper to keep track of the current leader of the master servers. The Mesos layer, built on top of this, will provide distributed synchronization and resource handling. It is responsible for managing the cluster. Marathon, the cluster’s distributed init system, is used to schedule tasks and hand work to the slave servers.
For the sake of this guide, we will be assuming that our machines have the following configuration:
| Hostname | Function | IP Address |
|---|---|---|
| master1 | Mesos master | 192.0.2.1 |
| master2 | Mesos master | 192.0.2.2 |
| master3 | Mesos master | 192.0.2.3 |
| slave1 | Mesos slave | 192.0.2.51 |
| slave2 | Mesos slave | 192.0.2.52 |
| slave3 | Mesos slave | 192.0.2.53 |
Each of these machines should have Ubuntu 14.04 installed. You will want to complete the basic configuration items listed in our Ubuntu 14.04 initial server setup guide.
When you are finished with the above steps, continue on with this guide.
Install Mesosphere on the Servers
The first step to getting your cluster up and running is to install the software. Fortunately, the Mesosphere project maintains an Ubuntu repository with up-to-date packages that are easy to install.
Add the Mesosphere Repositories to your Hosts
On all of the hosts (masters and slaves), complete the following steps.
First, add the Mesosphere repository to your sources list. This process involves downloading the Mesosphere project’s key from the Ubuntu keyserver and then crafting the correct URL for our Ubuntu release. The project provides a convenient way of doing this:
sudo apt-key adv --keyserver keyserver.ubuntu.com --recv E56151BF
DISTRO=$(lsb_release -is | tr '[:upper:]' '[:lower:]')
CODENAME=$(lsb_release -cs)
echo "deb http://repos.mesosphere.io/${DISTRO} ${CODENAME} main" | sudo tee /etc/apt/sources.list.d/mesosphere.list
Install the Necessary Components
After you have the Mesosphere repository added to your system, you must update your local package cache to gain access to the new component:
sudo apt-get -y update
Next, you need to install the necessary packages. The components you need will depend on the role of the host.
For your master hosts, you need the mesosphere meta package. This includes the zookeeper, mesos, marathon, and chronos applications:
sudo apt-get install mesosphere
For your slave hosts, you only need the mesos package, which also pulls in zookeeper as a dependency:
sudo apt-get install mesos
Set up the Zookeeper Connection Info for Mesos
The first thing we are going to do is configure our zookeeper connection info. This is the underlying layer that allows all of our hosts to connect to the correct master servers, so it makes sense to start here.
Our master servers will be the only members of our zookeeper cluster, but all of our servers will need some configuration to be able to communicate using the protocol. The file that defines this is /etc/mesos/zk.
On all of your hosts, complete the following step. Open the file with root privileges:
sudo nano /etc/mesos/zk
Inside, you will find the connection URL is set by default to access a local instance. It will look like this:
zk://localhost:2181/mesos
We need to modify this to point to our three master servers. This is done by replacing localhost with the IP address of our first Mesos master server. We can then add a comma after the port specification and replicate the format to add our second and third masters to the list.
For our guide, our masters have IP addresses of 192.0.2.1, 192.168.2.2, and 192.168.2.3. Using these values, our file will look like this:
zk://192.0.2.1:2181,192.0.2.2:2181,192.0.2.3:2181/mesos
The line must start with zk:// and end with /mesos. In between, your master servers’ IP addresses and zookeeper ports (2181 by default) are specified.
Save and close the file when you are finished.
Use this identical entry in each of your masters and slaves. This will help each individual server connect to the correct master servers to communicate with the cluster.
Configure the Master Servers’ Zookeeper Configuration
On your master servers, we will need to do some additional zookeeper configuration.
The first step is to define a unique ID number, from 1 to 255, for each of your master servers. This is kept in the /etc/zookeeper/conf/myid file. Open it now:
sudo nano /etc/zookeeper/conf/myid
Delete all of the info in this file and replace it with a single number, from 1 to 255. Each of your master servers must have a unique number. For the sake of simplicity, it is easiest to start at 1 and work your way up. We will be using 1, 2, and 3 for our guide.
Our first server will just have this in the file:
1
Save and close the file when you are finished. Do this on each of your master servers.
Next, we need to modify our zookeeper configuration file to map our zookeeper IDs to actual hosts. This will ensure that the service can correctly resolve each host from the ID system that it uses.
Open the zookeeper configuration file now:
sudo nano /etc/zookeeper/conf/zoo.cfg
Within this file, you need to map each ID to a host. The host specification will include two ports, the first for communicating with the leader, and the second for handling elections when a new leader is required. The zookeeper servers are identified by “server” followed by a dot and their ID number.
For our guide, we will be using the default ports for each function and our IDs are 1-3. Our file will look like this:
server.1=192.168.2.1:2888:3888
server.2=192.168.2.2:2888:3888
server.3=192.168.2.3:2888:3888
Add these same mappings in each of your master servers’ configuration files. Save and close each file when you are finished.
With that, our zookeeper configuration is complete. We can begin focusing on Mesos and Marathon.
Configure Mesos on the Master Servers
Next, we will configure Mesos on the three master servers. These steps should be taken on each of your master servers.
Modify the Quorum to Reflect your Cluster Size
First, we need to adjust the quorum necessary to make decisions. This will determine the number of hosts necessary for the cluster to be in a functioning state.
The quorum should be set so that over 50 percent of the master members must be present to make decisions. However, we also want to build in some fault tolerance so that if all of our masters are not present, the cluster can still function.
We have three masters, so the only setting that satisfies both of these requirements is a quorum of two. Since the initial configuration assumes a single server setup, the quorum is currently set to one.
Open the quorum configuration file:
sudo nano /etc/mesos-master/quorum
Change the value to “2”:
2
Save and close the file. Repeat this on each of your master servers.
Configure the Hostname and IP Address
Next, we’ll specify the hostname and IP address for each of our master servers. We will be using the IP address for the hostname so that our instances will not have trouble resolving correctly.
For our master servers, the IP address needs to be placed in these files:
- /etc/mesos-master/ip
- /etc/mesos-master/hostname
First, add each master node’s individual IP address in the /etc/mesos-master/ip file. Remember to change this for each server to match the appropriate value:
echo 192.168.2.1 | sudo tee /etc/mesos-master/ip
Now, we can copy this value to the hostname file:
sudo cp /etc/mesos-master/ip /etc/mesos-master/hostname
Do this on each of your master servers.
Configure Marathon on the Master Servers
Now that Mesos is configured, we can configure Marathon, Mesosphere’s clustered init system implementation.
Marathon will run on each of our master hosts, but only the leading master server will be able to actually schedule jobs. The other Marathon instances will transparently proxy requests to the master server.
First, we need to set the hostname again for each server’s Marathon instance. Again, we will use the IP address, which we already have in a file. We can copy that to the file location we need.
However, the Marathon configuration directory structure we need is not created automatically. We will have to create the directory and then we can copy the file over:
sudo mkdir -p /etc/marathon/conf
sudo cp /etc/mesos-master/hostname /etc/marathon/conf
Next, we need to define the list of zookeeper masters that Marathon will connect to for information and scheduling. This is the same zookeeper connection string that we’ve been using for Mesos, so we can just copy the file. We need to place it in a file called master:
sudo cp /etc/mesos/zk /etc/marathon/conf/master
This will allow our Marathon service to connect to the Mesos cluster. However, we also want Marathon to store its own state information in zookeeper. For this, we will use the other zookeeper connection file as a base, and just modify the endpoint.
First, copy the file to the Marathon zookeeper location:
sudo cp /etc/marathon/conf/master /etc/marathon/conf/zk
Next, open the file in your editor:
sudo nano /etc/marathon/conf/zk
The only portion we need to modify in this file is the endpoint. We will change it from /mesos to /marathon:
zk://192.0.2.1:2181,192.0.2.2:2181,192.0.2.3:2181/marathon
This is all we need to do for our Marathon configuration.
Configure Service Init Rules and Restart Services
Next, we will restart our master servers’ services to use the settings that we have been configuring.
First, we will need to make sure that our master servers are only running the Mesos master process, and not running the slave process. We can stop any currently running slave processes (this might fail, but that’s okay since this is just to ensure the process is stopped). We can also ensure that the server doesn’t start the slave process at boot by creating an override file:
sudo stop mesos-slave
echo manual | sudo tee /etc/init/mesos-slave.override
Now, all we need to do is restart zookeeper, which will set up our master elections. We can then start our Mesos master and Marathon processes:
sudo restart zookeeper
sudo start mesos-master
sudo start marathon
To get a peak at what you have just set up, visit one of your master servers in your web browser at port 5050:
http://192.168.2.1:5050
You should see the main Mesos interface. You may be told you are being redirected to the active master depending on whether you connected to the elected leader or not. Either way, the screen will look similar to this:
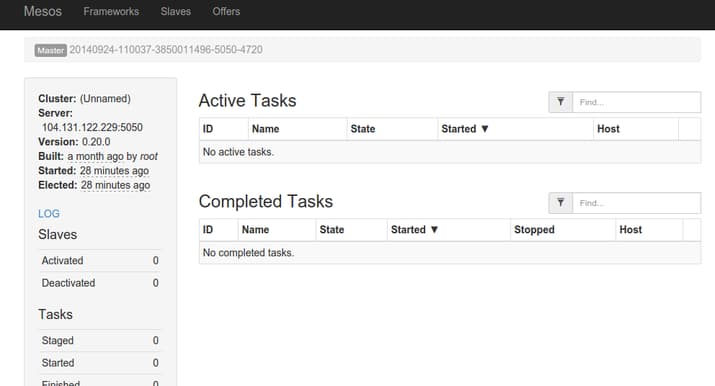
This is a view of your cluster currently. There is not much to see because there are no slave nodes available and no tasks started.
We have also configured Marathon, Mesosphere’s long-running task controller. This will be available at port 8080 on any of your masters:

We will briefly go over how to use these interfaces once we get our slaves set up.
Configure the Slave Servers
Now that we have our master servers configured, we can begin configuring our slave servers.
We have already configured our slaves with our masters servers’ zookeeper connection information. The slaves themselves do not run their own zookeeper instances.
We can stop any zookeeper process currently running on our slave nodes and create an override file so that it will not automatically start when the server reboots:
sudo stop zookeeper
echo manual | sudo tee /etc/init/zookeeper.override
Next, we want to create another override file to make sure the Mesos master process doesn’t start on our slave servers. We will also ensure that it is stopped currently (this command may fail if the process is already stopped. This is not a problem):
echo manual | sudo tee /etc/init/mesos-master.override
sudo stop mesos-master
Next, we need to set the IP address and hostname, just as we did for our master servers. This involves putting each node’s IP address into a file, this time under the /etc/mesos-slave directory. We will use this as the hostname as well, for easy access to services through the web interface:
echo 192.168.2.51 | sudo tee /etc/mesos-slave/ip
sudo cp /etc/mesos-slave/ip /etc/mesos-slave/hostname
Again, use each slave server’s individual IP address for the first command. This will ensure that it is being bound to the correct interface.
Now, we have all of the pieces in place to start our Mesos slaves. We just need to turn on the service:
sudo start mesos-slave
Do this on each of your slave machines.
To see whether your slaves are successfully registering themselves in your cluster, go back to your one of your master servers at port 5050:
http://192.168.2.1:5050
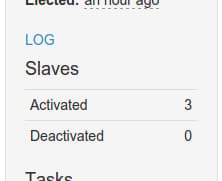
You should see the number of active slaves at “3” now in the interface:
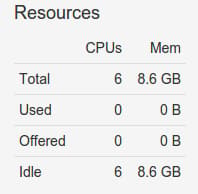
You can also see that the available resources in the interface has been updated to reflect the pooled resources of your slave machines:
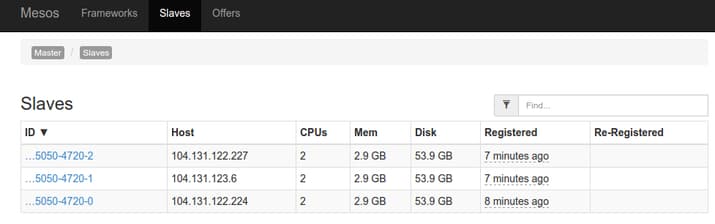
To get additional information about each of your slave machines, you can click on the “Slaves” link at the top of the interface. This will give you an overview of each machine’s resource contribution, as well as links to a page for each slave:
Starting Services on Mesos and Marathon
Marathon is Mesosphere’s utility for scheduling long-running tasks. It is easy to think of Marathon as the init system for a Mesosphere cluster because it handles starting and stopping services, scheduling tasks, and making sure applications come back up if they go down.
You can add services and tasks to Marathon in a few different ways. We will only be covering basic services. Docker containers will be handled in a future guide.
Starting a Service through the Web Interface
The most straight forward way of getting a service running quickly on the cluster is to add an application through the Marathon web interface.
First, visit the Marathon web interface on one of your the master servers. Remember, the Marathon interface is on port 8080:
http://192.168.2.1:8080
From here, you can click on the “New App” button in the upper-right corner. This will pop up an overlay where you can add information about your new application:
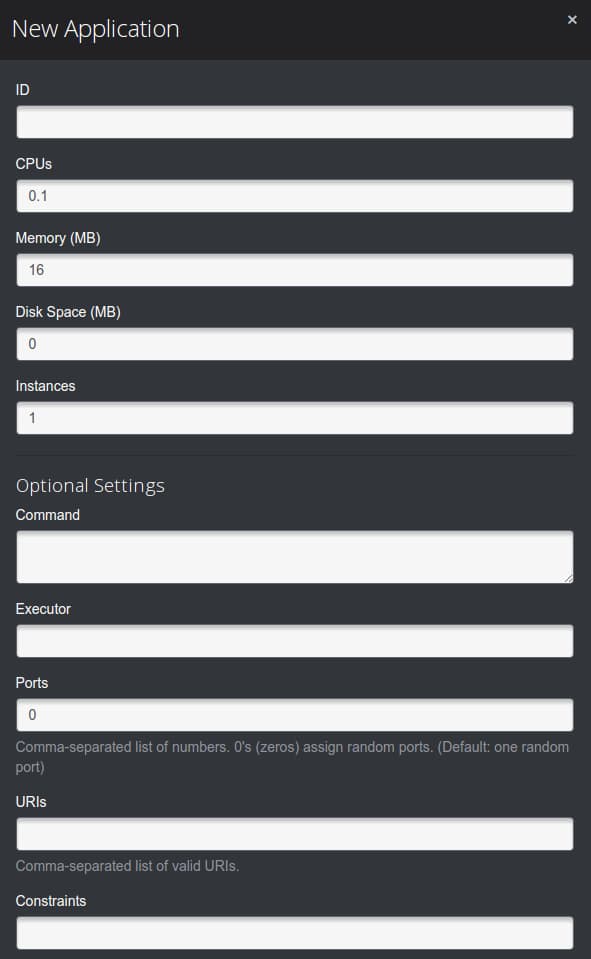
Fill in the fields with the requirements for your app. The only fields that are mandatory are:
- ID: A unique ID selected by the user to identify a process. This can be whatever you’d like, but must be unique.
- Command: This is the actual command that will be run by Marathon. This is the process that will be monitored and restarted if it fails.
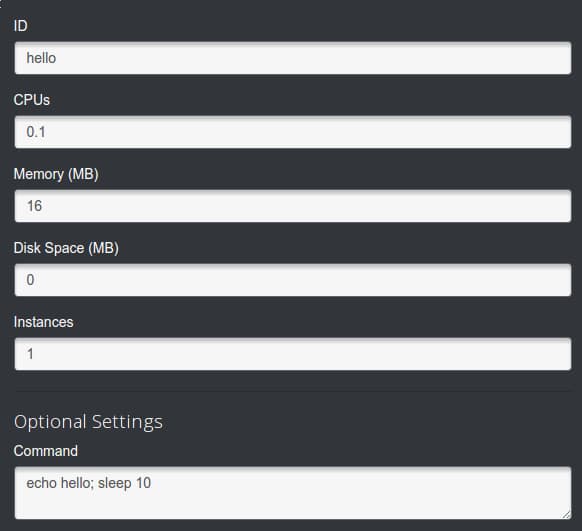
Using this information, you can set up a simple service that just prints “hello” and sleeps for 10 seconds. We will call this “hello”:
When you return to the interface, the service will go from “Deploying” to “Running”:

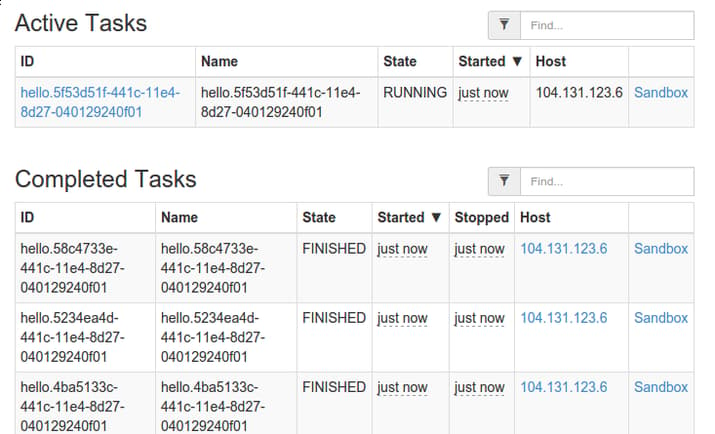
Every 10 seconds or so, the “Tasks/Instances” reading will go from “1/1” to “0/1” as the sleep amount passes and the service stops. Marathon then automatically restarts the task again. We can see this process more clearly in the Mesos web interface at port 5050:
http://192.168.2.1:5050
Here, you can see the process finishing and being restarted:
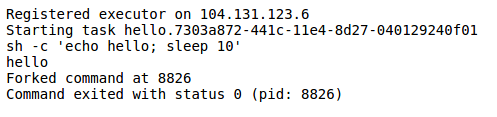
If you click on “Sandbox” and then “stdout” on any of the tasks, you can see the “hello” output being produced:
Starting a Service through the API
We can also submit services through Marathon’s API. This involves passing in a JSON object containing all of the fields that the overlay contained.
This is a relatively simple process. Again, the only required fields are id for the process identifier and cmd which contains the actual command to run.
So we could create a JSON file called hello.json with this information:
nano hello.json
Inside, the bare minimum specification would look like this:
{
    "id": "hello2",
    "cmd": "echo hello; sleep 10"
}
This service will work just fine. However, if we truly want to emulate the service we created in the web UI, we have to add some additional fields. These were defaulted in the web UI and we can replicate them here:
{
    "id": "hello2",
    "cmd": "echo hello; sleep 10",
    "mem": 16,
    "cpus": 0.1,
    "instances": 1,
    "disk": 0.0,
    "ports": [0]
}
Save and close the JSON file when you are finished.
Next, we can submit it using the Marathon API. The target is one of our master’s Marathon service at port 8080 and the endpoint is /v2/apps. The data payload is our JSON file, which we can read into curl by using the -d flag with the @ flag to indicate a file.
The command to submit will look like this:
curl -i -H 'Content-Type: application/json' -d@hello2.json 192.168.2.1:8080/v2/apps
If we look at the Marathon interface, we can see that it was successfully added. It seems to have the exact same properties as our first service:

The new service can be monitored and accessed in exactly the same way as the first service.
Conclusion
At this point, you should have a production-ready Mesosphere cluster up and running. We have only covered the basic configuration at this point, but you should be able to see the possibilities of leveraging the Mesosphere system.
In future guides, we will cover how to deploy Docker containers on your cluster and how to use some of the tools in more depth.
Thanks for learning with the DigitalOcean Community. Check out our offerings for compute, storage, networking, and managed databases.
Tutorial Series: Getting Started with Mesosphere
Mesosphere is a set of applications that, together, form a cluster management solution for scalable deployments. The Mesosphere components can be installed on most modern Linux distributions, making this system a flexible and powerful option. In this series, we’ll introduce you to the basic Mesosphere concepts and components, and show you how to get started using Mesosphere on your own servers.
Browse Series: 2 tutorials
About the author
Former Senior Technical Writer at DigitalOcean, specializing in DevOps topics across multiple Linux distributions, including Ubuntu 18.04, 20.04, 22.04, as well as Debian 10 and 11.
Still looking for an answer?
This textbox defaults to using Markdown to format your answer.
You can type !ref in this text area to quickly search our full set of tutorials, documentation & marketplace offerings and insert the link!
Thanks for the tutorial, will try as soon as possible. Looking forward to the Docker bit. Could you also include HAProxy load-balancing in combination with Mesosphere in a future tutorial? Also, how can we build in auto-scaling? Some info about all this is available, just not applied to the Digital Ocean situation.
excellent tutorial!
quick question… currently… anyone who knows one of my master IPs and knows that im running marathon can load my cluster? What about securing this in the future?
These seems like really exciting tech and I’m looking forward to using this in production!
any light on using HA-Proxy would also be super helpful!
https://mesosphere.github.io/marathon/docs/service-discovery-load-balancing.html
Brilliant guide, thank you. Much better than the mesos “getting started” on the apache site.
Only failure I had following this was that one slave didn’t want to start. I was just testing things out on 3 machines, using 2 as mesos masters, and all three as slaves (so fairly overlapped). But the currently elected master wouldn’t also run a slave. running $ sudo start mesos-slave would give me a process ID, but the slave wouldn’t show up in the web interface. dmesg gave me a big series of error and respawns ending with: [103624.335935] init: mesos-slave main process ended, respawning [103624.386736] init: mesos-slave main process (3266) terminated with status 1 [103624.386752] init: mesos-slave respawning too fast, stopped
(Ubuntu 14.04 64bit on all three machines with oracle java8)
Thanks for great tutorial. But I just curious why do you didn’t make shared Ansible playbooks in addition to those mesos, coreos tutorials, which could allow quickly try out this tools on real DO droplets?
Also I guess it will be useful for many persons if you will go further and make tutorial like this for Openshift, Cloud Foundry and Deis.
This worked so well!!! Thanks a lot! I reproduced this tutorial on RHEL 6.5 in a private environment and it worked!
Just one point that:
- If you clone VMs, make sure to remove all the configuration from Slaves before.
- Removing any "/etc/init/* that you don’t need in the slaves.
Thanks a lot!!!
Am i the only one aving troubles with the locations of the mesosphere debian packaes? Doesn’t seem to be working.
Should I have to use the Private IP or Public IP in the place of 192.0.2.x ?
Thanks for the tutorial.
I’m using an Ubuntu 14.10 utopic however I’m getting the following error on apt-get install mesosphere step:
$ sudo apt-get install mesosphere
Reading package lists... Done
Building dependency tree
Reading state information... Done
Some packages could not be installed. This may mean that you have
requested an impossible situation or if you are using the unstable
distribution that some required packages have not yet been created
or been moved out of Incoming.
The following information may help to resolve the situation:

The following packages have unmet dependencies:
 mesosphere : Depends: mesos (>= 0.20) but it is not installable
E: Unable to correct problems, you have held broken packages.
 This work is licensed under a Creative Commons Attribution-NonCommercial- ShareAlike 4.0 International License.
Become a contributor for community
Get paid to write technical tutorials and select a tech-focused charity to receive a matching donation.

DigitalOcean Documentation
Full documentation for every DigitalOcean product.

Resources for startups and AI-native businesses
The Wave has everything you need to know about building a business, from raising funding to marketing your product.
The developer cloud
Scale up as you grow — whether you're running one virtual machine or ten thousand.

Start building today
From GPU-powered inference and Kubernetes to managed databases and storage, get everything you need to build, scale, and deploy intelligent applications.
