Not using Ubuntu 16.04?
Choose a different version or distribution.
Introduction
By default, Jenkins comes with its own built-in Winstone web server listening on port 8080, which is convenient for getting started. As soon as you’re serious about using Jenkins, however, it should be secured with SSL to protect passwords and other sensitive data transmitted through the web interface.
In this tutorial, we’ll demonstrate how to configure Nginx as a reverse proxy to direct client requests to Jenkins. In order to begin, you’ll need to complete each of the the prerequisites below.
Prerequisites
One Ubuntu 16.04 server configured with a non-root sudo user and a firewall by following the Ubuntu 16.04 initial server setup guide with Jenkins and Nginx installed and configured using the following guides:
- How to Install Jenkins on Ubuntu 16.04
- How to Install Nginx on Ubuntu 16.04
- How to Secure Nginx with Let’s Encrypt on Ubuntu 16.04. Note that this tutorial requires a registered domain name that you own or control.
When you’ve completed these requirements, you’re ready to begin.
Step One — Configuring Nginx
In the prerequisite tutorial, How to Secure Nginx with Let’s Encrypt on Ubuntu 16.04, we configured Nginx to use SSL in the /etc/nginx/sites-available/default file, so we’ll open that file to add our reverse proxy settings.
- sudo nano /etc/nginx/sites-available/default
First, we’ll add specific access and error logs in the server block with the SSL configuration settings:
. . .
server {
        # SSL Configuration
        #
        # listen 443 ssl default_server;
        # listen [::]:443 ssl default_server;
        access_log            /var/log/nginx/jenkins.access.log;
        error_log            /var/log/nginx/jenkins.error.log;
Then, we’ll configure the proxy settings. Since we’re sending all requests to Jenkins, we’ll comment out the default try_files line which, as written, will return a 404 error before the request reaches Jenkins.
 . . .
           location / {
                # First attempt to serve request as file, then
                # as directory, then fall back to displaying a 404.
                # try_files $uri $uri/ =404;        }
. . .
Then, we’ll add the actual proxy settings. The configuration begins by including the Nginx-supplied proxy_params which ensure information like the hostname, the protocol of the client request, and the client IP address are retained will be available in our log files. Next, the proxy_pass sets the protocol and address of the proxied server, which in our case is the Jenkins server accessed on the localhost on port 8080. Then, we increase the proxy_read_timeout from Nginx’s 60 second default to the project’s recommended 90 second value. And finally we add the proxy_redirect to ensure that the responses are properly rewritten to include the proper host name.
Be sure to substitute your SSL-secured domain name in the proxy_redirect line below:
Location /
. . .
           location / {
                # First attempt to serve request as file, then
                # as directory, then fall back to displaying a 404.
                # try_files $uri $uri/ =404;
                include /etc/nginx/proxy_params;
                proxy_pass          http://localhost:8080;
                proxy_read_timeout  90s;
                # Fix potential "It appears that your reverse proxy set up is broken" error.
                proxy_redirect      http://localhost:8080 https://your.ssl.domain.name;
Once you’ve made these changes, save and exit the file. We’re not going to restart Nginx until after we’ve configured Jenkins but we will test our configuration now:
- sudo nginx -t
If all is well, the command will return:
Outputnginx: the configuration file /etc/nginx/nginx.conf syntax is ok
nginx: configuration file /etc/nginx/nginx.conf test is successful
If not, fix any errors reported until the test passes.
Note:
If you misconfigure the proxy_pass (by adding a trailing slash, for example), you will get something similar to the following in your Jenkins Configuration page.

If you see this error, double-check your proxy_pass and proxy_redirect settings in the Nginx configuration.
Step Two — Configuring Jenkins
For Jenkins to work with Nginx, we need to update the Jenkins configuration so that the Jenkins server listens only on the localhost interface rather than all interfaces (0.0.0.0). If Jenkins listens on all interfaces, then it’s potentially accessible on its original, unencrypted port (8080).
We will modify the /etc/default/jenkins configuration file to make these adjustments.
- sudo nano /etc/default/jenkins
Locate the JENKINS_ARGS line and add --httpListenAddress=127.0.0.1 to the existing arguments:
. . .
JENKINS_ARGS="--webroot=/var/cache/$NAME/war --httpPort=$HTTP_PORT --httpListenAddress=127.0.0.1"
Save and exit the file.
To use the new configuration settings, we’ll restart Jenkins and Nginx.
- sudo systemctl restart jenkins
Since systemctl doesn’t display output, we’ll check the status:
- sudo systemctl status jenkins
We should see the active (exited) status in the Active line:
Output● jenkins.service - LSB: Start Jenkins at boot time
   Loaded: loaded (/etc/init.d/jenkins; bad; vendor preset: enabled)
   Active: active (exited) since Tue 2017-04-25 22:37:29 UTC; 5s ago
     Docs: man:systemd-sysv-generator(8)
  Process: 11360 ExecStop=/etc/init.d/jenkins stop (code=exited, status=0/SUCCESS)
  Process: 11391 ExecStart=/etc/init.d/jenkins start (code=exited, status=0/SUCCESS)
We’ll repeat these steps for Nginx:
- sudo systemctl restart nginx
- sudo systemctl status nginx
Output● nginx.service - A high performance web server and a reverse proxy server
   Loaded: loaded (/lib/systemd/system/nginx.service; enabled; vendor preset: enabled)
   Active: active (running) since Tue 2017-04-25 22:36:08 UTC; 2min 51s ago
  Process: 11339 ExecStop=/sbin/start-stop-daemon --quiet --stop --retry QUIT/5 --pidfile /run/nginx.pid (code=
  Process: 11349 ExecStart=/usr/sbin/nginx -g daemon on; master_process on; (code=exited, status=0/SUCCESS)
  Process: 11345 ExecStartPre=/usr/sbin/nginx -t -q -g daemon on; master_process on; (code=exited, status=0/SUC
 Main PID: 11353 (nginx)
Now that we’ve restarted both servers, we should be able to visit the domain using either HTTP or HTTPS. HTTP requests will be redirected automatically to HTTPS, and the Jenkins site will be served securely.
Step Three — Testing the Configuration
We’ll test the configuration by resetting the administrative password now that we’ve enabled encryption. We’ll start by visiting the site via http to verify that we reach Jenkins and are redirected to https as we expected:
In your web browser, enter “http://your.ssl.domain.name”, substituting your domain for your.ssl.domain.name. After you press enter, the URL should start with https and the location bar should indicate that the connection is secure.
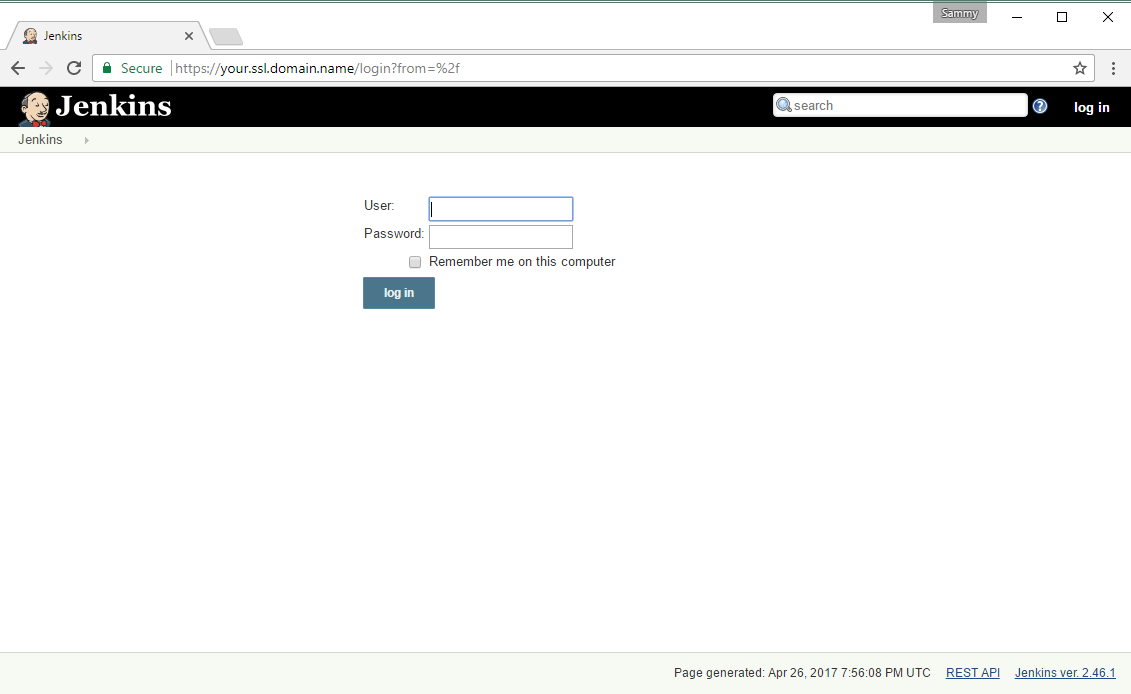
We’ll enter admin in the “User” field and the auto-generated password that Jenkins created and stored when we installed it.
- sudo cat /var/lib/jenkins/secrets/initialAdminPassword
If you’ve reset the admin user’s password, enter that password instead. Either way, once we log in, we’ll change the password to be sure it’s secure.
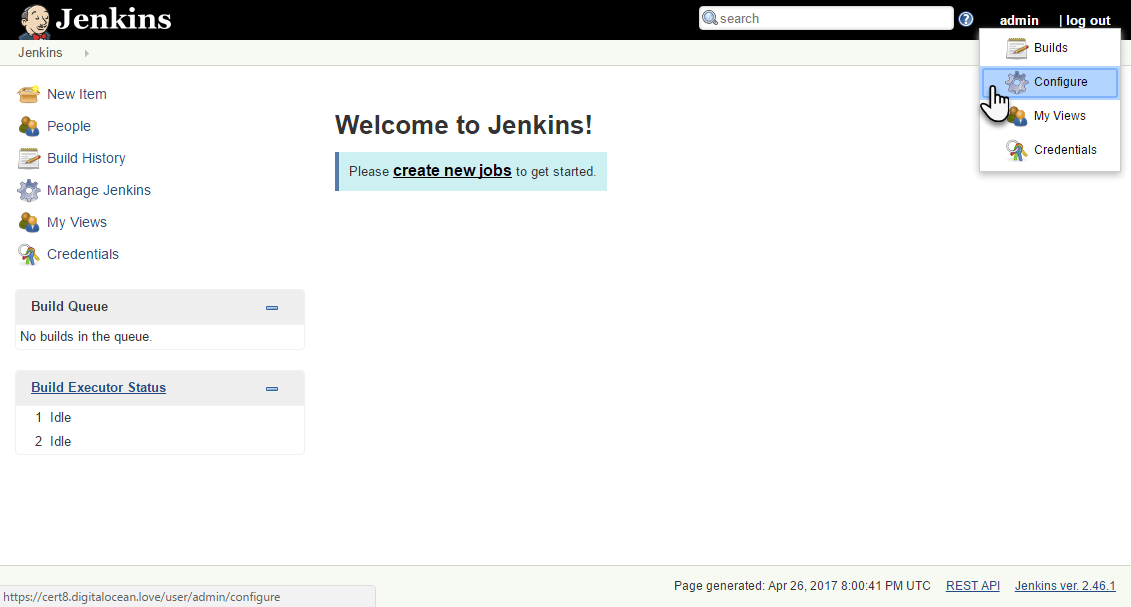
Click “admin” in the upper-right and select “Configure” from the dropdown menu. Enter and confirm the new password and click “Save”. You can now use the Jenkins web interface securely.
Conclusion
In this tutorial, after completing the prerequisites, we configured Nginx as a reverse proxy to Jenkins’ built-in web server in order to secure our credentials and other information transmitted via the Web interface. Now that Jenkins is secure, you can learn how to set up a continuous integration pipeline to automatically test code changes. Other resources to consider if you are new to Jenkins are the Jenkins project’s "Getting Started: Create your first Pipeline tutorial or the library of community-contributed plugins.
Thanks for learning with the DigitalOcean Community. Check out our offerings for compute, storage, networking, and managed databases.
About the author
Still looking for an answer?
This textbox defaults to using Markdown to format your answer.
You can type !ref in this text area to quickly search our full set of tutorials, documentation & marketplace offerings and insert the link!
Hello,
I have followed your tutorial with success, thanks ! But now I can’t figure out how to configure Nginx to manage Jenkins Slaves via JNLP v4 protocol through 443 port ? It look’s like I have to manage websocket connections (with a specified port; 7777 for example). But I can’t split Jenkins http traffic (=> 8080) and socket traffic (=>7777) because the Nginx location parameter (location /) is the same. My conclusion is that the Nginx split must be port based…
Am I wrong ?
Thanks
Hi - thanks for this tutorial
Can you elaborate what https://your.ssl.domain.name is? I followed all along and modified this line as follow:
proxy_redirect http://localhost:8080 https://jenkins.mydomain.com;
just because in your testing configuration image you have http://jenkins.mydomain.com
so I am getting:
The server at jenkins.mydomain.com is taking too long to respond.
Not an expert on the matter as you can tell.
Note: I replaced
mydomainwith my real domain name just in case you think I literally putmydomain
Thanks for your help in advanced.
I had an issue with the proxying using nginx, solved by setting a varaible in SELinux with the command:
setsebool -P httpd_can_network_connect 1
Yes I know this article is for Ubuntu but still may be helpful if anyone is on RHEL or CentOS and use this article
 This work is licensed under a Creative Commons Attribution-NonCommercial- ShareAlike 4.0 International License.
Become a contributor for community
Get paid to write technical tutorials and select a tech-focused charity to receive a matching donation.

DigitalOcean Documentation
Full documentation for every DigitalOcean product.

Resources for startups and AI-native businesses
The Wave has everything you need to know about building a business, from raising funding to marketing your product.
The developer cloud
Scale up as you grow — whether you're running one virtual machine or ten thousand.

Start building today
From GPU-powered inference and Kubernetes to managed databases and storage, get everything you need to build, scale, and deploy intelligent applications.
