Tutorial

How To Configure Nginx as a Web Server and Reverse Proxy for Apache on One Ubuntu 14.04 Droplet

Published on February 18, 2015
How To Configure Nginx as a Web Server and Reverse Proxy for Apache on One Ubuntu 14.04 Droplet
Not using Ubuntu 14.04?Choose a different version or distribution.
Ubuntu 14.04

Introduction

Apache and Nginx are two popular open source web servers often used with PHP. It can be useful to run both of them on the same virtual machine when hosting multiple websites which have varied requirements. The general solution for running two web servers on a single system is to either use multiple IP addresses or different port numbers.

Droplets which have both IPv4 and IPv6 addresses can be configured to serve Apache sites on one protocol and Nginx sites on the other, but this isn’t currently practical, as IPv6 adoption by ISPs is still not widespread. Having a different port number like 81 or 8080 for the second web server is another solution, but sharing URLs with port numbers (such as http://example.com:81) isn’t always reasonable or ideal.

This tutorial will show you how to configure Nginx as both a web server and as a reverse proxy for Apache – all on one Droplet. Depending on the web application, code changes might be required to keep Apache reverse-proxy-aware, especially when SSL sites are configured. To ensure this, we will install an Apache module named mod_rpaf which rewrites certain environment variables so it appears that Apache is directly handling requests from web clients.

We will host four domain names on one Droplet. Two will be served by Nginx: example.com (the default virtual host) and sample.org. The remaining two, foobar.net and test.io, will be served by Apache.

Prerequisites

  • A new Ubuntu 14.04 Droplet.

  • A standard user account with sudo privileges. You can set up a standard account by following Steps 2 and 3 of the Initial Server Setup with Ubuntu 14.04.

  • The desired domain names should point to your Droplet’s IP address in the DigitalOcean control panel. See Step 3 of How To Set Up a Host Name with DigitalOcean for an example of how to do this. If you host your domains’ DNS elsewhere, you should create appropriate A records there instead.

Optional References

This tutorial requires basic knowledge of virtual hosts in Apache and Nginx, and SSL certificate creation and configuration. For more information on these topics, see the following articles.

Step 1 — Installing Apache and PHP5-FPM

In addition to Apache and PHP-FPM, we must also install the PHP FastCGI Apache module. This is libapache2-mod-fastcgi, available in Ubuntu’s multiverse repository, which must first be enabled in the sources.list file.

sudo nano /etc/apt/sources.list

Find the following lines and uncomment them by removing the hash symbol (#) at the beginning.

# deb http://mirrors.digitalocean.com/ubuntu trusty multiverse

 . . .

# deb http://mirrors.digitalocean.com/ubuntu trusty-updates multiverse

That should leave you with what’s shown below.

 deb http://mirrors.digitalocean.com/ubuntu trusty multiverse

 . . .

 deb http://mirrors.digitalocean.com/ubuntu trusty-updates multiverse

Save the file and update the apt repository.

sudo apt-get update

Then install the necessary packages.

sudo apt-get install apache2 libapache2-mod-fastcgi php5-fpm

Step 2 — Configuring Apache and PHP5-FPM

In this step we will change Apache’s port number to 8080 and configure it to work with PHP5-FPM using the mod_fastcgi module. Edit the Apache configuration file and change the port number of Apache.

sudo nano /etc/apache2/ports.conf

Find the following line:

Listen 80

Change it to:

Listen 8080

Save and exit ports.conf.

Note: Web servers are generally set to listen on 127.0.0.1:8080 when configuring a reverse proxy but doing so would set the value of PHP’s environment variable SERVER_ADDR to the loopback IP address instead of the server’s public IP. Our aim is to set up Apache in such a way that its websites do not see a reverse proxy in front of it. So, we will configure it to listen on 8080 on all IP addresses.

Next we’ll edit the default virtual host file of Apache. The <VirtualHost> directive in this file is set to serve sites only on port 80.

sudo nano /etc/apache2/sites-available/000-default.conf

The first line should be:

<VirtualHost *:80>

Change it to:

<VirtualHost *:8080>

Save the file and reload Apache.

sudo service apache2 reload

Verify that Apache is now listening on 8080.

sudo netstat -tlpn

The output should look like below, with apache2 listening on :::8080.

Active Internet connections (only servers)
Proto Recv-Q Send-Q Local Address     Foreign Address      State    PID/Program name
tcp        0      0 0.0.0.0:22        0.0.0.0:*            LISTEN   1086/sshd
tcp6       0      0 :::8080           :::*                 LISTEN   4678/apache2
tcp6       0      0 :::22             :::*                 LISTEN   1086/sshd

Step 3 — Configuring Apache to Use mod_fastcgi

Apache works with mod_php by default, but it requires additional configuration to work with PHP5-FPM.

Note: If you are trying this tutorial on an existing installation of LAMP with mod_php, disable it first with:

sudo a2dismod php5

We will be adding a configuration block for mod_fastcgi which depends on mod_action. mod-action is disabled by default, so we first need to enable it.

sudo a2enmod actions

Find out which version of Apache is installed on your Droplet with:

sudo apache2 -v

Edit the fastcgi configuration file accordingly. These configuration directives pass requests for .php files to the PHP5-FPM UNIX socket.

sudo nano /etc/apache2/mods-enabled/fastcgi.conf

Add the following lines to the bottom of the <IfModule mod_fastcgi.c> . . . </IfModule> block for Apache 2.4:

 AddType application/x-httpd-fastphp5 .php
 Action application/x-httpd-fastphp5 /php5-fcgi
 Alias /php5-fcgi /usr/lib/cgi-bin/php5-fcgi
 FastCgiExternalServer /usr/lib/cgi-bin/php5-fcgi -socket /var/run/php5-fpm.sock -pass-header Authorization
 <Directory /usr/lib/cgi-bin>
  Require all granted
 </Directory>

Apache 2.2 does not require the <Directory> section so add the following:

 AddType application/x-httpd-fastphp5 .php
 Action application/x-httpd-fastphp5 /php5-fcgi
 Alias /php5-fcgi /usr/lib/cgi-bin/php5-fcgi
 FastCgiExternalServer /usr/lib/cgi-bin/php5-fcgi -socket /var/run/php5-fpm.sock -pass-header Authorization

When finished in fastcgi.conf, do a configuration test.

sudo apachectl -t

Reload Apache if Syntax OK is displayed. If you see the warning Could not reliably determine the server's fully qualified domain name, using 127.0.1.1. Set the 'ServerName' directive globally to suppress this message., that’s fine. It doesn’t affect us now.

sudo service apache2 reload

Step 4 — Verifying PHP Functionality

Check if PHP works by creating a phpinfo() file and accessing it from your web browser.

echo "<?php phpinfo(); ?>" | sudo tee /var/www/html/info.php

To see the file in a browser, go to http://111.111.111.111:8080/info.php but using your Droplet’s IP address. This will give you a list of configuration specifications PHP is using.

phpinfo Server API

phpinfo PHP Variables

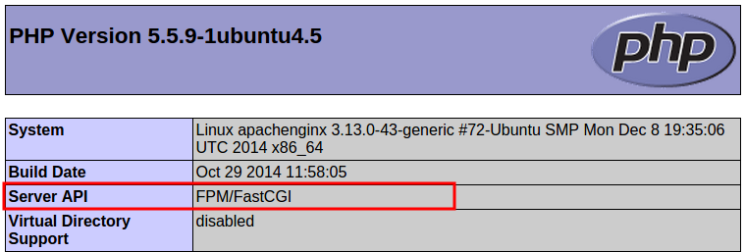
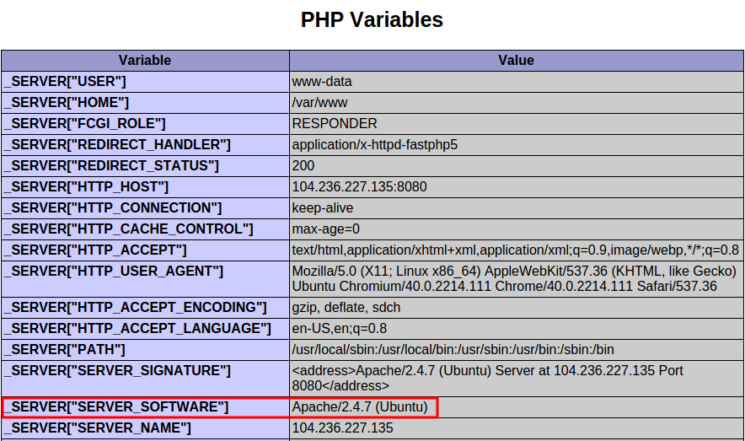
At the top of the page, check that Server API says FPM/FastCGI. About two-thirds of the way down the page, the PHP Variables section will tell you the SERVER_SOFTWARE is Apache on Ubuntu. These confirm that mod_fastcgi is active and Apache is using PHP5-FPM to process PHP files.

Step 5 — Creating Virtual Hosts for Apache

We will create two Apache virtual host files for the domains foobar.net and test.io. This begins with creating document root directories for both sites.

sudo mkdir -v /var/www/{foobar.net,test.io}

Now we will add two files to each directory for testing after setup is complete.

First we’ll create an index file for each site.

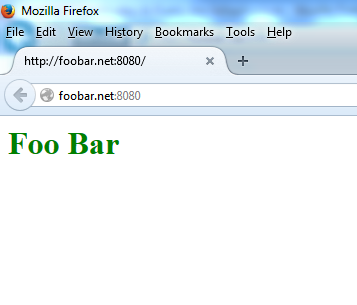
echo "<h1 style='color: green;'>Foo Bar</h1>" | sudo tee /var/www/foobar.net/index.html
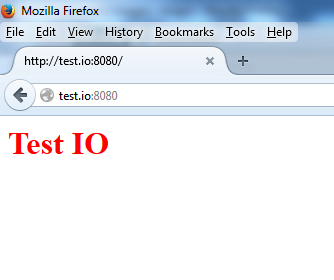
echo "<h1 style='color: red;'>Test IO</h1>" | sudo tee /var/www/test.io/index.html

Then, a phpinfo() file.

echo "<?php phpinfo(); ?>" | sudo tee /var/www/foobar.net/info.php
echo "<?php phpinfo(); ?>" | sudo tee /var/www/test.io/info.php

Create the virtual host file for the foobar.net domain.

sudo nano /etc/apache2/sites-available/foobar.net.conf

Place the following directive in it:

<VirtualHost *:*>
	ServerName foobar.net
	ServerAlias www.foobar.net
	DocumentRoot /var/www/foobar.net
	<Directory /var/www/foobar.net>
		AllowOverride All
	</Directory>
</VirtualHost>

Save and close the file. Then do the same for test.io.

sudo nano /etc/apache2/sites-available/test.io.conf
<VirtualHost *:*>
	ServerName test.io
	ServerAlias www.test.io
	DocumentRoot /var/www/test.io
	<Directory /var/www/test.io>
		AllowOverride All
	</Directory>
</VirtualHost>

Note 1: AllowOverride All enables .htaccess support.

Note 2: These are only the most basic directives. For a complete guide on setting up virtual hosts in Apache, see How To Set Up Apache Virtual Hosts on Ubuntu 14.04 LTS.

Now that both Apache virtual hosts are set up, enable the sites using the a2ensite command. This creates a symbolic link to the virtual host file in the sites-enabled directory.

sudo a2ensite foobar.net
sudo a2ensite test.io

Check Apache for configuration errors again.

sudo apachectl -t

Reload it if Syntax OK is displayed.

sudo service apache2 reload

To confirm the sites are working, open http://foobar.net:8080 and http://test.io:8080 in your browser and verify they’re displaying their index.html files.

You should see:

foobar.net index page

test.io index page

Also, check if PHP is working by accessing the info.php files: http://foobar.net:8080/info.php and http://test.io:8080/info.php.

You should see the same PHP configuration spec list on each site as you saw in Step 1. We now have two websites hosted on Apache at port 8080.

Step 6 — Installing and Configuring Nginx

In this step we will install Nginx and configure the domains example.com and sample.org as Nginx’s virtual hosts. For a complete guide on setting up virtual hosts in Nginx, see How To Set Up Nginx Server Blocks (Virtual Hosts) on Ubuntu 14.04 LTS.

Install Nginx.

sudo apt-get install nginx

Then remove the default virtual host’s symlink.

sudo rm /etc/nginx/sites-enabled/default

Now we’ll create virtual hosts for Nginx. First make document root directories for both the websites:

sudo mkdir -v /usr/share/nginx/{example.com,sample.org}

As we did with Apache’s virtual hosts, we’ll again create index and phpinfo() files for testing after setup is complete.

echo "<h1 style='color: green;'>Example.com</h1>" | sudo tee /usr/share/nginx/example.com/index.html
echo "<h1 style='color: red;'>Sample.org</h1>" | sudo tee /usr/share/nginx/sample.org/index.html
echo "<?php phpinfo(); ?>" | sudo tee /usr/share/nginx/example.com/info.php
echo "<?php phpinfo(); ?>" | sudo tee /usr/share/nginx/sample.org/info.php

Now create a virtual host file for the domain example.com.

sudo nano /etc/nginx/sites-available/example.com

Nginx calls server {. . .} areas of a configuration file server blocks. Create a server block for the primary virtual host, example.com. The default_server configuration directive makes this the default virtual host which processes HTTP requests that do not match any other virtual host.

Paste the following into the file for example.com:

server {
	listen 80 default_server;

	root /usr/share/nginx/example.com;
	index index.php index.html index.htm;

	server_name example.com www.example.com;
	location / {
		try_files $uri $uri/ /index.php;
	}

	location ~ \.php$ {
		try_files $uri =404;
		fastcgi_pass unix:/var/run/php5-fpm.sock;
		fastcgi_index index.php;
		include fastcgi_params;
	}
}

Save and close the file. Now create a virtual host file for Nginx’s second domain, sample.org.

sudo nano /etc/nginx/sites-available/sample.org

The server block for sample.org should look like this:

server {
	root /usr/share/nginx/sample.org;
	index index.php index.html index.htm;

	server_name sample.org www.sample.org;
	location / {
		try_files $uri $uri/ /index.php;
	}

	location ~ \.php$ {
		try_files $uri =404;
		fastcgi_pass unix:/var/run/php5-fpm.sock;
		fastcgi_index index.php;
		include fastcgi_params;
	}
}

Save and close the file. Then enable both the sites by creating symbolic links to the sites-enabled directory.

sudo ln -s /etc/nginx/sites-available/example.com /etc/nginx/sites-enabled/example.com
sudo ln -s /etc/nginx/sites-available/sample.org /etc/nginx/sites-enabled/sample.org

Do an Nginx configuration test:

sudo service nginx configtest

Then reload Nginx if OK is displayed.

sudo service nginx reload

Now acccess the phpinfo() file of your Nginx virtual hosts in a web browser by http://example.com/info.php and http://sample.org/info.php. Look under the PHP Variables section again.

Nginx PHP Variables

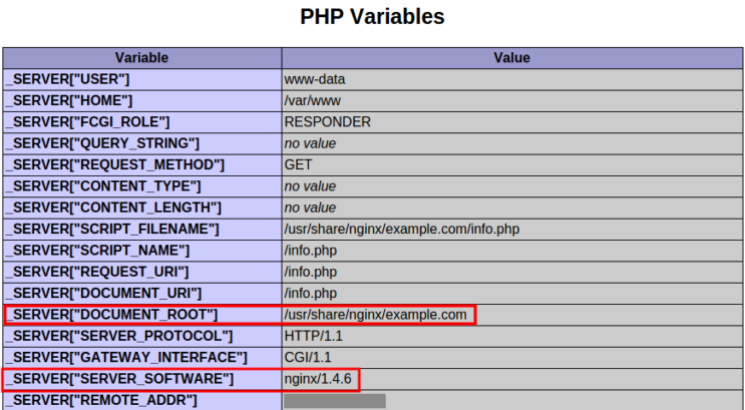
[“SERVER_SOFTWARE”] should say nginx, indicating that the files were directly served by Nginx. [“DOCUMENT_ROOT”] should point to the directory you created earlier in this step for each Nginx site.

At this point, we have installed Nginx and created two virtual hosts. Next we will set up an additional virtual host to proxy requests meant for domains hosted on Apache.

Step 7 — Configuring Nginx for Apache’s Virtual Hosts

In this section we will create an additional Nginx virtual host with multiple domain names in the server_name directives. Requests for these domain names will be proxied to Apache.

Create a new Nginx virtual host file:

sudo nano /etc/nginx/sites-available/apache

Add the code block below. This specifies the names of both Apache virtual host domains, and proxies their requests to Apache. Remember to use the public IP address in proxy_pass.

server {
	listen 80;
	server_name foobar.net www.foobar.net test.io www.test.io;

	location / {
		proxy_pass http://111.111.111.111:8080;
		proxy_set_header Host $host;
		proxy_set_header X-Real-IP $remote_addr;
		proxy_set_header X-Forwarded-For $proxy_add_x_forwarded_for;
		proxy_set_header X-Forwarded-Proto $scheme;
	}
}

Save the file and enable this new virtual host by creating a symbolic link.

sudo ln -s /etc/nginx/sites-available/apache /etc/nginx/sites-enabled/apache

Do a configuration test:

sudo service nginx configtest

Reload Nginx if OK is displayed.

sudo service nginx reload

Open the browser and access the http://foobar.net/info.php on one of Apache’s domain names. Scroll down to the PHP Variables section and check the values displayed.

phpinfo of Apache via Nginx

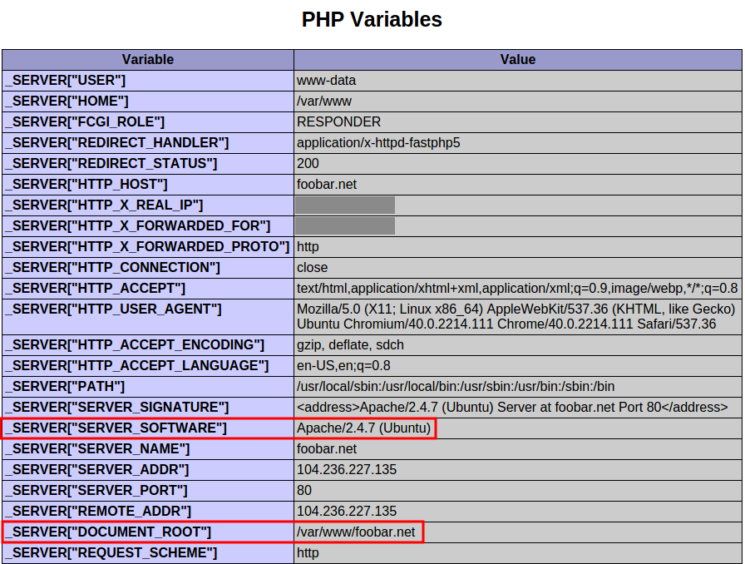
The variables SERVER_SOFTWARE and DOCUMENT_ROOT should confirm that this request was handled by Apache. The variables HTTP_X_REAL_IP and HTTP_X_FORWARDED_FOR were added by Nginx and should show the public IP address of the computer you’re accessing the URL from in your browser.

We have successfully setup Nginx to proxy requests for specific domains to Apache. The next step is to configure Apache to set variables REMOTE_ADDR as if it were handling these requests directly.

Step 8 — Installing and Configuring mod_rpaf

In this step we will install an Apache module named mod_rpaf which rewrites the values of REMOTE_ADDR, HTTPS and HTTP_PORT based on the values provided by a reverse proxy. Without this module, some PHP applications would require code changes to work seamlessly from behind a proxy. This module is present in Ubuntu’s repository as libapache2-mod-rpaf but is outdated and doesn’t support certain configuration directives. Instead, we will install it from source.

Install the packages needed to compile and build the module:

sudo apt-get install unzip build-essential apache2-threaded-dev

Download the latest stable release from GitHub.

wget https://github.com/gnif/mod_rpaf/archive/stable.zip

Extract it with:

unzip stable.zip

Change into the working directory.

cd mod_rpaf-stable

Then compile and install the module.

sudo make
sudo make install

Create a file in the mods-available directory which loads the rpaf module.

sudo nano /etc/apache2/mods-available/rpaf.load

Add the following line to the file:

LoadModule rpaf_module /usr/lib/apache2/modules/mod_rpaf.so

Create another file in this directory. This will contain the configuration directives.

sudo nano /etc/apache2/mods-available/rpaf.conf

Add the following code block, making sure to add the IP address of your Droplet.

<IfModule mod_rpaf.c>
        RPAF_Enable             On
        RPAF_Header             X-Real-Ip
        RPAF_ProxyIPs           111.111.111.111
        RPAF_SetHostName        On
        RPAF_SetHTTPS           On
        RPAF_SetPort            On
</IfModule>

Here’s a brief description of each directive. See the mod_rpaf README file for more information.

  • RPAF_Header - The header to use for the client’s real IP address.
  • RPAF_ProxyIPs - The proxy IP to adjust HTTP requests for.
  • RPAF_SetHostName - Updates the vhost name so ServerName and ServerAlias work.
  • RPAF_SetHTTPS - Sets the HTTPS environment variable based on the value contained in X-Forwarded-Proto.
  • RPAF_SetPort - Sets the SERVER_PORT environment variable. Useful for when Apache is behind a SSL proxy.

Save rpaf.conf and enable the module.

sudo a2enmod rpaf

This creates symbolic links of the files rpaf.load and rpaf.conf in the mods-enabled directory. Now do a configuration test.

sudo apachectl -t

Reload Apache if Syntax OK is returned.

sudo service apache2 reload

Access one of Apache’s websites’ phpinfo() page on your browser and check the PHP Variables section. The REMOTE_ADDR variable will now also be that of your local computer’s public IP address.

Step 9 — Setting Up HTTPS Websites (Optional)

In this step we will configure SSL certificates for both the domains hosted on Apache. Nginx supports SSL termination so we can set up SSL without modifying Apache’s configuration files. The mod_rpaf module ensures the required environment variables are set on Apache to make applications work seamlessly behind a SSL reverse proxy.

Create a directory for the SSL certificates and their private keys.

sudo mkdir /etc/nginx/ssl

For this article we will use self-signed SSL certificates with a validity of 10 years. Generate self-signed certificates for both foobar.net and test.io.

sudo openssl req -x509 -sha256 -newkey rsa:2048 -keyout /etc/nginx/ssl/foobar.net-key.pem -out /etc/nginx/ssl/foobar.net-cert.pem -days 3650 -nodes
sudo openssl req -x509 -sha256 -newkey rsa:2048 -keyout /etc/nginx/ssl/test.io-key.pem -out /etc/nginx/ssl/test.io-cert.pem -days 3650 -nodes

Each time, you will be prompted for certificate identification details.

Country Name (2 letter code) [AU]:US
State or Province Name (full name) [Some-State]:New York
Locality Name (eg, city) []:New York City
Organization Name (eg, company) [Internet Widgits Pty Ltd]:DigitalOcean Inc
Organizational Unit Name (eg, section) []:
Common Name (e.g. server FQDN or YOUR name) []:example.com
Email Address []:

Now open the apache virtual host file that proxies requests from Nginx to Apache.

sudo nano /etc/nginx/sites-available/apache

Since we have separate certificates and keys for each domain we need to have separate server { . . . } blocks for each domain. You should delete it’s current contents and when finished, your apache vhost file should look similar to below.

server {
	listen 80;
	listen 443 ssl;
	server_name test.io www.test.io;

	ssl on;
	ssl_certificate /etc/nginx/ssl/test.io-cert.pem;
	ssl_certificate_key /etc/nginx/ssl/test.io-key.pem;

	location / {
		proxy_pass http://111.111.111.111:8080;
		proxy_set_header Host $host;
		proxy_set_header X-Real-IP $remote_addr;
		proxy_set_header X-Forwarded-For $proxy_add_x_forwarded_for;
		proxy_set_header X-Forwarded-Proto $scheme;
	}
}

server {
	listen 80;
	listen 443 ssl;
	server_name foobar.net www.foobar.net;

	ssl on;
	ssl_certificate /etc/nginx/ssl/foobar.net-cert.pem;
	ssl_certificate_key /etc/nginx/ssl/foobar.net-key.pem;

	location / {
		proxy_pass http://111.111.111.111:8080;
		proxy_set_header Host $host;
		proxy_set_header X-Real-IP $remote_addr;
		proxy_set_header X-Forwarded-For $proxy_add_x_forwarded_for;
		proxy_set_header X-Forwarded-Proto $scheme;
	}
}

Save the file and perform a configuration test.

sudo service nginx configtest

Reload Nginx if the test succeeds.

sudo service nginx reload

Access one of Apache’s domains over the browser with the https:// prefix: https://foobar.net/info.php

phpinfo ssl

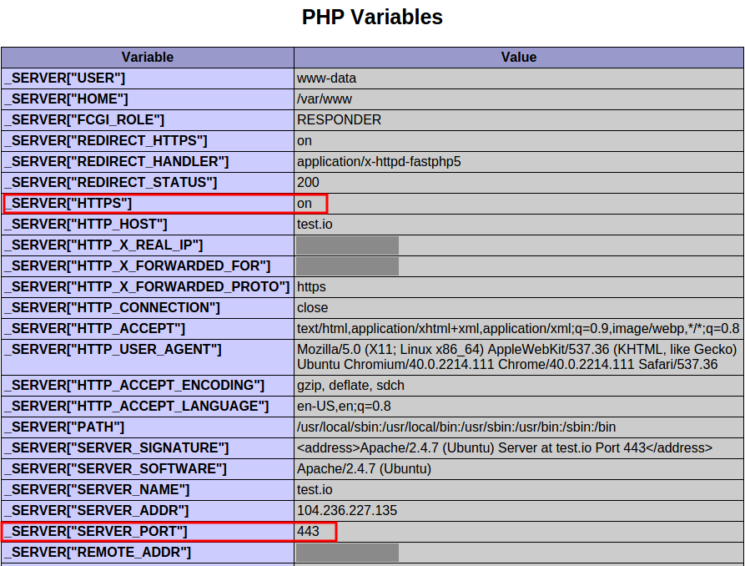
Look in the PHP Variables section. The variable SERVER_PORT has been set to 443 and HTTPS set to on, as though Apache was directly accessed over HTTPS. With these variables set, PHP applications do not have to be specially configured to work behind a reverse proxy.

Step 10 — Blocking Direct Access to Apache (Optional)

Since Apache is listening on port 8080 on the public IP address, it is accessible by everyone. It can be blocked by working the following IPtables command into your firewall rule set.

sudo iptables -I INPUT -p tcp --dport 8080 ! -s 111.111.111.111 -j REJECT --reject-with tcp-reset

Be sure to use your Droplet’s IP address in place of the example in red. Once port 8080 is blocked in your firewall, test that Apache is unreachable on it. Open your web browser and try accessing one of Apache’s domain names on port 8080. For example: http://example.com:8080

The browser should display an “Unable to connect” or “Webpage is not available” error message. With the IPtables tcp-reset option in place, an outsider would see no difference between port 8080 and a port that doesn’t have any service on it.

Note: IPtables rules do not survive a system reboot by default. There are multiple ways to preserve IPtables rules, but the easiest is to use iptables-persistent in Ubuntu’s repository.

Step 11 — Serving Static Files Using Nginx (Optional)

When Nginx proxies requests for Apache’s domains, it sends every file request to domain to Apache. Nginx is faster than Apache in serving static files like images, JavaScript and style sheets. So in this section we will configure Nginx’s apache virtual host file to directly serve static files and just send PHP requests to Apache.

Open the apache virtual host file.

sudo nano /etc/nginx/sites-available/apache

Add two additional location blocks to each server block as shown in red in the code block below.

server {
	listen 80;
	server_name test.io www.test.io;
	root /var/www/test.io;
	index index.php index.htm index.html;

	location / {
		try_files $uri $uri/ /index.php;
	}
 
	location ~ \.php$ {
		proxy_pass http://111.111.111.111:8080;
		proxy_set_header Host $host;
		proxy_set_header X-Real-IP $remote_addr;
		proxy_set_header X-Forwarded-For $proxy_add_x_forwarded_for;
		proxy_set_header X-Forwarded-Proto $scheme;
	}

	location ~ /\. {
		deny all;
	}
}

server {
	listen 80;
	server_name foobar.net www.foobar.net;
	root /var/www/foobar.net;
	index index.php index.htm index.html;

	location / {
		try_files $uri $uri/ /index.php;
	}
 
	location ~ \.php$ {
		proxy_pass http://111.111.111.111:8080;
		proxy_set_header Host $host;
		proxy_set_header X-Real-IP $remote_addr;
		proxy_set_header X-Forwarded-For $proxy_add_x_forwarded_for;
		proxy_set_header X-Forwarded-Proto $scheme;
	}

	location ~ /\. {
		deny all;
	}
}

The try_files directive makes Nginx to look for files in the document root and directly serve them. If the file has a .php extension, the request is passed to Apache. Even if the file is not found in the document root, the request is passed on to Apache so that application features like permalinks work without problems.

Safe the file and perform a configuration test.

sudo service nginx configtest

Reload Nginx if the test succeeds.

sudo service nginx reload

To verify this is working, you can examine Apache’s log files in /var/log/apache2 and see the GET requests for the index.php files of test.io and foobar.net. The only caveat of this setup is that Apache will not be able to restrict access to static files. Access control for static files would need to be configured in Nginx’s apache virtual host file.

Warning: The location ~ /\. directive is very important to include. This prevents Nginx from printing the contents of files like .htaccess and .htpasswd.

Conclusion

Having completed this tutorial, you should now have one Ubuntu Droplet with Nginx serving example.com and sample.org, along with Apache serving foobar.net and test.io. Though Nginx is acting as a reverse-proxy for Apache, Nginx’s proxy service is transparent and connections to Apache’s domains appear be served directly from Apache itself.

Thanks for learning with the DigitalOcean Community. Check out our offerings for compute, storage, networking, and managed databases.

Learn more about our products

About the author(s)

Category:
Tutorial

Still looking for an answer?

Ask a questionSearch for more help

Was this helpful?
 
40 Comments
Leave a comment...

This textbox defaults to using Markdown to format your answer.

You can type !ref in this text area to quickly search our full set of tutorials, documentation & marketplace offerings and insert the link!

Perfect, tutorial, got almost everything working.

I just needed to change on the nginx configuration the php part:

        try_files $uri =404;
        fastcgi_pass unix:/var/run/php5-fpm.sock;
        fastcgi_index index.php;
        include fastcgi_params;
    }

to

        try_files $uri =404;
        fastcgi_pass unix:/var/run/php5-fpm.sock;
        fastcgi_index index.php;
        include fastcgi.conf;
    }

Otherwise I was getting a blank page when I tried to access a php file with nginx

You must be running Ubuntu 14.10. This distribution installs Nginx 1.6.x which doesn’t set the SCRIPT_FILENAME value in the fastcgi_params file.

So you either have to use the fastcgi.conf file or define it manually:

location ~ \.php$ {
    try_files $uri =404;
    fastcgi_pass unix:/var/run/php5-fpm.sock;
    fastcgi_index index.php;
    fastcgi_param  SCRIPT_FILENAME    $document_root$fastcgi_script_name;
    include fastcgi_params;
}

Oh yes, that’s correct.

Does it have any difference between using the **fastcgi.conf ** or setting the SCRIPT_FILENAME ?

Absolutely nothing, the fastcgi.conf file has SCRIPT_FILENAME set in it. Open the file and have a look at the first line.

@jesin do you know if the php request(handle by apache) will also read the .htaccess files or not?

Sure it will if AllowOverride is set. You can test by creating a .htaccess file inside a directory with the following contents:

deny from all

Access the directory and you should see a 403 Forbidden error.

Awesome, thanks @jesin

Cuz right now, I’ve created a new Digital Ocean droplet,just like this tutorial, to host my wordpress blog, and configured my main droplet(ngix) to proxypass the /blog request to my wordpress droplet, but when I try to access /blog it keeps redirecting me to my root domain. So I’m still trying to figure out why

Was the blog already installed?

Edit the wp-config.php file and add the following before /* That's all, st...:

define( 'WP_SITEURL', 'http://example.com/blog' );
define( 'WP_HOME', 'http://example.com/blog' );

Yes the blog was already running and installed. And now I’m trying to migrate to another server.

I already have this configuration at my wp-config.php file.

Could might be something with my nginx proxy pass config?

location   ^~ /blog {
  proxy_set_header X-Forwarded-Host $host;
  proxy_set_header X-Forwarded-Server $host;
  proxy_set_header X-Forwarded-For $proxy_add_x_forwarded_for;
  proxy_set_header X-Real-IP  $remote_addr;
  proxy_set_header Host $host;
  rewrite ^/(.*)/$ /$1 last;
  rewrite ^/blog/?(.*)$ /$1 break;
  proxy_pass http://blog.example.com;
}

On what port is Apache running? Try using the public IP address in the proxy_pass directive. Also comment out the two rewrite directives for the time being.

Apache is running on port 8080. And for some strange reason now I’m getting this error: This webpage has a redirect loop

This is my apache config:

<VirtualHost *:*>
    DocumentRoot /var/www
    CustomLog /var/log/apache2/access.log combined
    ErrorLog /var/log/apache2/error.log
    <Directory /var/www>
        AllowOverride All
    </Directory>
</VirtualHost>

And this is my Nginx config:

server {
    auth_basic "Restricted";
    auth_basic_user_file /var/www/.htpasswd;
    listen 80;

    server_name www.example.com;

    root /var/www;
    index index.php index.html index.htm;

    location / {
        try_files $uri $uri/ /index.php?q=$uri&$args;
    }

    error_page 404 /404.html;
    error_page 500 502 503 504 /50x.html;

    location = /50x.html {
            root /usr/share/nginx/html;
    }

    location ~ \.php$ {
        proxy_pass http://111.111.111.11:8080;
    }

    location = /favicon.ico {
        log_not_found off;
        access_log off;
    }

    location = /robots.txt {
        allow all;
        log_not_found off;
        access_log off;
    }

    location ~ /\. {
        deny all;
    }

    location ~* /(?:uploads|files)/.*\.php$ {
        deny all;
    }
}

This comment has been deleted

    Where is the location ^~ /blog block?

    The location ~\.php$ block should also contain:

            proxy_set_header Host $host;
            proxy_set_header X-Real-IP $remote_addr;
            proxy_set_header X-Forwarded-For $proxy_add_x_forwarded_for;
            proxy_set_header X-Forwarded-Proto $scheme;
    

    If this is the exact Nginx virtual host file remove those two lines from wp-config.php. Also add blog.example.com to the server_name directive.

    The location ^~ /blog is at my other droplet, the one with the proxy pass.

    At the wordpress droplet I don’t have a ^~ /blog. Should I?

    Can you explain your setup. How many Droplets do you have? If a one Droplet already has Nginx configured as a reverse proxy why install Nginx as a reverse proxy in your WordPress Droplet?

    First of all, thank you so much @jesin for helping me out.

    I already have a wordpress running at /blog on my website, but everything is at the same droplet. So I created another droplet to migrate only my wordpress.

    The configuration I have today are 2 droplets, one where is currenty all my applications(wordpress + other apps) running only nginx, and the other droplet I created to migrate my wordpress, that is just like the one you teached at this tutorial.

    The main problem is that I need to configure the /blog to read from a different droplet from the one where my main website is.

    You’re welcome @descubraomundo!

    I had a look your site and got a clear idea now. I’ll test out a similar setup and tell you tomorrow.

    One more doubt, after migration do you want WordPress accessible over example.com/blog or blog.example.com?

    If you are looking to make it a subdomain you can directly create a DNS A record and point it to the second Droplet.

    @jesin that would be amazing =D, I’ll be waiting for a reply from you them.

    And we want to keep the WordPress accessible over example.com/blog

    I tried this on two new Droplets and have shared the configs via Gist.

    Replace 1.1.1.1 with the IP of the first Droplet and 2.2.2.2 with the IP of the second.

    Droplet 1 (existing) - https://gist.github.com/jesinwp/bbb6aa5ef59cadde1a58 Droplet 2 (WordPress) - https://gist.github.com/jesinwp/1d1152337bc85bcb99d9

    Droplet 2 - Apache and mod_rpaf.conf

    <VirtualHost *:*>
        DocumentRoot /var/www/html
        CustomLog /var/log/apache2/access.log combined
        ErrorLog /var/log/apache2/error.log
        <Directory /var/www>
            AllowOverride All
        </Directory>
    </VirtualHost>
    

    mod_rpaf.conf

    <IfModule mod_rpaf.c>
            RPAF_Enable             On
            RPAF_Header             X-Forwarded-For
            RPAF_ProxyIPs           1.1.1.1 2.2.2.2
            RPAF_SetHostName        On
            RPAF_SetHTTPS           On
            RPAF_SetPort            On
    </IfModule>
    

    All files of WordPress must be inside /var/www/html/blog for the /blog request to work properly.

    @jesin Thanks you so much, I’ll try the config now and let you know.

    @jesin apparently now it works, but I don’t know if I have something wrong with my php-fpm. Because when I load a file with just a phpinfo() it works, but when I try to access the wordpress index file, I get a Apache Internal Server Error , and on my apache log all I have is this:

    [fastcgi:error] [pid 19838:tid 3012533056] (104)Connection reset by peer: FastCGI: comm with server "/usr/lib/cgi-bin/php5-fcgi" aborted: read failed
    [fastcgi:error] [pid 19838:tid 3012533056] FastCGI: incomplete headers (0 bytes) received from server "/usr/lib/cgi-bin/php5-fcgi
    

    Could be something with my php configuration?

    This comment has been deleted

      Where is the location ^~ /blog block?

      The location ~\.php$ block should also contain:

              proxy_set_header Host $host;
              proxy_set_header X-Real-IP $remote_addr;
              proxy_set_header X-Forwarded-For $proxy_add_x_forwarded_for;
              proxy_set_header X-Forwarded-Proto $scheme;
      

      If this is the exact Nginx virtual host file remove those two lines from wp-config.php. Also add blog.example.com to the server_name directive.

      The location ^~ /blog is at my other droplet, the one with the proxy pass.

      At the wordpress droplet I don’t have a ^~ /blog. Should I?

      Can you explain your setup. How many Droplets do you have? If a one Droplet already has Nginx configured as a reverse proxy why install Nginx as a reverse proxy in your WordPress Droplet?

      First of all, thank you so much @jesin for helping me out.

      I already have a wordpress running at /blog on my website, but everything is at the same droplet. So I created another droplet to migrate only my wordpress.

      The configuration I have today are 2 droplets, one where is currenty all my applications(wordpress + other apps) running only nginx, and the other droplet I created to migrate my wordpress, that is just like the one you teached at this tutorial.

      The main problem is that I need to configure the /blog to read from a different droplet from the one where my main website is.

      You’re welcome @descubraomundo!

      I had a look your site and got a clear idea now. I’ll test out a similar setup and tell you tomorrow.

      One more doubt, after migration do you want WordPress accessible over example.com/blog or blog.example.com?

      If you are looking to make it a subdomain you can directly create a DNS A record and point it to the second Droplet.

      @jesin that would be amazing =D, I’ll be waiting for a reply from you them.

      And we want to keep the WordPress accessible over example.com/blog

      I tried this on two new Droplets and have shared the configs via Gist.

      Replace 1.1.1.1 with the IP of the first Droplet and 2.2.2.2 with the IP of the second.

      Droplet 1 (existing) - https://gist.github.com/jesinwp/bbb6aa5ef59cadde1a58 Droplet 2 (WordPress) - https://gist.github.com/jesinwp/1d1152337bc85bcb99d9

      Droplet 2 - Apache and mod_rpaf.conf

      <VirtualHost *:*>
          DocumentRoot /var/www/html
          CustomLog /var/log/apache2/access.log combined
          ErrorLog /var/log/apache2/error.log
          <Directory /var/www>
              AllowOverride All
          </Directory>
      </VirtualHost>
      

      mod_rpaf.conf

      <IfModule mod_rpaf.c>
              RPAF_Enable             On
              RPAF_Header             X-Forwarded-For
              RPAF_ProxyIPs           1.1.1.1 2.2.2.2
              RPAF_SetHostName        On
              RPAF_SetHTTPS           On
              RPAF_SetPort            On
      </IfModule>
      

      All files of WordPress must be inside /var/www/html/blog for the /blog request to work properly.

      @jesin Thanks you so much, I’ll try the config now and let you know.

      @jesin apparently now it works, but I don’t know if I have something wrong with my php-fpm. Because when I load a file with just a phpinfo() it works, but when I try to access the wordpress index file, I get a Apache Internal Server Error , and on my apache log all I have is this:

      [fastcgi:error] [pid 19838:tid 3012533056] (104)Connection reset by peer: FastCGI: comm with server "/usr/lib/cgi-bin/php5-fcgi" aborted: read failed
      [fastcgi:error] [pid 19838:tid 3012533056] FastCGI: incomplete headers (0 bytes) received from server "/usr/lib/cgi-bin/php5-fcgi
      

      Could be something with my php configuration?

      I changed some of the php configuration, and now I have a This webpage has a redirect loop error

      I managed to get the front page work by adding

      remove_filter('template_redirect', 'redirect_canonical');
      

      To my theme functions.php everytime I try to access a post page I keeps me showing the front page too.

      When I try to access wp-admin it gives me the apache Internal Server Error

      And I also needed to copy the index.php file to /var/www/html and update the line:

      require( dirname( __FILE__ ) . '/blog/wp-blog-header.php' );
      

      I would suggest starting from scratch on Droplet2.

      Copy all the WordPress files from Droplet1 and move it to /var/www/html/blog in Droplet2.

      The DocumentRoot in Apache’s config (Droplet2) must leave out the directory - /var/www/html.

      Edit the hosts file on your local PC to point example.com to the IP address of Droplet2.

      Now access your website on the browser (only example.com), it should show Apache’s default page. Then add the /blog directory and see if WordPress is displayed properly. If it does, you can add the location ^~ /blog {...} to Droplet1.

      Do not move the index.php file or add anything to wp-config.php. WordPress should be exactly the same in both the Droplets, only the server configs must change.

      I believe you are accessing the blog over the subdomain which is the cause of all chaos.

      @jesin Thanks again for all your support, but I did what you suggested but I still get the This webpage has a redirect loop error.

      Here’s my configuration files:

      Nginx Site

      server {
          listen 80;
          server_name example.com www.example.com;
      
          root /var/www/example.com;
          index index.php index.html index.htm;
      
          location / {
              try_files $uri $uri/ /index.php?q=$uri&$args;
          }
      
          error_page 404 /404.html;
          error_page 500 502 503 504 /50x.html;
      
          location = /50x.html {
                  root /usr/share/nginx/html;
          }
      
          location ~ \.php$ {
              proxy_pass http://2.2.2.2:8080;
              proxy_set_header Host $host;
              proxy_set_header X-Forwarded-For $proxy_add_x_forwarded_for;
              proxy_set_header X-Forwarded-Proto $scheme;
          }
      
          location = /favicon.ico {
              log_not_found off;
              access_log off;
          }
      
          location = /robots.txt {
              allow all;
              log_not_found off;
              access_log off;
          }
      
          location ~ /\. {
              deny all;
          }
      
          location ~* /(?:uploads|files)/.*\.php$ {
              deny all;
          }
      }
      

      Apache Site

      <VirtualHost *:*>
          ServerName example.com
          ServerAlias www.example.com
          DocumentRoot /var/www/example.com
          CustomLog /var/log/apache2/access.log combined
          ErrorLog /var/log/apache2/error.log
          <Directory /var/www>
              AllowOverride All
          </Directory>
      </VirtualHost>
      

      /var/www/example.com/blog/.htaccess

      # BEGIN WordPress
      <IfModule mod_rewrite.c>
      RewriteEngine On
      RewriteBase /
      RewriteRule ^index\.php$ - [L]
      RewriteCond %{REQUEST_FILENAME} !-f
      RewriteCond %{REQUEST_FILENAME} !-d
      RewriteRule . /index.php [L]
      </IfModule>
      # END WordPress
      

      wp-config.php *(only added this because I changed the wp-content folder name to conteudo *

      define ('WP_CONTENT_FOLDERNAME', 'conteudo');
      define ('WP_CONTENT_DIR', ABSPATH . WP_CONTENT_FOLDERNAME) ;
      
      define( 'WP_CONTENT_DIR', '/var/www/example.com/blog/conteudo' );
      define( 'WP_CONTENT_URL', 'http://www.example.com/blog/conteudo' );
      

      Folder Structure inside( /var/www)

      |-- example.com
      |   |-- blog
      |   |   |-- conteudo
      |   |   |-- index.php
      |   |   |-- license.txt
      |   |   |-- readme.html
      |   |   |-- robots.txt
      |   |   |-- sitemap.backup.xml
      |   |   |-- wp-activate.php
      |   |   |-- wp-admin
      |   |   |-- wp-blog-header.php
      |   |   |-- wp-comments-post.php
      |   |   |-- wp-config.php
      |   |   |-- wp-cron.php
      |   |   |-- wp-includes
      |   |   |-- wp-links-opml.php
      |   |   |-- wp-load.php
      |   |   |-- wp-login.php
      |   |   |-- wp-mail.php
      |   |   |-- wp-settings.php
      |   |   |-- wp-signup.php
      |   |   |-- wp-snapshots
      |   |   |-- wp-trackback.php
      |   |   `-- xmlrpc.php
      |   `-- index.html (apache default file)
      

      I don’t know if it helps, but I have this on my apache log when I try to access the /blog url:

      [Tue Feb 24 13:24:59.570436 2015] [rewrite:trace3] [pid 331:tid 2961128256] mod_rewrite.c(475): [client :59971] 222.222.222.222 - example [www.example.com/sid#b7218f28][rid#b6966058/subreq] [perdir /var/www/example.com/blog/] applying pattern '^index\\.php$' to uri 'index.php'
      [Tue Feb 24 13:24:59.570452 2015] [rewrite:trace1] [pid 331:tid 2961128256] mod_rewrite.c(475): [client :59971] 222.222.222.222 - example [www.example.com/sid#b7218f28][rid#b6966058/subreq] [perdir /var/www/example.com/blog/] pass through /var/www/example.com/blog/index.php
      [Tue Feb 24 13:25:00.487594 2015] [rewrite:trace3] [pid 331:tid 2952735552] mod_rewrite.c(475): [client :59972] 222.222.222.222 - example [www.example.com/sid#b7218f28][rid#b697a058/initial] [perdir /var/www/example.com/blog/] strip per-dir prefix: /var/www/example.com/blog/index.php -> index.php
      [Tue Feb 24 13:25:00.487657 2015] [rewrite:trace3] [pid 331:tid 2952735552] mod_rewrite.c(475): [client :59972] 222.222.222.222 - example [www.example.com/sid#b7218f28][rid#b697a058/initial] [perdir /var/www/example.com/blog/] applying pattern '^index\\.php$' to uri 'index.php'
      [Tue Feb 24 13:25:00.487673 2015] [rewrite:trace1] [pid 331:tid 2952735552] mod_rewrite.c(475): [client :59972] 222.222.222.222 - example [www.example.com/sid#b7218f28][rid#b697a058/initial] [perdir /var/www/example.com/blog/] pass through /var/www/example.com/blog/index.php
      [Tue Feb 24 13:25:00.488349 2015] [rewrite:trace3] [pid 331:tid 2952735552] mod_rewrite.c(475): [client :59972] 222.222.222.222 - example [www.example.com/sid#b7218f28][rid#b699b058/subreq] [perdir /var/www/example.com/blog/] strip per-dir prefix: /var/www/example.com/blog/index.php -> index.php
      [Tue Feb 24 13:25:00.488368 2015] [rewrite:trace3] [pid 331:tid 2952735552] mod_rewrite.c(475): [client :59972] 222.222.222.222 - example [www.example.com/sid#b7218f28][rid#b699b058/subreq] [perdir /var/www/example.com/blog/] applying pattern '^index\\.php$' to uri 'index.php'
      [Tue Feb 24 13:25:00.488380 2015] [rewrite:trace1] [pid 331:tid 2952735552] mod_rewrite.c(475): [client :59972] 222.222.222.222 - example [www.example.com/sid#b7218f28][rid#b699b058/subreq] [perdir /var/www/example.com/blog/] pass through /var/www/example.com/blog/index.php
      [Tue Feb 24 13:25:01.467422 2015] [rewrite:trace3] [pid 331:tid 2944342848] mod_rewrite.c(475): [client :59973] 222.222.222.222 - example [www.example.com/sid#b7218f28][rid#b6966058/initial] [perdir /var/www/example.com/blog/] strip per-dir prefix: /var/www/example.com/blog/index.php -> index.php
      [Tue Feb 24 13:25:01.467472 2015] [rewrite:trace3] [pid 331:tid 2944342848] mod_rewrite.c(475): [client :59973] 222.222.222.222 - example [www.example.com/sid#b7218f28][rid#b6966058/initial] [perdir /var/www/example.com/blog/] applying pattern '^index\\.php$' to uri 'index.php'
      [Tue Feb 24 13:25:01.467482 2015] [rewrite:trace1] [pid 331:tid 2944342848] mod_rewrite.c(475): [client :59973] 222.222.222.222 - example [www.example.com/sid#b7218f28][rid#b6966058/initial] [perdir /var/www/example.com/blog/] pass through /var/www/example.com/blog/index.php
      [Tue Feb 24 13:25:01.468144 2015] [rewrite:trace3] [pid 331:tid 2944342848] mod_rewrite.c(475): [client :59973] 222.222.222.222 - example [www.example.com/sid#b7218f28][rid#b697a058/subreq] [perdir /var/www/example.com/blog/] strip per-dir prefix: /var/www/example.com/blog/index.php -> index.php
      [Tue Feb 24 13:25:01.468167 2015] [rewrite:trace3] [pid 331:tid 2944342848] mod_rewrite.c(475): [client :59973] 222.222.222.222 - example [www.example.com/sid#b7218f28][rid#b697a058/subreq] [perdir /var/www/example.com/blog/] applying pattern '^index\\.php$' to uri 'index.php'
      [Tue Feb 24 13:25:01.468183 2015] [rewrite:trace1] [pid 331:tid 2944342848] mod_rewrite.c(475): [client :59973] 222.222.222.222 - example [www.example.com/sid#b7218f28][rid#b697a058/subreq] [perdir /var/www/example.com/blog/] pass through /var/www/example.com/blog/index.php
      [Tue Feb 24 13:25:02.288736 2015] [rewrite:trace3] [pid 331:tid 2935950144] mod_rewrite.c(475): [client :59974] 222.222.222.222 - example [www.example.com/sid#b7218f28][rid#b699b058/initial] [perdir /var/www/example.com/blog/] strip per-dir prefix: /var/www/example.com/blog/index.php -> index.php
      [Tue Feb 24 13:25:02.289587 2015] [rewrite:trace3] [pid 331:tid 2935950144] mod_rewrite.c(475): [client :59974] 222.222.222.222 - example [www.example.com/sid#b7218f28][rid#b699b058/initial] [perdir /var/www/example.com/blog/] applying pattern '^index\\.php$' to uri 'index.php'
      [Tue Feb 24 13:25:02.289629 2015] [rewrite:trace1] [pid 331:tid 2935950144] mod_rewrite.c(475): [client :59974] 222.222.222.222 - example [www.example.com/sid#b7218f28][rid#b699b058/initial] [perdir /var/www/example.com/blog/] pass through /var/www/example.com/blog/index.php
      [Tue Feb 24 13:25:02.290204 2015] [rewrite:trace3] [pid 331:tid 2935950144] mod_rewrite.c(475): [client :59974] 222.222.222.222 - example [www.example.com/sid#b7218f28][rid#b6966058/subreq] [perdir /var/www/example.com/blog/] strip per-dir prefix: /var/www/example.com/blog/index.php -> index.php
      [Tue Feb 24 13:25:02.290215 2015] [rewrite:trace3] [pid 331:tid 2935950144] mod_rewrite.c(475): [client :59974] 222.222.222.222 - example [www.example.com/sid#b7218f28][rid#b6966058/subreq] [perdir /var/www/example.com/blog/] applying pattern '^index\\.php$' to uri 'index.php'
      [Tue Feb 24 13:25:02.290222 2015] [rewrite:trace1] [pid 331:tid 2935950144] mod_rewrite.c(475): [client :59974] 222.222.222.222 - example [www.example.com/sid#b7218f28][rid#b6966058/subreq] [perdir /var/www/example.com/blog/] pass through /var/www/example.com/blog/index.php
      

      Any idea what else could be?

      I am checking with your real IP address, can you remove the HTTP authentication for a moment.

      Also did you undo the changes made in the index.php file and the remove the template_redirect part?

      Just removed the HTTP authentication.

      And yes, my index.php file is currently

      <?php
      /**
       * Front to the WordPress application. This file doesn't do anything, but loads
       * wp-blog-header.php which does and tells WordPress to load the theme.
       *
       * @package WordPress
       */
      
      /**
       * Tells WordPress to load the WordPress theme and output it.
       *
       * @var bool
       */
      define('WP_USE_THEMES', true);
      
      /** Loads the WordPress Environment and Template */
      require( dirname( __FILE__ ) . '/wp-blog-header.php' );
      

      And I removed the template_redirect part

      Found it after hours of troubleshooting. This was something I missed out in the article itself. Nginx didn’t properly send the requested URL to Apache which caused the redirect loop. Adding request_uri to proxy_pass fixes this. This affects any PHP application with permalinks, so I’ll get this article fixed.

      proxy_pass http://2.2.2.2:8080$request_uri;
      

      Now in your environment location / {...} isn’t needed, remove it and add the following:

      location /blog {
              try_files $uri $uri/ /blog/index.php;
      }
      

      Also the .htaccess (inside the /blog directory) file should have the /blog prefix:

      <IfModule mod_rewrite.c>
      RewriteEngine On
      RewriteBase /blog/
      RewriteRule ^index\.php$ - [L]
      RewriteCond %{REQUEST_FILENAME} !-f
      RewriteCond %{REQUEST_FILENAME} !-d
      RewriteRule . /blog/index.php [L]
      </IfModule>
      

      Don’t forget to enable mod_rewrite.

      sudo a2enmod rewrite
      sudo service apache2 reload
      

      @jesin you’re the man…

      The front end works 100%.

      But when I try to access /blog/wp-admin page it gives me an Apache error instead of redirecting me to /wp-login.php. But if I go directly to /wp-login.php and login, I can access the /blog/wp-admin.

      So I believe it might be something related to redirect user;

      It must be a problem with one of the .htaccess files. Check the error log of Apache for details.

      tail /var/log/apache2/error.log
      

      Do any of the .htaccess files have php_value or php_flag configs in them?

      All I have in my apache error log is:

      [authz_core:debug] [pid 9366:tid 2962176832] mod_authz_core.c(802): AH01626: authorization result of Require all granted: granted
      [authz_core:debug] [pid 9366:tid 2962176832] mod_authz_core.c(802): AH01626: authorization result of <RequireAny>: granted
      [fastcgi:error] [pid 9366:tid 2962176832] (104)Connection reset by peer: FastCGI: comm with server "/usr/lib/cgi-bin/php5-fcgi" aborted: read failed
      [fastcgi:error] [pid 9366:tid 2962176832] FastCGI: incomplete headers (0 bytes) received from server "/usr/lib/cgi-bin/php5-fcgi"
      

      All the .htaccess files I have on my server are

      /var/www/example.com/blog/conteudo/plugins/wp-missed-schedule/.htaccess
      /var/www/example.com/blog/conteudo/plugins/akismet/.htaccess
      /var/www/example.com/blog/conteudo/plugins/wp-external-links/js/src/.htaccess
      /var/www/example.com/blog/conteudo/.htaccess
      /var/www/example.com/blog/conteudo/uploads/ithemes-security/logs/.htaccess
      /var/www/example.com/blog/conteudo/uploads/ithemes-security/.htaccess
      /var/www/example.com/blog/conteudo/themes/independent-publishers/js/pushy-master/.htaccess
      /var/www/example.com/blog/.htaccess
      

      And in none of them I php_value or php_flag configs

      Could be some php-fpm config?

      Good Article! Thanks for that, however, I would love to see this for CentOS7, ideally inline with some basic but still real world examples and recommendations about tweaking performance with varnish and/or page speed, improve security in this setup (do I still should use mod-security or do I need to focus on securing nginx, if so how,…

      I am aware that this quickly could become a full-time job writing such articles, so please treat this as a “wish” and not as a complaint.

      Nice tutorial :)

      I have question, I ll buy server for prestashop store.

      Nginx standalone OR Apache + Nginx (reverse proxy) ?

      I prefer nginx standalone less configuration but I don’t know if the combo apache+nginx is really the best ?

      If you are comfortable with Nginx and comfortable without .htaccess use standalone Nginx + PHP-FPM. Don’t forget these rewrite rules for pretty URLs.

      Yes :) Thanks Jesin <3 NGINX

      uder the fastcgi.conf Alias /php5-fcgi /usr/lib/cgi-bin/php5-fcgi

      I could not find /usr/lib/cgi-bin/php5-fcgi. Is it a self created folder ?

      Hi @adrianmak,

      Yes you do not have to create it manually.

      most open source php cms required mod_rewrite enabled to work properly.

      Should I have to both, enable the apache mod_rewrite module and add url rewrite rules on the nginx reserve proxy conf ?

      I found that, with the same php website, fastcgi + php5-fpm is not much responsive than a mod_php

      It isn’t only about responsiveness but also about resource usage. The mod_php module is embedded inside the Apache process. So it consumes system resources for each HTTP request including requests for static files like CSS, JS and images.

      Hence when your site starts getting more traffic Apache will be consuming more RAM.

      How do I test whether css,js,images are served by nginx but not apache, serve php page only ?

      I just figured out slow response on first request. The problem solved by flushing local dns cache of my Windows.

      The website is blazing fast, even on a VM box

      How do I test whether css,js,images are served by nginx but not apache, serve php page only ?

      Stop the Apache service and access an image file, it should load properly. Now access a PHP file, it should show a HTTP gateway error.

      NEAT!!! writeup. And bonus points on rpaf. Yet I think (maybe I’m blind) you somehow missed to make a point about the benfits a reverseproxy brings.

      From wiki, A reverse proxy can reduce load on its origin servers by caching static content, as well as dynamic content - also known as web acceleration. Proxy caches of this sort can often satisfy a considerable number of website requests, greatly reducing the load on the origin server(s).

      http://en.wikipedia.org/wiki/Reverse_proxy

      For nginx, severing static content , css, jpg, js are much faster than apache. Of course nginx could also be configured as content caching.

      Hi Jesin,

      I have ubuntu 12.04 and I try the first step with Apache but at this step : “To confirm the sites are working, open http://example1.com:8080 and http://example2.com:8080 in your browser and verify they’re displaying their index.html files.”

      both of them , loading to /var/www/index.html at same page, it looks like the vhost doens’t work before these changes they were working . and not /var/www/example1/index.php or /var/www/example2/index.php

      cat 000-default 
      <VirtualHost *:8080>
      
      	ServerAdmin webmaster@localhost
      
      
      	DocumentRoot /var/www
      	<Directory />
      		Options FollowSymLinks
      		AllowOverride All
      	</Directory>
      	<Directory /var/www/>
      		Options Indexes FollowSymLinks MultiViews
      		AllowOverride all
      		Order allow,deny
      		allow from all
      	</Directory>
      
      cat example1.com
      <VirtualHost *:*>
      
        ServerName example1.com
        ServerAlias www.example1.com
        DocumentRoot /var/www/example1/
          
       <Directory /var/www/example1/>
                     Options Indexes FollowSymLinks MultiViews
                    AllowOverride all
                   #Order allow,deny
                    # allow from all
              </Directory>
      
       cat example2.com
      <VirtualHost *:*>
      
        ServerName example2.com
        ServerAlias www.example2.com
        DocumentRoot /var/www/example2
      
          
       <Directory /var/www/example2/>
             #        Options Indexes FollowSymLinks MultiViews
                    AllowOverride all
              #     Order allow,deny
               #      allow from all
              </Directory>


      Hi claenjoy,

      I believe Apache uses the most restrictive <VirtualHost> directive - <VirtualHost *:8080> vs <VirtualHost *:*>. So you have two options

      1. Disable the default vHost.
      sudo a2dissite 000-default
      sudo service apache2 reload
      

      Or

      1. Edit both the files and change <VirtualHost *:*> to <VirtualHost *:8080> and reload Apache.

      Hi

      thanks for your answer, I tried the first option

      and when I restart apache2 says:

       [warn] NameVirtualHost *:80 has no VirtualHosts
      
      
      /etc/apache2/ports.conf
      
      NameVirtualHost *:80
      Listen 8080
      
      
      <IfModule mod_ssl.c>
          # If you add NameVirtualHost *:443 here, you will also have to change
          # the VirtualHost statement in /etc/apache2/sites-available/default-ssl
          # to <VirtualHost *:443>
          # Server Name Indication for SSL named virtual hosts is currently not
          # supported by MSIE on Windows XP.
          Listen 443
      </IfModule>
      
      <IfModule mod_gnutls.c>
          Listen 443
      </IfModule>
      
      
      netstat -tlpn
      Active Internet connections (only servers)
      Proto Recv-Q Send-Q Local Address           Foreign Address         State       PID/Program name
      tcp        0      0 0.0.0.0:8080            0.0.0.0:*               LISTEN      9742/apache2    
      tcp        0      0 0.0.0.0:22              0.0.0.0:*               LISTEN      885/sshd        
      tcp        0      0 127.0.0.1:5432          0.0.0.0:*               LISTEN      1107/postgres   
      tcp        0      0 127.0.0.1:9000          0.0.0.0:*               LISTEN      8771/php-fpm.conf)
      tcp        0      0 127.0.0.1:3306          0.0.0.0:*               LISTEN      1074/mysqld     
      tcp6       0      0 :::22                   :::*                    LISTEN      885/sshd
      

      Change *NameVirtualHost :80 to *NameVirtualHost :8080.

      This comment has been deleted

        [warn] NameVirtualHost *:8080 has no VirtualHosts


        Check if both the sites are enabled:

        ls -l /etc/apache2/sites-enabled
        

        If not enable them:

        sudo a2ensite example1.com
        sudo a2ensite example2.com
        sudo service apache2 reload
        

        Hi Jesin,

        now is work example1.com:8080 go to /var/www/example1/index.html and also example1.com:8080/info.php go to/var/www/example1/info.php and it’s working for example2.com too

        now I have remove var/www/example1/index.html and left var/www/example1/index.php running wordpress1 and the same with /var/www/example2/index.php running workpress2 too, but doesn’t seem to be work . basically now without index.html if I go to example1.com:8080 redirect my browser to example1.com any suggestions?

        Yes, WordPress will redirect to its URL. Install Nginx and configure it as a reverse proxy and the site will be accessible over example1.com.

        I followed this guide to enable fastcgi on apache. Up to this step, apache fail to interpert php script, the browser just open the php source content

        http://1.ii.gl/zynQvBEBB.png

        I have side by side to read the config file carefully. It seems looking fine.

        I used apache2ctl -M to check whether fastcgi module is loaded. Yes, apache is loaded this module.

        What OS are you using? Please post the contents of this file - /etc/apache2/mods-enabled/fastcgi.conf.

        I figured it out. Since the linux box is upgraded from 12.04 to 14.04. Probably there were some configuration conflict after apache upgraded from 2.2 to 2.4. I fully uninstall and reinstall and the issue gone.

        I followed this guide to configure my server for some time ago. It’s working fine. Recently, I wanted for detail log statistic from apache log, and found that all client’s ip is from 127.0.0.1. Apache server log didn’t log down the real remote ip address.

        ps phpinfo is showing real remote address correctly.

        The logging process happens before mod_rpaf rewrites IP addresses, so it is best to use the access log of Nginx. It is present in /var/log/nginx/access.log.

        I followed all the steps in the guide, to setup a wordpress server. It all works but i do not get the mod_rpaf to rewrite the SSL values. It does rewrite the IP address but not the SSL related items.

        when i request the page via ssl : https://drifting.media/info.php i get the following results.

        _SERVER["SERVER_ADDR"]	128.199.50.234
        _SERVER["SERVER_PORT"]	80
        _SERVER["REMOTE_ADDR"]	84.106.136.101
        _SERVER["DOCUMENT_ROOT"]	/var/www/drifting.media
        _SERVER["REQUEST_SCHEME"]	http
        _SERVER["SERVER_PROTOCOL"]	HTTP/1.0
        

        Any idea what i did wrong?

        Looks like you missed out proxy_set_header X-Forwarded-Proto $scheme; in the Nginx config.

        Hey, really nice article. It has helped me a lot. I have successfully got my server up and running. Both Apache and nginx are working to serve files. But for me there have been two tiny issues that are not preventing my site from functioning, but I had to work around the problem. But I’m curious if you know what could cause these issues. Here goes:

        Issue 1: On step 7 of the tutorial, I was not able to get this to work using the IP address of the server. I had to type in localhost:8080 to get it to work, like this:

        server {
            listen 80;
            server_name foobar.net www.foobar.net test.io www.test.io;
        
            location / {
                proxy_pass http://localhost:8080;
                proxy_set_header Host $host;
                proxy_set_header X-Real-IP $remote_addr;
                proxy_set_header X-Forwarded-For $proxy_add_x_forwarded_for;
                proxy_set_header X-Forwarded-Proto $scheme;
            }
        }
        

        If I type the IP of the server into this configuration file, it acts as if the port is blocked. Thus, the page never loads.

        Issue 2: In Step 8, when I check the phpinfo(), the remote address simply says 127.0.0.1.

        Do you know what could be causing this? And is it even a problem?

        Well. I said “it acts as if the port is blocked”. It was, actually, a firewall issue. My mistake.

        Is phpinfo() showing the correct IP address now?

        This comment has been deleted

          Yes. It is correct now. I had traffic blocked from all IPs except the one I was using to administer things. Because of that, when nginx would reverse proxy, it would not show the request as coming from my IP, but some other. So I opened the firewall and voila! It worked.

          Perfect, this tutorial.

          Hi, Thanks for the article and it is very clear. Helps people like me who doesn’t have the server knowledge at all.

          I have followed the steps mentioned and everything went well still Step 8.

          After i started installing SSL by following the steps mentioned on Step 9, i have tried sudo service nginx configtest but it failed. I don’t understand what went wrong.

          Could you please guide me what went wrong with this.

          Please let me know if you need to see some config files so that i can provide you.

          Thanks in advance.

          Best Regards, Sri

          This comment has been deleted

            Please disregard my comment, i have figured it myself. missed .com on domain name when creating ssl certificate.

            You Sir - ROCK !!!

            This tutorial is spectacular, thank you.

            Only thing I had to do differently was to remove the 000-default config from apaches sites-enabled in order to be able to access my apache sites via the reverse proxy. I was getting the default apache page instead of the correct index.html before. This may have been because all the domains i was using were subdomains but i’m not sure. Thought i’d mention this here in case it tripped someone else up

            A question about architecture. Is it more efficient to have both nginx/apache on a 1 GB RAM or one on each droplet with 500 MB RAM? Looking to host some wordpress sites.

            It is better to have them both on a single 1GB Droplet. When using two 512MB Droplets, there are two OSs consuming resources.

            This is good stuff. By the way, was there a tutorial for nginx and apache as reverse proxy but on 2 separate droplets? Thanks

            Andrew SB
            DigitalOcean Employee
            DigitalOcean Employee badge
            May 13, 2015

            Great tutorial Jesin. Thanks for all your work!

            Hey @jesin

            Your article solved an issue for me which was hangin (like a sword on my head) since a week :]

            I was getting bugged up (had almost given up) and tried asking several others, but got useful “no response”!

            THE SETUP I set my server like this:

            OVER HTTP Visitor > Varnish3.0 (on port 80) > Apache (on 8080)

            OVER HTTPS Visitor > Nginx (on port 443) > SSL Termination > Varnish3.0 (on port 80) > Apache (on 8080)

            THE ISSUE Whenever I tried to access it over SSL, it would throw an endless loop error.

            I tried a work-around by adding this to my .htaccess file:

            SetEnvIf X-Forwarded-Protocol https HTTPS=on
            

            But site theme used to break (maybe because HTTPS was not handled properly)…

            THE CURE I followed your STEP 8. Compiled and enabled mod-rpaf and viola, it worked!

            Thanks a ton that you posted this article and I ultimately found it too :p …

            CHEERS :]

            One more question regarding handling of switching from HTTP to HTTPS: I’m using WHMCS and there are few specific Knowledgebase articles which I want only registered users to view. So I enabled the option and now the system asks for username & password before the visitor can view such restricted article.

            But it seems VPS is not able to redirect the visitor to SSL properly. In place of showing the article after entering the username & password, the system again asks for the credentials and then simply logs the visitor into his account.

            For a work-around (temporarily), I forced whole WHMCS on HTTPS. So there is no redirect at all.

            When I removed Varnish, it works fine. But I’m keen for setting up the system with Varnish.

            But what is actually required to solve this redirect issue? Can you help, please?

            – Regards Saurabh

            Hi @saurabh,

            Instead of

            SetEnvIf X-Forwarded-Protocol https HTTPS=on
            

            you should’ve tried

            SetEnvIf X-Forwarded-Proto https HTTPS=on
            

            Regarding the varnish issue, it is probably Varnish blocking the authentication cookie. Disable Varnish, use the Firebug addon to locate the cookie name that is being set when a user logs in at the KB area. Then configure Varnish to pass this cookie and not cache responses for it.

            Hi @jesin

            Thanks for your response ;]

            In the meanwhile I pushed Varnish completely behind Nginx. I was also thinking that Varnish is not able to properly handle switching from HTTP to HTTPS.

            Now I’m using server like this:

            OVER HTTP & HTTPS Visitor > Nginx (on port 80 & 443) > SSL Termination > Varnish > Apache

            This solved the problem of endless loop and also WHMCS KB articles.

            Do you think above setup is fundamentally fine? Or you feel it is necessary to put Varnish as front end for port 80?

            In my opinion Varnish doesn’t improve WHMCS’s load times as most of the visitors are logged in. So Nginx + Apache would be enough, or if Varnish is required you can use Pound in front of it for HTTPS.

            Visitor > Pound (on port 443) > Varnish > Apache.

            Thanks for this very good tutorial ! I’ve a doubt, because for each new site i’ve to create two vhost and two folder, where i’ve to put my joomla files ? apache or nginx vhost?

            Kamal Nasser
            DigitalOcean Employee
            DigitalOcean Employee badge
            May 29, 2015

            Yes, you will need to create a folder, an nginx virtualhost, and an apache virtualhost for each domain that you want to host on the droplet.

            yes , but where i’ve to put my joomla files ? in which folder? apache one or nginx one ?

            Do you want Joomla to use only Nginx or do you need Apache’s features also (.htaccess)? The files should be placed based on this.

            I’ve done ! thanks

            i’ve a server configured as this tutorial with some difference:

            1. i don’t use Nginx “apache” virtual host file because i’ve create an nginx vhost for each site
            2. i don’t use nginx sites, all are routed to Apache sites (joomla)

            The problem is that joomla backed is working fine, but the Frontend show an “Access Denied” error I’ve discovered that the problem is related to php.ini-> cgi.fixpathinfo=0 parameter with cgi.fixpathinfo=1 all working fine

            But i’ve read that cgi.fixpathinfo=1 is not secure !

            what can i do ? thanks for help

            I’ve a problem with this configuration I need to use php open_basedir for security reasons but i cannot use directive with apache 2.4 and php-fpm… how can i solve this problem ? ps. i’ve multiple vhosts Thanks for help

            Create a file named .user.ini inside the document root of each virtual host and place the open_basedir config entry in it. Create a phpinfo() file and check if the config entry is working as expected.

            http://php.net/manual/en/configuration.file.per-user.php

            How i can replay to one replay ? PS. Thanks Jesin, your solution it working fine but a parameter like this: disable_functions=show_source, system, shell_exec, passthru, exec, phpinfo, popen, proc_open

            Is not working on .user.ini do you know why?

            I’ve solved… disablefunctions working fine !

            disable_functions doesn’t work in .user.ini files because it is changeable only at PHP_INI_SYSTEM.

            More information: http://php.net/manual/en/configuration.changes.modes.php http://php.net/manual/en/ini.core.php

            Hi,

            Could you please let me know, how to configure mod security with this setup. I see your tutorial for apache. Will the same work for this too.

            Or will it be different because this setup consists of nginix and apache.

            Thanks in advance.

            Hi Srikanth,

            The tutorial for Mod_Security on Apache will work fine with this setup.

            This comment has been deleted

              This comment has been deleted

                This comment has been deleted

                  Hey Jesin, this is a really nice tutorial which helped me to host php as well as python applications from subdomains.

                  However, the static files serving using Nginx in conjunction with https doesn’t work for me. When I call up my subdomain http://humhub-staging.nrbrt.com all runs well, but when calling https://humhub-staging.nrbrt.com no static files seem to get loaded.

                  Checking /var/log/apache2/other_vhosts_access.log only shows me the redirect and success GET-request multiple times.

                  Do you or anybody has an idea what could be wrong?

                  Im stuck on Step 8 Installing and Configuring mod_rpaf

                  I ran the following command

                  root@example:~# sudo apt-get install unzip build-essential apache2-threaded-dev
                  Reading package lists... Done
                  Building dependency tree       
                  Reading state information... Done
                  Package apache2-threaded-dev is a virtual package provided by:
                    apache2-dev 2.4.7-1ubuntu4.5 [Not candidate version]
                    apache2-dev 2.4.7-1ubuntu4.8 [Not candidate version]
                    apache2-dev 2.4.7-1ubuntu4 [Not candidate version]
                  
                  E: Package 'apache2-threaded-dev' has no installation candidate
                  

                  BTW i installed Apache/2.4.17 (Ubuntu) using this repository

                  	sudo add-apt-repository -y ppa:ondrej/apache2 

                  	sudo apt-get update 

                  	sudo apt-get install -y apache2 
                  

                  So now i have to install apache2-dev as it includes the apache-threaded-dev i need. Read More Here

                  sudo apt-get install apache2-dev
                  

                  Is this correct?

                  Hello there, terric tutorial. I’m a newbie, so to me there’s only one problem: if I did step 9 (“Setting Up HTTPS Websites”), is it impossible to do step 11 (“Serving Static Files Using Nginx”)?

                  Because step 11 also changes the apache virtual host file. I tried to only add the additional location blocks, but the nginx configtest resulted in a fail.

                  What should I do?

                  PS: for the time being I did step 11, and I’m not using the HTTPs config anymore (step 9). I’d appreciate if anyone can help.

                  Hello;

                  I use wordpress, and am still thinking if i should go with apache+nginx because of some plugins that require htaccess( not compulsory) or nginx+pphfpm

                  Any reason why css and images are not loading? Looks like they are pulling up as 502 Bad Gateway.

                  Awesome Tuto. I make it work on Debian Jessie.

                  Thanks.

                  Hi, i am trying to set up apache+nginx+SSL+mod_pagespeed on apache. After enabling SSL mod_pagespeed in not working. Any ideea? Thanks, Emil

                  Join the Tech Talk
                  Success! Thank you! Please check your email for further details.

                  Please complete your information!

                  Become a contributor for community

                  Get paid to write technical tutorials and select a tech-focused charity to receive a matching donation.

                  DigitalOcean Documentation

                  Full documentation for every DigitalOcean product.

                  Resources for startups and SMBs

                  The Wave has everything you need to know about building a business, from raising funding to marketing your product.

                  Get our newsletter

                  Stay up to date by signing up for DigitalOcean’s Infrastructure as a Newsletter.

                  New accounts only. By submitting your email you agree to our Privacy Policy

                  The developer cloud

                  Scale up as you grow — whether you're running one virtual machine or ten thousand.

                  Get started for free

                  Sign up and get $200 in credit for your first 60 days with DigitalOcean.*

                  *This promotional offer applies to new accounts only.