
Introduction
By default, Jenkins comes with its own built in web server, which listens on port 8080. This is convenient if you run a private Jenkins instance, or if you just need to get something up quickly and don’t care about security. Once you have real production data going to your host, though, it’s a good idea to use a more secure web server such as Nginx handling the traffic.
This post will detail how to wrap your site with SSL using the Nginx web server as a reverse proxy for your Jenkins instance. This tutorial assumes some familiarity with Linux commands, a working Jenkins installation, and a Ubuntu 20.04 installation.
You can install Jenkins later in this tutorial, if you don’t have it installed yet.
Prerequisites
This guide assumes that you are using Ubuntu 20.04. Before you begin, you should have a non-root user account with sudo privileges set up on your system. You can learn how to do this by following the Ubuntu 20.04 initial server setup tutorial. You will also need the Nginx server installed and hosting your domain. You can learn how to do this with the How To Install Nginx on Ubuntu 20.04 tutorial.
Additionally, having your Jenkins instance secured by SSL is very important. If is visible on the internet, you can secure it with Let’s Encrypt. You can learn how to do this with the How to Secure Nginx with Let’s Encrypt on Ubuntu 22.04 tutorial. As stated previously, this tutorial assumes that Jenkins is already installed. This tutorial will show you how to install Jenkins if necessary. You will probably need to switch to the root user for that article.
Step 1 — Configure Nginx
Nginx has become a favorite web server for its speed and flexibility in recent years, which makes it an idea choice for our application.
Edit the Configuration
Next you will need to edit the default Nginx configuration file. The following example uses nano.
- sudo nano etc/nginx/sites-enabled/default
Here is what the final configuration might look like; the sections are broken down and briefly explained below. You can update or replace the existing config file, although you may want to make a backup copy first.
server {23
    listen 80;
    return 301 https://$host$request_uri;
}

server {

    listen 443;
    server_name jenkins.domain.com;

    access_log            /var/log/nginx/jenkins.access.log;

    location / {

      proxy_set_header        Host $host;
      proxy_set_header        X-Real-IP $remote_addr;
      proxy_set_header        X-Forwarded-For $proxy_add_x_forwarded_for;
      proxy_set_header        X-Forwarded-Proto $scheme;

      proxy_pass          http://localhost:8080;
      proxy_read_timeout  90;

      proxy_redirect      http://localhost:8080 https://jenkins.domain.com;
    }

    ...
}
You will need to update the server_name and proxy_redirect lines with your own domain name. There is some additional Nginx magic going on as well that tells requests to be read by Nginx and rewritten on the response side to ensure the reverse proxy is working.
Save and close the file. If you used nano, you can do so by pressing Ctrl + X, Y, and then Enter.
The first section tells the Nginx server to listen to any requests that come in on port 80 (default HTTP) and redirect them to HTTPS.
...
server {
   listen 80;
   return 301 https://$host$request_uri;
}
...
After that, the proxying happens. It basically takes any incoming requests and proxies them to the Jenkins instance that is bound/listening to port 8080 on the local network interface.
...
location / {

    proxy_set_header        Host $host;
    proxy_set_header        X-Real-IP $remote_addr;
    proxy_set_header        X-Forwarded-For $proxy_add_x_forwarded_for;
    proxy_set_header        X-Forwarded-Proto $scheme;

    proxy_pass          http://localhost:8080;
    proxy_read_timeout  90;

    proxy_redirect      http://localhost:8080 https://jenkins.domain.com;
}
...
Note: If you’d like to learn more about proxying in Nginx, this tutorial has some good information about the Nginx proxy settings.
A few quick things to point out here. If you don’t have a domain name that resolves to your Jenkins server, then the proxy_redirect statement above won’t function correctly without modification, so keep that in mind. Also, if you misconfigure the proxy_pass (by adding a trailing slash for example), you will get something similar to the following in your Jenkins Configuration page.

So, if you see this error, double-check your proxy_pass and proxy_redirect settings in the Nginx configuration!
Step 2 — Configure Jenkins
For Jenkins to work with Nginx, we need to update the Jenkins config to listen only on the localhost address instead of all (0.0.0.0), to ensure traffic gets handled properly. This is an important security step because if Jenkins is still listening on all addresses, then it will still potentially be accessible via its original port (8080). We will modify the /etc/default/jenkins configuration file to make these adjustments.
- sudo nano /etc/default/jenkins
Locate the JENKINS\_ARGS line and update it to look like the following:
JENKINS_ARGS="--webroot=/var/cache/jenkins/war --httpListenAddress=127.0.0.1 --httpPort=$HTTP_PORT -ajp13Port=$AJP_PORT"
Notice that the –httpListenAddress=127.0.0.1 setting must be either added or modified.
Then go ahead and restart Jenkins and Nginx.
- sudo service jenkins restart
- sudo service nginx restart
You should now be able to visit your domain using HTTPS, and the Jenkins site will be served securely.
Optional — Update OAuth URLs
If you are using the GitHub or another OAuth plugin for authentication, it will probably be broken at this point. For example, when attempting to visit the URL, you will get a “Failed to open page” with a URL similar to http://jenkins.domain.com:8080/securityRealm/finishLogin?code=random-string.
To fix this you will need to update a few settings within Jenkins, including your OAuth plugin settings. First update the Jenkins URL in the Jenkins GUI; it can be found in the Jenkins -> Manage Jenkins -> Configure System -> Jenkins Location menu.
Update the Jenkins URL to use HTTPS - https://jenkins.domain.com/

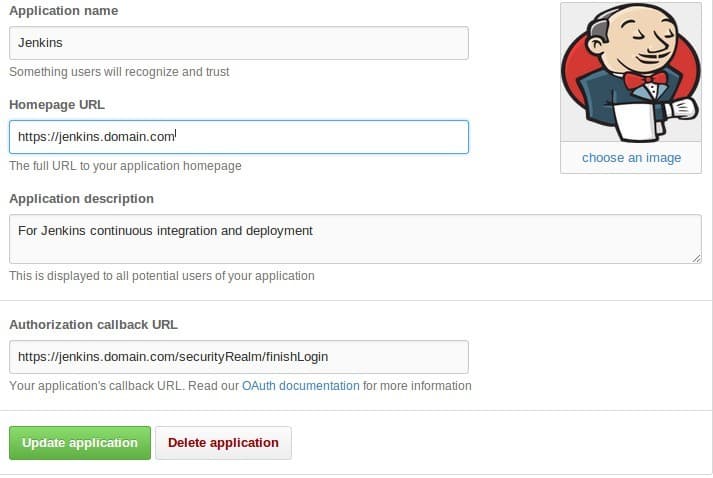
Next, update your OAuth settings with the external provider. This example is for GitHub. On GitHub, this can be found under Settings -> Applications -> Developer applications, on the GitHub site.
There should be an entry for Jenkins. Update the Homepage URL and Authorization callback URL to reflect the HTTPS settings. It might look similar to the following:
Conclusion
The only thing left to do is verify that everything worked correctly. As mentioned above, you should now be able to browse to your newly configured URL - jenkins.domain.com - over either HTTP or HTTPS. You should be redirected to the secure site, and should see some site information, including your newly updated SSL settings. As noted previously, if you are not using hostnames via DNS, then your redirection may not work as desired. In that case, you will need to modify the proxy_pass section in the Nginx config file.
Thanks for learning with the DigitalOcean Community. Check out our offerings for compute, storage, networking, and managed databases.
About the author(s)
Current fan and former Editorial Manager at DigitalOcean. Hi! Expertise in areas including Ubuntu, Docker, Rails, and more.
Still looking for an answer?
This textbox defaults to using Markdown to format your answer.
You can type !ref in this text area to quickly search our full set of tutorials, documentation & marketplace offerings and insert the link!
I followed this article yesterday. It helped me a lot. Great work digital ocean.
When configuring on Centos 6, I made the following changes:
yum install epel-release
yum install nginx
Verify/Add the following line at the end of the http{} block in /etc/nginx/nginx.conf:
include /etc/nginx/conf.d/*.conf;
The JENKINS_LISTEN_ADDRESS variable is located in /etc/sysconfig/jenkins
If you see a “502 Bad Gateway” in your browser, run the following command on the server (Lost 3 hours because of this):
setsebool -P httpd_can_network_connect 1
Hi Thank you for the helpful article. The banner in the top has a typo in it, and it should be “as a Reverse Proxy” instead of Reserve.
Thanks for the great tutorial, it helped me a lot with a “broken proxy” issue. It appeared that I’ve added trailing slash to proxy_pass directive http://127.0.0.1:8080/ But what is the problem with that slash? Sometimes proxying works with it, sometimes not. Where can I find explanation of this issue?
I just wanted to say THANK YOU!
This casually dropped comment…
Also, if you misconfigure the proxy_pass (by adding a trailing slash for example), you will get something similar to the following in your Jenkins Configuration page.
…saved my life. I had spent 3 days trying to find the error in a seemingly correct configuration. It was the trailing slash.
Note if you want your http to be redirected to https, include server_name into server section like
server {
   listen 80;
   server_name example.com;
   return 301 https://$host$request_uri;
}
Thanx for an article :) Hey, I got an interesting question about proxy thing.
So what if I decided to make proxy_pass to some proxy server. I spend 3 days trying to make it working. And it works just fine with HTTP. And totally getting broken when it comes to HTTPS.
I tried a number of options but all of them are giving the same result. Is there some small hint that might help me find solution for the case?)
Excellent tutorial! Thank you! Although I suggest an update of the SSL settings from this location:
 This work is licensed under a Creative Commons Attribution-NonCommercial- ShareAlike 4.0 International License.
Become a contributor for community
Get paid to write technical tutorials and select a tech-focused charity to receive a matching donation.

DigitalOcean Documentation
Full documentation for every DigitalOcean product.

Resources for startups and AI-native businesses
The Wave has everything you need to know about building a business, from raising funding to marketing your product.
The developer cloud
Scale up as you grow — whether you're running one virtual machine or ten thousand.

Start building today
From GPU-powered inference and Kubernetes to managed databases and storage, get everything you need to build, scale, and deploy intelligent applications.
