By zasghar and Anish Singh Walia

Introduction
If you’re building a full-stack application composed of multiple services (e.g., frontend, authentication, task APIs) using a monorepo, deploying it efficiently can be complex. Monorepos simplify development workflows, but deployment often becomes a bottleneck. This guide walks you through containerizing each service using Docker and deploying them to DigitalOcean App Platform, enabling independent scalability and service isolation.
By the end of this tutorial, you’ll have:
-
A structured monorepo with isolated services.
-
Docker containers for each service.
-
A docker-compose setup for local development.
-
A deployed multi-service application on App Platform.
Key Takeaways
This tutorial covered the following key aspects of containerizing and deploying a monorepo application to DigitalOcean App Platform:
- Structuring a monorepo for efficient service isolation and deployment
- Creating Docker containers for each service to ensure independent scalability and isolation
- Setting up a docker-compose environment for local development and inter-service communication
- Deploying containerized services to DigitalOcean App Platform for independent scaling and management
- Understanding the benefits of containerization and microservices architecture for monorepo applications
Prerequisites
Before you begin this tutorial, ensure you have the following:
-
Docker and Docker Compose: Install Docker Desktop or Docker Engine and Docker Compose on your local machine.
-
DigitalOcean Account: Create a DigitalOcean account if you don’t have one. You’ll need access to App Platform for deployment.
-
Git Repository: Have your monorepo code hosted on GitHub, GitLab, or another Git provider that integrates with DigitalOcean App Platform.
-
Basic Knowledge: Familiarity with Docker concepts, command line operations, and basic understanding of microservices architecture.
-
Code Editor: Any text editor or IDE of your choice (VS Code, Cursor, Sublime Text, etc.) for editing configuration files.
-
Terminal/Command Line: Access to a terminal or command prompt for running Docker commands and managing your application.
What are the Problems with Monorepo architecture?
Monorepo architecture groups multiple services in a single codebase. While it simplifies version control and dependency management, it also introduces challenges:
-
Service Isolation: Services may become tightly coupled.
-
Complex Builds: Each service may require different dependencies and build logic.
-
Environment Drift: Difficult to replicate production behavior locally.
-
Deployment Overhead: Traditional CI/CD tools don’t handle monorepos natively.
How to resolve these problems?
To mitigate these challenges, containerizing each service in the monorepo is the most efficient approach. By using Docker and Docker Compose, each microservice can have its own isolated environment while still being developed and deployed from within the monorepo.
We will:
- Use Docker to containerize each service independently.
- Use Docker Compose for local development and inter-service communication.
- Configure DigitalOcean App Platform to deploy each containerized service as an independent component.
- Define shared and environment-specific configurations.
How a Microservices Application Works?
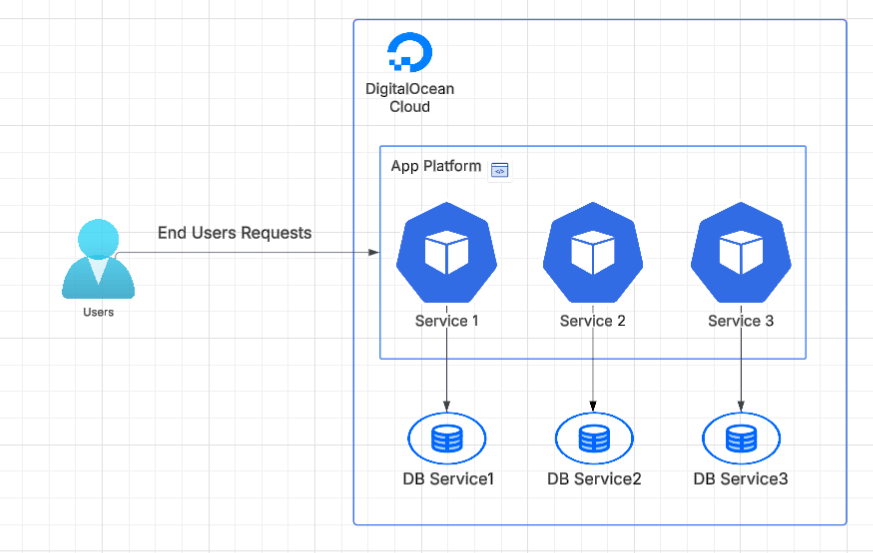
- Requests are routed by App Platform to the appropriate services.
- Services are independently scaled and connected to their databases.
- All services can log to a shared logging and monitoring solution.
What are the Benefits of This Architecture?
-
Isolation: Each service runs in its own container with dedicated resources, preventing conflicts and enabling independent scaling, updates, and failure isolation.
-
Faster CI/CD: Only modified services need redeploying, significantly reducing build times and deployment overhead while enabling parallel development workflows.
-
Developer Productivity: Unified local development via docker-compose provides consistent environments, eliminates “works on my machine” issues, and simplifies onboarding for new team members.
-
Portability: Consistent environments across dev, staging, and production ensure reliable deployments and reduce environment-specific bugs and configuration drift.
-
Environment Parity: Services run identically across all environments, eliminating deployment surprises and ensuring predictable behavior from development to production.
-
Scalability: Individual services can be scaled independently based on demand, optimizing resource utilization and cost efficiency.
-
Technology Diversity: Each service can use different programming languages, frameworks, and dependencies without affecting other services in the monorepo.
-
Fault Tolerance: Service failures are isolated, preventing cascading failures across the entire application and improving overall system reliability.
-
Team Autonomy: Different teams can work on different services simultaneously without coordination overhead, enabling parallel development and faster feature delivery.
-
Resource Optimization: Services can be allocated resources based on their specific needs, preventing resource contention and improving performance.
Step 1 - How to Structure Your Monorepo?
To organize your monorepo, create a services/ directory and place each microservice in its own folder. This structure allows for easy management and isolation of each service within the monorepo.
The following commands create the necessary directories for each microservice:
mkdir -p services/auth-api
mkdir -p services/frontend
mkdir -p services/log-message-processor
mkdir -p services/todos-api
mkdir -p services/users-api
mkdir -p services/zipkin
This structure ensures that each microservice has its own dedicated space within the monorepo, facilitating independent development, deployment, and maintenance.
Step 2 - How to Add a Dockerfile to Each Service?
In this step, you need to create a Dockerfile for each microservice within the monorepo. A Dockerfile is a text document that contains all the commands a user could call on the command line to assemble an image. Using Dockerfiles, you can automate the process of creating a Docker image.
The following examples illustrate the path to the Dockerfile for each microservice within the monorepo:
microservice-app-example/auth-api/Dockerfile
microservice-app-example/frontend/Dockerfile
microservice-app-example/log-message-processor/Dockerfile
microservice-app-example/todos-api/Dockerfile
microservice-app-example/users-api/Dockerfile
microservice-app-example/zipkin/Dockerfile
These Dockerfiles will serve as blueprints for building Docker images for each microservice. This is a crucial step in containerizing your application, allowing for efficient and consistent deployment across different environments.
Step 3 - How to Create a docker-compose.yml for Local Development?
docker-compose.yml for Local Development?In this step, we create a docker-compose.yml file to define and run multi-container Docker applications. This file is essential for local development as it simplifies the process of starting and managing multiple services within the monorepo.
The provided docker-compose.yml file defines the following services:
-
frontend: This service is built from the Dockerfile in the
./frontenddirectory. It exposes port 8080 and depends on thezipkin,auth-api,todos-api, andusers-apiservices. Environment variables are set forPORT,AUTH_API_ADDRESS,TODOS_API_ADDRESS, andZIPKIN_URL. -
auth-api: This service is built from the Dockerfile in the
./auth-apidirectory. It exposes port 8081 and depends on thezipkinandusers-apiservices. Environment variables are set forAUTH_API_PORT,JWT_SECRET,USERS_API_ADDRESS, andZIPKIN_URL. -
todos-api: This service is built from the Dockerfile in the
./todos-apidirectory. It exposes port 8082 and depends on thezipkinandredis-queueservices. Environment variables are set forTODO_API_PORT,JWT_SECRET,REDIS_HOST,REDIS_PORT,REDIS_CHANNEL, andZIPKIN_URL. -
users-api: This service is built from the Dockerfile in the
./users-apidirectory. It exposes port 8083 and depends on thezipkinservice. Environment variables are set forSERVER_PORT,JWT_SECRET, andSPRING_ZIPKIN_BASE_URL. -
log-message-processor: This service is built from the Dockerfile in the
./log-message-processordirectory. It depends on thezipkinandredis-queueservices. Environment variables are set forREDIS_HOST,REDIS_PORT,REDIS_CHANNEL, andZIPKIN_URL. -
zipkin: This service uses the
openzipkin/zipkinimage and exposes port 9411. -
redis-queue: This service uses the
redisimage.
The docker-compose.yml file orchestrates the creation and management of these services, ensuring they are started in the correct order and with the necessary dependencies. This simplifies the process of running the entire application stack locally for development and testing purposes.
version: "3"
services:
  frontend:
    build: ./frontend
    image: frontend
    environment:
      PORT: 8080
      AUTH_API_ADDRESS: http://auth-api:8081
      TODOS_API_ADDRESS: http://todos-api:8082
      ZIPKIN_URL: http://zipkin:9411/api/v2/spans
    ports:
      - 8080:8080
    depends_on:
      - zipkin
      - auth-api
      - todos-api
      - users-api

  auth-api:
    build: ./auth-api
    image: auth-api
    environment:
      AUTH_API_PORT: 8081
      JWT_SECRET: myfancysecret
      USERS_API_ADDRESS: http://users-api:8083
      ZIPKIN_URL: http://zipkin:9411/api/v2/spans
    depends_on:
      - zipkin
      - users-api

  todos-api:
    build: ./todos-api
    image: todos-api
    environment:
      TODO_API_PORT: 8082
      JWT_SECRET: myfancysecret
      REDIS_HOST: redis-queue
      REDIS_PORT: 6379
      REDIS_CHANNEL: log_channel
      ZIPKIN_URL: http://zipkin:9411/api/v2/spans
    depends_on:
      - zipkin
      - redis-queue

  users-api:
    build: ./users-api
    image: users-api
    environment:
     SERVER_PORT: 8083
     JWT_SECRET: myfancysecret
     SPRING_ZIPKIN_BASE_URL: http://zipkin:9411
    depends_on:
      - zipkin

  log-message-processor:
    build: ./log-message-processor
    image: log-message-processor
    environment:
      REDIS_HOST: redis-queue
      REDIS_PORT: 6379
      REDIS_CHANNEL: log_channel
      ZIPKIN_URL: http://zipkin:9411/api/v1/spans
    depends_on:
      - zipkin
      - redis-queue

  zipkin:
    image: openzipkin/zipkin
    ports:
      - 9411:9411

  redis-queue:
    image: redis
Step 4 - Test Locally
To verify that all services are functioning correctly, run the entire application stack locally using Docker Compose. This command will build and start all services defined in the docker-compose.yml file:
docker-compose up --build
Once the services are up and running, you can access them through the following URLs:
- Frontend Service:
http://frontend- This is the entry point for users to interact with the application. - Zipkin Service:
http://zipkin:9411- This service is used for distributed tracing and monitoring of the application’s performance and latency.
By accessing these services, you can ensure that the application is functioning as expected and that all components are communicating correctly.
Step 5 - How to Push to Git Repository?
git init
# you can use your own repo in origin link
git remote add origin https://github.com/zasghar26/microservice-app-example
git add .
git commit -m "Initial containerized monorepo"
git push origin main
Push your monorepo to GitHub/GitLab or upload images to DigitalOcean Container Registry.
Step 6 - How to Deploy to App Platform?
To deploy your containerized monorepo to DigitalOcean App Platform, follow these steps:
Navigate to App Platform
Go to cloud.digitalocean.com/apps and click Create App.
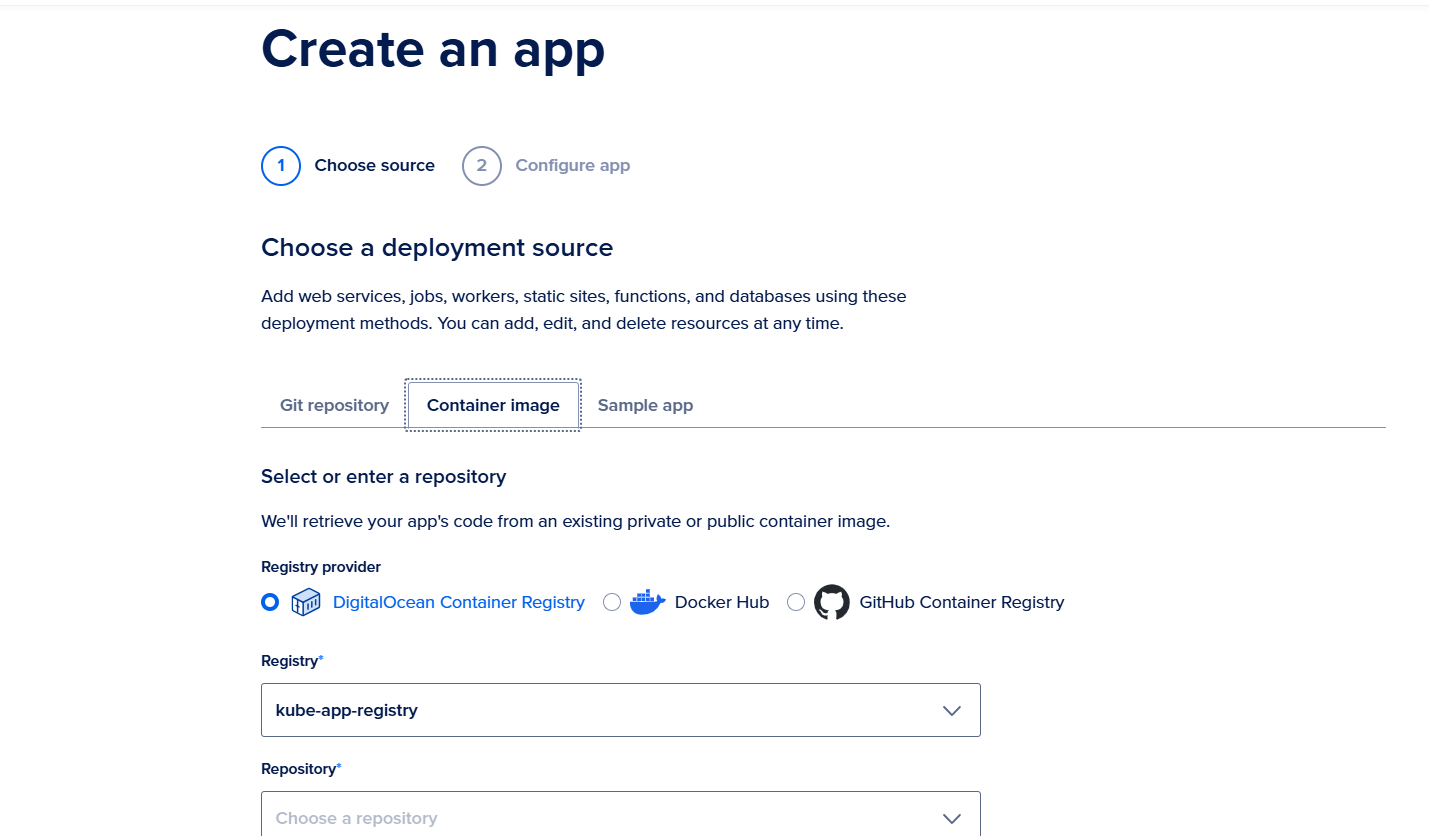
Select Source Repository
Connect your repository account, like GitHub or Container Registry, and choose your application repository, then configure the settings and click Create App.
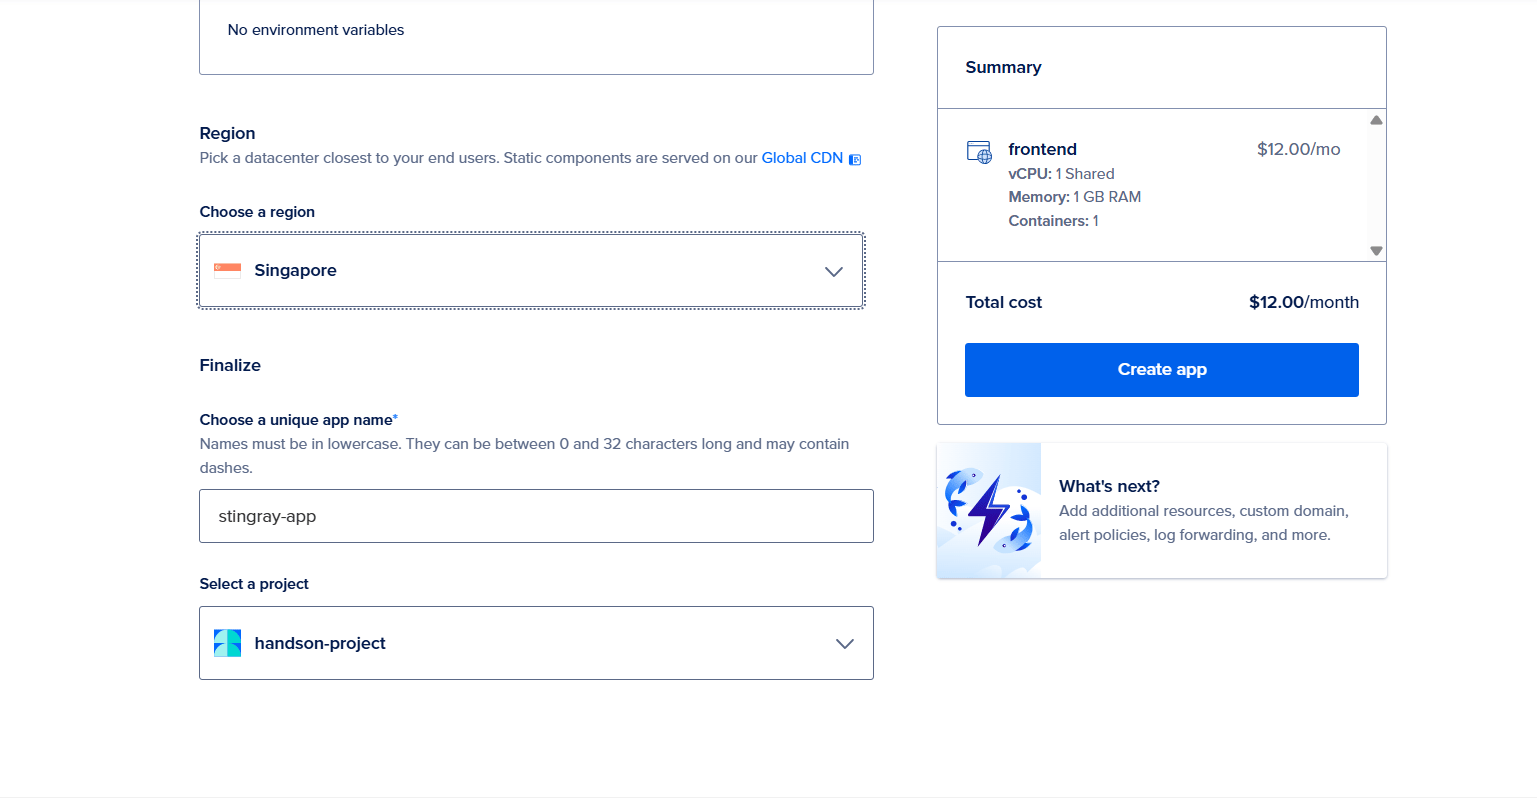
Add Each Component as a Service
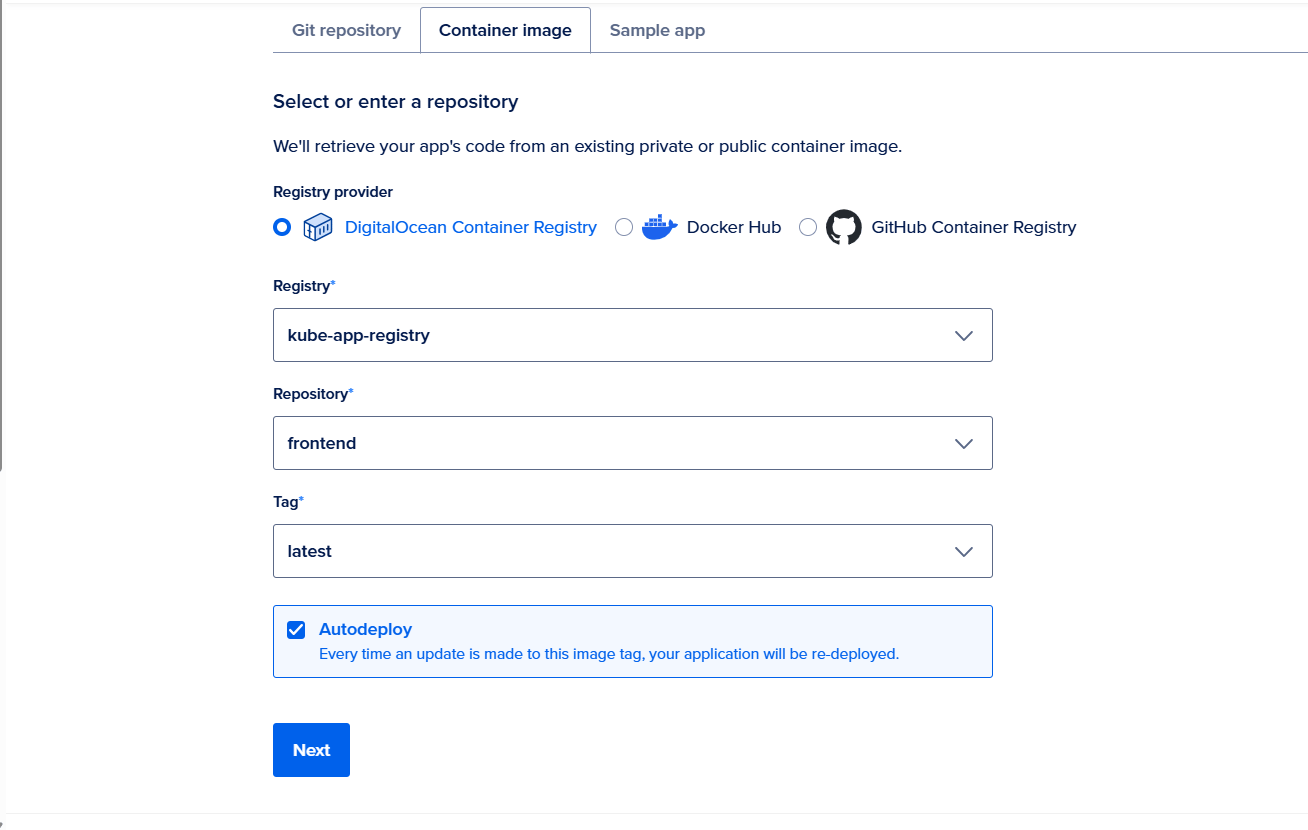
For each microservice (auth-api, frontend, todos-api), click Add Resource, and choose “Web Service” as the component type. This selection is crucial as it determines how the service will be exposed and interact with other components within the App Platform.
b. Select the appropriate registry image and create an app. Ensure the image is correctly tagged and points to the correct Dockerfile within your monorepo. c. Set any required environment variables, secrets, or configuration files. This step is essential for ensuring each service has the necessary configuration to function correctly in the App Platform environment.
Understanding App Platform Component Types
a. Web Service: A long-running web service that receives HTTP traffic (e.g., your auth service). This type is ideal for services that need to be exposed to the public or interact with other services via HTTP.
b. Worker: A background service that runs continuously but doesn’t receive HTTP traffic (ideal for jobs, schedulers, or event processors). This type is suitable for services that perform tasks asynchronously or require continuous execution without direct user interaction.
c. Job: One-off tasks triggered manually or on a schedule, useful for migrations, batch processing, etc. This type is perfect for services that need to execute a specific task at a given time or on demand.
d. Static Site: Frontend-only apps that don’t require server-side logic (not common in backend-heavy monorepos). This type is ideal for static websites or single-page applications that don’t require dynamic server-side rendering.
Networking Between Components
a. All components are automatically part of the same private internal network. This allows services to communicate with each other without exposing them to the public internet. b. Services can call each other using the App name and component name. This simplifies service discovery and communication within the App Platform. c. No manual port mapping or reverse proxying is needed; App Platform handles internal DNS resolution and service discovery. This eliminates the need for complex network configurations, making it easier to manage service interactions.
Expose Required Services to the Public
a. Typically, only the frontend or API gateway is exposed. This is a security best practice to limit public access to only the necessary services. b. You can make individual components public or private by setting the HTTP routes and public access toggles in the UI. This allows for fine-grained control over service exposure and access.
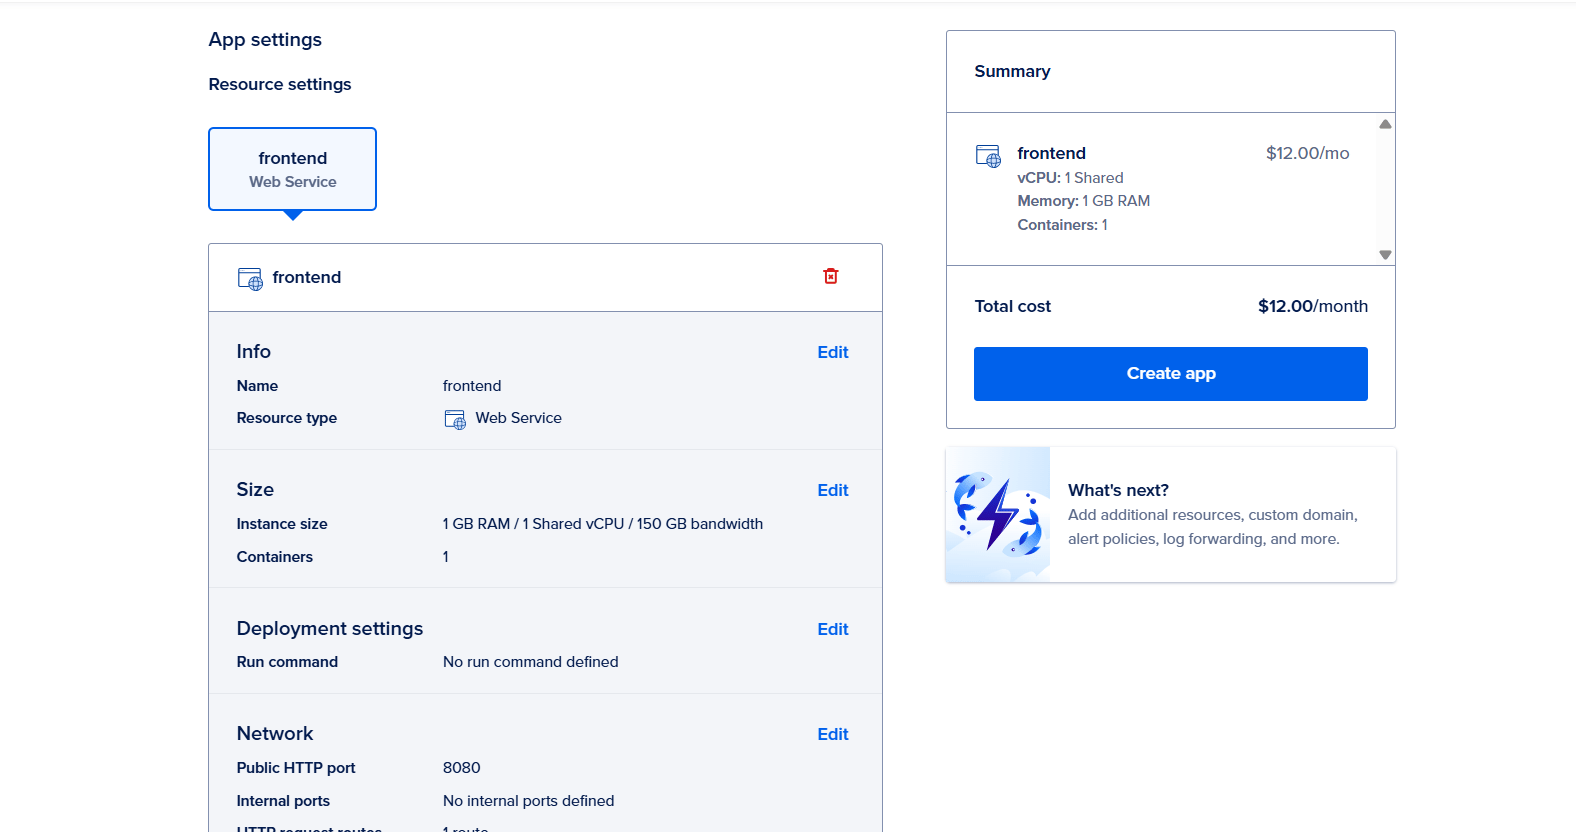
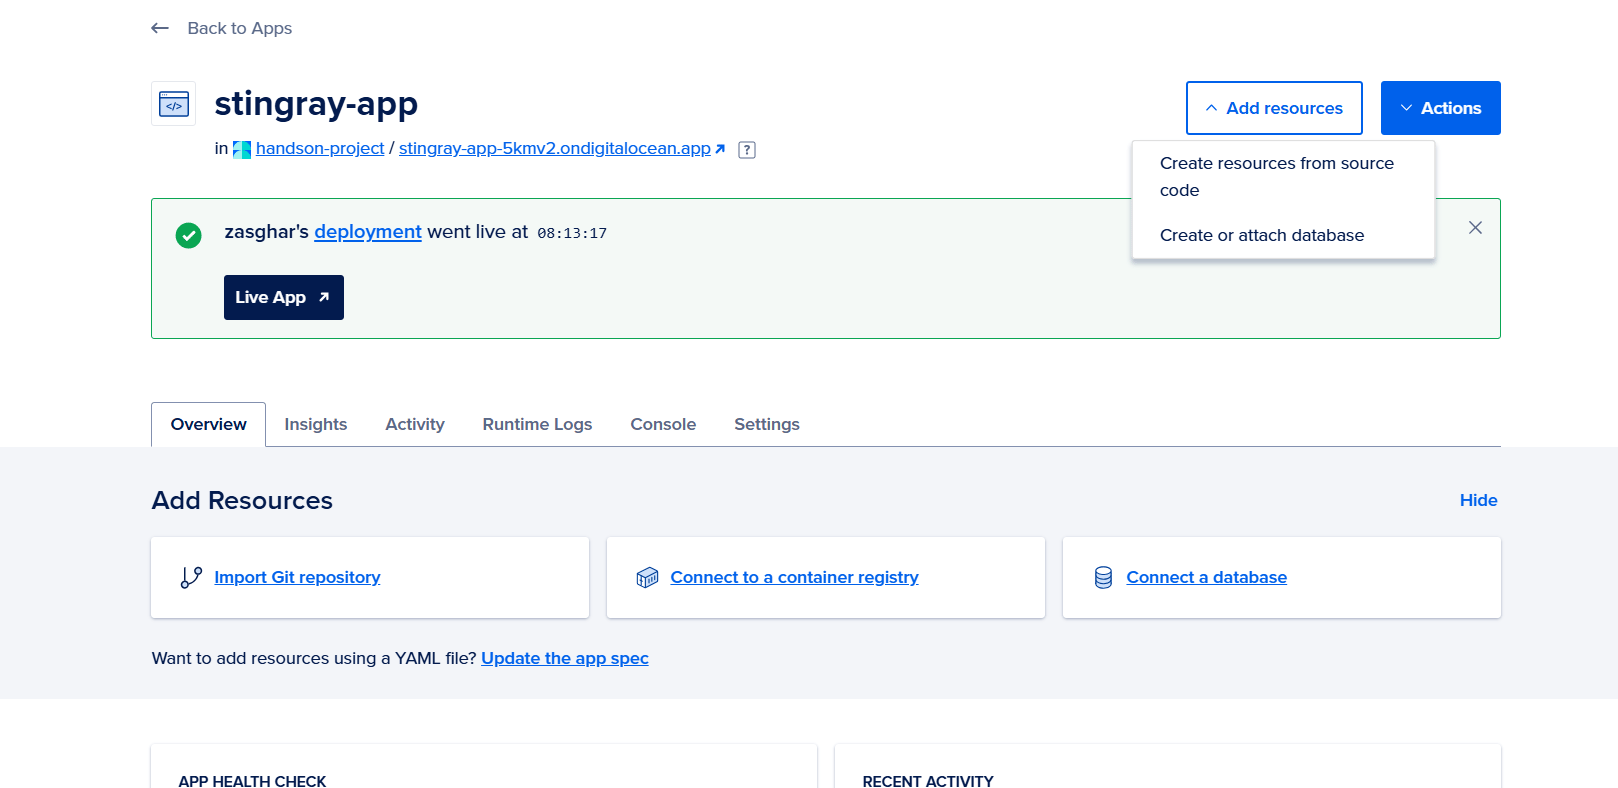
Deploy & Monitor
a. Once configured, click Deploy App. This initiates the deployment process, which includes building and provisioning each container. b. App Platform will automatically build, deploy, and provision each container. This process ensures that each service is correctly configured and running in the App Platform environment.
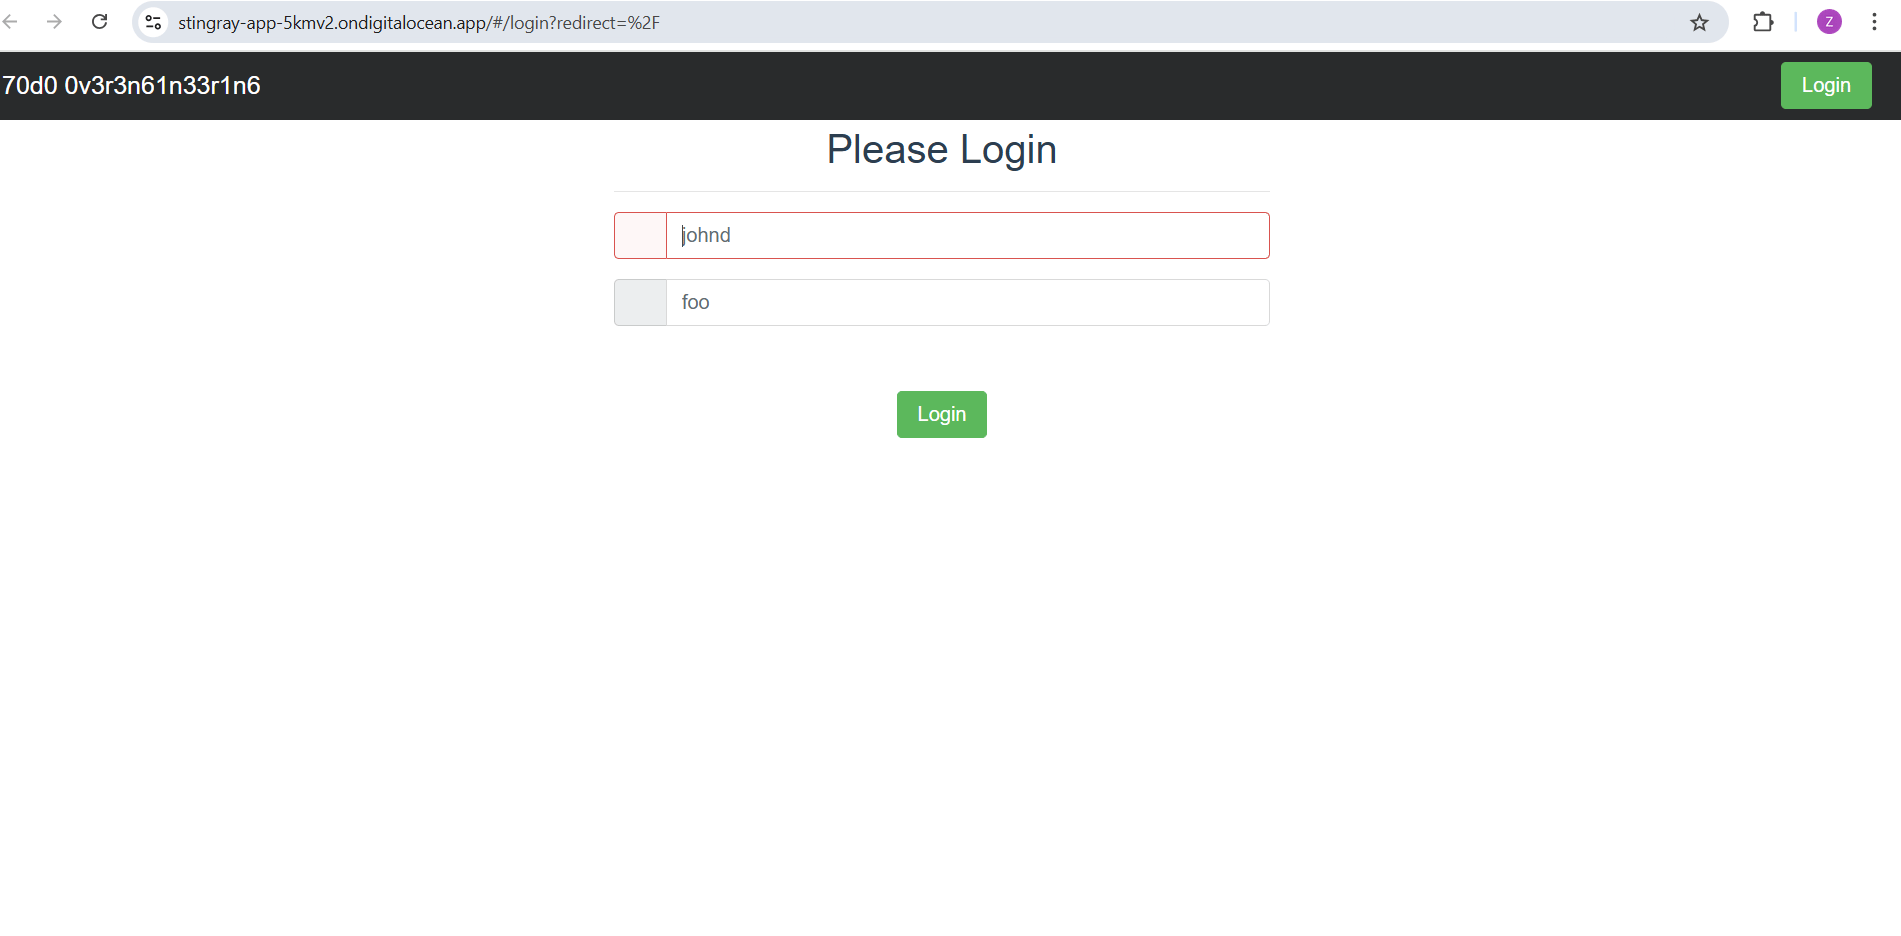
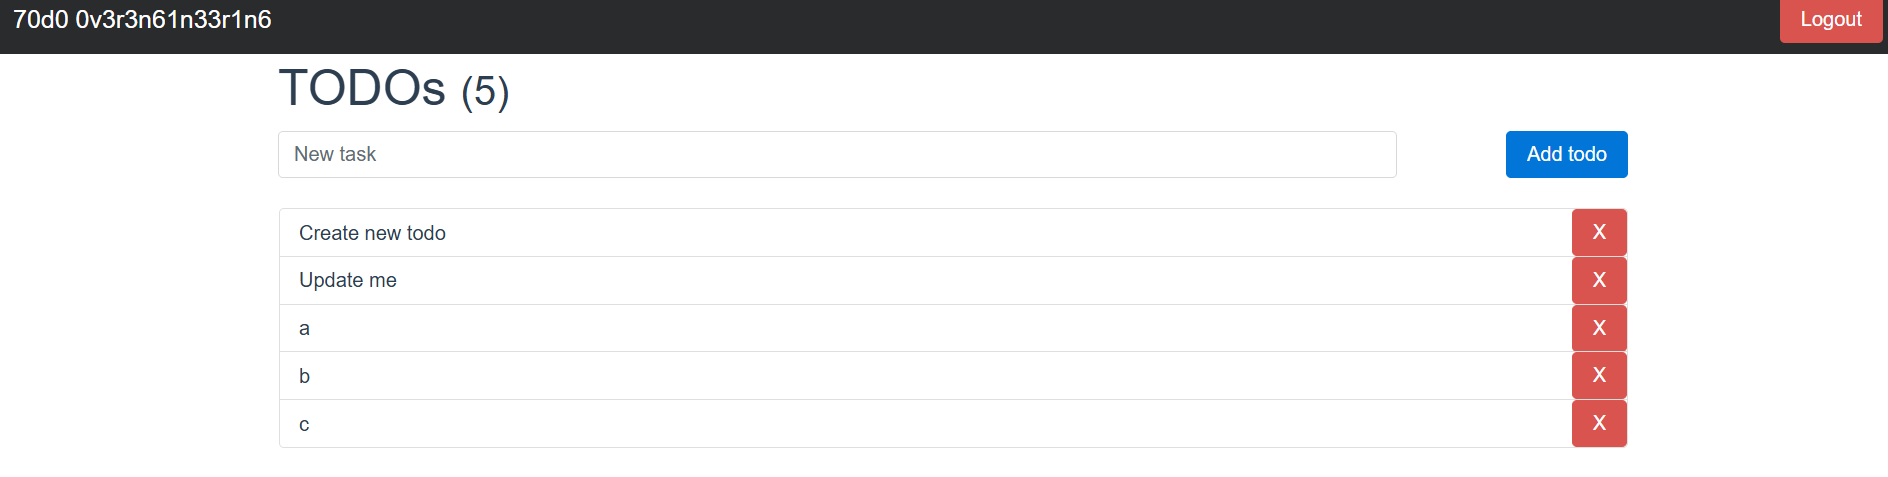
After entering your credentials, you will be directed to the TODOs page.
c. Use the Insights tab to monitor resource usage, logs, and health checks. This provides real-time visibility into the performance and health of your application, enabling proactive issue detection and resolution.
Conclusion
Containerizing a monorepo and deploying to DigitalOcean App Platform enables better scalability, modular development, and streamlined CI/CD. Each service operates independently, allowing isolated updates, quicker deployments, and consistent environments across all stages.
This structure aligns with modern DevOps principles and is a solid foundation for adding autoscaling, centralized logging, and API gateways in the future. For further exploration of CI/CD concepts and tools, refer to the following resources:
- An Introduction to Continuous Integration, Delivery, and Deployment: Learn the fundamentals of CI/CD pipelines, including the benefits, key concepts, and how to implement them in your projects.
- CI/CD Tag: Explore a curated collection of tutorials, articles, and resources focused on Continuous Integration and Continuous Deployment, covering various tools, best practices, and real-world applications.
- CI/CD Tools Comparison: Jenkins, GitLab CI, Buildbot, Drone, and Concourse: Compare and contrast popular CI/CD tools, understanding their strengths, weaknesses, and use cases to make informed decisions for your project’s automation needs.
Thanks for learning with the DigitalOcean Community. Check out our offerings for compute, storage, networking, and managed databases.
About the author(s)
Solution Architect
Anish is a Sr Technical Content Strategist and Team Lead at DigitalOcean with 7+ years of experience as an DevOps SRE at Nutanix and Cloud consultant at AMEX, and technical writing at DOCN, and shipping deep infra and AI inference tutorials that help developers deploy production‑ready applications on DigitalOcean.
Still looking for an answer?
This textbox defaults to using Markdown to format your answer.
You can type !ref in this text area to quickly search our full set of tutorials, documentation & marketplace offerings and insert the link!
 This work is licensed under a Creative Commons Attribution-NonCommercial- ShareAlike 4.0 International License.
Become a contributor for community
Get paid to write technical tutorials and select a tech-focused charity to receive a matching donation.

DigitalOcean Documentation
Full documentation for every DigitalOcean product.

Resources for startups and AI-native businesses
The Wave has everything you need to know about building a business, from raising funding to marketing your product.
The developer cloud
Scale up as you grow — whether you're running one virtual machine or ten thousand.

Start building today
From GPU-powered inference and Kubernetes to managed databases and storage, get everything you need to build, scale, and deploy intelligent applications.
